Eps HONDA ODYSSEY 2006 RB1-RB2 / 3.G Owners Manual
[x] Cancel search | Manufacturer: HONDA, Model Year: 2006, Model line: ODYSSEY, Model: HONDA ODYSSEY 2006 RB1-RB2 / 3.GPages: 420, PDF Size: 6.01 MB
Page 23 of 420
Your seat belt system includes lap/
shoulder belts in all seating positions.
The f ront seat belts are also
equipped with automatic seat belt
tensioners.The seat belt system
includes an indicator on the
instrument panel and a beeper to
remind you to f asten your seat belt.
If you turn the ignition switch to ON
(II) without f astening your belt, a
beeper will sound and the indicator
will f lash. If you do not f asten your
seat belt bef ore the beeper stops, the
indicator will stop f lashing but
remain on.
If you continue driving without
f astening your seat belt, the beeper
will sound and the indicator will f lash
again at regular intervals. The lap/shoulder belt goes over
your shoulder, across your chest,
and across your hips.
To fasten the belt, insert the latch
plate into the buckle, then tug on the
belt to make sure the buckle is
latched (see page f or how to
properly position the belt).
To unlock the belt, press the red
PRESSbuttononthebuckle.Guide
the belt across your body so that it
retracts completely. Af ter exiting the
vehicle, be sure the belt is out of the
way and will not get closed in the
door.
All seat belts have an emergency
locking retractor. In normal driving,
the retractor lets you move f reely in
your seat while it keeps some
tension on the belt. During a collision
or sudden stop, the retractor
automatically locks the belt to helprestrain your body.
The seat belts in all positions except
the driver’s have an additional
locking mechanism that must be
activated to secure a child seat (see
page ).
If the shoulder part of the belt is
pulled all the way out, the locking
mechanism will activate. The belt
will retract, but it will not allow the
passenger to move f reely.
To deactivate the locking
mechanism, unlatch the buckle and
let the seat belt f ully retract. To
ref asten the seat belt, pull it out only
as f ar as needed.
16
48
Additional Inf ormation About Your Seat Belts
Seat Belt System Components L ap/Shoulder Belt
22
Page 45 of 420
Whatever type of seat you choose, to
provide proper protection, a child
seat should meet three
requirements:Look f or FMVSS
213 or CMVSS 213 on the box.
Rear-facing for infants, forward-
f acing f or small children.
Bef ore purchasing a conventional
child seat, or using a previously
purchased one, we recommend that
you test the seat in the specif ic
vehicle seating position, or positions,
where the seat will be used. Af ter selecting a proper child seat
and a good place to install the seat,
there are three main steps in
installing the seat:
All child seats must be
secured to the vehicle with the lap
part of a lap/shoulder belt or with
the LATCH (lower anchors and
tethers for children) system. A
child whose seat is not properly
secured to the vehicle can be
endangered in a crash.
Af ter installing a child
seat, push and pull the seat
f orward and f rom side-to-side to
verify that it is secure.
A child seat secured with a seat belt
should be installed as f irmly as
possible. However, it does not need
to be ‘‘rock solid.’’ Some side-to-side movement can be expected and
should not reduce the child seat’s
ef f ectiveness.
If the child seat is not secure, try
installing it in a dif f erent seating
position, or use a dif f erent style of
child seat that can be f irmly secured.
Make sure the child is properly
strappedinthechildseat
according to the child seat maker’s
instructions. A child who is not
properly secured in a child seat
can be seriously injured in a crash.
The f ollowing pages provide
guidelines on how to properly install
a child seat. A f orward-f acing child
seat is used in all examples, but the
instructions are the same f or rear-
f acing child seats.
T he child seat should meet U.S. or Canadian Mot or Vehicle Saf et ySt andard 213.
T he child seat should be of theproper type and size to f it the child.
T he child seat should f it thevehicle seat ing posit ion (orposit ions) where it will be used. Properly secure t he child seat t o
the vehicle.
Make sure t he child seat is f irmlysecured. Secure the child in the child seat.
1.
2.3. 1.
2. 3.
Installing a Child Seat
Selecting a Child Seat, Installing a Child Seat
44
Page 48 of 420
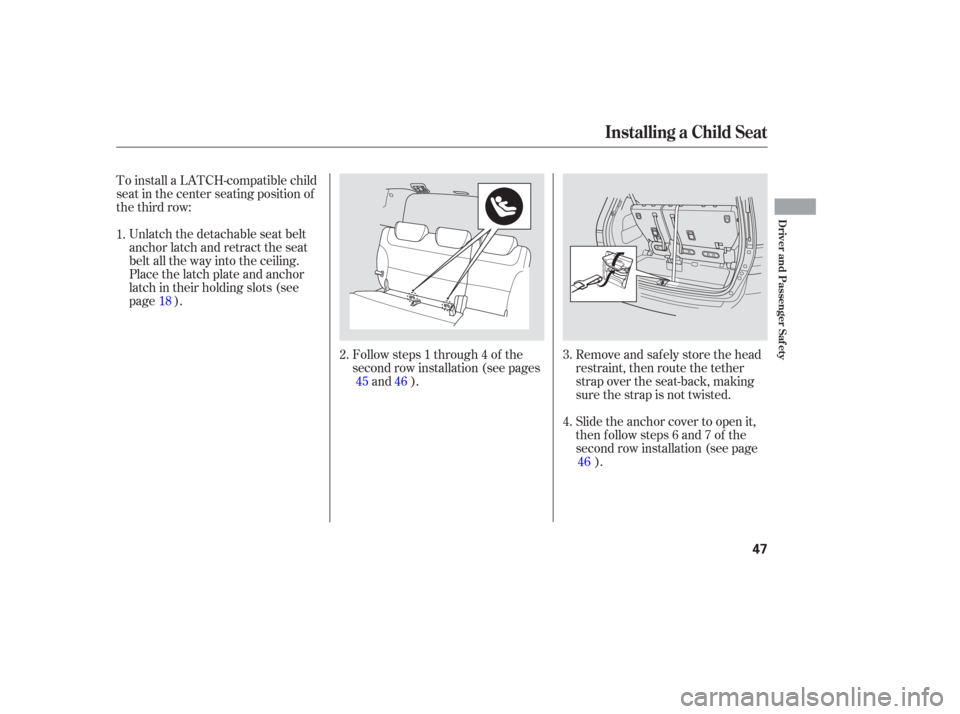
Slide the anchor cover to open it,
then follow steps 6 and 7 of the
second row installation (see page).
Followsteps1through4of the
second row installation (see pages
and ).
To install a LATCH-compatible child
seat in the center seating position of
the third row:
Unlatch the detachable seat belt
anchor latch and retract the seat
belt all the way into the ceiling.
Place the latch plate and anchor
latch in their holding slots (see
page ).
Remove and safely store the head
restraint, then route the tether
strap over the seat-back, making
sure the strap is not twisted.
1.
2.3.
4.
46
45 46
18
Installing a Child Seat
Driver and Passenger Saf ety
47
Page 49 of 420
When not using the LATCH system,
all child seats must be secured to the
vehicle with the lap part of a lap/
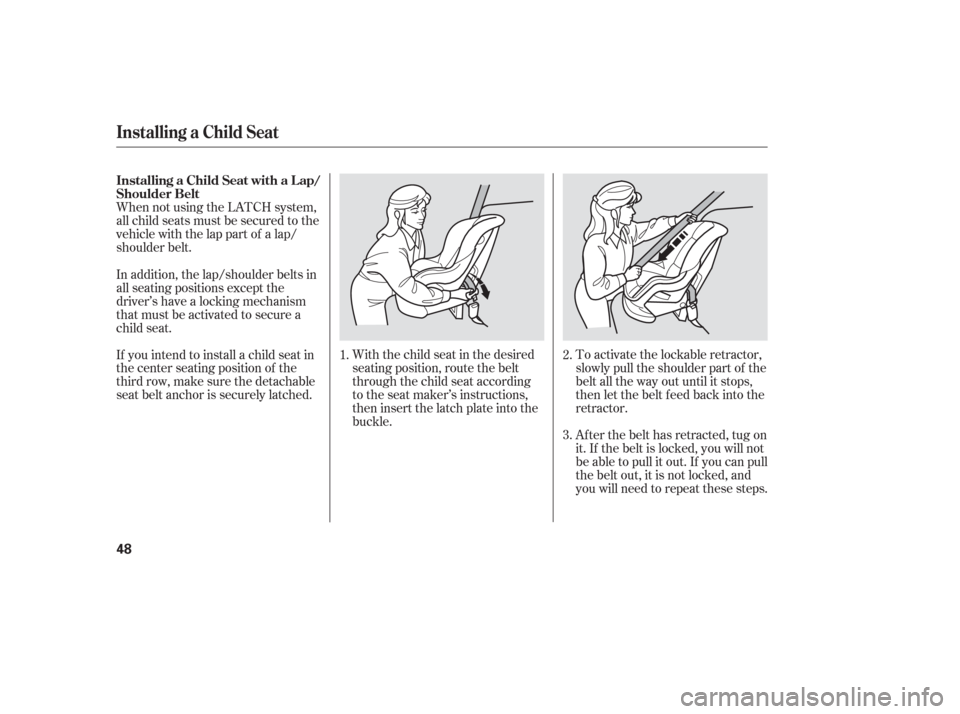
shoulder belt.With the child seat in the desired
seating position, route the belt
through the child seat according
to the seat maker’s instructions,
then insert the latch plate into the
buckle.To activate the lockable retractor,
slowly pull the shoulder part of the
belt all the way out until it stops,
then let the belt f eed back into the
retractor.
Af ter the belt has retracted, tug on
it. If the belt is locked, you will not
be able to pull it out. If you can pull
thebeltout,itisnotlocked,and
you will need to repeat these steps.
In addition, the lap/shoulder belts in
all seating positions except the
driver’s have a locking mechanism
that must be activated to secure a
child seat.
If you intend to install a child seat in
the center seating position of the
thirdrow,makesurethedetachable
seat belt anchor is securely latched.
1.
2.
3.
Installing a Child Seat
Installing a Child Seat with a L ap/
Shoulder Belt
48
Page 50 of 420
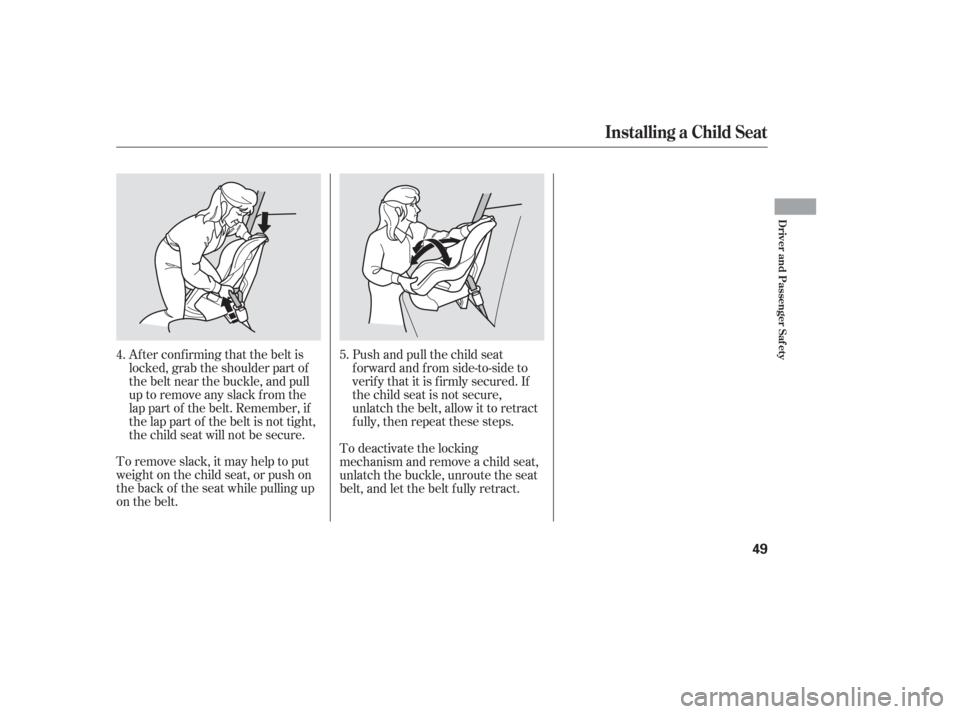
To remove slack, it may help to put
weight on the child seat, or push on
the back of the seat while pulling up
on the belt.Push and pull the child seat
f orward and f rom side-to-side to
verif y that it is f irmly secured. If
the child seat is not secure,
unlatch the belt, allow it to retract
f ully, then repeat these steps.
To deactivate the locking
mechanism and remove a child seat,
unlatch the buckle, unroute the seat
belt, and let the belt f ully retract.
Af ter conf irming that the belt is
locked, grab the shoulder part of
the belt near the buckle, and pull
up to remove any slack from the
lap part of the belt. Remember, if
the lap part of the belt is not tight,
the child seat will not be secure.
5.
4.
Installing a Child Seat
Driver and Passenger Saf ety
49
Page 52 of 420
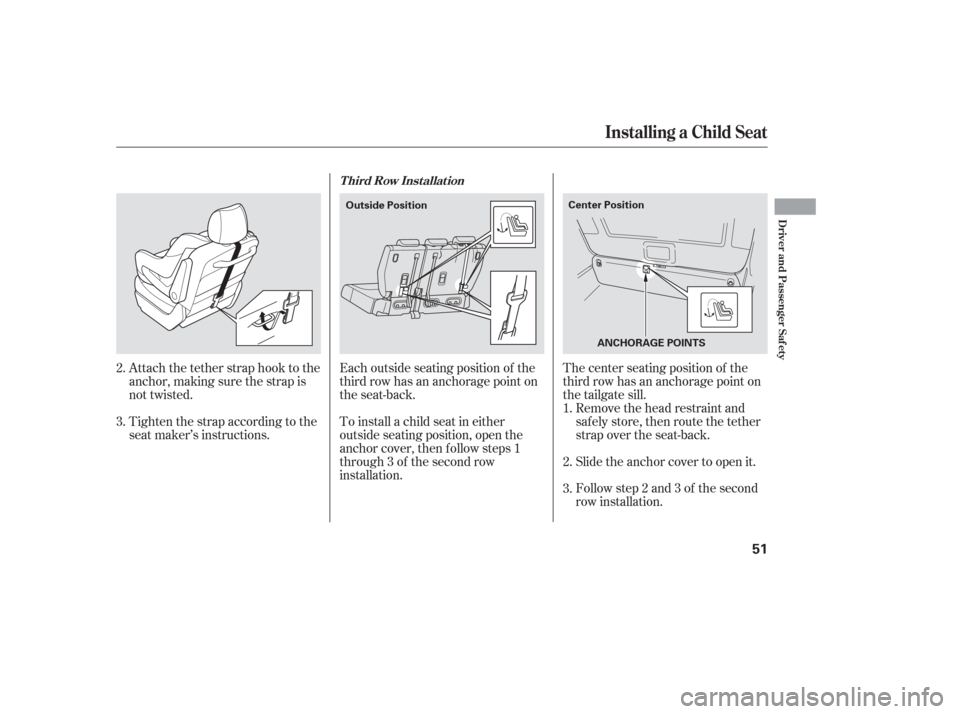
Attach the tether strap hook to the
anchor, making sure the strap is
not twisted.
Tighten the strap according to the
seat maker’s instructions.Remove the head restraint and
safely store, then route the tether
strap over the seat-back.
Slide the anchor cover to open it.
Follow step 2 and 3 of the second
row installation.
The center seating position of the
third row has an anchorage point on
the tailgate sill.
Each outside seating position of the
third row has an anchorage point on
the seat-back.
To install a child seat in either
outside seating position, open the
anchor cover, then f ollow steps 1
through 3 of the second row
installation.
2.
1.
3.
2.
3.
T hird Row Inst allat ion
Installing a Child Seat
Driver and Passenger Saf ety
51
ANCHORAGE POINTS
Center Position
Outside Position
Page 140 of 420
Each remote transmitter activates
the driver’s seat position memory
system (see page ) and
customized vehicle control settings
(see page ). When you open the
driver’s door af ter unlocking it with
the remote transmitter, the driver’s
seat moves to the positions stored in
memory. You will hear two beeps
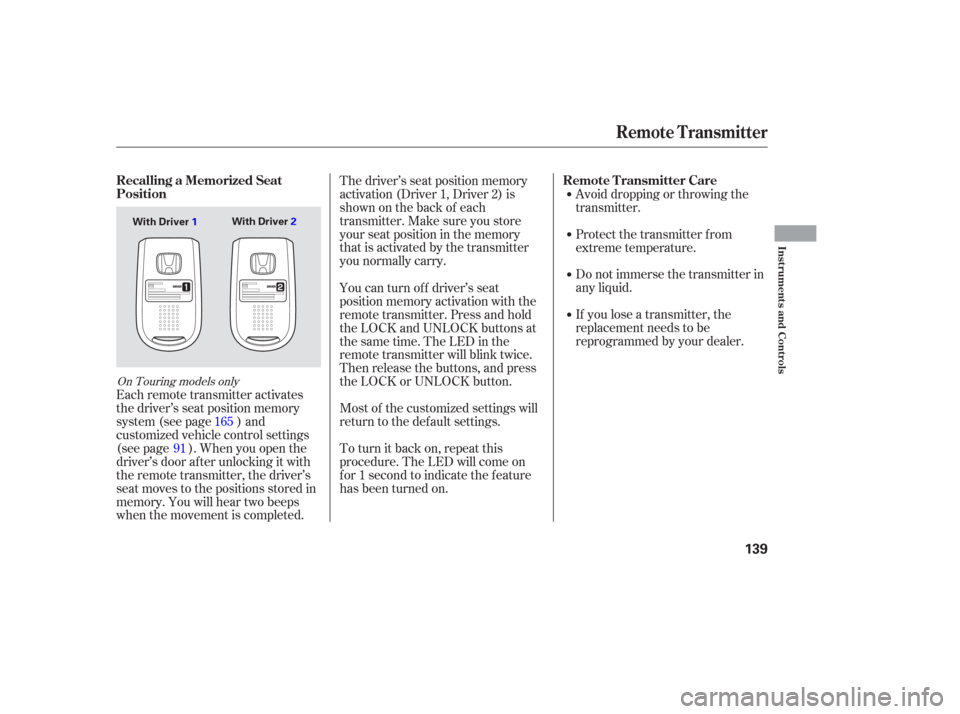
when the movement is completed.The driver’s seat position memory
activation (Driver 1, Driver 2) is
shownonthebackof each
transmitter. Make sure you store
your seat position in the memory
that is activated by the transmitter
you normally carry.
Avoid dropping or throwing the
transmitter.
Protect the transmitter from
extreme temperature.
Do not immerse the transmitter in
any liquid.
If you lose a transmitter, the
replacement needs to be
reprogrammed by your dealer.
Most of the customized settings will
return to the default settings.
To turn it back on, repeat this
procedure. The LED will come on
for 1 second to indicate the feature
has been turned on. You can turn of f driver’s seat
position memory activation with the
remote transmitter. Press and hold
the LOCK and UNLOCK buttons at
thesametime.TheLEDinthe
remote transmitter will blink twice.
Then release the buttons, and press
the LOCK or UNLOCK button.
91 165
On Touring models only
Recalling a Memorized Seat
Position
Remote Transmitter Care
Remote Transmitter
Inst rument s and Cont rols
139
With Driver
2
With Driver 1
Page 144 of 420
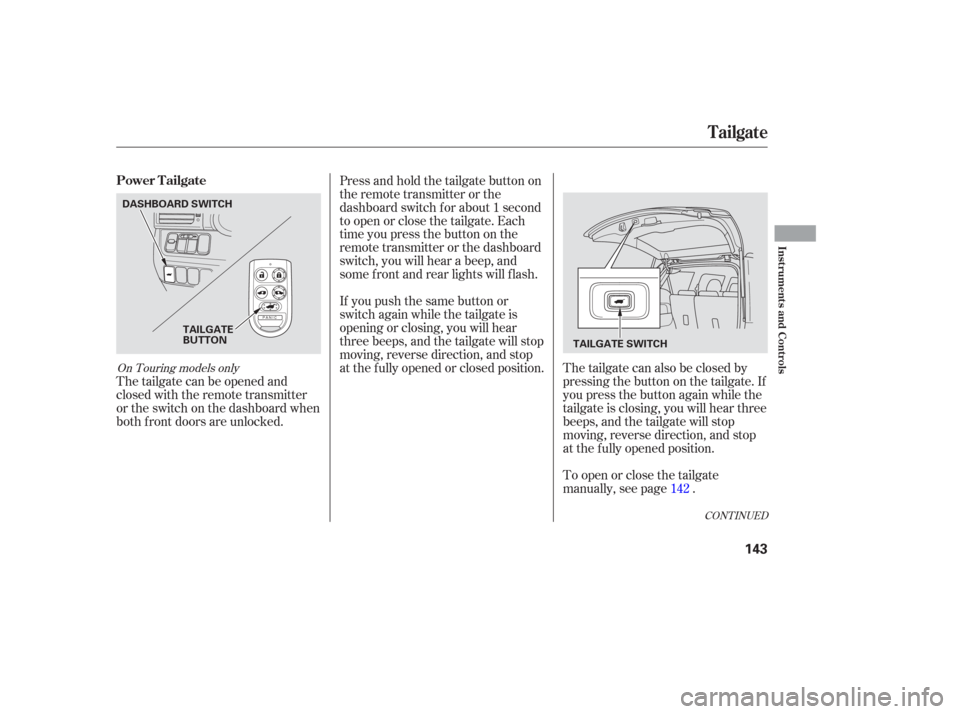
The tailgate can be opened and
closed with the remote transmitter
or the switch on the dashboard when
both f ront doors are unlocked.The tailgate can also be closed by
pressing the button on the tailgate. If
you press the button again while the
tailgate is closing, you will hear three
beeps, and the tailgate will stop
moving, reverse direction, and stop
at the f ully opened position.
Press and hold the tailgate button on
the remote transmitter or the
dashboard switch f or about 1 second
to open or close the tailgate. Each
time you press the button on the
remote transmitter or the dashboard
switch, you will hear a beep, and
some f ront and rear lights will f lash.
To open or close the tailgate
manually, see page .
If you push the same button or
switch again while the tailgate is
opening or closing, you will hear
three beeps, and the tailgate will stop
moving, reverse direction, and stop
at the f ully opened or closed position.
142
CONT INUED
On Touring models only
Power Tailgate
Tailgate
Inst rument s and Cont rols
143
DASHBOARD SWITCH
TAILGATE
BUTTON TAILGATE SWITCH
Page 149 of 420
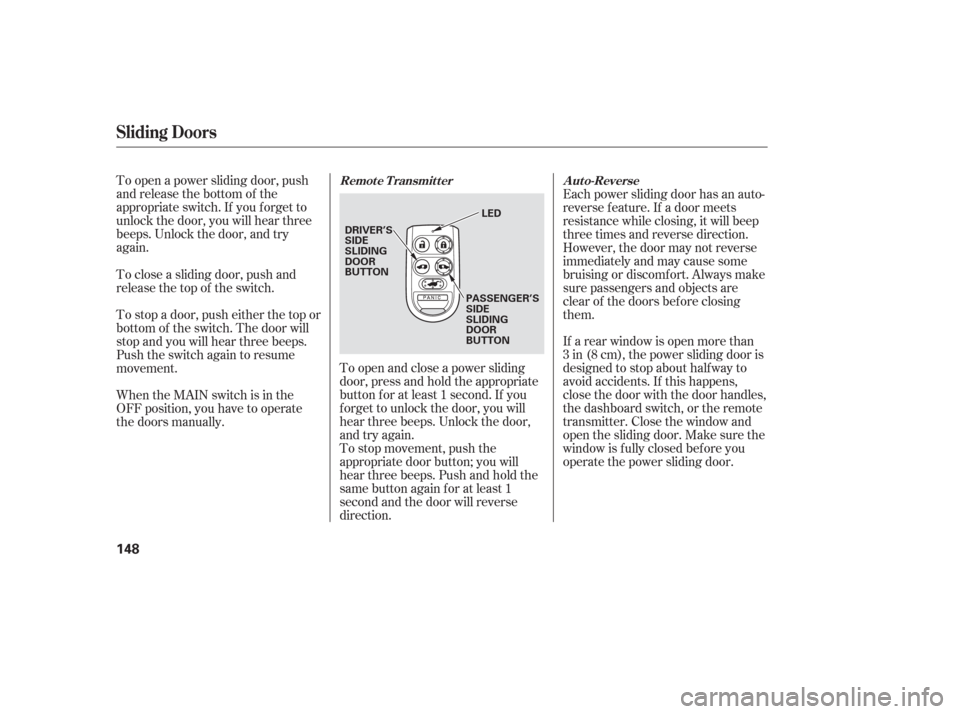
To open a power sliding door, push
and release the bottom of the
appropriate switch. If you f orget to
unlock the door, you will hear three
beeps. Unlock the door, and try
again.To open and close a power sliding
door, press and hold the appropriate
button f or at least 1 second. If you
f orget to unlock the door, you will
hear three beeps. Unlock the door,
and try again.Each power sliding door has an auto-
reverse f eature. If a door meets
resistance while closing, it will beep
three times and reverse direction.
However, the door may not reverse
immediately and may cause some
bruising or discomf ort. Always make
sure passengers and objects are
clear of the doors bef ore closing
them.
If a rear window is open more than
3 in (8 cm), the power sliding door is
designed to stop about half way to
avoid accidents. If this happens,
close the door with the door handles,
the dashboard switch, or the remote
transmitter. Close the window and
open the sliding door. Make sure the
window is f ully closed bef ore you
operate the power sliding door.
To stop movement, push the
appropriate door button; you will
hear three beeps. Push and hold the
same button again f or at least 1
second and the door will reverse
direction.
When the MAIN switch is in the
OFF position, you have to operate
the doors manually. To stop a door, push either the top or
bottom of the switch. The door will
stop and you will hear three beeps.
Push the switch again to resume
movement. To close a sliding door, push and
release the top of the switch.
Sliding Doors
Remote Transmitter
Auto-Reverse
148
DRIVER’S
SIDE
SLIDING
DOOR
BUTTON
PASSENGER’S
SIDE
SLIDING
DOOR
BUTTONLED
Page 166 of 420
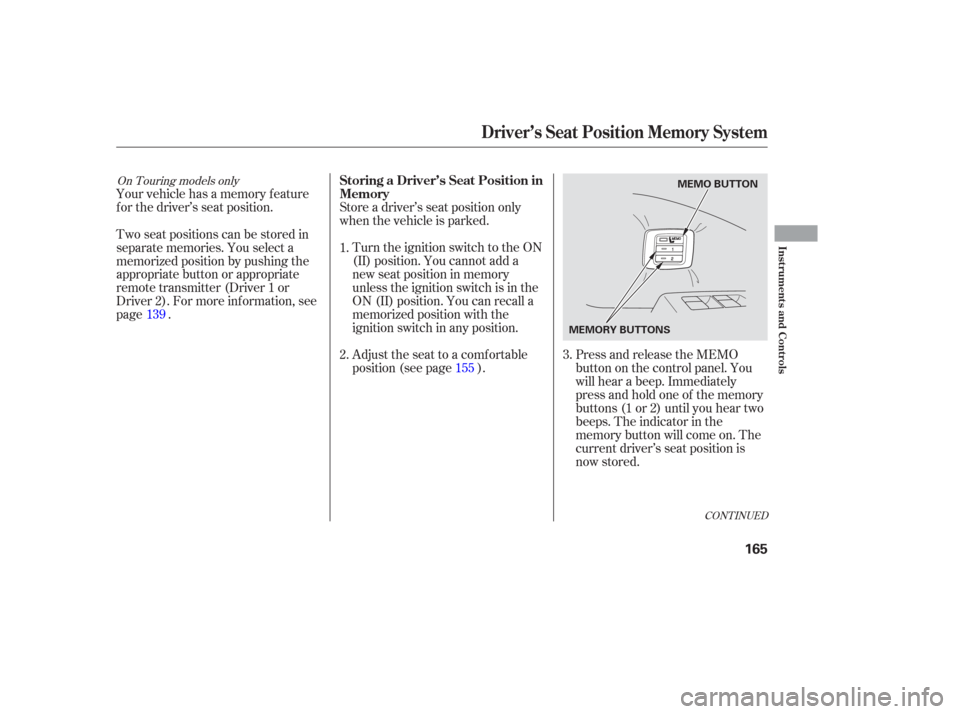
Your vehicle has a memory feature
f or the driver’s seat position.Press and release the MEMO
buttononthecontrolpanel.You
will hear a beep. Immediately
press and hold one of the memory
buttons (1 or 2) until you hear two
beeps. The indicator in the
memory button will come on. The
current driver’s seat position is
now stored.
Store a driver’s seat position only
when the vehicle is parked.
Turn the ignition switch to the ON
(II) position. You cannot add a
new seat position in memory
unless the ignition switch is in the
ON (II) position. You can recall a
memorized position with the
ignition switch in any position.
Adjust the seat to a comfortable
position (see page ).
Two seat positions can be stored in
separate memories. You select a
memorized position by pushing the
appropriate button or appropriate
remote transmitter (Driver 1 or
Driver 2). For more inf ormation, see
page .
1.
2.
3.
139
155
CONT INUED
On Touring models onlyStoring a Driver’s Seat Position in
Memory
Driver’s Seat Position Memory System
Inst rument s and Cont rols
165
MEMO BUTTON
MEMORY BUTTONS