High HONDA ODYSSEY 2009 RB3-RB4 / 4.G Navigation Manual
[x] Cancel search | Manufacturer: HONDA, Model Year: 2009, Model line: ODYSSEY, Model: HONDA ODYSSEY 2009 RB3-RB4 / 4.GPages: 153, PDF Size: 4.75 MB
Page 4 of 153
4Navigation System
Introduction
Manual Overview
The manual is divided into the
following sections:
Getting Started - A basic introduction that discusses the controls and how to
communicate with the system.
Entering a Destination - How to enter an address or locate a point of interest
(POI).
Driving to Your Destination - An explanation of the map features,
guidance, and cautions.
Information Features - Setup, Cellular Phonebook, Calendar,
Calculator, Voice Command Help,
Map Legend, and Key to Zagat
Ratings.
System Setup - How to Setup and tailor the system for your personal
use and use the Address Book. The back of this manual contains:
Map Coverage (page109)
Frequently Asked Questions (FAQs)
(page124)
Troubleshooting Guide (page131)
Glossary of Terms (page133)
Voice Command List (page136)
Operation Specific to Alaska and Hawaii (page122)
System Overview
Your navigation system is a highly
sophisticated location system with voice
control that uses satellites and a map
database to show you where you are and
to help guide you to a desired
destination.
The navigation system receives signals
from the global positioning system
(GPS), a network of 24 satellites in orbit
around the earth. By receiving signals
from several of these satellites, the
navigation system can determine the
latitude, longitude, and elevation of
your vehicle. In a ddition, a gyroscopic
yaw sensor and a vehicle speed sensor
in your vehicle k eep track of the
direction and speed of travel at all times.
2009 Odyssey
Page 10 of 153
10Navigation System
Getting Started
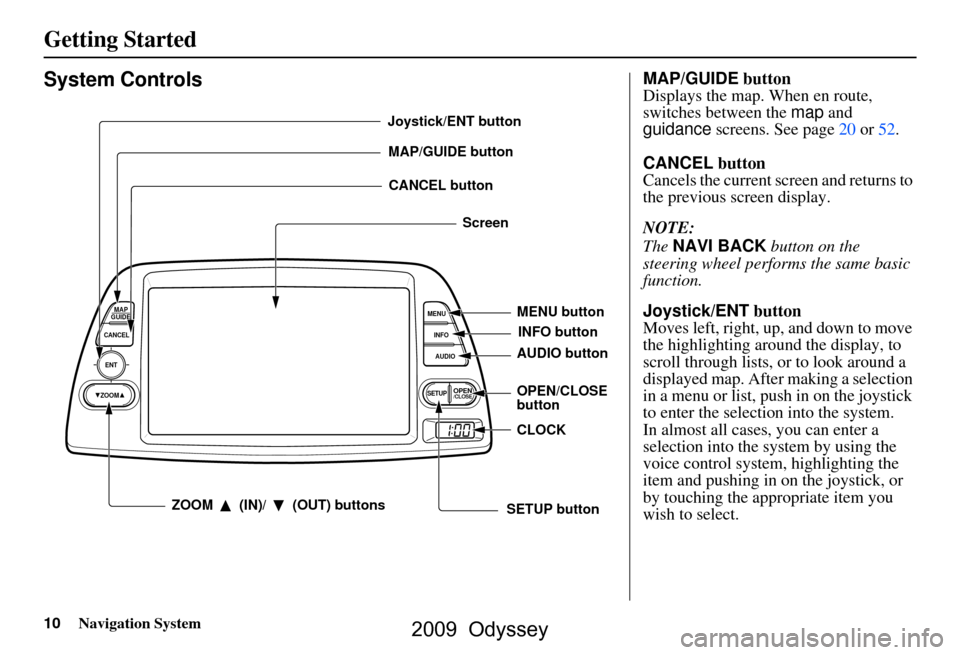
System Controls
ENT
CANCELMAP
GUIDE
MENU
INFO
AUDIO
SETUPOPEN/CLOSEZOOM
MAP/GUIDE buttonCANCEL button
Screen
MENU button
AUDIO button INFO button
ZOOM (IN)/ (OUT) buttons
Joystick/ENT button
OPEN/CLOSE
buttonCLOCK
SETUP button
MAP/GUIDE button
Displays the map. When en route,
switches between the map and
guidance screens. See page
20 or 52.
CANCEL button
Cancels the current screen and returns to
the previous screen display.
NOTE:
The NAVI BACK button on the
steering wheel perfor ms the same basic
function.
Joystick/ENT button
Moves left, right, up, and down to move
the highlighting around the display, to
scroll through lists, or to look around a
displayed map. After making a selection
in a menu or list, push in on the joystick
to enter the selectio n into the system.
In almost all cases, you can enter a
selection into the system by using the
voice control system, highlighting the
item and pushing in on the joystick, or
by touching the appropriate item you
wish to select.
2009 Odyssey
Page 14 of 153
14Navigation System
Getting Started
Improving Voice Recognition
To achieve optimum voice recognition
when using either the navigation or
Bluetooth® HandsFreeLink® voice
control system, the following guidelines
should be followed:
NOTE:
Make sure the correct screen is
displayed for the voice command that
you are using. See Voice Command
Index on page136.
Lower the A/C fan speed during voice recognition operation, and
adjust the airflow from both the
dashboard and side vents so they do
not blow against the microphone on
the ceiling.
Close the windows and the sunroof.
If more than one pe rson is speaking at
the same time, the system may
misinterpret your command.
After pressing and releasing the NAVI TALK button, wait for the
beep, then give a voice command. Give a voice command in a clear,
natural speaking voice without
pausing between words.
If the system cannot recognize your command because of background
noise, speak louder.
If you are still having trouble with the voice control system, refer to Voice
Command Help on the
Information screen.
Selecting an Item (Button)
on the Screen
On most screens, there are items that
can be selected (lik e buttons with titles
such as OK or Return ). To select an
item on any screen, do one of the
following:
Use the voice control system and say the name of the desired item. Almost
all selectable items on the screen,
including some listed items, are
recognized by the voice control
system.
Touch the desired item on the screen.
Move the highlightin g to the desired
item with the joystick, then push in
on the joystick.
Tip:
If items are grayed out, this means that
they cannot be selected.
2009 Odyssey
Page 15 of 153
Navigation System15
Getting Started
Selecting an Item in a List
To scroll through a list, do one of the
following:
Use the joystick to scroll through the
list item by item.
Use the voice cont rol system and say
“Next” or “Previous” or use the “on-
screen” scroll up or down buttons, or
the ZOOM buttons to scroll through
the list page by page.
If you cannot find the desired name, or
have made an error, return to the
previous screen by pressing the
CANCEL or the NAVI BACK button.
To select the desired item in the list, do
one of the following:
Use the voice control system, and say the item number of the desired item.
Touch the item on the screen.
Use the joystick to move the highlighting to the ite m, then push in
on the joystick.
2009 Odyssey
Page 16 of 153
16Navigation System
Getting Started
Using the On-screen
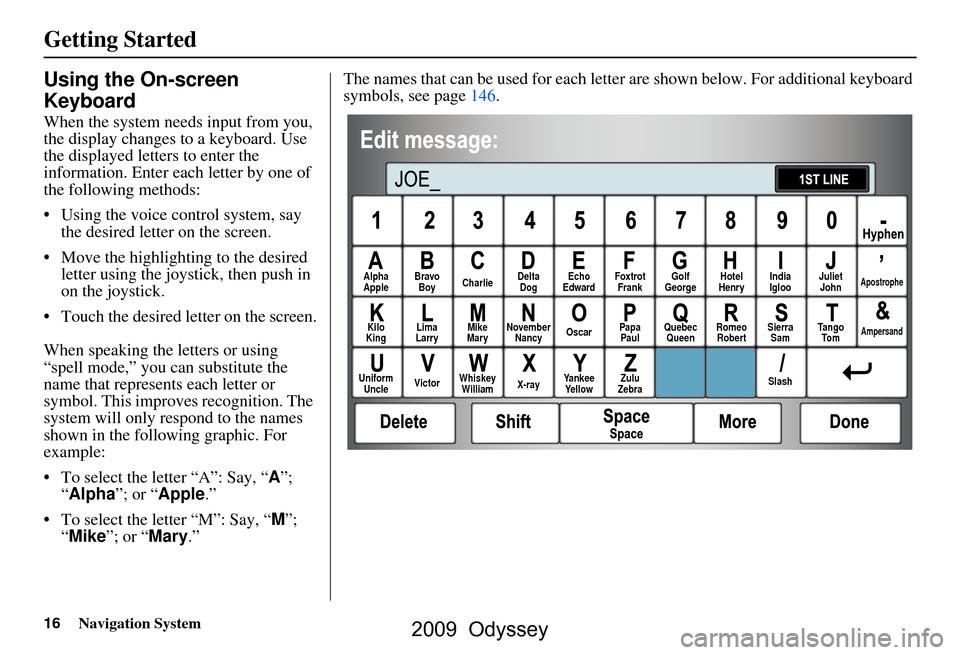
Keyboard
When the system needs input from you,
the display changes to a keyboard. Use
the displayed letters to enter the
information. Enter each letter by one of
the following methods:
Using the voice control system, say the desired letter on the screen.
Move the highlighting to the desired letter using the joystick, then push in
on the joystick.
Touch the desired le tter on the screen.
When speaking the letters or using
“spell mode,” you can substitute the
name that represents each letter or
symbol. This improves recognition. The
system will only re spond to the names
shown in the following graphic. For
example:
To select the letter “A”: Say, “ A”;
“ Alpha ”; or “Apple .”
To select the letter “M”: Say, “ M”;
“ Mike”; or “Mary.” The names that can be used for each lette
r are shown below. For additional keyboard
symbols, see page146.
Alpha
Apple Bravo
Boy Charlie Delta
Dog Echo
Edward Foxtrot
Frank Golf
George Hotel
Henry Juliet
JohnApostrophe
Kilo
King Lima
Larry Mike
Mary November
Nancy Oscar
Papa
Paul Quebec
Queen Romeo
Robert Sierra
Sam Tango
To mAmpersand
Uniform Uncle Victor
Whiskey
William X-rayYankee
Yellow Zulu
Zebra SlashIndia
Igloo
2009 Odyssey
Page 27 of 153
Navigation System27
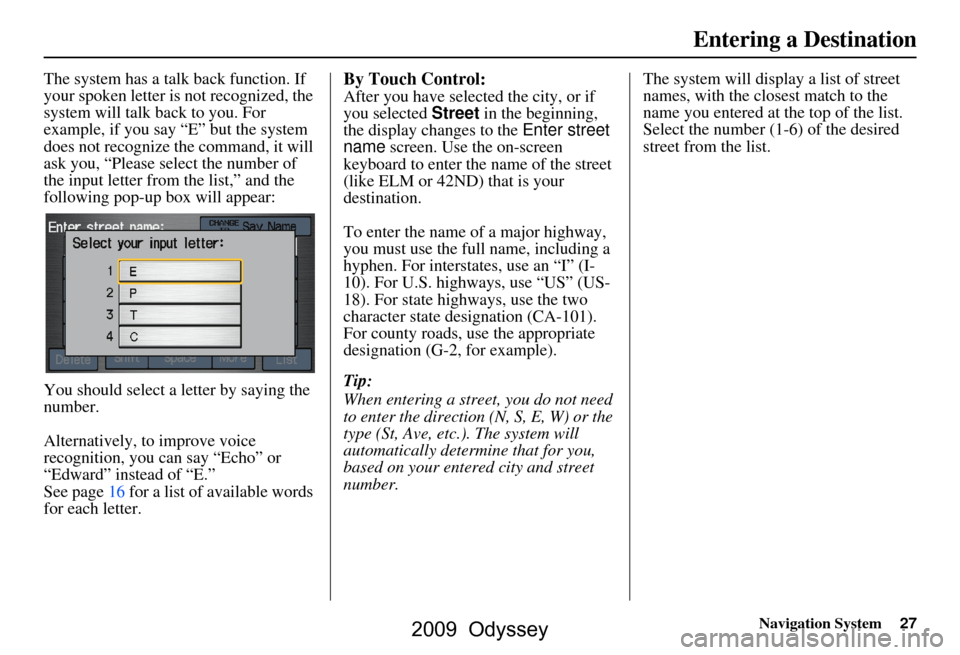
The system has a talk back function. If
your spoken letter is not recognized, the
system will talk back to you. For
example, if you say “E” but the system
does not recognize the command, it will
ask you, “Please select the number of
the input letter from the list,” and the
following pop-up box will appear:
You should select a letter by saying the
number.
Alternatively, to improve voice
recognition, you can say “Echo” or
“Edward” instead of “E.”
See page16 for a list of available words
for each letter.By Touch Control:
After you have selected the city, or if
you selected Street in the beginning,
the display changes to the Enter street
name screen. Use the on-screen
keyboard to enter the name of the street
(like ELM or 42ND) that is your
destination.
To enter the name of a major highway,
you must use the full name, including a
hyphen. For interstates, use an “I” (I-
10). For U.S. highways, use “US” (US-
18). For state highways, use the two
character state designation (CA-101).
For county roads, use the appropriate
designation (G-2, for example).
Tip:
When entering a street, you do not need
to enter the direction (N, S, E, W) or the
type (St, Ave, etc.). The system will
automatically determine that for you,
based on your entered city and street
number. The system will display a list of street
names, with the closest match to the
name you entered at the top of the list.
Select the number (1-6) of the desired
street from the list.
Entering a Destination
2009 Odyssey
Page 32 of 153
32Navigation System
By Touch Control:
After you have selected the city, or if
you select Street in the beginning, the
display changes to the Enter street
name screen. Use the on-screen
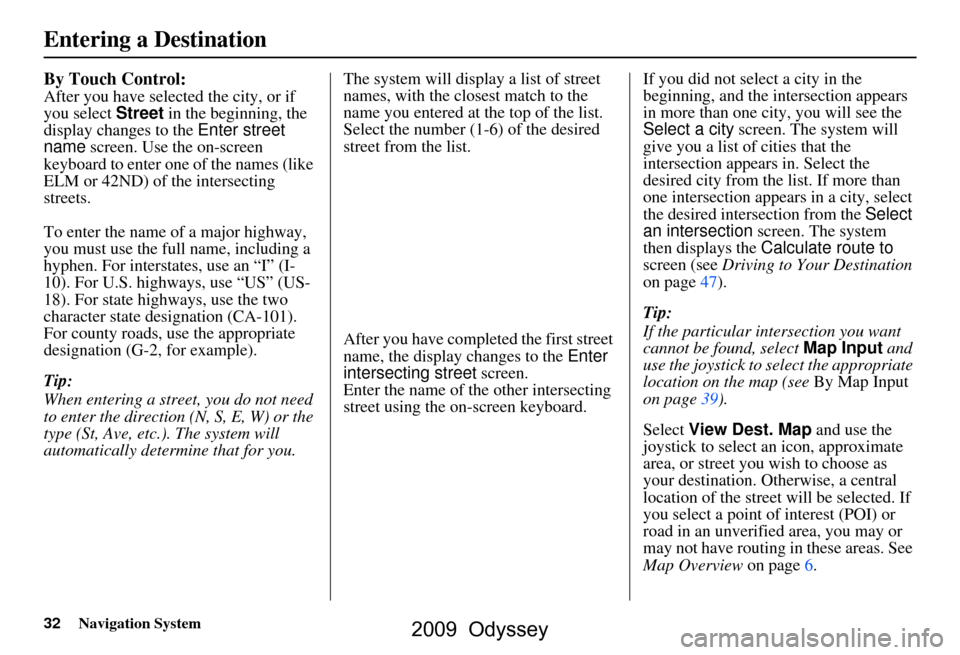
keyboard to enter one of the names (like
ELM or 42ND) of the intersecting
streets.
To enter the name of a major highway,
you must use the full name, including a
hyphen. For intersta tes, use an “I” (I-
10). For U.S. highways, use “US” (US-
18). For state highways, use the two
character state desi gnation (CA-101).
For county roads, use the appropriate
designation (G-2, for example).
Tip:
When entering a street, you do not need
to enter the direction (N, S, E, W) or the
type (St, Ave, etc.). The system will
automatically determine that for you. The system will display a list of street
names, with the closest match to the
name you entered at the top of the list.
Select the number (1-6) of the desired
street from the list.
After you have completed the first street
name, the display
changes to the Enter
intersecting street screen.
Enter the name of the other intersecting
street using the on-screen keyboard. If you did not select a city in the
beginning, and the
intersection appears
in more than one city, you will see the
Select a city screen. The system will
give you a list of cities that the
intersection appears in. Select the
desired city from the list. If more than
one intersection appears in a city, select
the desired intersection from the Select
an intersection screen. The system
then displays the Calculate route to
screen (see Driving to Your Destination
on page47).
Tip:
If the particular intersection you want
cannot be found, select Map Input and
use the joystick to select the appropriate
location on the map (see By Map Input
on page39).
Select View Dest. Map and use the
joystick to select an icon, approximate
area, or street you wish to choose as
your destination. Otherwise, a central
location of the street will be selected. If
you select a point of interest (POI) or
road in an unverified area, you may or
may not have routing in these areas. See
Map Overview on page6.
Entering a Destination
2009 Odyssey
Page 34 of 153
34Navigation System
Auto Service
The subcategories are Acura Dealers,
Honda Dealers, Gas Stations, etc.
Banking
The subcategories are ATM, Bank, etc.
Community
The subcategories are City Hall, Civic/
Community Center, Convention/
Exhibition Center, Court House, Higher
Education, Library, Post Office, School,
etc.
Emergency
The subcategories are Hospital, Police
Station, Roadside Assistance, etc.
Lodging
The subcategories are Bed & Breakfast,
Hotel/Motel, etc.
Leisure
The subcategories are Amusement Park,
Golf Course, Historical Monument,
Marina, Movie Theater, Museum, Park/
Recreation Area, Performing Arts,
Sports Complex, and Tourist Attraction.Restaurant
This category is broken down into types
of food, giving you
a selection by each
type: All Types, American, French,
Japanese, etc.
The ZAGAT SURVEY for some
restaurants is available in the system.
See the Information screen “Key to
Zagat Ratings” for an explanation of
these ratings (see page75).
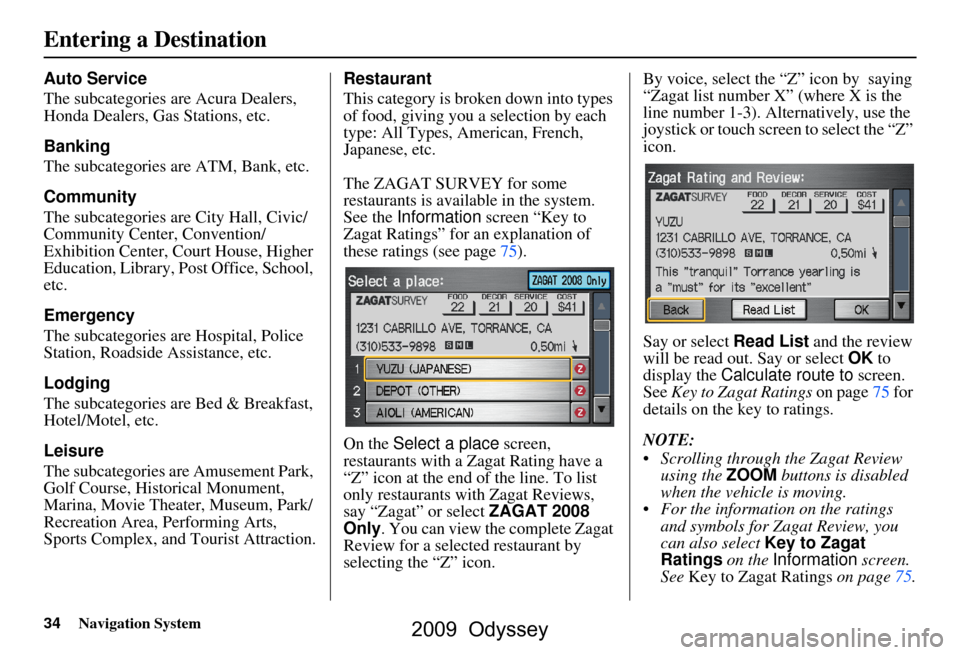
On the Select a place screen,
restaurants with a Zagat Rating have a
“Z” icon at the end of the line. To list
only restaurants with Zagat Reviews,
say “Zagat” or select ZAGAT 2008
Only . You can view the complete Zagat
Review for a select ed restaurant by
selecting the “Z” icon. By voice, select the “Z” icon by saying
“Zagat list number X” (where X is the
line number 1-3). Alternatively, use the
joystick or touch screen to select the “Z”
icon.
Say or select
Read List and the review
will be read out. Say or select OK to
display the Calculate route to screen.
See Key to Zagat Ratings on page75 for
details on the key to ratings.
NOTE:
Scrolling through the Zagat Review using the ZOOM buttons is disabled
when the vehicle is moving.
For the information on the ratings and symbols for Zagat Review, you
can also select Key to Zagat
Ratings on the Information screen.
See Key to Zagat Ratings on page75.
Entering a Destination
2009 Odyssey
Page 49 of 153
Navigation System49
Viewing the Routes
Touching View Routes on the
Calculate route to screen allows you to
scroll through and view the various
routes (Direct, Easy, Maximize
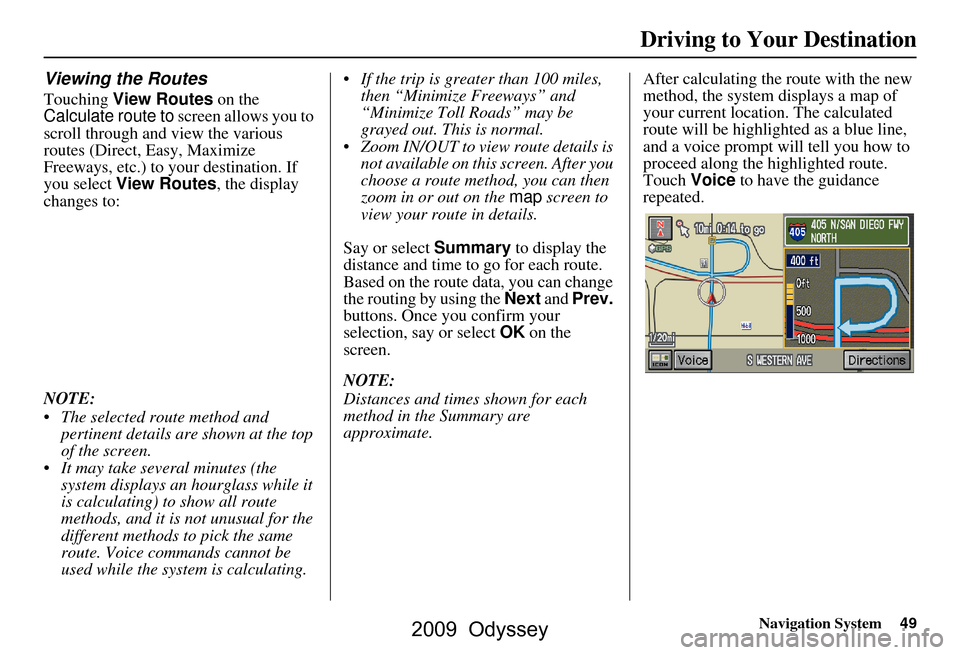
Freeways, etc.) to your destination. If
you select View Routes, the display
changes to:
NOTE:
The selected route method and pertinent details are shown at the top
of the screen.
It may take several minutes (the system displays an hourglass while it
is calculating) to show all route
methods, and it is not unusual for the
different methods to pick the same
route. Voice commands cannot be
used while the system is calculating. If the trip is greater than 100 miles,
then “Minimize Freeways” and
“Minimize Toll Roads” may be
grayed out. This is normal.
Zoom IN/OUT to view route details is not available on this screen. After you
choose a route method, you can then
zoom in or out on the map screen to
view your route in details.
Say or select Summary to display the
distance and time to go for each route.
Based on the route data, you can change
the routing by using the Next and Prev.
buttons. Once you confirm your
selection, say or select OK on the
screen.
NOTE:
Distances and times shown for each
method in the Summary are
approximate. After calculating the route with the new
method, the system displays a map of
your current locatio
n. The calculated
route will be highlighted as a blue line,
and a voice prompt will tell you how to
proceed along the highlighted route.
Touch Voice to have the guidance
repeated.
Driving to Your Destination
2009 Odyssey
Page 50 of 153
50Navigation System
Driving to Your Destination
Viewing the Destination Map
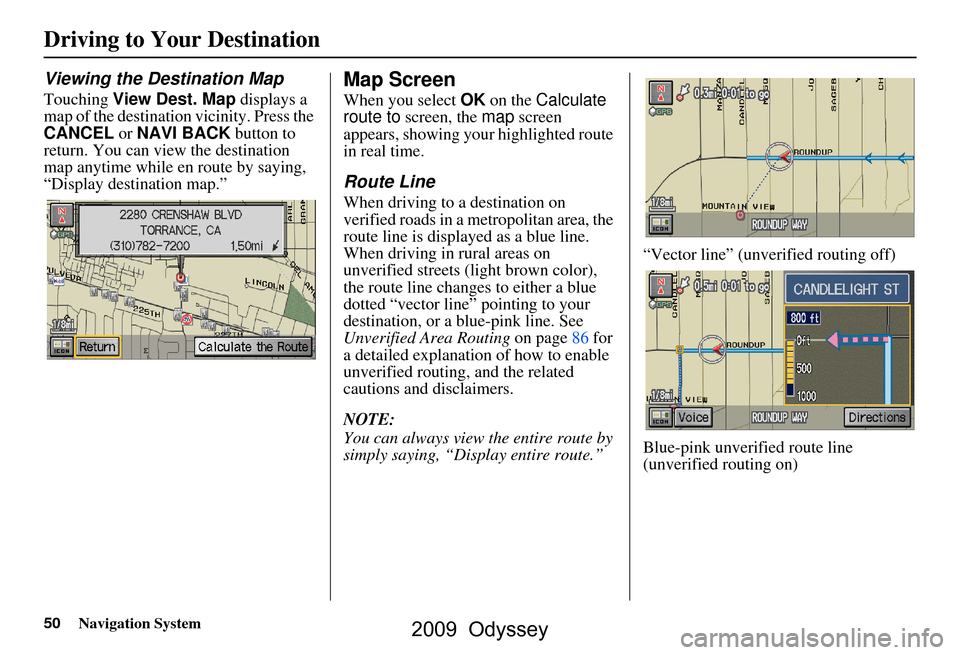
Touching View Dest. Map displays a
map of the destination vicinity. Press the
CANCEL or NAVI BACK button to
return. You can view the destination
map anytime while en route by saying,
“Display destination map.”
Map Screen
When you select OK on the Calculate
route to screen, the map screen
appears, showing your highlighted route
in real time.
Route Line
When driving to a destination on
verified roads in a metropolitan area, the
route line is displayed as a blue line.
When driving in rural areas on
unverified streets (light brown color),
the route line changes to either a blue
dotted “vector line” pointing to your
destination, or a blue-pink line. See
Unverified Area Routing on page86 for
a detailed explanatio n of how to enable
unverified routing, and the related
cautions and disclaimers.
NOTE:
You can always view the entire route by
simply saying, “Display entire route.” “Vector line” (unverified routing off)
Blue-pink unverified route line
(unverified routing on)
2009 Odyssey