Date HONDA ODYSSEY 2010 RB3-RB4 / 4.G Navigation Manual
[x] Cancel search | Manufacturer: HONDA, Model Year: 2010, Model line: ODYSSEY, Model: HONDA ODYSSEY 2010 RB3-RB4 / 4.GPages: 155, PDF Size: 4.14 MB
Page 3 of 155
Navigation System3
Table of Contents
System Initialization ................. 101
System Initialization .................... 101
Entering the Security Code.......... 101
GPS Initialization ........................ 102
Map Matching ............................. 102
System Limitations ...................103
Database Limitations ............... 105
Customer Assistance ................ 107
Reporting Errors .......................... 107
Honda Automobile Customer Service ...................................... 107
Visiting Your Dealer ................... 108
Obtaining a Navigation Update DVD ......................................... 108
Changing the DVD ...................... 109
PC Card ....................................... 109
Coverage Areas .........................110
Map Coverage ............................. 110
U.S. Detailed Coverage Areas....... 110
Canada Detailed Coverage Areas .......................................... 115
Operation in Alaska and
Hawaii ...................................... 124
Alaska ............................................ 124
Hawaii ........................................... 124Shipping a Vehicle To or From
Hawaii ........................................ 125
Frequently Asked Questions...126
Troubleshooting ....................... 133
Glossary .................................... 135
Glossary ....................................... 135
Voice Command Index ............138
Global Commands ....................... 138
Navigation General Commands ................................ 138
Navigation Display Commands ................................ 139
Find Place Commands ................. 140
Climate Control Commands ........ 141
Temperature Voice Commands ................................ 142
Radio Voice Commands .............. 142
CD Voice Commands .................. 143
DVD Voice Commands ............... 143
AUX Voice Commands ............... 144
Rear Radio Voice Commands ..... 144
Rear CD Voice Commands ......... 145
Rear DVD Voice Commands ...... 146
Rear AUX Voice Commands ...... 146Information Screen Voice
Commands ................................ 147
Setup Screen (first) Commands ................................ 147
On-Screen Commands ................. 148
On-Screen Commands Assist .........148
Index ......................................... 150
2010 Odyssey
Page 5 of 155
Navigation System5
Introduction
The navigation system applies location,
direction, and speed information to the
maps and calculates a route to the
destination you enter. As you drive to
that destination, the system provides
map and voice guidance.
The navigation system is easy to use.
The locations of many places of
business and entertainment are already
entered in the system. You can select
any of them as a destination by using the
touch screen, joystick, or voice control.
There are several ways to enter a
destination, such as by point of interest
(POI), by address, by phone number,
and by selecting it from the map. The
last 50 destinations are saved for reuse
at a later date. The system also allows
you to store a home address to simplify
returning home from your destination.Accessories Precautions
If you have front or side window tinting
installed, be aware that if the tint has
metallic properties, it can seriously
degrade or prevent GPS reception. This
is because the GPS antenna is located
under the dashboard.
If you plan to install electronic
components, such as radar detectors,
vehicle tracking devices, remote
starters, additional amplifiers, or other
audio components, ensure that they are
not located near the navigation control
unit under the driver’s seat, near the
navigation screen in the dash, or near
the GPS antenna under the dashboard.
Signal noise emanating from these
devices can cause intermittent
disruption of the navigation system.
Important Safety Information
The navigation system can distract your
attention from the road if you focus on
the screen or operate the system’s
controls while driving.
Enter as much information as possible
into the system before you begin
driving, or when the vehicle is stopped.
Then, as you drive, listen to the audio
instructions and use voice commands
when possible.
2010 Odyssey
Page 6 of 155
6Navigation System
While driving, do not look at the screen
or operate the system controls for more
than a second or so at a time, and only
after deciding you can do so safely. Pull
to the side of the road if you need more
time to look at the screen or operate the
controls. The navigation system is designed to
provide route information to help you
reach your destination. However, this
route guidance may sometimes conflict
with current road conditions such as
street closures, road construction,
detours, and out-of-date map data.
Additionally, the system itself has
certain limitations (see page
103).
Therefore, you must verify the audio
and visual route information provided
by the system by caref ully observing the
roadway, signs and signals, etc. If you
are unsure, proceed with caution.
Always use your own good judgment,
and obey traffic laws while driving.
Map Overview
Current Street
The current street on which your vehicle
is located appears at the bottom of the
map screen (see page 20). A message
saying
“Not on a digitized road” may
appear instead when you drive half a
mile away from a mapped road. For
more details, see Off-road Tracking on
page 63.
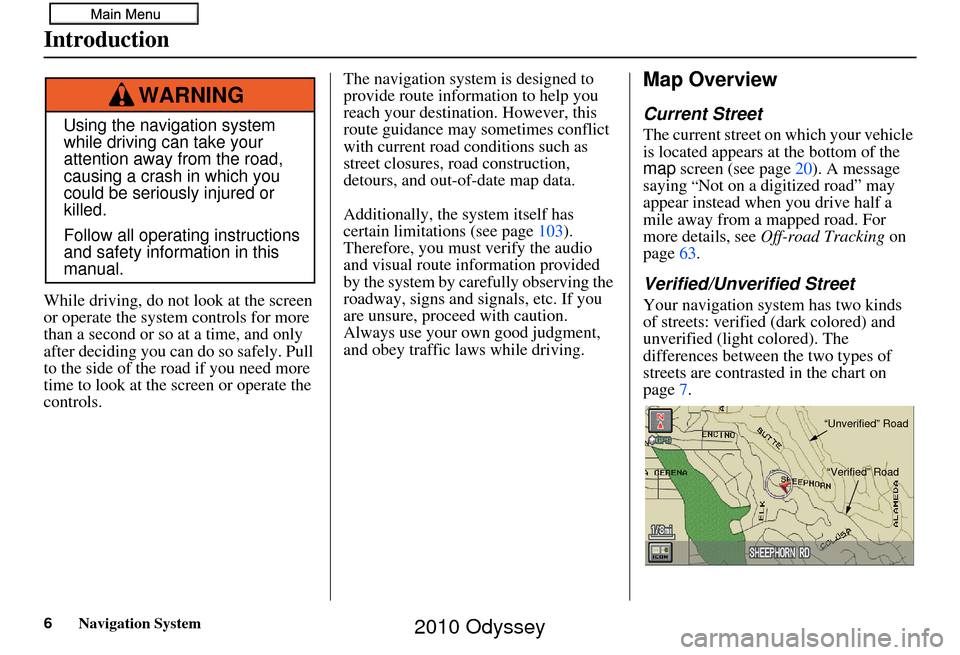
Verified/Unverified Street
Your navigation system has two kinds
of streets: verified (dark colored) and
unverified (light colored). The
differences between the two types of
streets are contrasted in the chart on
page 7.
Using the navigation system
while driving can take your
attention away from the road,
causing a crash in which you
could be seriously injured or
killed.
Follow all operating instructions
and safety information in this
manual.
WARNING
“Unverified” Road
“Verified” Road
Introduction
2010 Odyssey
Page 21 of 155
Navigation System21
Getting Started
Map Screen Description
Zoom In/Out
Use the ZOOM buttons to change the
scale of the map. Zooming in increases
the detail, while zooming out gives you
a wide area view. After changing the
scale, give the system a few moments to
update the display.
Map Scrolling
To view other areas on the map, move
the joystick left, right, up, or down. The
map will shift in that direction. To
return the map to you r current location,
press either the MAP/GUIDE ,
CANCEL , or NAVI BACK button on
the steering wheel.
Displaying Current Location
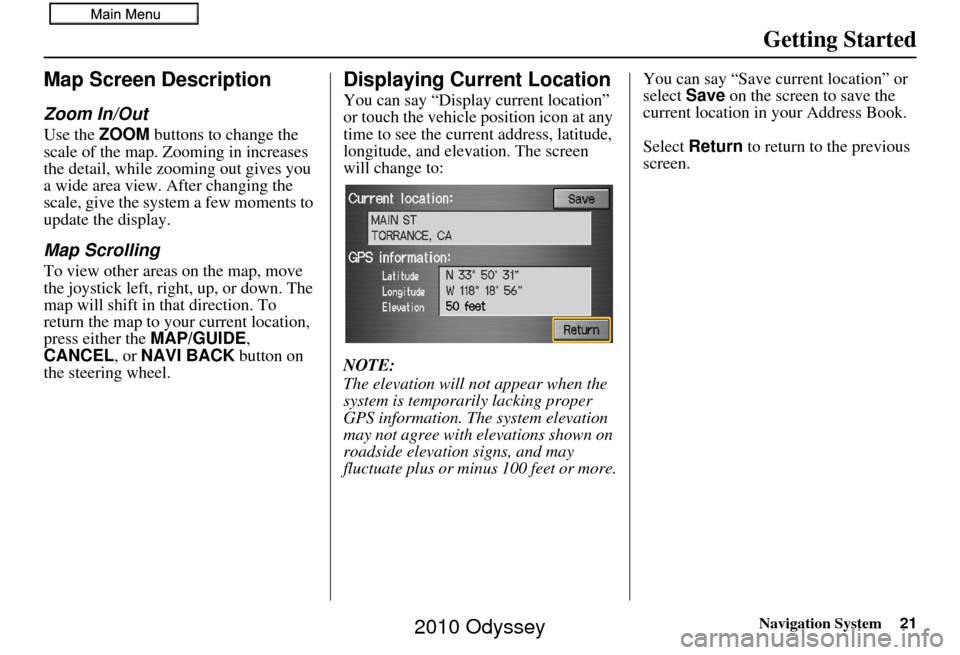
You can say “Display current location”
or touch the vehicle position icon at any
time to see the current address, latitude,
longitude, and elevation. The screen
will change to:
NOTE:
The elevation will not appear when the
system is temporarily lacking proper
GPS information. The system elevation
may not agree with elevations shown on
roadside elevation signs, and may
fluctuate plus or minus 100 feet or more. You can say “Save current location” or
select
Save on the screen to save the
current location in your Address Book.
Select Return to return to the previous
screen.
2010 Odyssey
Page 43 of 155
Navigation System43
Entering a Destination
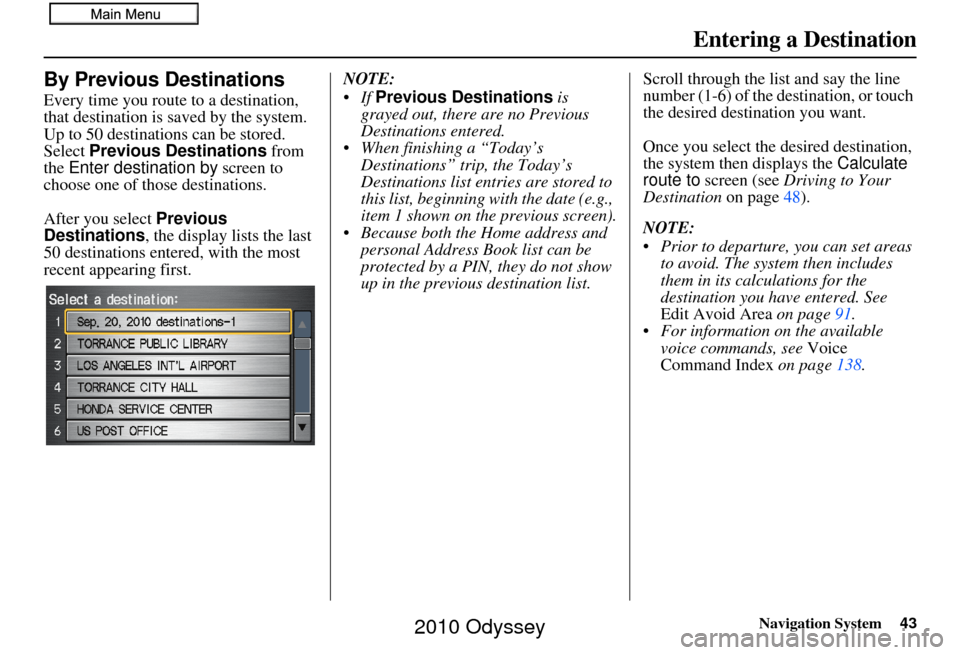
By Previous Destinations
Every time you route to a destination,
that destination is saved by the system.
Up to 50 destinations can be stored.
Select Previous Destinations from
the Enter destination by screen to
choose one of those destinations.
After you select Previous
Destinations , the display lists the last
50 destinations entered, with the most
recent appearing first. NOTE:
Previous Destinations is
grayed out, there are no Previous
Destinations entered.
When finishing a “Today’s Destinations” trip, the Today’s
Destinations list entries are stored to
this list, beginning with the date (e.g.,
item 1 shown on the previous screen).
Because both the Home address and personal Address Book list can be
protected by a PIN, they do not show
up in the previous destination list. Scroll through the list and say the line
number (1-6) of the destination, or touch
the desired destination you want.
Once you select the desired destination,
the system then displays the
Calculate
route to screen (see Driving to Your
Destination on page48).
NOTE:
Prior to departure, you can set areas to avoid. The system then includes
them in its calculations for the
destination you have entered. See
Edit Avoid Area on page91.
For information on the available voice commands, see Voice
Command Index on page138.
2010 Odyssey
Page 45 of 155
Navigation System45
Entering a Destination
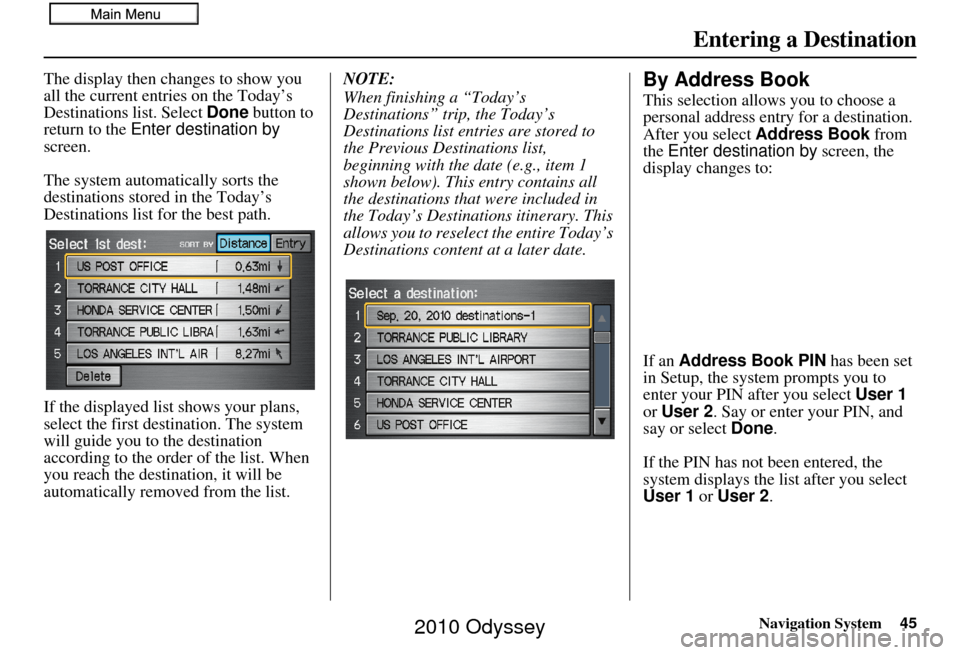
The display then changes to show you
all the current entries on the Today’s
Destinations list. Select Done button to
return to the Enter destination by
screen.
The system automatically sorts the
destinations stored in the Today’s
Destinations list fo r the best path.
If the displayed list shows your plans,
select the first destination. The system
will guide you to the destination
according to the order of the list. When
you reach the destination, it will be
automatically removed from the list. NOTE:
When finishing a “Today’s
Destinations” trip, the Today’s
Destinations list entries are stored to
the Previous Destinations list,
beginning with the
date (e.g., item 1
shown below). This entry contains all
the destinations that were included in
the Today’s Destinations itinerary. This
allows you to reselect the entire Today’s
Destinations content at a later date.By Address Book
This selection allows you to choose a
personal address entry for a destination.
After you select Address Book from
the Enter destination by screen, the
display changes to:
If an Address Book PIN has been set
in Setup, the system prompts you to
enter your PIN after you select User 1
or User 2 . Say or enter your PIN, and
say or select Done.
If the PIN has not been entered, the
system displays the list after you select
User 1 or User 2 .
2010 Odyssey
Page 57 of 155
Navigation System57
Driving to Your Destination
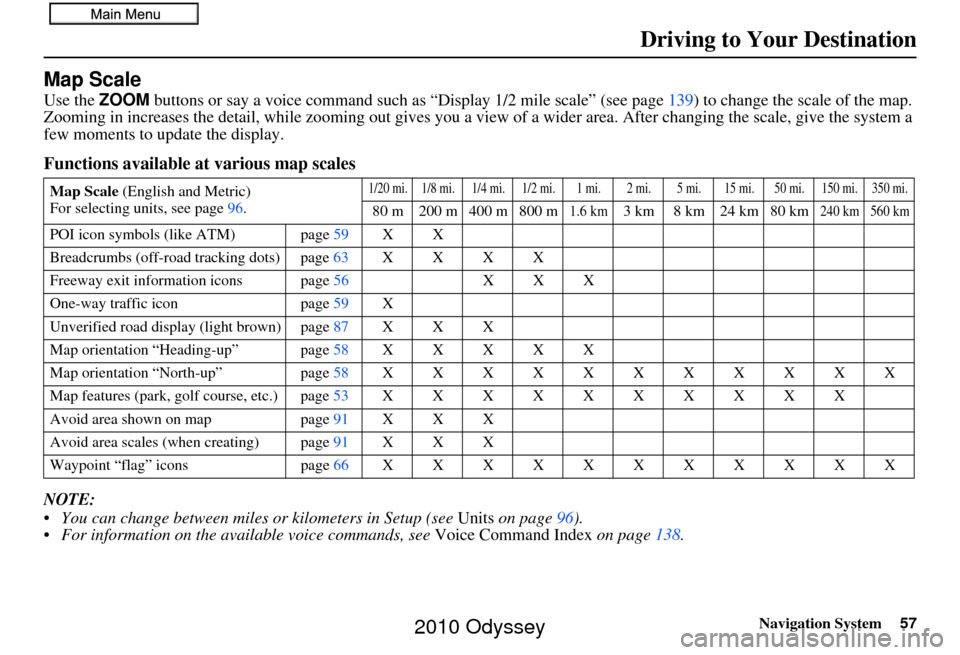
Map Scale
Use the ZOOM buttons or say a voice command such as “Display 1/2 m ile scale” (see page139) to change the scale of the map.
Zooming in increases the detail, while zooming out gives you a vi ew of a wider area. After changing the scale, give the system a
few moments to update the display.
Functions available at various map scales
NOTE:
You can change between miles or kilometers in Setup (see Units on page 96).
For information on the available voice commands, see Voice Command Index on page138.
Map Scale (English and Metric)
For selecting uni ts, see page96.1/20 mi. 1/8 mi. 1/4 mi. 1/2 mi. 1 mi. 2 mi. 5 mi. 15 mi. 50 mi. 150 mi. 350 mi.
80 m 200 m 400 m 800 m1.6 km3 km 8 km 24 km 80 km240 km 560 km
POI icon symbols (like ATM) page 59X X
Breadcrumbs (off-road tracking dots)page 63XXXX
Freeway exit information icons page 56X X X
One-way traffic icon page59 X
Unverified road display (light brown) page 87X X X
Map orientation “Heading-up” page 58XXXXX
Map orientation “North-up” page 58XXXXXXXXXXX
Map features (park, golf course, etc.)page 53XXXXXXXXXX
Avoid area shown on map page91 X X X
Avoid area scales (w hen creating) page 91X X X
Waypoint “flag” icons page66 XXXXXXXXXXX
2010 Odyssey
Page 64 of 155
64Navigation System
Viewing/Saving the Current
Location
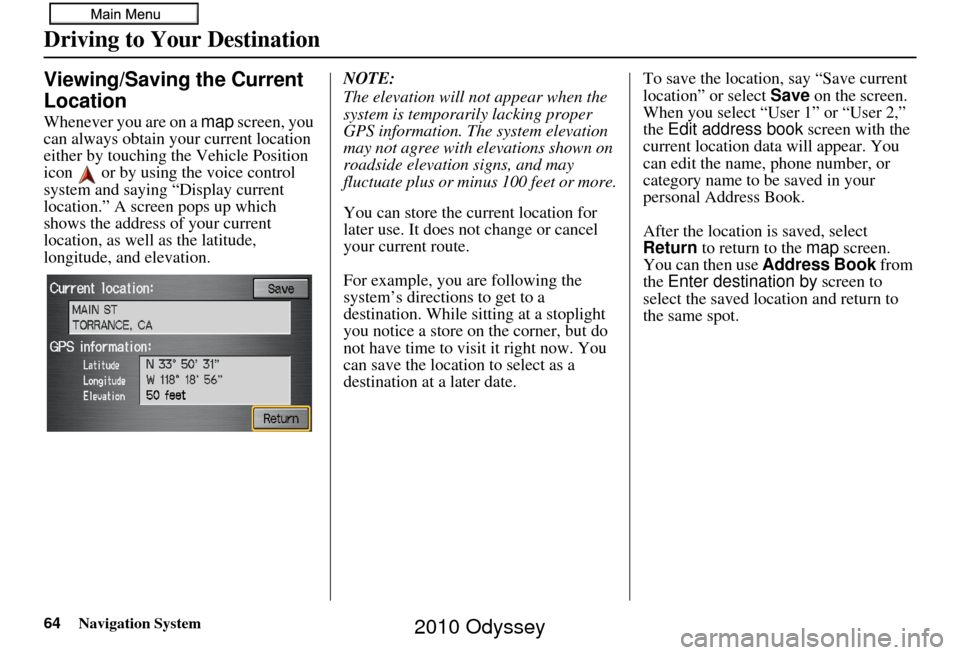
Whenever you are on a map screen, you
can always obtain your current location
either by touching the Vehicle Position
icon or by using the voice control
system and saying “Display current
location.” A screen pops up which
shows the address of your current
location, as well as the latitude,
longitude, and elevation. NOTE:
The elevation will not appear when the
system is temporarily lacking proper
GPS information. The system elevation
may not agree with elevations shown on
roadside elevation signs, and may
fluctuate plus or minus 100 feet or more.
You can store the current location for
later use. It does not change or cancel
your current route.
For example, you are following the
system’s directions to get to a
destination. While sitting at a stoplight
you notice a store on the corner, but do
not have time to visit it right now. You
can save the location to select as a
destination at a later date.To save the location, say “Save current
location” or select
Save on the screen.
When you select “User 1” or “User 2,”
the Edit address book screen with the
current location data will appear. You
can edit the name, phone number, or
category name to be saved in your
personal Address Book.
After the location is saved, select
Return to return to the map screen.
You can then use Address Book from
the Enter destination by screen to
select the saved location and return to
the same spot.
Driving to Your Destination
2010 Odyssey
Page 72 of 155
72Navigation System
Information Features
Calendar
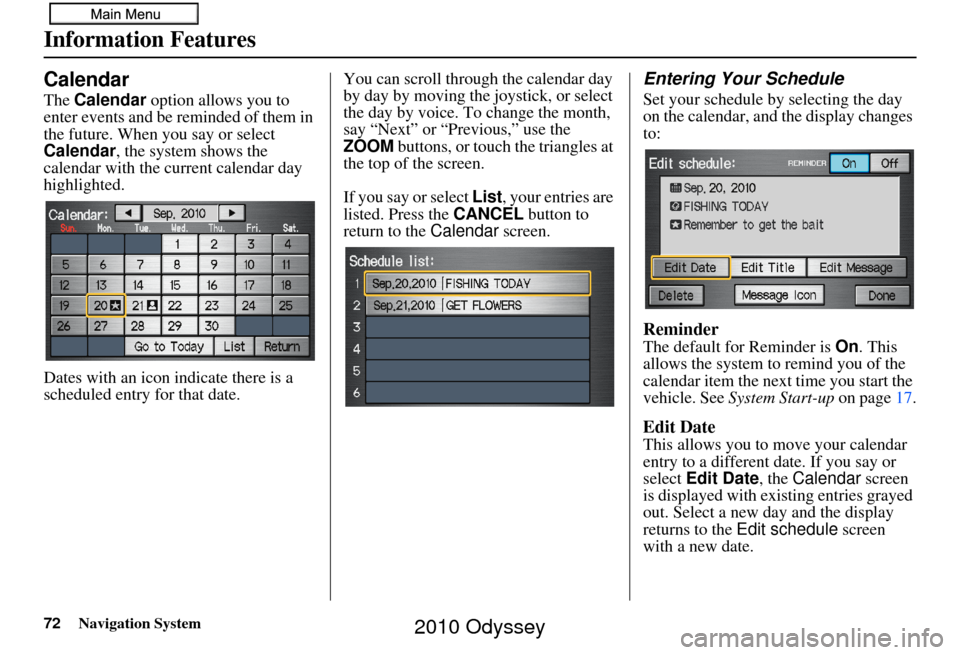
The Calendar option allows you to
enter events and be reminded of them in
the future. When you say or select
Calendar , the system shows the
calendar with the current calendar day
highlighted.
Dates with an icon indicate there is a
scheduled entry for that date. You can scroll through the calendar day
by day by moving the joystick, or select
the day by voice. To change the month,
say “Next” or “Previous,” use the
ZOOM
buttons, or touch the triangles at
the top of the screen.
If you say or select List, your entries are
listed. Press the CANCEL button to
return to the Calendar screen.
Entering Your Schedule
Set your schedule by selecting the day
on the calendar, and the display changes
to:
Reminder
The default for Reminder is On. This
allows the system to remind you of the
calendar item the next time you start the
vehicle. See System Start-up on page17.
Edit Date
This allows you to move your calendar
entry to a different date. If you say or
select Edit Date , the Calendar screen
is displayed with existing entries grayed
out. Select a new day and the display
returns to the Edit schedule screen
with a new date.
2010 Odyssey
Page 73 of 155
Navigation System73
Information Features
Edit Title
Say or select Edit Title, then enter the
name of your title using the on-screen
keyboard. Once you have entered the
title, say or select Done .
Edit Message
Say or select Edit Message , and the
system will show the Edit Message
screen. You can enter a message on two
lines. Use to change the line.
Once you have entered the message, say
or select Done .
Message Icon
Say or select Message Icon , and the
system displays a list of icons you can
select to help identify the type of
message you entered. The message icon
you choose will be displayed alongside
the specified date on the Calendar
screen.
Delete
From the Calendar screen, select the
date of the schedule you wish to
remove. To remove the schedule, say or
select Delete .
Done
Once you have finished entering the
schedule, say or select Done. The
Calendar screen is redisplayed and a
message icon appears.
NOTE:
You can only enter one message per day.
A maximum of 50 entries can be stored in the schedule. After you
reach 50 entries, a warning message
will appear telling you that the limit
has been reached. You can clear any
older entries as needed.
To reactivate a previous message, turn the Reminder setting from Off to
On . If it is not turned on, the
reminder will not be displayed when
you start the vehicle.
The system displays active calendar entries only after you answer OK on
the Disclaimer screen.
For more information, refer to System Start-up on page 17.Calculator
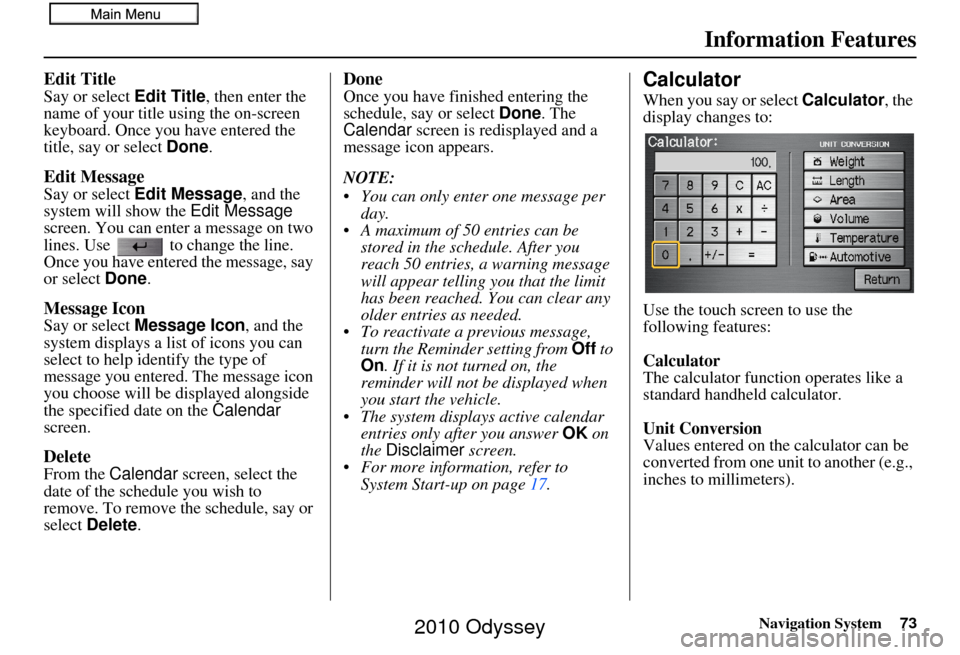
When you say or select Calculator, the
display changes to:
Use the touch screen to use the
following features:
Calculator
The calculator function operates like a
standard handheld calculator.
Unit Conversion
Values entered on the calculator can be
converted from one unit to another (e.g.,
inches to millimeters).
2010 Odyssey