HONDA ODYSSEY 2012 RB3-RB4 / 4.G Owners Manual
Manufacturer: HONDA, Model Year: 2012, Model line: ODYSSEY, Model: HONDA ODYSSEY 2012 RB3-RB4 / 4.GPages: 441, PDF Size: 14.07 MB
Page 101 of 441
uuGauges and DisplaysuMulti-Information Display
*
100Instrument Panel
Shows the average speed in mph or km/h since the last time Trip A or Trip B was
reset.
Shows the remaining oil life and Maintenance Minder
TM.
2Maintenance Minder™ P. 335
Shows the outside temperature in Fahrenheit (U.S.) or Celsius (Canada).■
Adjusting the outside temperature display
Adjust the temperature reading up to ±5°F or ±3°C if the temperature reading
seems incorrect.
■
Average Speed
■
Engine Oil Life
■
Outside Temperature
1Outside Temperature
The temperature sensor is in the front bumper.
Road heat and exhaust from another vehicle can
affect the temperature reading when your vehicle
speed is less than 19 mph (30 km/h).
It may take several minutes for the display to be
updated after the temperature reading has stabilized.
Use the multi-information display's customized
features to correct the temperature.
2Customized Features P. 101
Page 102 of 441
Continued
101
uuGauges and DisplaysuMulti-Information Display
*
Instrument Panel
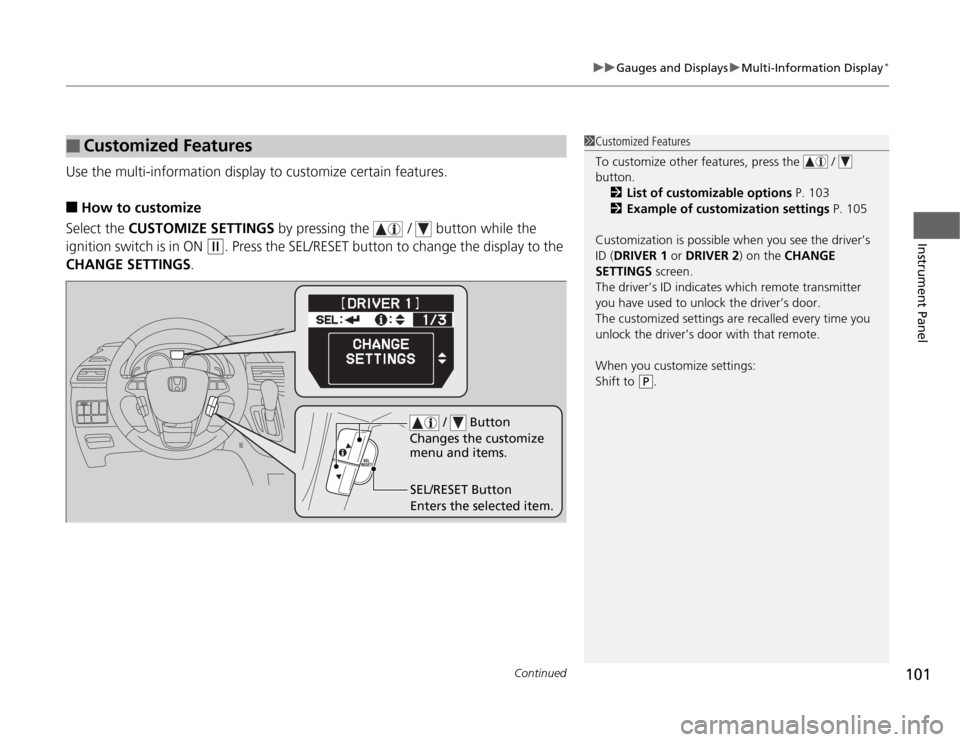
Use the multi-information display to customize certain features.■
How to customize
Select the CUSTOMIZE SETTINGS by pressing the / button while the
ignition switch is in ON
(w
. Press the SEL/RESET button to change the display to the
CHANGE SETTINGS.
■
Customized Features
1Customized Features
To customize other features, press the /
button.
2List of customizable options P. 103
2Example of customization settings P. 105
Customization is possible when you see the driver’s
ID (DRIVER 1 or DRIVER 2) on the CHANGE
SETTINGS screen.
The driver’s ID indicates which remote transmitter
you have used to unlock the driver’s door.
The customized settings are recalled every time you
unlock the driver’s door with that remote.
When you customize settings:
Shift to
(P
.
SEL/RESET Button
Enters the selected item. / Button
Changes the customize
menu and items.
Page 103 of 441
102
uuGauges and DisplaysuMulti-Information Display
*
Instrument Panel
■
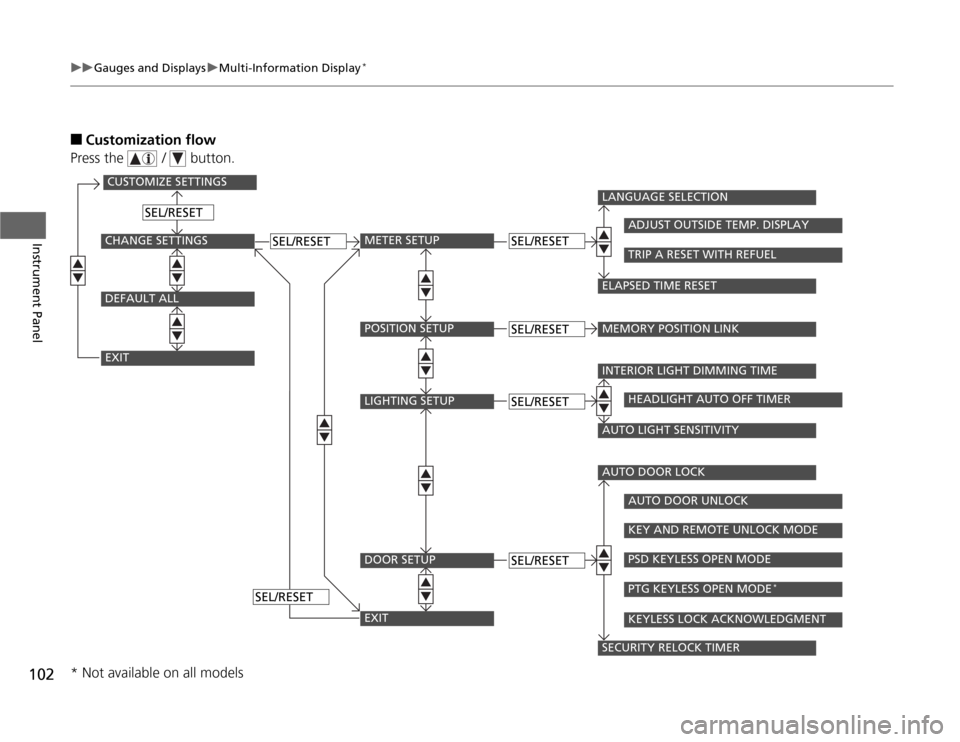
Customization flow
Press the / button.
CUSTOMIZE SETTINGSCHANGE SETTINGSEXITDEFAULT ALL
METER SETUP
SEL/RESET
SEL/RESET
SEL/RESET
SEL/RESET
POSITION SETUPLIGHTING SETUPDOOR SETUPEXIT
SEL/RESETSEL/RESETSEL/RESET
LANGUAGE SELECTIONMEMORY POSITION LINK
ADJUST OUTSIDE TEMP. DISPLAYTRIP A RESET WITH REFUEL
ELAPSED TIME RESETINTERIOR LIGHT DIMMING TIME
HEADLIGHT AUTO OFF TIMER
AUTO LIGHT SENSITIVITYAUTO DOOR LOCK
AUTO DOOR UNLOCKKEY AND REMOTE UNLOCK MODEPSD KEYLESS OPEN MODEPTG KEYLESS OPEN MODE
*
KEYLESS LOCK ACKNOWLEDGMENT
SECURITY RELOCK TIMER
* Not available on all models
Page 104 of 441
103
uuGauges and DisplaysuMulti-Information Display
*
Continued
Instrument Panel
■
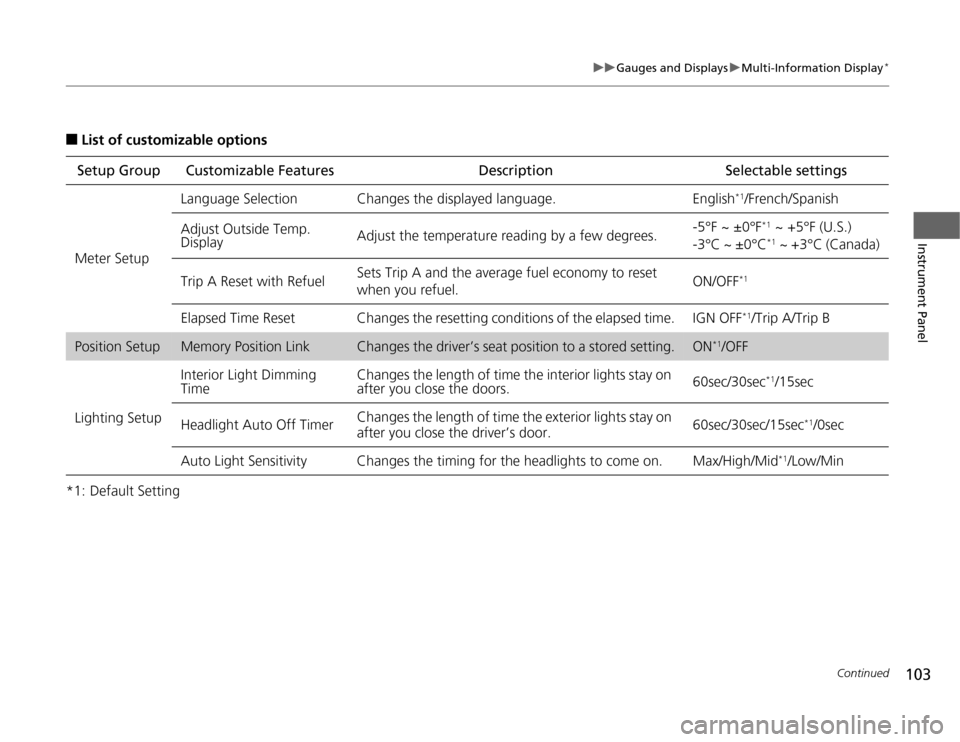
List of customizable options
*1: Default SettingSetup Group Customizable Features Description Selectable settings
Meter SetupLanguage Selection Changes the displayed language. English
*1/French/Spanish
Adjust Outside Temp.
DisplayAdjust the temperature reading by a few degrees.-5°F ~ ±0°F
*1 ~ +5°F (U.S.)
-3°C ~ ±0°C*1 ~ +3°C (Canada)
Trip A Reset with RefuelSets Trip A and the average fuel economy to reset
when you refuel.ON/OFF
*1
Elapsed Time Reset Changes the resetting conditions of the elapsed time. IGN OFF
*1/Trip A/Trip B
Position Setup
Memory Position Link
Changes the driver’s seat position to a stored setting.
ON
*1/OFF
Lighting SetupInterior Light Dimming
TimeChanges the length of time the interior lights stay on
after you close the doors.60sec/30sec
*1/15sec
Headlight Auto Off TimerChanges the length of time the exterior lights stay on
after you close the driver’s door.60sec/30sec/15sec
*1/0sec
Auto Light Sensitivity Changes the timing for the headlights to come on. Max/High/Mid
*1/Low/Min
Page 105 of 441
104
uuGauges and DisplaysuMulti-Information Display
*
Instrument Panel
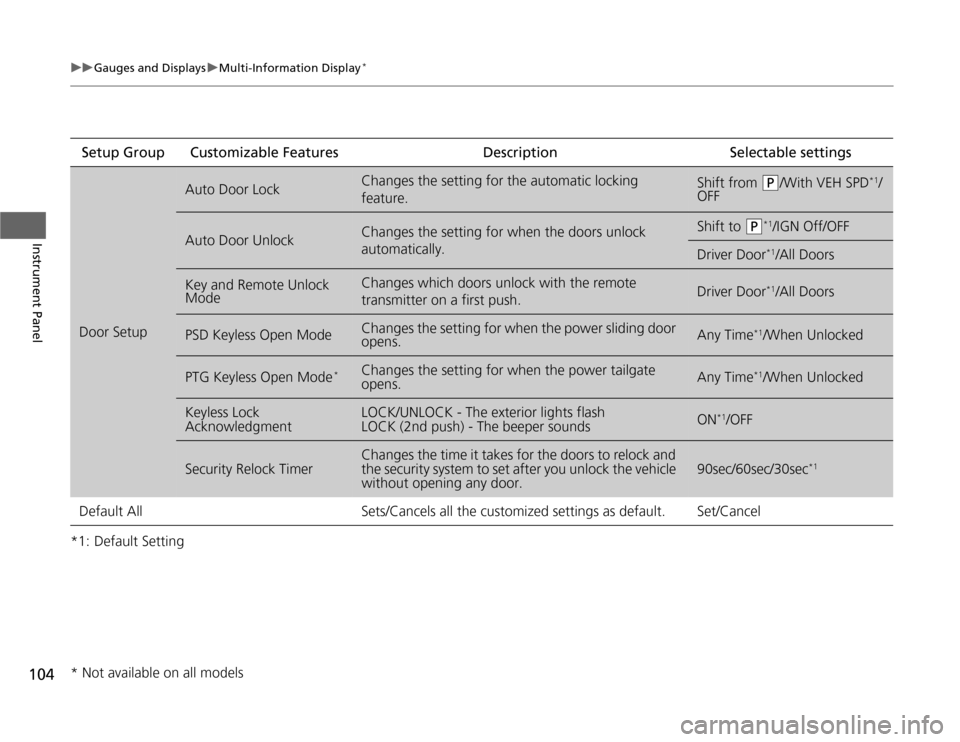
*1: Default SettingSetup Group Customizable Features Description Selectable settingsDoor Setup
Auto Door Lock
Changes the setting for the automatic locking
feature.
Shift from
(P
/With VEH SPD
*1/
OFF
Auto Door Unlock
Changes the setting for when the doors unlock
automatically.
Shift to
(P
*1/IGN Off/OFF
Driver Door
*1/All Doors
Key and Remote Unlock
Mode
Changes which doors unlock with the remote
transmitter on a first push.
Driver Door
*1/All Doors
PSD Keyless Open Mode
Changes the setting for when the power sliding door
opens.
Any Time
*1/When Unlocked
PTG Keyless Open Mode
*
Changes the setting for when the power tailgate
opens.
Any Time
*1/When Unlocked
Keyless Lock
Acknowledgment
LOCK/UNLOCK - The exterior lights flash
LOCK (2nd push) - The beeper sounds
ON
*1/OFF
Security Relock Timer
Changes the time it takes for the doors to relock and
the security system to set after you unlock the vehicle
without opening any door.
90sec/60sec/30sec
*1
Default All Sets/Cancels all the customized settings as default. Set/Cancel* Not available on all models
Page 106 of 441
105
uuGauges and DisplaysuMulti-Information Display
*
Continued
Instrument Panel
■
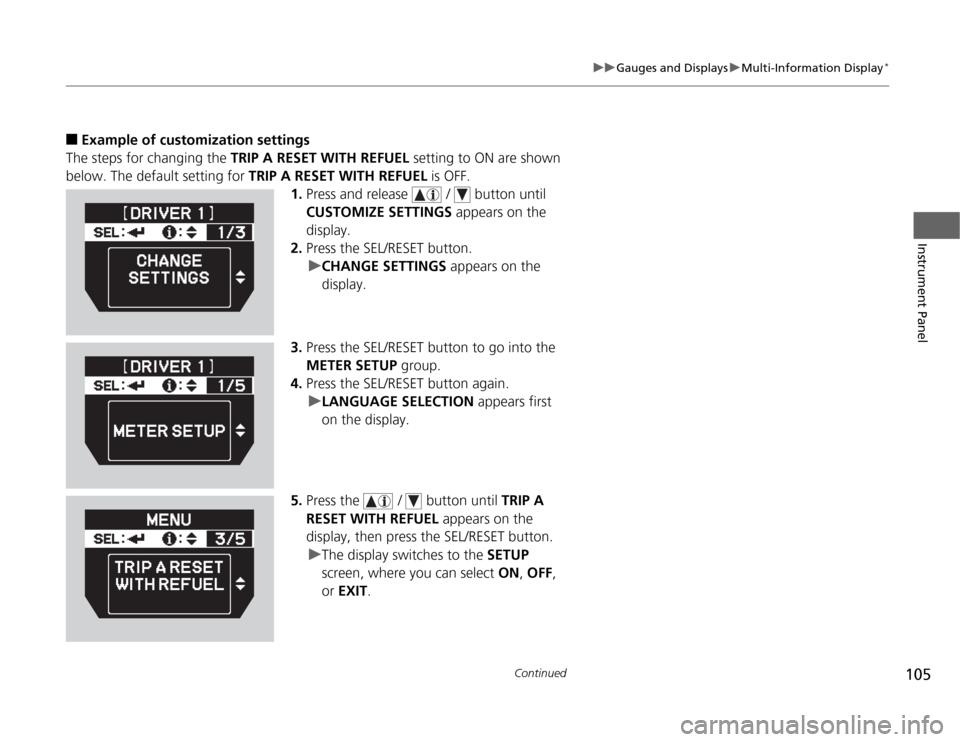
Example of customization settings
The steps for changing the TRIP A RESET WITH REFUEL setting to ON are shown
below. The default setting for TRIP A RESET WITH REFUEL is OFF.
1.Press and release / button until
CUSTOMIZE SETTINGS appears on the
display.
2.Press the SEL/RESET button.
uCHANGE SETTINGS appears on the
display.
3.Press the SEL/RESET button to go into the
METER SETUP group.
4.Press the SEL/RESET button again.
uLANGUAGE SELECTION appears first
on the display.
5.Press the / button until TRIP A
RESET WITH REFUEL appears on the
display, then press the SEL/RESET button.
uThe display switches to the SETUP
screen, where you can select ON, OFF,
or EXIT.
Page 107 of 441
106
uuGauges and DisplaysuMulti-Information Display
*
Instrument Panel
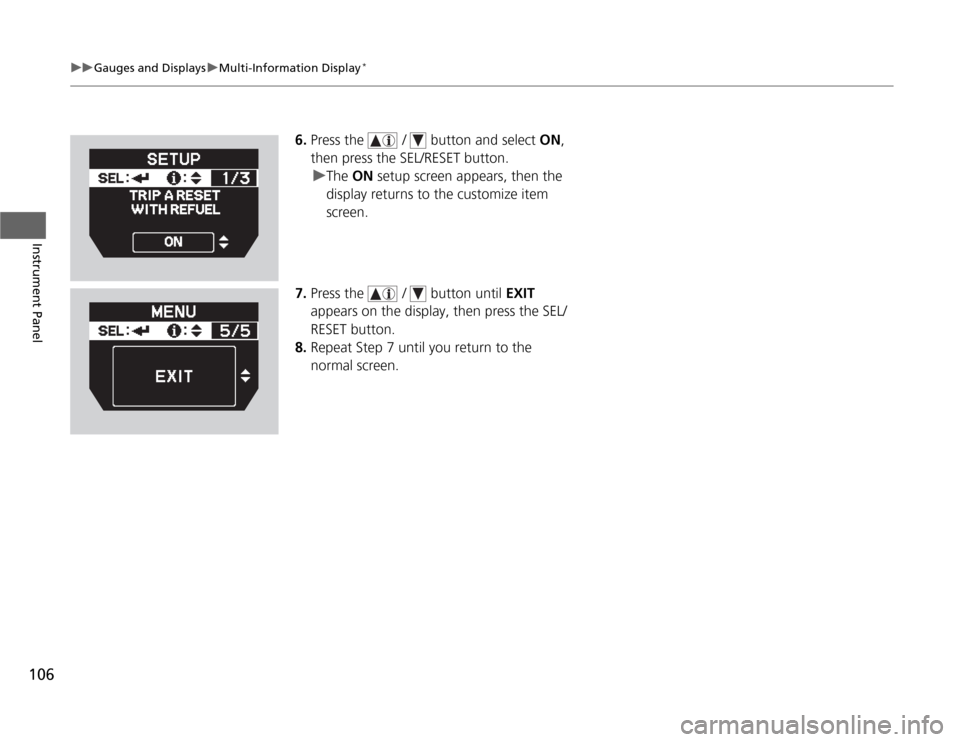
6.Press the / button and select ON,
then press the SEL/RESET button.
uThe ON setup screen appears, then the
display returns to the customize item
screen.
7.Press the / button until EXIT
appears on the display, then press the SEL/
RESET button.
8.Repeat Step 7 until you return to the
normal screen.
Page 108 of 441
107
Controls
This chapter explains how to operate the various controls necessary for driving.
Setting the Clock.............................. 108
Locking and Unlocking the Doors
Key Types and Functions .................. 110
Locking/Unlocking the Doors from the
Outside .......................................... 112
Locking/Unlocking the Doors from the
Inside ............................................. 114
Childproof Door Locks ..................... 115
Auto Door Locking/Unlocking .......... 116
Opening and Closing the Tailgate... 120Opening and Closing the Sliding Doors
...... 126
Security System................................ 134
Immobilizer System .......................... 134
Security System Alarm
*.................... 134
Opening and Closing the Windows.... 137Opening and Closing the Moonroof
*...... 140
Operating the Switches Around the
Steering Wheel
Ignition Switch ................................. 141
Turn Signals ..................................... 142
Light Switches.................................. 142
Fog Lights
*...................................... 144
Daytime Running Lights ................... 144
Wipers and Washers ........................ 145
Brightness Control ........................... 147
Rear Defogger/Heated Door Mirror
*
Button ........................................... 148
Driving Position Memory System
*.... 149
Adjusting the Steering Wheel........... 151Adjusting the Mirrors....................... 152
Interior Rearview Mirror ................... 152
Power Door Mirrors ......................... 153
Adjusting the Seats.......................... 154
Adjusting the Seat Positions ............. 154
Interior Lights/Interior Convenience
Items................................................ 169
Interior Lights .................................. 169
Interior Convenience Items .............. 171
Heating and Cooling
*....................... 183
Using Vents, Heating and A/C.......... 183
Climate Control System*.................. 187
Using Automatic Climate Control .... 187
Automatic Climate Control Sensors . 192
* Not available on all models
Page 109 of 441
108Controls
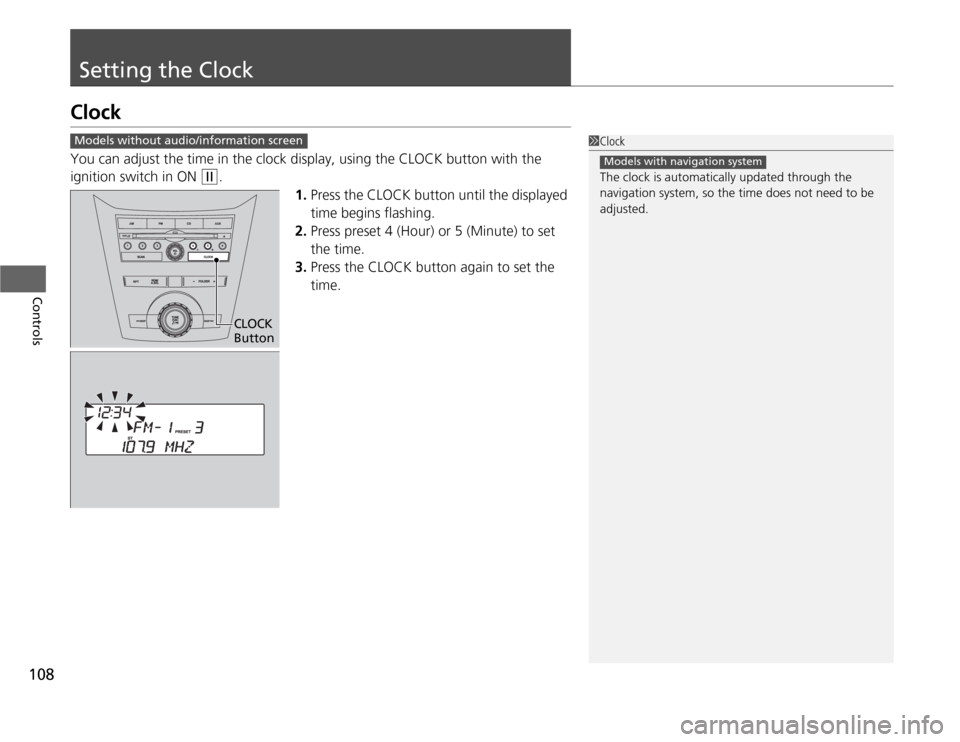
Setting the ClockClockYou can adjust the time in the clock display, using the CLOCK button with the
ignition switch in ON
(w
.
1.Press the CLOCK button until the displayed
time begins flashing.
2.Press preset 4 (Hour) or 5 (Minute) to set
the time.
3.Press the CLOCK button again to set the
time.
1Clock
The clock is automatically updated through the
navigation system, so the time does not need to be
adjusted.
Models with navigation system
Models without audio/information screen
CLOCK
Button
Page 110 of 441
109
uuSetting the ClockuClock
Controls
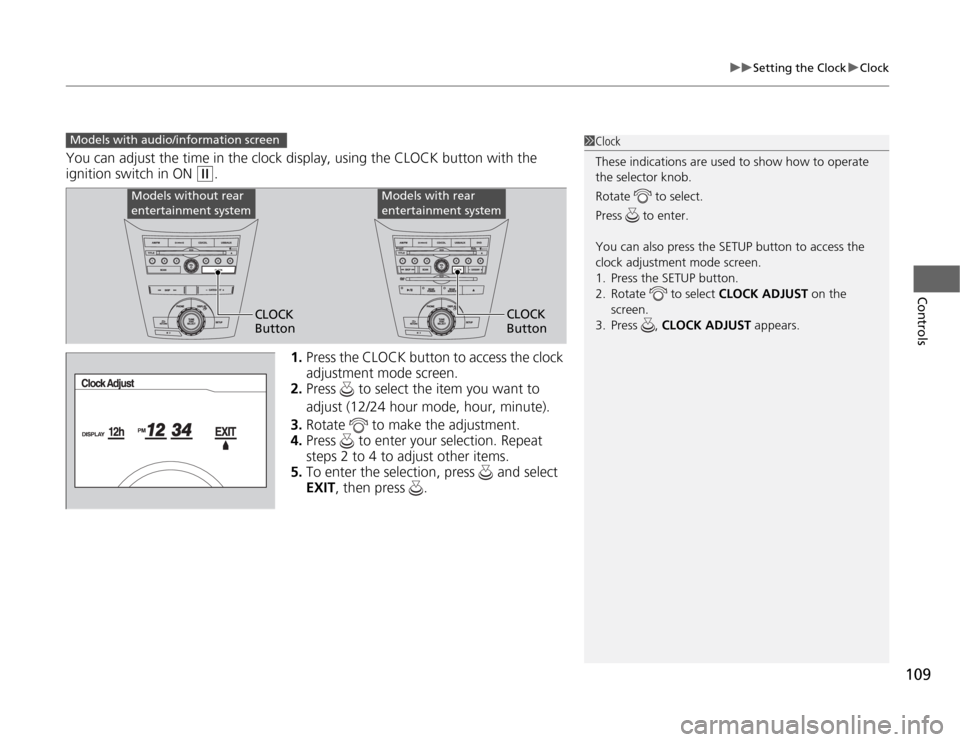
You can adjust the time in the clock display, using the CLOCK button with the
ignition switch in ON
(w
.
1.Press the CLOCK button to access the clock
adjustment mode screen.
2.Press to select the item you want to
adjust (12/24 hour mode, hour, minute).
3.Rotate to make the adjustment.
4.Press to enter your selection. Repeat
steps 2 to 4 to adjust other items.
5.To enter the selection, press and select
EXIT, then press .
Models with audio/information screen
1Clock
These indications are used to show how to operate
the selector knob.
Rotate to select.
Press to enter.
You can also press the SETUP button to access the
clock adjustment mode screen.
1. Press the SETUP button.
2. Rotate to select CLOCK ADJUST on the
screen.
3. Press , CLOCK ADJUST appears.
Models without rear
entertainment system
Models with rear
entertainment system
CLOCK
ButtonCLOCK
Button