display HONDA ODYSSEY 2013 RC1-RC2 / 5.G Navigation Manual
[x] Cancel search | Manufacturer: HONDA, Model Year: 2013, Model line: ODYSSEY, Model: HONDA ODYSSEY 2013 RC1-RC2 / 5.GPages: 267, PDF Size: 8.64 MB
Page 2 of 267
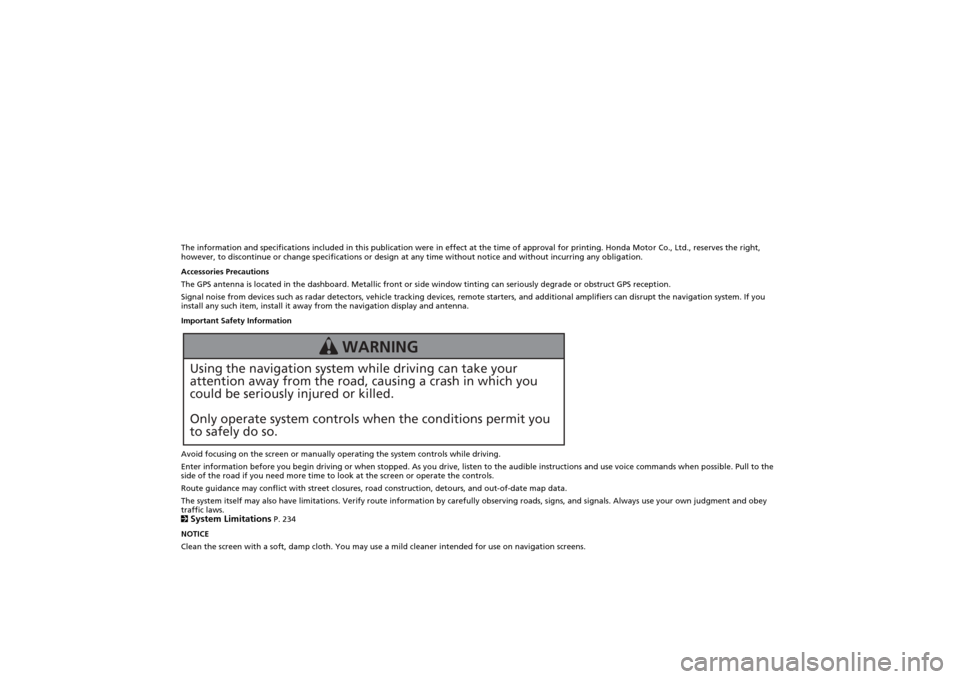
The information and specifications included in this publication were in effect at the time of approval for printing. Honda Motor Co., Ltd., reserves the right,
however, to discontinue or change specifications or design at any time without notice and without incurring any obligation.
Accessories Precautions
The GPS antenna is located in the dashboard. Metallic front or side window tinting can seriously degrade or obstruct GPS recept ion.
Signal noise from devices such as radar detectors, vehicle tracking devices, remote starters, and additional amplifiers can dis rupt the navigation system. If you
install any such item, install it away from the navigation display and antenna.
Important Safety Information
Avoid focusing on the screen or manually operating the system controls while driving.
Enter information before you begin driving or when stopped. As yo u drive, listen to the audible instructions and use voice commands when possible. Pull to the
side of the road if you need more time to look at the screen or operate the controls.
Route guidance may conflict with street closures, road construction, detours, and out-of-date map data.
The system itself may also have limitations. Verify route info rmation by carefully observing roads, signs, and signals. Always use your own judgment and obey
traffic laws.
2System Limitations
P. 234
NOTICE
Clean the screen with a soft, damp cloth. You may us e a mild cleaner intended for use on navigation screens.
Using the navigation system while driving can take your
attention away from the road, causing a crash in which you
could be seriously injured or killed.
Only operate system controls when the conditions permit you
to safely do so.
WARNING
Page 6 of 267
4Quick Reference Guide
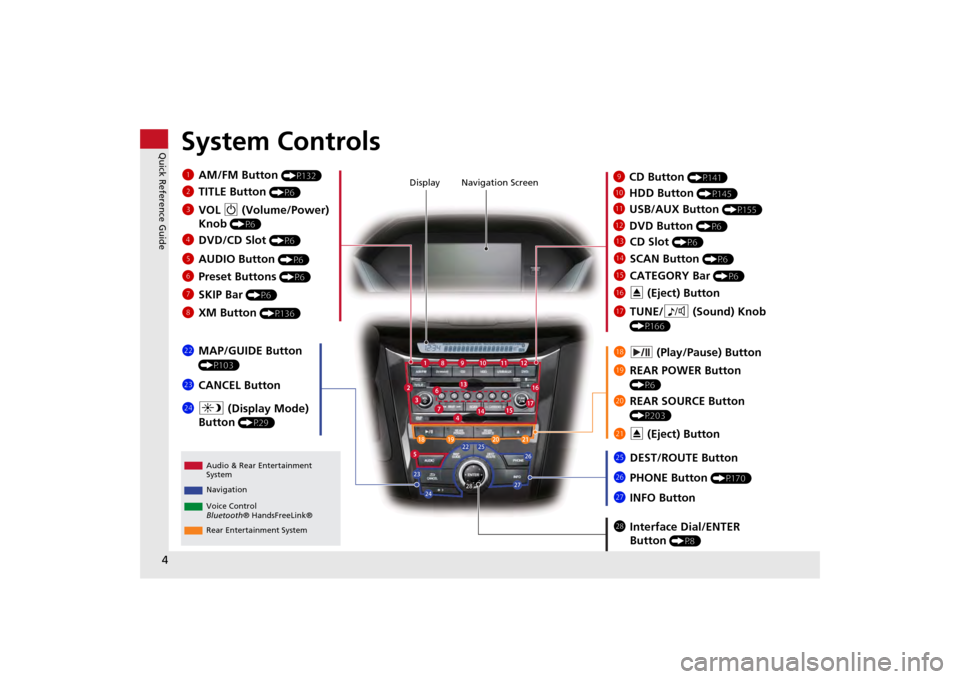
System Controls
laHDD Button
(P145)
Display
lc
DVD Button
(P6)
ljREAR POWER Button
(P6)
lfCATEGORY Bar
(P6)
1 AM/FM Button
(P132)
lbUSB/AUX Button
(P155)
lhTUNE/ 8 (Sound) Knob
(P166)
li (Play/Pause) Button
2TITLE Button
(P6)
4DVD/CD Slot
(P6)
mea (Display Mode)
Button
(P29)
md CANCEL Button
miInterface Dial/ENTER
Button
(P8)
lgE (Eject) Button
9
CD Button
(P141)
Navigation Screen
Audio & Rear Entertainment
System
Navigation
Voice Control
Bluetooth ® HandsFreeLink®
maREAR SOURCE Button
(P203)
ldCD Slot
(P6)
leSCAN Button
(P6)
mhINFO Button
mc
MAP/GUIDE Button
(P103)
3VOL 9 (Volume/Power)
Knob
(P6)
5 AUDIO Button
(P6)
6Preset Buttons
(P6)
7SKIP Bar
(P6)
8XM Button
(P136)
mgPHONE Button
(P170)
mfDEST/ROUTE Button
mb
E (Eject) Button
Rear Entertainment System
Page 7 of 267
5Quick Reference Guide
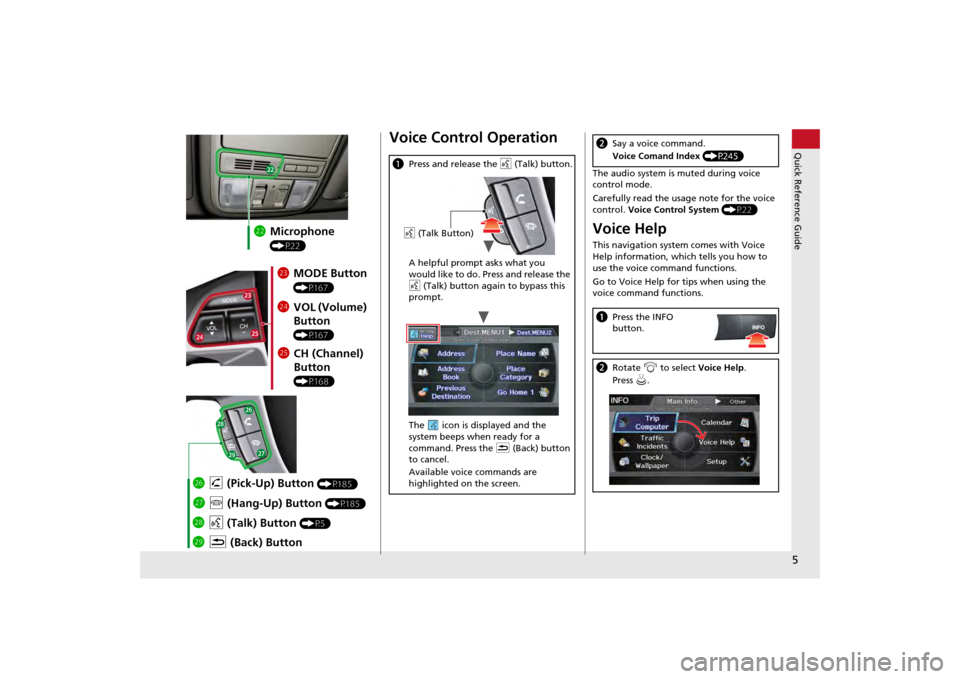
mcMicrophone
(P22)mdMODE Button
(P167)
meVOL (Volume)
Button
(P167)
mfCH (Channel)
Button
(P168)
mj K (Back) Button
mi
d (Talk) Button
(P5)
mh j (Hang-Up) Button
(P185)
mg h (Pick-Up) Button
(P185)
Voice Control Operationa Press and release the d (Talk) button.
A helpful prompt asks what you
would like to do. Press and release the
d (Talk) button again to bypass this
prompt.
The icon is displayed and the
system beeps when ready for a
command. Press the K (Back) button
to cancel.
Available voice commands are
highlighted on the screen.d (Talk Button)
The audio system is muted during voice
control mode.
Carefully read the usage note for the voice
control. Voice Control System (P22)Voice HelpThis navigation system comes with Voice
Help information, which tells you how to
use the voice command functions.
Go to Voice Help for tips when using the
voice command functions.bSay a voice command.
Voice Comand Index (P245)aPress the INFO
button.bRotate i to select Voice Help .
Press u.
Page 8 of 267
6Quick Reference Guide
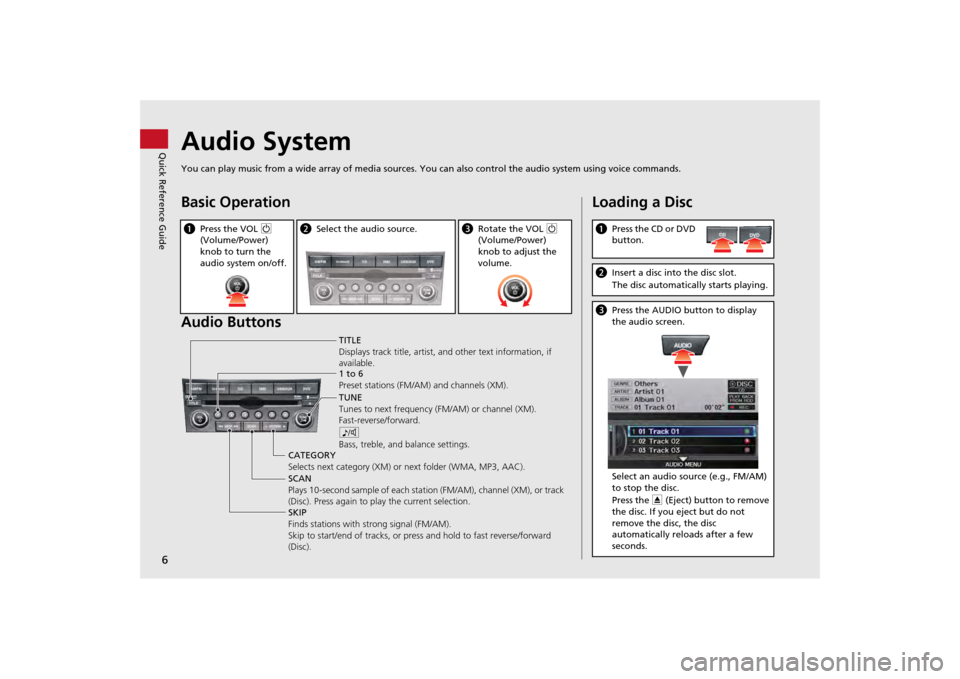
Audio SystemYou can play music from a wide array of media sources. You can also control the audio system using voice commands.Basic Operation
Audio ButtonsaPress the VOL 9
(Volume/Power)
knob to turn the
audio system on/off.
b Select the audio source.
cRotate the VOL 9
(Volume/Power)
knob to adjust the
volume.
TITLE
Displays track title, artist, and other text information, if
available.
8
Bass, treble, and balance settings.
1 to 6
Preset stations (FM/AM) and channels (XM).
SKIP
Finds stations with strong signal (FM/AM).
Skip to start/end of tracks, or press and hold to fast reverse/forward
(Disc). SCAN
Plays 10-second sample of each stat ion (FM/AM), channel (XM), or track
(Disc). Press again to play the current selection. TUNE
Tunes to next frequency
(FM/AM) or channel (XM).
Fast-reverse/forward.
CATEGORY
Selects next category (XM) or next folder (WMA, MP3, AAC).
Loading a DiscaPress the CD or DVD
button.bInsert a disc into the disc slot.
The disc automatically starts playing.cPress the AUDIO button to display
the audio screen.
Select an audio source (e.g., FM/AM)
to stop the disc.
Press the E (Eject) button to remove
the disc. If you eject but do not
remove the disc, the disc
automatically reloads after a few
seconds.
Page 9 of 267
7Quick Reference Guide
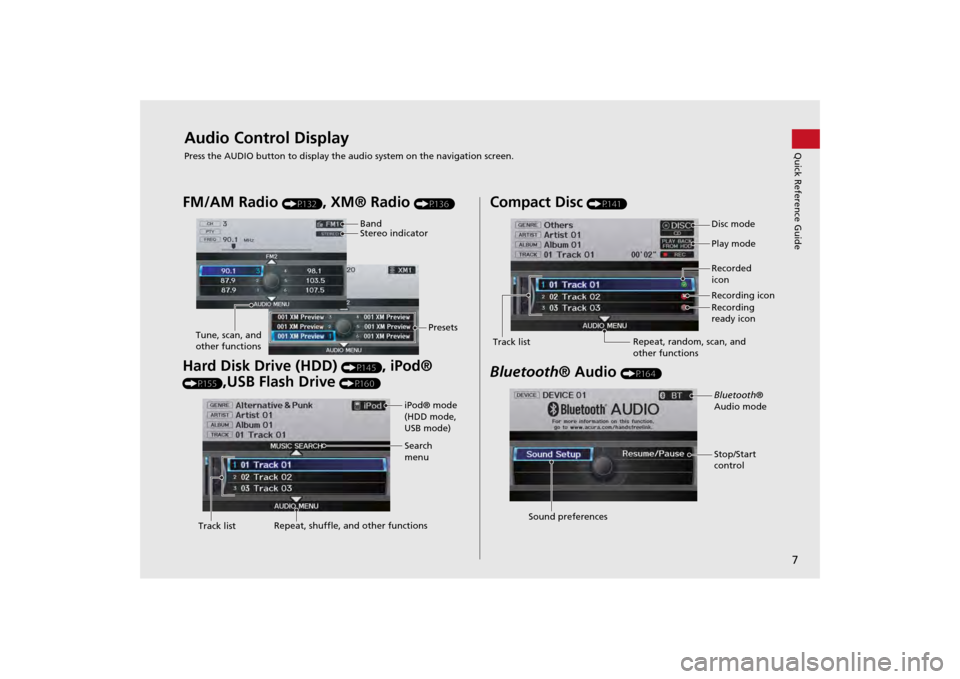
Audio Control DisplayPress the AUDIO button to display the audio system on the navigation screen.FM/AM Radio
(P132)
, XM® Radio
(P136)
Hard Disk Drive (HDD)
(P145)
, iPod®
(P155)
,USB Flash Drive
(P160)
Band
Stereo indicatorPresets
Tune, scan, and
other functions
iPod® mode
(HDD mode,
USB mode)
Search
menu
Track list Repeat, shuffle, and other functions
Compact Disc
(P141)
Bluetooth
® Audio
(P164)
Disc mode
Play mode
Recorded
icon
Recording icon
Recording
ready icon
Repeat, random, scan, and
other functions
Track listBluetooth®
Audio mode
Stop/Start
control
Sound preferences
Page 11 of 267
9Quick Reference Guide
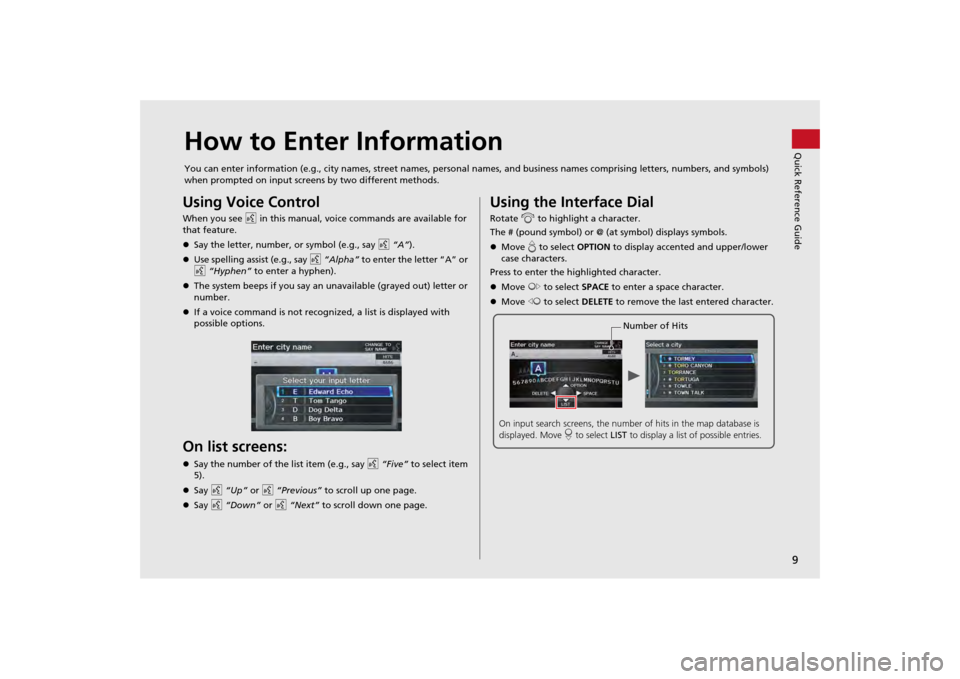
How to Enter InformationYou can enter information (e.g., city names, street names, personal names, and business names comprising letters, numbers, and symbols)
when prompted on input screens by two different methods.Using Voice ControlWhen you see d in this manual, voice commands are available for
that feature.
Say the letter, number, or symbol (e.g., say d “A”).
Use spelling assist (e.g., say d “Alpha” to enter the letter “A” or
d “Hyphen” to enter a hyphen).
The system beeps if you say an unavailable (grayed out) letter or
number.
If a voice command is not recognized, a list is displayed with
possible options.On list screens:Say the number of the list item (e.g., say d “Five” to select item
5).
Say d “Up” or d “Previous” to scroll up one page.
Say d “Down” or d “Next” to scroll down one page.
Using the Interface DialRotate i to highlight a character.
The # (pound symbol) or @ (a t symbol) displays symbols.
Move e to select OPTION to display accented and upper/lower
case characters.
Press to enter the highlighted character.
Move y to select SPACE to enter a space character.
Move w to select DELETE to remove the last entered character.
Number of Hits
On input search screens, the number of hits in the map database is
displayed. Move r to select LIST to display a list of possible entries.
Page 13 of 267
11Quick Reference Guide
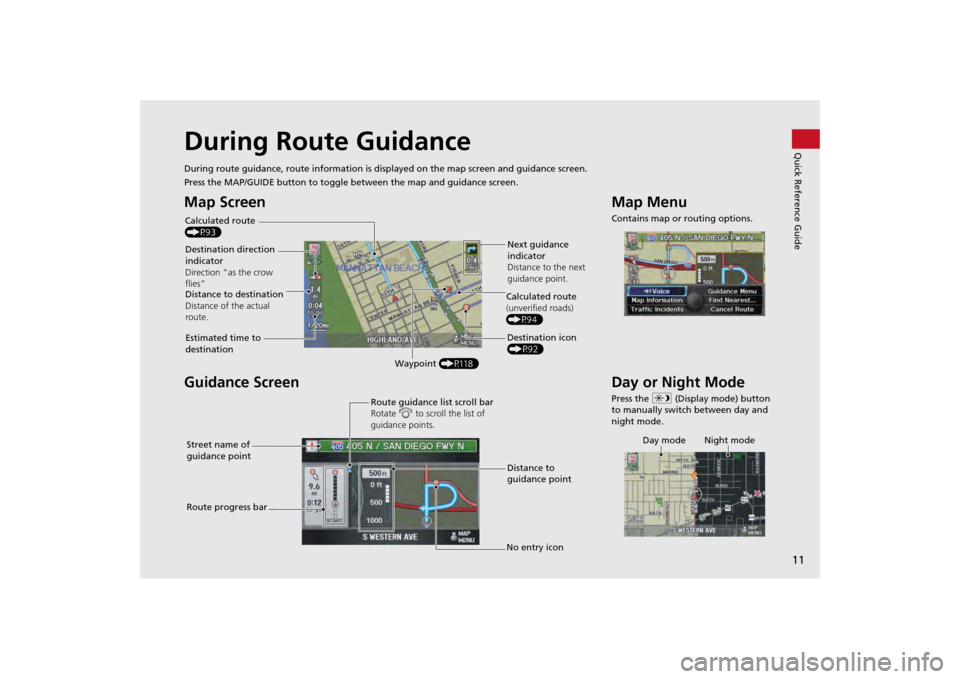
During Route GuidanceDuring route guidance, route information is displayed on the ma p screen and guidance screen.
Press the MAP/GUIDE button to toggle between the map and guidance screen.Map Screen
Guidance ScreenCalculated route
(P93)
Destination direction
indicator
Direction “as the crow
flies” Next guidance
indicator
Distance to the next
guidance point.
Distance to destination
Distance of the actual
route.
Estimated time to
destination Waypoint (P118) Destination icon
(P92)
Calculated route
(unverified roads)
(P94)Street name of
guidance point Route guidance list scroll bar
Rotate
i to scroll the list of
guidance points.
Route progress bar Distance to
guidance point
No entry icon
Map MenuContains map or routing options.Day or Night ModePress the a (Display mode) button
to manually switch between day and
night mode.
Day mode Night mode
Page 14 of 267
12Quick Reference Guide
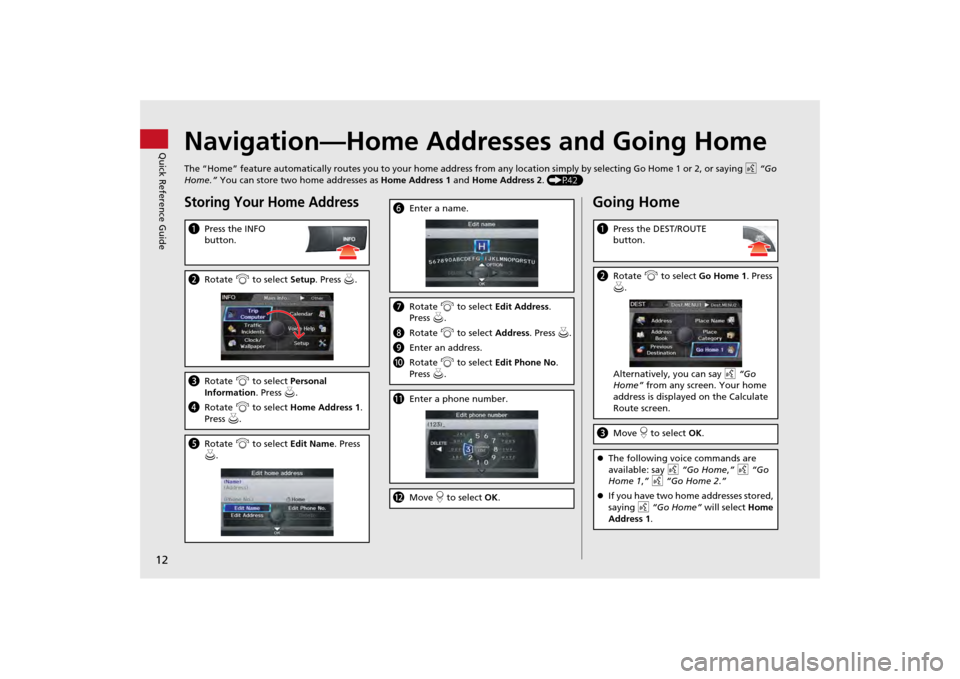
Navigation—Home Addresses and Going HomeThe “Home” feature automatically routes you to your home address from any location simply by selecting Go Home 1 or 2, or saying d “Go
Home.” You can store two home addresses as Home Address 1 and Home Address 2. (P42)Storing Your Home AddressaPress the INFO
button.bRotate i to select Setup . Press u.cRotate i to select Personal
Information . Press u.
d Rotate i to select Home Address 1.
Press u.e Rotate i to select Edit Name. Press
u .
f Enter a name.gRotate i to select Edit Address .
Press u.
h Rotate i to select Address. Press u.
i Enter an address.
j Rotate i to select Edit Phone No .
Press u.k Enter a phone number.lMove r to select OK .
Going HomeaPress the DEST/ROUTE
button.bRotate i to select Go Home 1. Press
u .
Alternatively, you can say d “Go
Home” from any screen. Your home
address is displayed on the Calculate
Route screen.c Move r to select OK.The following voice commands are
available: say d “Go Home ,” d “Go
Home 1 ,” d “Go Home 2.”
If you have two home addresses stored,
saying d “Go Home” will select Home
Address 1.
Page 15 of 267
13Quick Reference Guide
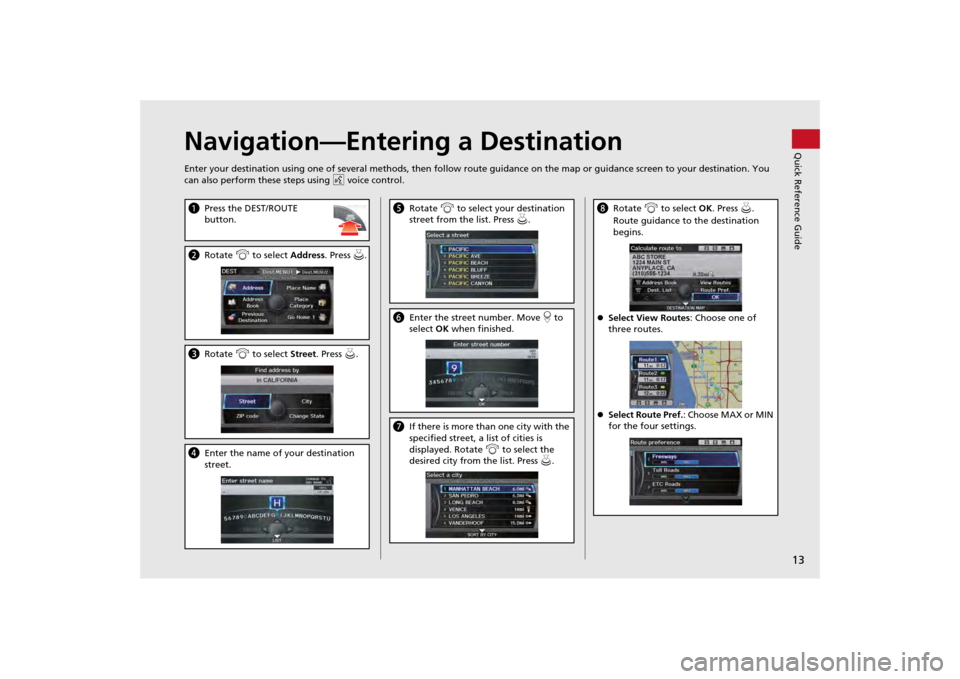
Navigation—Entering a DestinationEnter your destination using one of several methods, then follow route guidance on the map or guidance screen to your destinati on. You
can also perform these steps using d voice control.a Press the DEST/ROUTE
button.bRotate i to select Address . Press u.cRotate i to select Street . Press u.dEnter the name of your destination
street.
eRotate i to select your destination
street from the list. Press u.f Enter the street number. Move r to
select OK when finished.g If there is more than one city with the
specified street, a list of cities is
displayed. Rotate i to select the
desired city from the list. Press u.
h Rotate i to select OK . Press u.
Route guidance to the destination
begins.
Select View Routes : Choose one of
three routes.
Select Route Pref. : Choose MAX or MIN
for the four settings.
Page 17 of 267
15Quick Reference Guide
Rear Entertainment System
(P189)
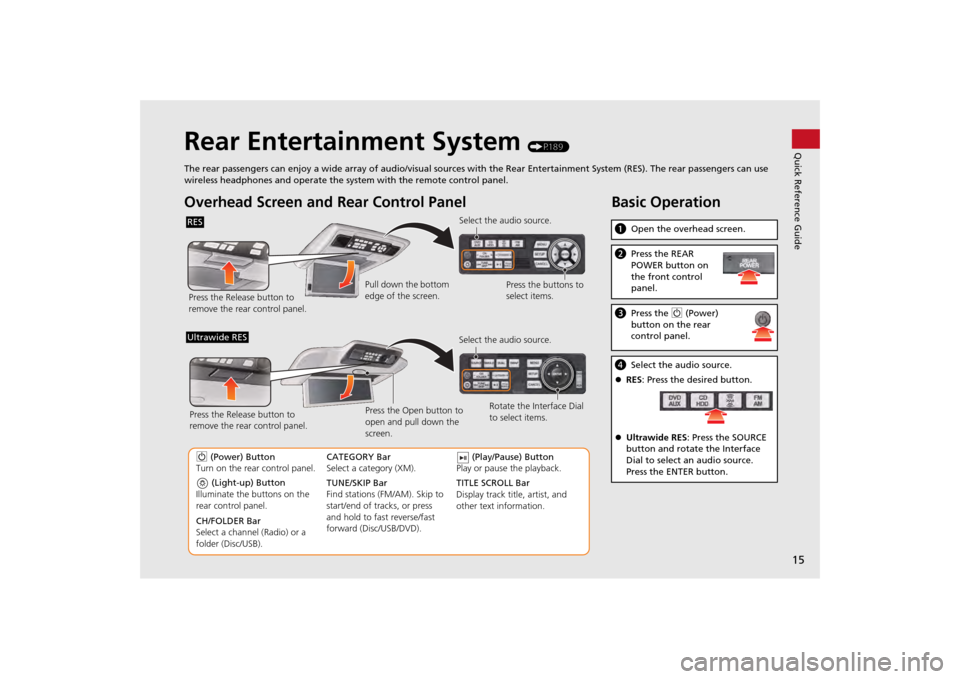
The rear passengers can enjoy a wide array of audio/visual sources with the Rear Entertainment System (RES). The rear passengers can use
wireless headphones and operate the system with the remote control panel.
Overhead Screen and Rear Control PanelRESPress the Release button to
remove the rear control panel. Select the audio source.
Press the buttons to
select items.
Pull down the bottom
edge of the screen.
(Light-up) Button
Illuminate the buttons on the
rear control panel.
9 (Power) Button
Turn on the rear control panel.
CH/FOLDER Bar
Select a channel (Radio) or a
folder (Disc/USB). TUNE/SKIP Bar
Find stations (FM/AM). Skip to
start/end of tracks, or press
and hold to fast reverse/fast
forward (Disc/USB/DVD). CATEGORY Bar
Select a category (XM).
(Play/Pause) Button
Play or pause the playback.
TITLE SCROLL Bar
Display track title, artist, and
other text information. Select the audio source.
Rotate the Interface Dial
to select items.
Ultrawide RES
Press the Open button to
open and pull down the
screen.
Press the Release button to
remove the rear control panel.
Basic Operationa
Open the overhead screen.bPress the REAR
POWER button on
the front control
panel.cPress the 9 (Power)
button on the rear
control panel.d Select the audio source.
RES : Press the desired button.
Ultrawide RES : Press the SOURCE
button and rotate the Interface
Dial to select an audio source.
Press the ENTER button.