bluetooth HONDA ODYSSEY 2015 RC1-RC2 / 5.G Quick Guide
[x] Cancel search | Manufacturer: HONDA, Model Year: 2015, Model line: ODYSSEY, Model: HONDA ODYSSEY 2015 RC1-RC2 / 5.GPages: 80, PDF Size: 10.54 MB
Page 2 of 80
Devices That Emit Radio WavesThe following products and systems on your vehicle emit radio waves when\
in
operation:
•
Audio system • Immobilizer system
• Bluetooth® Audio • Remote transmitter
• Bluetooth® HandsFreeLink® • Smart Entry System
• HomeLink® Universal Transceiver • Tire Pressure Monitoring System
Each of the above complies with the appropriate requirements or the required
standards of the FCC (Federal Communications Commission) and Industry Canada,
described below:
As required by the FCC:
This device complies with Part 15 of the FCC rules. Operation is subject to the
following two conditions: (1) This device may not cause harmful interference, and
(2) this device must accept any interference received, including interference that
may cause undesired operation.
Changes or modifications not expressly approved by the party responsible for
compliance could void the user’s authority to operate the equipment.
As required by Industry Canada:
This device complies with Industry Canada Standard RSS-Gen/210/310.
Operation is subject to the following two conditions: (1) this device may not
cause interference, and (2) this device must accept any interference, including
interference that may cause undesired operation of the device.
California Perchlorate Contamination Prevention Act
The airbags, seat belt tensioners, and CR-type batteries in this vehicle may
contain perchlorate materials—special handling may apply. See www.dtsc.
ca.gov/hazardouswaste/perchlorate/ for more information.
California Proposition 65 Warning
WARNING: This product contains or emits chemicals known to the state of
California to cause cancer and birth defects or other reproductive harm.
DISCLOSURES
Event Data RecordersThis vehicle is equipped with an event data recorder (EDR). The main purpose of
an EDR is to record, in certain crash or near crash-like situations, such as an air
bag deployment or hitting a road obstacle, data that will assist in understanding
how a vehicle’s systems performed. The EDR is designed to record data related to
vehicle dynamics and safety systems for a short period of time, typicall\
y
30 seconds or less. The EDR in this vehicle is designed to record such d\
ata as:
• How various systems in your vehicle were operating;
• Whether or not the driver and passenger safety belts were buckled/fasten\
ed;
• How far (if at all) the driver was depressing the accelerator and/or b\
rake
pedal; and,
• How fast the vehicle was traveling.
These data can help provide a better understanding of the circumstances in
which crashes and injuries occur. NOTE: EDR data are recorded by your vehicle
only if a non-trivial crash situation occurs; no data are recorded by the EDR under
normal driving conditions and no personal data (e.g., name, gender, age, and
crash location) are recorded. However, other parties, such as law enforcement,
could combine the EDR data with the type of personally identifying data routinely
acquired during a crash investigation.
To read data recorded by an EDR, special equipment is required, and access to
the vehicle or the EDR is needed. In addition to the vehicle manufacturer, other
parties such as law enforcement that have the special equipment can read the
information if they have access to the vehicle or the EDR.
The data belong to the vehicle owner and may not be accessed by anyone else
except as legally required or with the permission of the vehicle owner.
Service Diagnostic Recorders
This vehicle is equipped with service-related devices that record information
about powertrain performance. The data can be used to verify emissions law
requirements and/or help technicians diagnose and solve service problems. It may
also be combined with data from other sources for research purposes, but
it remains confidential.
Page 3 of 80
Honda Automobile Customer Service
Your authorized Honda dealer should be able to answer any questions you have
about your vehicle. However, if you are dissatisfied with the information you receive,
you can call Honda Automobile Customer Service (see page 141).
Honda Roadside Assistance
24-hour emergency road service is available to you in the United States and Canada
throughout your 3-year/36,000-mile warranty term. Services include jump starting,
flat tire and lockout assistance, towing, and more (limitations apply\
).
This Owner’s Guide is intended to help you quickly get acquainted with your 2015
Honda Odyssey. It provides basic information and instructions on technology and
convenience features, as well as emergency procedures and how to get ass\
istance.
This guide is for vehicles sold in the United States and Canada. It covers all Odyssey
models, so you may find descriptions of features and equipment that are not in your
vehicle. Images throughout this guide are from U.S. vehicles and represent features
and equipment that are available on some, but not all, models.
This guide is not intended to be a substitute for the Owner’s Manual. The Owner
Information CD enclosed in your glove box kit includes the Owner’s Manual,
Navigation Manual, and vehicle and tire warranties in electronic format.\
This
information can be viewed on a computer (PC or Mac platform) and saved or printed
for your reference. You can also visit owners.honda.com (U.S.) or myhonda.ca
(Canada) to view the complete and most current information.
If you are the first registered owner of your vehicle, you may request a complimentary
printed copy of the Owner’s Manual, Navigation Manual, or Vehicle Warranty within
the first six months of vehicle purchase. To request a copy, visit owners.honda.com
and create or log in to your account. In Canada, please request a copy from your
Honda dealer.
American Honda Motor Company strives to be proactive in protecting our
environment and natural resources. By using electronic delivery for a considerable
portion of the information typically found in a vehicle owner’s manual, we are further
reducing our impact on the environment.
INTRODUCTIONTABLE OF CONTENTS
Call (800) 999-1009 (U.S.) or (888) 946-6329 (Canada)
Call (866) 864-5211 (U.S) or (800) 465-7587 (Canada)
*if equipped
VISUAL INDEX .......................................1
Steering Wheel and Nearby Controls ...1
Dashboard and Ceiling Controls
........2
SAFETY INFORMATION
........................3
Important Safety Information
..............3
Seat Belts
...............................................5
Airbags
....................................................9
Child Safety
..........................................15
Safety Label Locations
.......................22
Reporting Safety Defects
...................23
INSTRUMENT PANEL
.........................24
Malfunction Indicators
......................24
Condition Indicators
...........................26
On/Off Indicators
.................................27
Information Display*
..........................28
Multi-Information Display*
...............29
VEHICLE CONTROLS
...........................30
Using the Key or Remote Transmitter
...30
Smart Entry System*
...........................31
Power Tailgate Operation*
...............32
Door Operation
....................................33
Power Window Operation
................36
Power Moonroof Operation*
...........37
Interior and Exterior Lights
...............38
One-Touch Turn Signal
.......................39
Wiper Operation
..................................40
Adjusting the Seats
............................41
Rear Seats
...........................................44
Driving Position Memory System*
...47
Adjusting the Steering Wheel
..........47
Adjusting the Mirrors
.........................48
HomeLink
® Garage Opener* .............49
HondaVAC
®* ........................................50
Cool Box*
.............................................51 Air Conditioning System*
.................52
Climate Control System*
..................53
Seat Heaters*
......................................54
Customized Features
..........................55
AUDIO AND CONNECTIVITY
.............56
Basic Audio Operation
.......................56
Models with one display
Intelligent Multi-Information Display
(i-MID)
...................................................58
FM/AM Radio
.......................................59
Compact Disc (CD)
..............................60
iPod
® or USB Flash Drive ...................61
Bluetooth
® Audio ................................62
Pandora
® ..............................................63
Models with two displays
Intelligent Multi-Information Display
(i-MID)
...................................................64
Touchscreen Operation
.....................65
FM/AM Radio
......................................66
SiriusXM
® Radio .................................67
Compact Disc (CD)
.............................68
Hard Disc Drive (HDD) Audio
..........69
iPod
® or USB Flash Drive .................70
Bluetooth
® Audio ................................71
Pandora
® ..............................................72
HondaLink featuring Aha™
...............73
Rear Entertainment System (RES)*
...74
BLUETOOTH
® HANDSFREELINK®..... 78
Basic HFL Operation
...........................78
Pairing a Phone
...................................80
Making a Call
......................................81
SMS Text Messaging and E-Mail*
...83
NAVIGATION*
......................................84
Basic Navigation Operation
.............84
Page 32 of 80
56 || 57
AUDIO AND CONNECTIVITY
AUDIO AND CONNECTIVITY
Basic Audio Operation
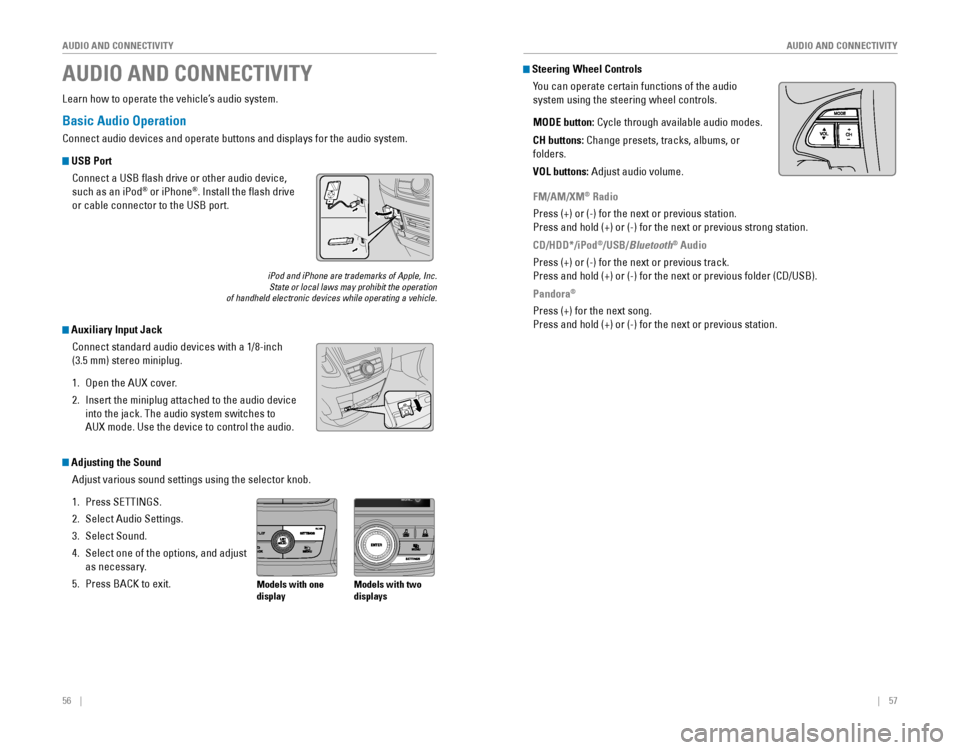
Connect audio devices and operate buttons and displays for the audio system.
USB Port
Connect a USB flash drive or other audio device,
such as an iPod
® or iPhone®. Install the flash drive
or cable connector to the USB port.
Auxiliary Input Jack
Connect standard audio devices with a 1/8-inch
(3.5 mm) stereo miniplug.
1. Open the AUX cover.
2. Insert the miniplug attached to the audio device
into the jack. The audio system switches to
AUX mode. Use the device to control the audio.
iPod and iPhone are trademarks of Apple, Inc.State or local laws may prohibit the operation of handheld electronic devices while operating a vehicle.
AUDIO AND CONNECTIVITY
Learn how to operate the vehicle’s audio system.
Adjusting the Sound
Adjust various sound settings using the selector knob.
1. Press SETTINGS.
2. Select Audio Settings.
3. Select Sound.
4. Select one of the options, and adjust
as necessary.
5. Press BACK to exit.Models with one
display Models with two
displays
Steering Wheel Controls
You can operate certain functions of the audio
system using the steering wheel controls.
MODE button:
Cycle through available audio modes.
CH buttons: Change presets, tracks, albums, or
folders.
VOL buttons: Adjust audio volume.
FM/AM/XM® Radio
Press (+) or (-) for the next or previous station.
Press and hold (+) or (-) for the next or previous strong station.
CD/HDD*/iPod
®/USB/Bluetooth® Audio
Press (+) or (-) for the next or previous track.
Press and hold (+) or (-) for the next or previous folder (CD/USB).
Pandora®
Press (+) for the next song.
Press and hold (+) or (-) for the next or previous station.
Page 35 of 80
62 || 63
AUDIO AND CONNECTIVITY
AUDIO AND CONNECTIVITY
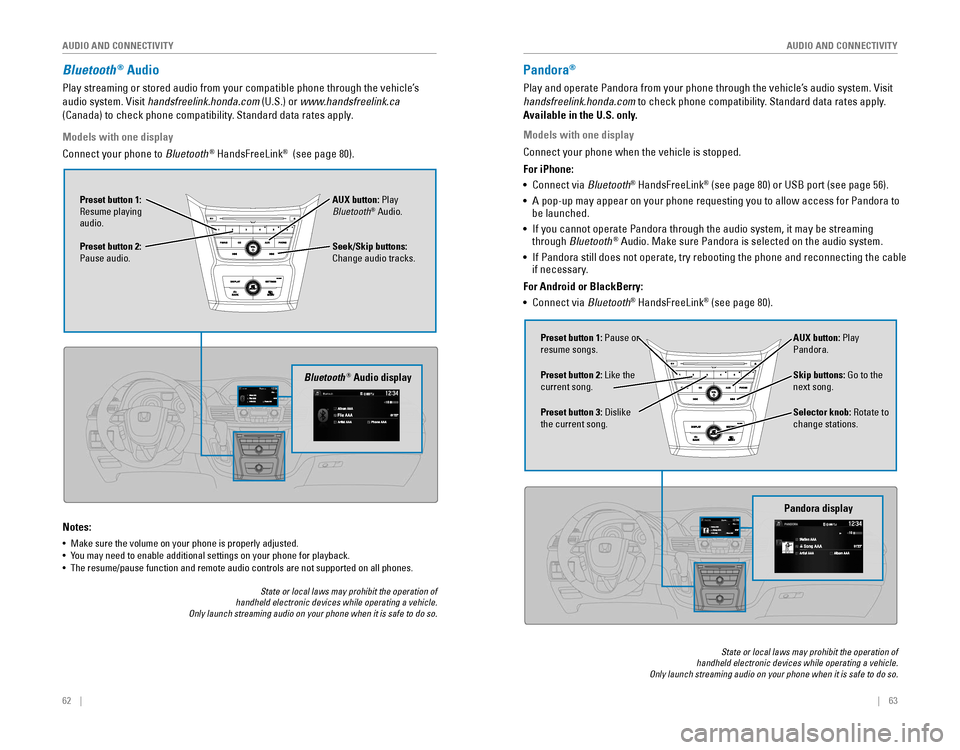
Bluetooth® Audio
Play streaming or stored audio from your compatible phone through the vehicle’s
audio system. Visit handsfreelink.honda.com (U.S.) or www.handsfreelink.ca
(Canada) to check phone compatibility. Standard data rates apply.
Notes:
• Make sure the volume on your phone is properly adjusted.
• You may need to enable additional settings on your phone for playback.• The resume/pause function and remote audio controls are not supported on all phones.
Seek/Skip buttons:
Change audio tracks. AUX button: Play
Bluetooth
® Audio.
Preset button 1:
Resume playing
audio.
Preset button 2:
Pause audio.
Bluetooth® Audio display
Models with one display
Connect your phone to Bluetooth® HandsFreeLink® (see page 80).
State or local laws may prohibit the operation of handheld electronic devices while operating a vehicle. Only launch streaming audio on your phone when it is safe to do so.
Pandora®
Play and operate Pandora from your phone through the vehicle’s audio system. Visit
handsfreelink.honda.com
to check phone compatibility. Standard data rates apply.
Available in the U.S. only.
Skip buttons: Go to the
next song.
Selector knob: Rotate to
change stations. AUX button: Play
Pandora.
Preset button 1: Pause or
resume songs.
Preset button 3:
Dislike the current song. Preset button 2: Like the
current song.
Pandora display
State or local laws may prohibit the operation of handheld electronic devices while operating a vehicle. Only launch streaming audio on your phone when it is safe to do so.
Models with one display
Connect your phone when the vehicle is stopped.
For iPhone:
•
Connect via Bluetooth
® HandsFreeLink® (see page 80) or USB port (see page 56).
• A pop-up may appear on your phone requesting you to allow access for Pandora to be launched.
• If you cannot operate Pandora through the audio system, it may be streaming through Bluetooth® Audio. Make sure Pandora is selected on the audio system.
•
If Pandora still does not operate, try rebooting the phone and reconnecting the cable if necessary.
For Android or BlackBerry:
• Connect via Bluetooth
® HandsFreeLink® (see page 80).
Page 39 of 80
70 || 71
AUDIO AND CONNECTIVITY
AUDIO AND CONNECTIVITY
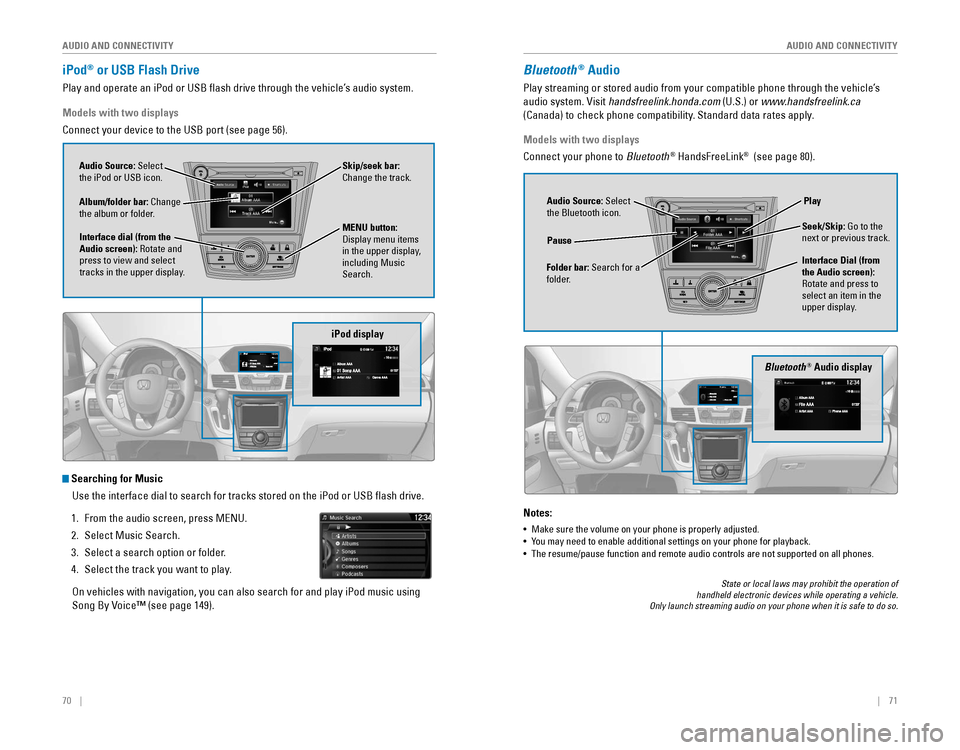
iPod® or USB Flash Drive
Play and operate an iPod or USB flash drive through the vehicle’s audio system.
iPod display
Audio Source: Select
the iPod or USB icon.
Album/folder bar: Change
the album or folder.
MENU button: Display menu items in the upper display,
including Music
Search.
Interface dial (from the
Audio screen): Rotate and
press to view and select
tracks in the upper display. Skip/seek bar:
Change the track.
Models with two displays
Connect your device to the USB port (see page 56).
Searching for Music
Use the interface dial to search for tracks stored on the iPod or USB fl\
ash drive.
1. From the audio screen, press MENU.
2. Select Music Search.
3. Select a search option or folder.
4. Select the track you want to play.
On vehicles with navigation, you can also search for and play iPod music using
Song By Voice™ (see page 149).
Bluetooth® Audio display
Audio Source: Select
the Bluetooth icon.
Folder bar: Search for a
folder. Pause
Interface Dial (from
the Audio screen):
Rotate and press to
select an item in the
upper display.Play
Seek/Skip: Go to the
next or previous track.
Bluetooth® Audio
Play streaming or stored audio from your compatible phone through the vehicle’s
audio system. Visit handsfreelink.honda.com (U.S.) or www.handsfreelink.ca
(Canada) to check phone compatibility. Standard data rates apply.
Notes:
• Make sure the volume on your phone is properly adjusted.
• You may need to enable additional settings on your phone for playback.• The resume/pause function and remote audio controls are not supported on all phones.
Models with two displays
Connect your phone to Bluetooth
® HandsFreeLink® (see page 80).
State or local laws may prohibit the operation of handheld electronic devices while operating a vehicle. Only launch streaming audio on your phone when it is safe to do so.
Page 40 of 80
72 || 73
AUDIO AND CONNECTIVITY
AUDIO AND CONNECTIVITY
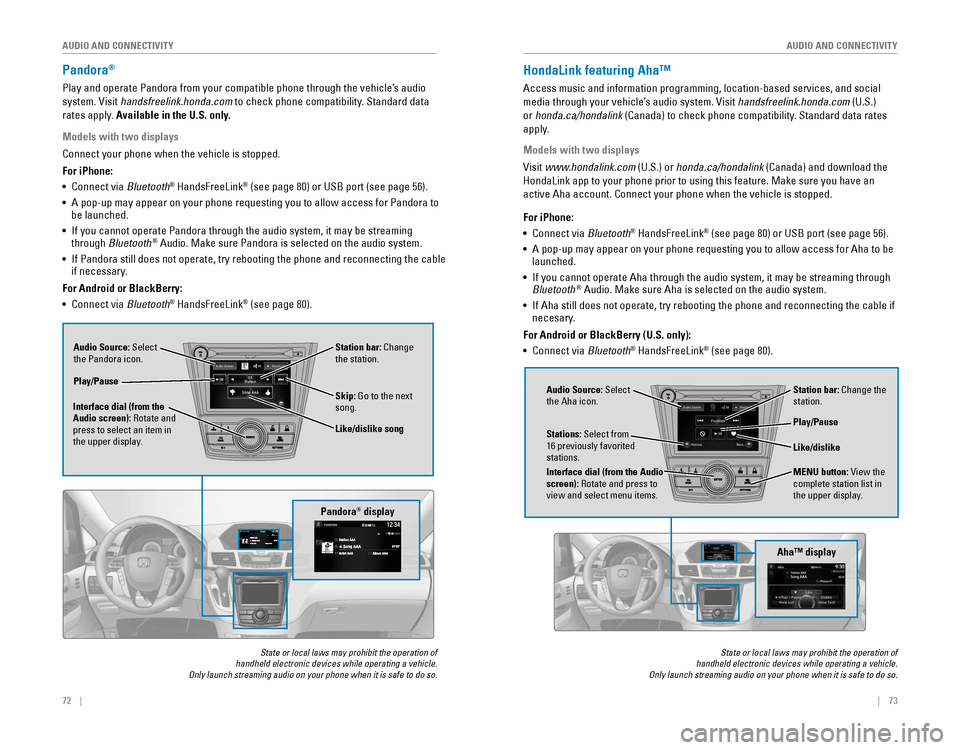
Pandora®
Play and operate Pandora from your compatible phone through the vehicle’s audio
system. Visit handsfreelink.honda.com to check phone compatibility. Standard data
rates apply. Available in the U.S. only.
Audio Source: Select
the Pandora icon. Station bar: Change
the station.
Like/dislike song
Play/Pause
Interface dial (from the
Audio screen): Rotate and
press to select an item in
the upper display. Skip: Go to the next
song.
Models with two displays
Connect your phone when the vehicle is stopped.
For iPhone:
•
Connect via Bluetooth
® HandsFreeLink® (see page 80) or USB port (see page 56).
• A pop-up may appear on your phone requesting you to allow access for Pandora to be launched.
• If you cannot operate Pandora through the audio system, it may be streaming through Bluetooth® Audio. Make sure Pandora is selected on the audio system.
•
If Pandora still does not operate, try rebooting the phone and reconnecting the cable if necessary.
For Android or BlackBerry:
• Connect via Bluetooth
® HandsFreeLink® (see page 80).
Pandora® display
State or local laws may prohibit the operation of handheld electronic devices while operating a vehicle. Only launch streaming audio on your phone when it is safe to do so.
HondaLink featuring Aha™
Access music and information programming, location-based services, and social
media through your vehicle’s audio system. Visit handsfreelink.honda.com (U.S.)
or honda.ca/hondalink
(Canada) to check phone compatibility. Standard data rates
apply.
Models with two displays
Visit www.hondalink.com (U.S.) or honda.ca/hondalink (Canada) and download the
HondaLink app to your phone prior to using this feature. Make sure you h\
ave an
active Aha account. Connect your phone when the vehicle is stopped.
Audio Source: Select
the Aha icon. Station bar: Change the
station.
MENU button: View the
complete station list in
the upper display.
Like/dislike
Play/Pause
Interface dial (from the Audio
screen): Rotate and press to
view and select menu items.
Stations: Select from
16 previously favorited stations.
State or local laws may prohibit the operation of handheld electronic devices while operating a vehicle. Only launch streaming audio on your phone when it is safe to do so.
For iPhone:
•
Connect via Bluetooth® HandsFreeLink® (see page 80) or USB port (see page 56).
• A pop-up may appear on your phone requesting you to allow access for Aha to be launched.
•
If you cannot operate Aha through the audio system, it may be streaming through Bluetooth® Audio. Make sure Aha is selected on the audio system.
•
If Aha still does not operate, try rebooting the phone and reconnecting the cable if necesary.
For Android or BlackBerry (U.S. only):
• Connect via Bluetooth
® HandsFreeLink® (see page 80).
Aha™ display
Page 43 of 80
78 || 79
Learn how to operate the vehicle’s hands-free calling system.
Basic HFL Operation
Make and receive phone calls using the vehicle’s audio system, without handling
your phone. Visit handsfreelink.honda.com (U.S.) or www.handsfreelink.ca (Canada)
to check phone compatibility.
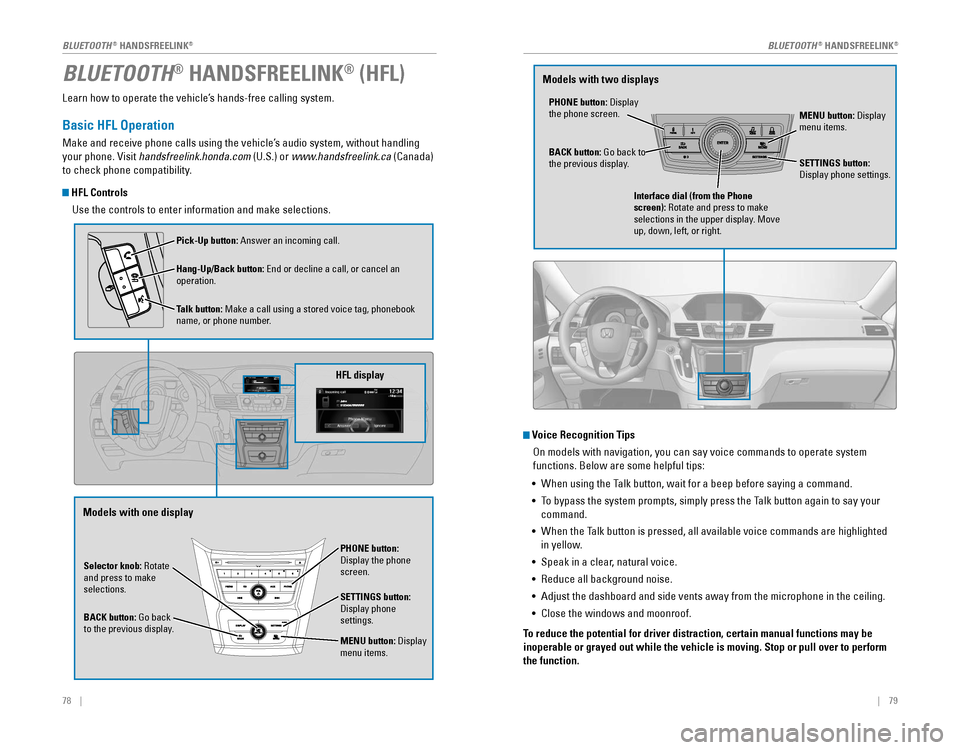
HFL Controls
Use the controls to enter information and make selections.
BLUETOOTH® HANDSFREELINK® (HFL)
Selector knob: Rotate
and press to make
selections.
BACK button:
Go back to the previous display.
PHONE button: Display the phone screen.
SETTINGS button: Display phone settings.
MENU button: Display menu items.
HFL display
Pick-Up button: Answer an incoming call.
Hang-Up/Back button:
End or decline a call, or cancel an operation.
Talk button:
Make a call using a stored voice tag, phonebook name, or phone number.
Voice Recognition Tips On models with navigation, you can say voice commands to operate system
functions. Below are some helpful tips:
•
When using the Talk button, wait for a beep before saying a command.
• To bypass the system prompts, simply press the Talk button again to say your
command.
•
When the Talk button is pressed, all available voice commands are highlighted
in yellow.
• Speak in a clear, natural voice.
•
Reduce all background noise.
• Adjust the dashboard and side vents away from the microphone in the ceiling.
• Close the windows and moonroof.
To reduce the potential for driver distraction, certain manual functions \
may be
inoperable or grayed out while the vehicle is moving. Stop or pull over \
to perform
the function.
PHONE button: Display the phone screen. MENU button: Display menu items.
BACK button:
Go back to the previous display. SETTINGS button: Display phone settings.
Interface dial (from the Phone
screen): Rotate and press to make
selections in the upper display. Move
up, down, left, or right.
Models with one display Models with two displays
BLUETOOTH® HANDSFREELINK®BLUETOOTH® HANDSFREELINK®
Page 44 of 80
80 || 81
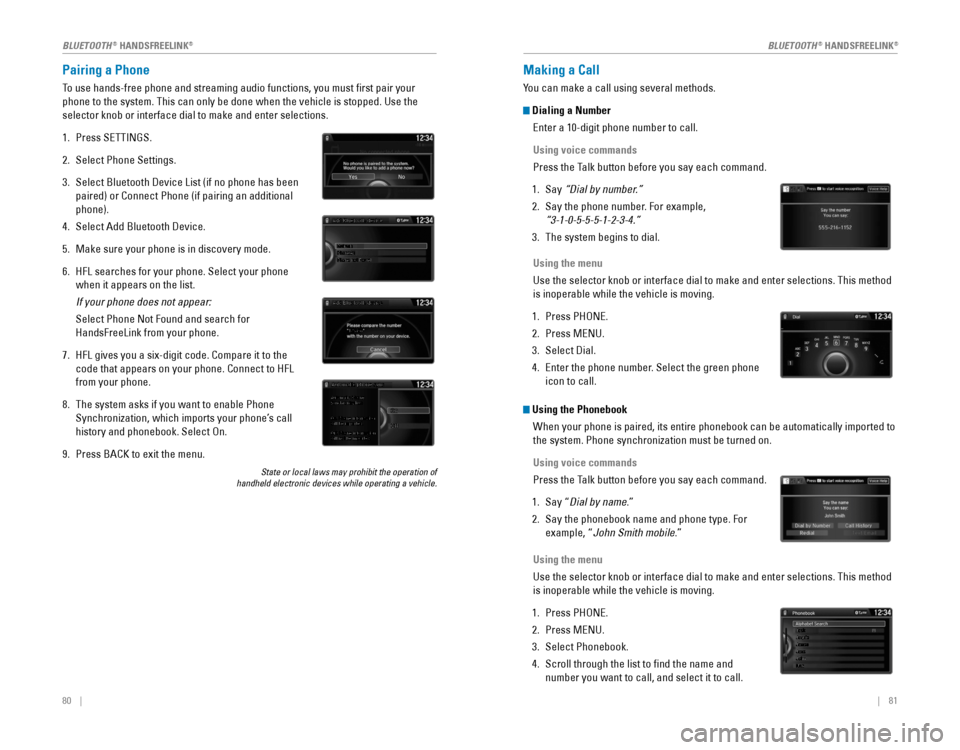
Pairing a Phone
To use hands-free phone and streaming audio functions, you must first p\
air your
phone to the system. This can only be done when the vehicle is stopped. Use the
selector knob or interface dial to make and enter selections.
1. Press SETTINGS.
2. Select Phone Settings.
3. Select Bluetooth Device List (if no phone has been
paired) or Connect Phone (if pairing an additional
phone).
4. Select Add Bluetooth Device.
5. Make sure your phone is in discovery mode.
6. HFL searches for your phone. Select your phone
when it appears on the list.
If your phone does not appear:
Select Phone Not Found and search for
HandsFreeLink from your phone.
7. HFL gives you a six-digit code. Compare it to the
code that appears on your phone. Connect to HFL
from your phone.
8. The system asks if you want to enable Phone
Synchronization, which imports your phone’s call
history and phonebook. Select On.
9. Press BACK to exit the menu.
State or local laws may prohibit the operation of handheld electronic devices while operating a vehicle.
Making a Call
You can make a call using several methods.
Dialing a Number
Enter a 10-digit phone number to call.
Using voice commands
Press the Talk button before you say each command.
1. Say “Dial by number.”
2. Say the phone number. For example,
“3-1-0-5-5-5-1-2-3-4.”
3. The system begins to dial.
Using the menu
Use the selector knob or interface dial to make and enter selections. This method
is inoperable while the vehicle is moving.
1. Press PHONE.
2. Press MENU.
3. Select Dial.
4. Enter the phone number. Select the green phone
icon to call.
Using the Phonebook
When your phone is paired, its entire phonebook can be automatically imported to
the system. Phone synchronization must be turned on.
Using voice commands
Press the Talk button before you say each command.
1. Say “Dial by name.”
2. Say the phonebook name and phone type. For
example, “John Smith mobile.”
Using the menu
Use the selector knob or interface dial to make and enter selections. This method
is inoperable while the vehicle is moving.
1. Press PHONE.
2. Press MENU.
3. Select Phonebook.
4. Scroll through the list to find the name and
number you want to call, and select it to call.
BLUETOOTH® HANDSFREELINK®BLUETOOTH® HANDSFREELINK®
Page 45 of 80
82 || 83
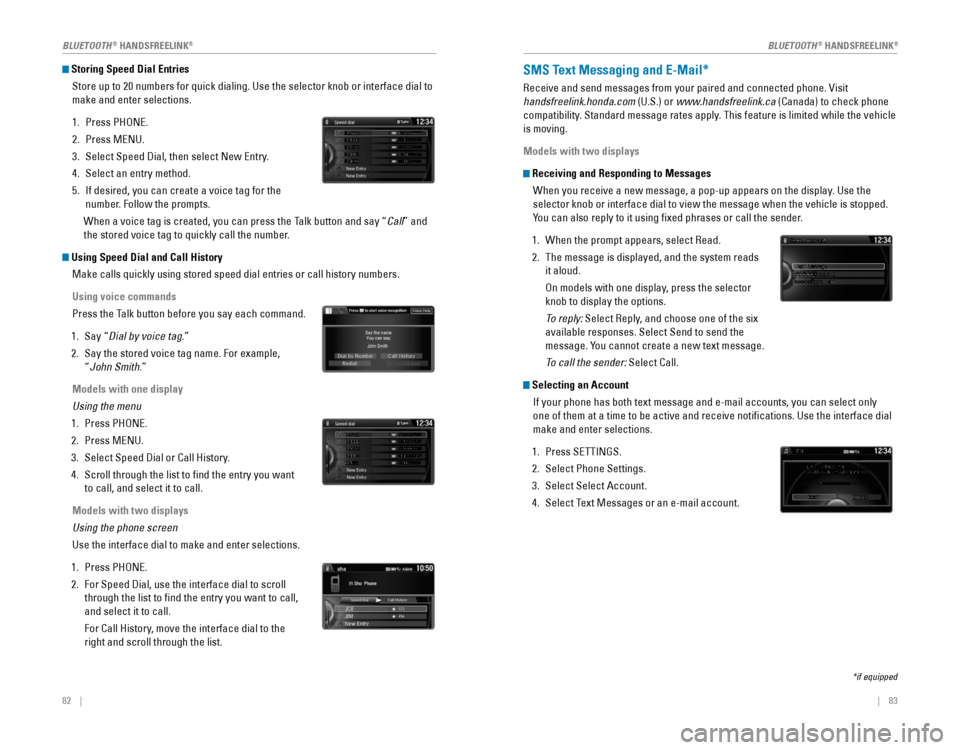
Storing Speed Dial Entries
Store up to 20 numbers for quick dialing. Use the selector knob or interface dial to
make and enter selections.
1. Press PHONE.
2. Press MENU.
3. Select Speed Dial, then select New Entry.
4. Select an entry method.
5. If desired, you can create a voice tag for the
number. Follow the prompts.
When a voice tag is created, you can press the Talk button and say “Call” and
the stored voice tag to quickly call the number.
Using Speed Dial and Call History
Make calls quickly using stored speed dial entries or call history numbers.
Using voice commands
Press the Talk button before you say each command.
1. Say “Dial by voice tag.”
2. Say the stored voice tag name. For example,
“
John Smith.”
Models with one display
Using the menu
1. Press PHONE.
2. Press MENU.
3. Select Speed Dial or Call History.
4. Scroll through the list to find the entry you want
to call, and select it to call.
Models with two displays
Using the phone screen
Use the interface dial to make and enter selections.
1. Press PHONE.
2. For Speed Dial, use the interface dial to scroll
through the list to find the entry you want to call,
and select it to call.
For Call History, move the interface dial to the
right and scroll through the list.
Mr.AAA111AAA####
555EEE#### 444DDD#### 333CCC####
222BBB####
Mr.EEE Mr.DDD
Mr.CCC
Mr.BBB
Mr.AAA111AAA####
555EEE#### 444DDD#### 333CCC####
222BBB####
Mr.EEE Mr.DDD
Mr.CCC
Mr.BBB
SMS Text Messaging and E-Mail*
Receive and send messages from your paired and connected phone. Visit
handsfreelink.honda.com (U.S.) or www.handsfreelink.ca (Canada) to check phone
compatibility. Standard message rates apply. This feature is limited while the vehicle
is moving.
Models with two displays
Receiving and Responding to Messages When you receive a new message, a pop-up appears on the display. Use the
selector knob or interface dial to view the message when the vehicle is stopped.
You can also reply to it using fixed phrases or call the sender.
1. When the prompt appears, select Read.
2. The message is displayed, and the system reads
it aloud.
On models with one display, press the selector
knob to display the options.
To reply: Select Reply, and choose one of the six
available responses. Select Send to send the
message. You cannot create a new text message.
To call the sender: Select Call.
Selecting an Account
If your phone has both text message and e-mail accounts, you can select only
one of them at a time to be active and receive notifications. Use the interface dial
make and enter selections.
1. Press SETTINGS.
2. Select Phone Settings.
3. Select Select Account.
4. Select Text Messages or an e-mail account.
*if equipped
BLUETOOTH® HANDSFREELINK®BLUETOOTH® HANDSFREELINK®
Page 47 of 80
86 || 87
NAVIGATION
NAVIGATION
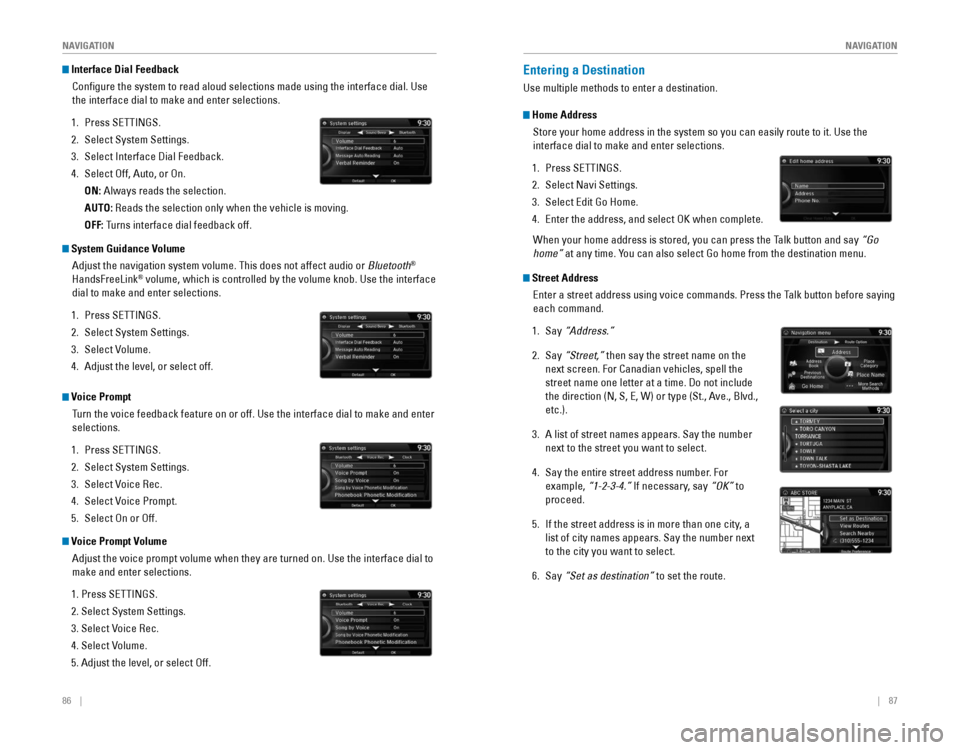
Interface Dial Feedback
Configure the system to read aloud selections made using the interface\
dial. Use
the interface dial to make and enter selections.
1. Press SETTINGS.
2. Select System Settings.
3. Select Interface Dial Feedback.
4. Select Off, Auto, or On.
ON: Always reads the selection.
AUTO: Reads the selection only when the vehicle is moving.
OFF: Turns interface dial feedback off.
System Guidance VolumeAdjust the navigation system volume. This does not affect audio or Bluetooth
®
HandsFreeLink® volume, which is controlled by the volume knob. Use the interface
dial to make and enter selections.
1. Press SETTINGS.
2. Select System Settings.
3. Select Volume.
4. Adjust the level, or select off.
Voice Prompt
Turn the voice feedback feature on or off. Use the interface dial to make and enter
selections.
1. Press SETTINGS.
2. Select System Settings.
3. Select Voice Rec.
4. Select Voice Prompt.
5. Select On or Off.
Voice Prompt Volume
Adjust the voice prompt volume when they are turned on. Use the interfac\
e dial to
make and enter selections.
1. Press SETTINGS.
2. Select System Settings.
3. Select Voice Rec.
4. Select Volume.
5. Adjust the level, or select Off.
Entering a Destination
Use multiple methods to enter a destination.
Home AddressStore your home address in the system so you can easily route to it. Use\
the
interface dial to make and enter selections.
1. Press SETTINGS.
2. Select Navi Settings.
3. Select Edit Go Home.
4. Enter the address, and select OK when complete.
When your home address is stored, you can press the Talk button and say “Go
home” at any time. You can also select Go home from the destination menu.
Street Address
Enter a street address using voice commands. Press the Talk button before saying
each command.
1. Say “Address.”
2. Say “Street,” then say the street name on the
next screen. For Canadian vehicles, spell the
street name one letter at a time. Do not include
the direction (N, S, E, W) or type (St., Ave., Blvd.,
etc.).
3. A list of street names appears. Say the number
next to the street you want to select.
4. Say the entire street address number. For
example, “1-2-3-4.” If necessary, say “OK” to
proceed.
5. If the street address is in more than one city, a
list of city names appears. Say the number next
to the city you want to select.
6. Say “Set as destination” to set the route.