tow HONDA ODYSSEY 2015 RC1-RC2 / 5.G Quick Guide
[x] Cancel search | Manufacturer: HONDA, Model Year: 2015, Model line: ODYSSEY, Model: HONDA ODYSSEY 2015 RC1-RC2 / 5.GPages: 80, PDF Size: 10.54 MB
Page 3 of 80
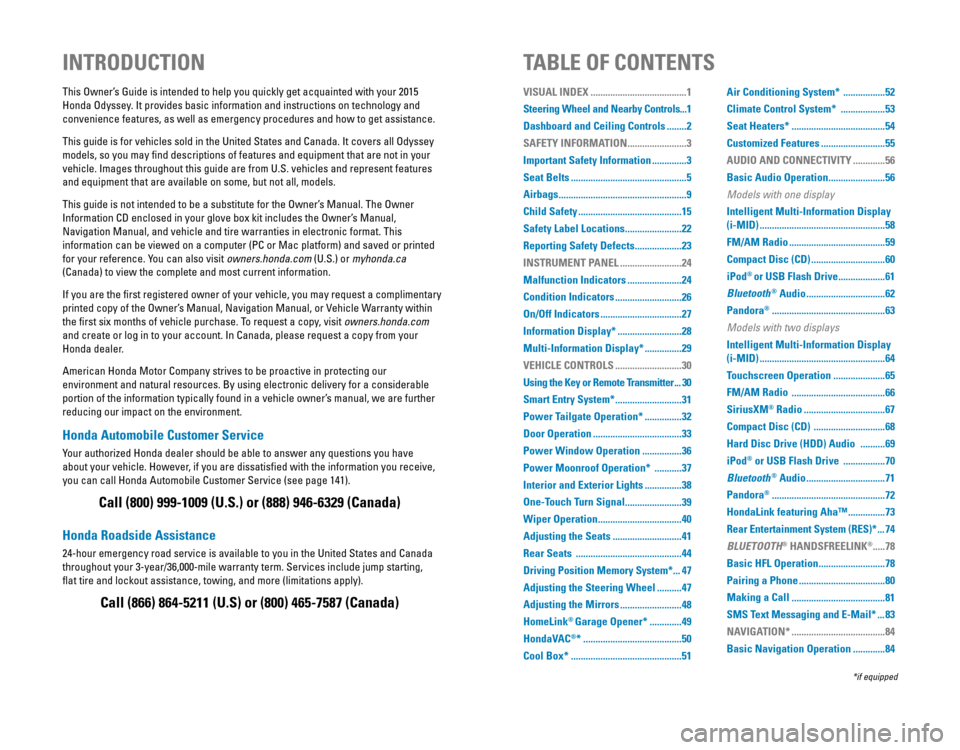
Honda Automobile Customer Service
Your authorized Honda dealer should be able to answer any questions you have
about your vehicle. However, if you are dissatisfied with the information you receive,
you can call Honda Automobile Customer Service (see page 141).
Honda Roadside Assistance
24-hour emergency road service is available to you in the United States and Canada
throughout your 3-year/36,000-mile warranty term. Services include jump starting,
flat tire and lockout assistance, towing, and more (limitations apply\
).
This Owner’s Guide is intended to help you quickly get acquainted with your 2015
Honda Odyssey. It provides basic information and instructions on technology and
convenience features, as well as emergency procedures and how to get ass\
istance.
This guide is for vehicles sold in the United States and Canada. It covers all Odyssey
models, so you may find descriptions of features and equipment that are not in your
vehicle. Images throughout this guide are from U.S. vehicles and represent features
and equipment that are available on some, but not all, models.
This guide is not intended to be a substitute for the Owner’s Manual. The Owner
Information CD enclosed in your glove box kit includes the Owner’s Manual,
Navigation Manual, and vehicle and tire warranties in electronic format.\
This
information can be viewed on a computer (PC or Mac platform) and saved or printed
for your reference. You can also visit owners.honda.com (U.S.) or myhonda.ca
(Canada) to view the complete and most current information.
If you are the first registered owner of your vehicle, you may request a complimentary
printed copy of the Owner’s Manual, Navigation Manual, or Vehicle Warranty within
the first six months of vehicle purchase. To request a copy, visit owners.honda.com
and create or log in to your account. In Canada, please request a copy from your
Honda dealer.
American Honda Motor Company strives to be proactive in protecting our
environment and natural resources. By using electronic delivery for a considerable
portion of the information typically found in a vehicle owner’s manual, we are further
reducing our impact on the environment.
INTRODUCTIONTABLE OF CONTENTS
Call (800) 999-1009 (U.S.) or (888) 946-6329 (Canada)
Call (866) 864-5211 (U.S) or (800) 465-7587 (Canada)
*if equipped
VISUAL INDEX .......................................1
Steering Wheel and Nearby Controls ...1
Dashboard and Ceiling Controls
........2
SAFETY INFORMATION
........................3
Important Safety Information
..............3
Seat Belts
...............................................5
Airbags
....................................................9
Child Safety
..........................................15
Safety Label Locations
.......................22
Reporting Safety Defects
...................23
INSTRUMENT PANEL
.........................24
Malfunction Indicators
......................24
Condition Indicators
...........................26
On/Off Indicators
.................................27
Information Display*
..........................28
Multi-Information Display*
...............29
VEHICLE CONTROLS
...........................30
Using the Key or Remote Transmitter
...30
Smart Entry System*
...........................31
Power Tailgate Operation*
...............32
Door Operation
....................................33
Power Window Operation
................36
Power Moonroof Operation*
...........37
Interior and Exterior Lights
...............38
One-Touch Turn Signal
.......................39
Wiper Operation
..................................40
Adjusting the Seats
............................41
Rear Seats
...........................................44
Driving Position Memory System*
...47
Adjusting the Steering Wheel
..........47
Adjusting the Mirrors
.........................48
HomeLink
® Garage Opener* .............49
HondaVAC
®* ........................................50
Cool Box*
.............................................51 Air Conditioning System*
.................52
Climate Control System*
..................53
Seat Heaters*
......................................54
Customized Features
..........................55
AUDIO AND CONNECTIVITY
.............56
Basic Audio Operation
.......................56
Models with one display
Intelligent Multi-Information Display
(i-MID)
...................................................58
FM/AM Radio
.......................................59
Compact Disc (CD)
..............................60
iPod
® or USB Flash Drive ...................61
Bluetooth
® Audio ................................62
Pandora
® ..............................................63
Models with two displays
Intelligent Multi-Information Display
(i-MID)
...................................................64
Touchscreen Operation
.....................65
FM/AM Radio
......................................66
SiriusXM
® Radio .................................67
Compact Disc (CD)
.............................68
Hard Disc Drive (HDD) Audio
..........69
iPod
® or USB Flash Drive .................70
Bluetooth
® Audio ................................71
Pandora
® ..............................................72
HondaLink featuring Aha™
...............73
Rear Entertainment System (RES)*
...74
BLUETOOTH
® HANDSFREELINK®..... 78
Basic HFL Operation
...........................78
Pairing a Phone
...................................80
Making a Call
......................................81
SMS Text Messaging and E-Mail*
...83
NAVIGATION*
......................................84
Basic Navigation Operation
.............84
Page 4 of 80
| 1
VISUAL INDEX
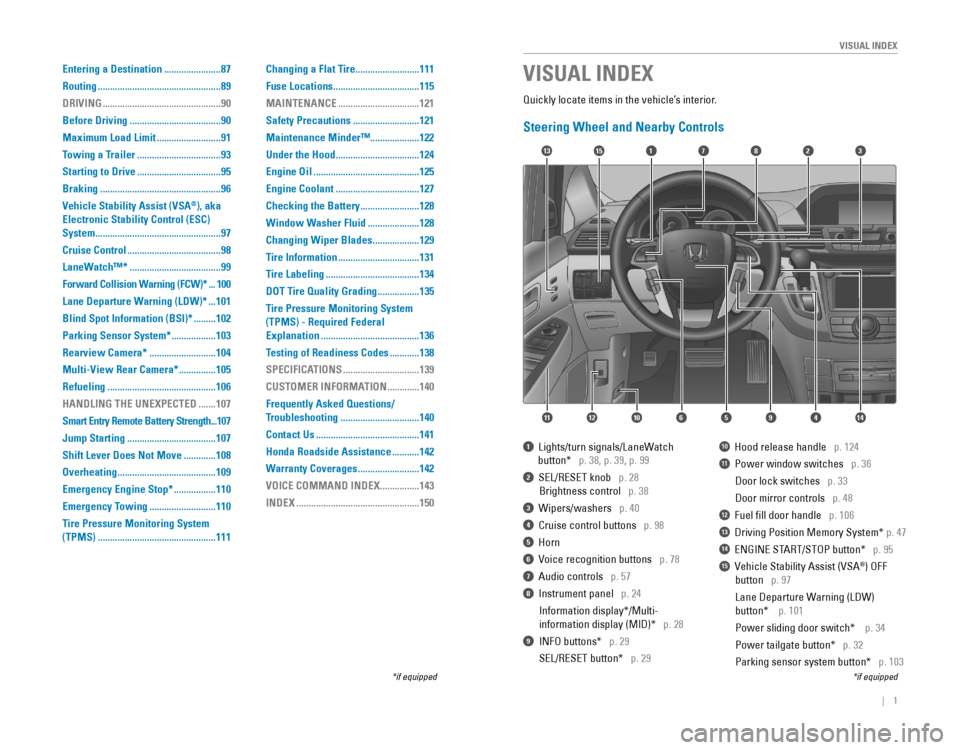
Quickly locate items in the vehicle’s interior.
Steering Wheel and Nearby Controls
17
4596111210
1513823
14
1 Lights/turn signals/LaneWatch
button* p. 38, p. 39, p. 99
2 SEL/RESET knob p. 28
Brightness control p. 38
3 Wipers/washers p. 40
4 Cruise control buttons p. 98
5 Horn
6 Voice recognition buttons p. 78
7 Audio controls p. 57
8 Instrument panel p. 24
Information display*/Multi-
information display (MID)* p. 28
9 INFO buttons* p. 29
SEL/RESET button* p. 29
10 Hood release handle p. 124
11 Power window switches p. 36
Door lock switches p. 33
Door mirror controls p. 48
12 Fuel fill door handle p. 106
13 Driving Position Memory System* p. 47
14 ENGINE START/STOP button* p. 95
15 Vehicle Stability Assist (VSA®) OFF
button p. 97
Lane Departure Warning (LDW)
button* p. 101
Power sliding door switch* p. 34
Power tailgate button* p. 32
Parking sensor system button* p. 103
VISUAL INDEX
*if equipped*if equipped
Entering a Destination .......................87
Routing
..................................................89
DRIVING
................................................90
Before Driving
.....................................90
Maximum Load Limit
..........................91
Towing a Trailer
..................................93
Starting to Drive
..................................95
Braking
.................................................96
Vehicle Stability Assist (VSA
®), aka
Electronic Stability Control (ESC)
System
...................................................97
Cruise Control
......................................98
LaneWatch™*
.....................................99
Forward Collision Warning (FCW)*
...100
Lane Departure Warning (LDW)*
...101
Blind Spot Information (BSI)*
.........102
Parking Sensor System*
..................103
Rearview Camera*
...........................104
Multi-View Rear Camera*
...............105
Refueling
............................................106
HANDLING THE UNEXPECTED
.......107
Smart Entry Remote Battery Strength
...107
Jump Starting
....................................107
Shift Lever Does Not Move
.............108
Overheating
........................................109
Emergency Engine Stop*
.................110
Emergency Towing
...........................110
Tire Pressure Monitoring System
(TPMS)
................................................111 Changing a Flat Tire
..........................111
Fuse Locations
...................................115
MAINTENANCE
.................................121
Safety Precautions
...........................121
Maintenance Minder™ ....................122
Under the Hood
..................................124
Engine Oil
...........................................125
Engine Coolant
..................................127
Checking the Battery
........................128
Window Washer Fluid
.....................128
Changing Wiper Blades
...................129
Tire Information
.................................131
Tire Labeling
......................................134
DOT Tire Quality Grading
.................135
Tire Pressure Monitoring System
(TPMS) - Required Federal
Explanation
........................................136
Testing of Readiness Codes
............138
SPECIFICATIONS
...............................139
CUSTOMER INFORMATION
.............140
Frequently Asked Questions/
Troubleshooting
................................140
Contact Us
..........................................141
Honda Roadside Assistance
...........142
Warranty Coverages
.........................142
VOICE COMMAND INDEX
................143
INDEX
..................................................150
Page 21 of 80
34 || 35
VEHICLE CONTROLSVEHICLE CONTROLS
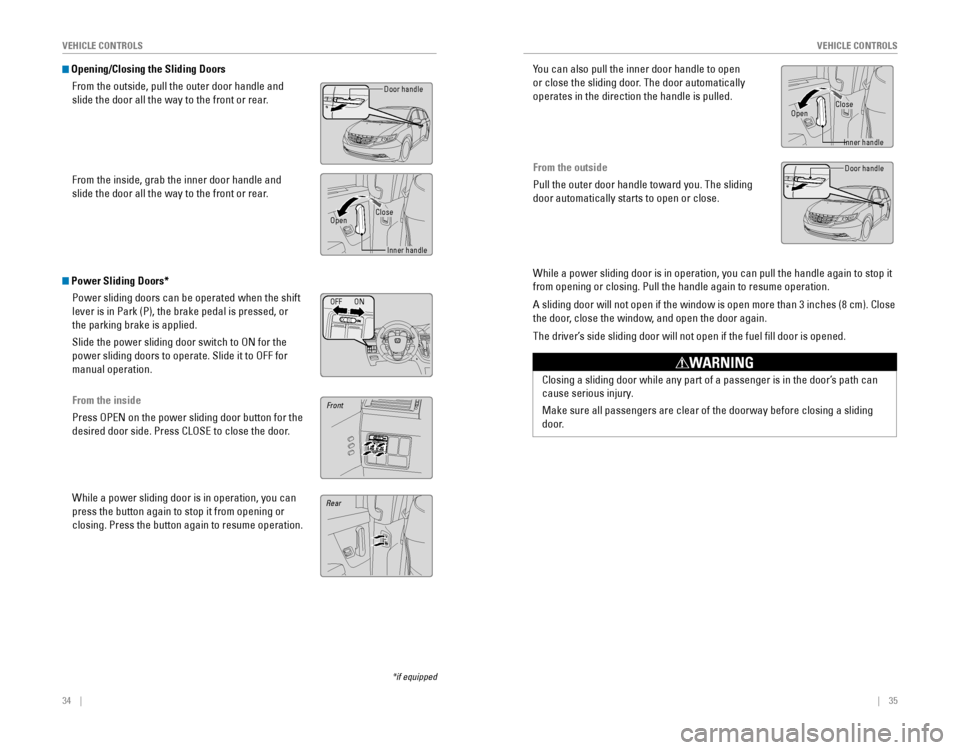
Opening/Closing the Sliding Doors
From the outside, pull the outer door handle and
slide the door all the way to the front or rear.
From the inside, grab the inner door handle and
slide the door all the way to the front or rear.
Power Sliding Doors*
Power sliding doors can be operated when the shift
lever is in Park (P), the brake pedal is pressed, or
the parking brake is applied.
Slide the power sliding door switch to ON for the
power sliding doors to operate. Slide it to OFF for
manual operation.
From the inside
Press OPEN on the power sliding door button for the
desired door side. Press CLOSE to close the door.
While a power sliding door is in operation, you can
press the button again to stop it from opening or
closing. Press the button again to resume operation.
Door handle
OpenClose
Rear
Front
Inner handle
OFFON
*if equipped
Closing a sliding door while any part of a passenger is in the door’s path can
cause serious injury.
Make sure all passengers are clear of the doorway before closing a sliding
door.
WARNING
You can also pull the inner door handle to open
or close the sliding door. The door automatically
operates in the direction the handle is pulled.
From the outside
Pull the outer door handle toward you. The sliding
door automatically starts to open or close.
While a power sliding door is in operation, you can pull the handle agai\
n to stop it
from opening or closing. Pull the handle again to resume operation.
A sliding door will not open if the window is open more than 3 inches (\
8 cm). Close
the door, close the window, and open the door again.
The driver’s side sliding door will not open if the fuel fill door is opened.
Door handle
OpenClose
Inner handle
Page 50 of 80
92 || 93
DRIVING
DRIVING
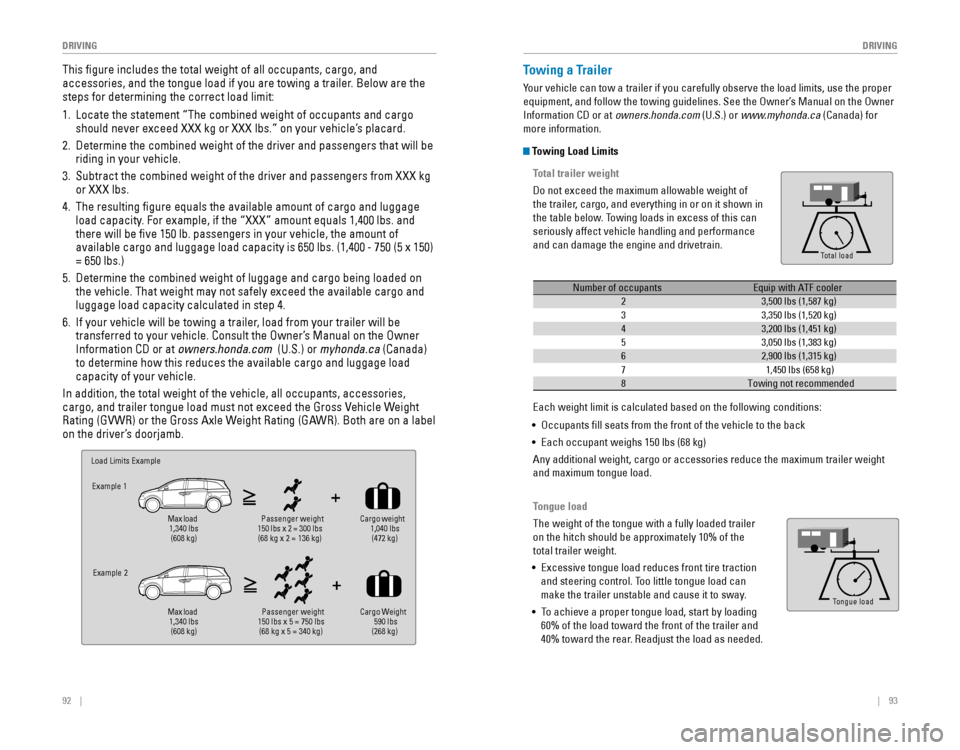
This figure includes the total weight of all occupants, cargo, and
accessories, and the tongue load if you are towing a trailer. Below are the
steps for determining the correct load limit:
1. Locate the statement “The combined weight of occupants and cargo
should never exceed XXX kg or XXX lbs.” on your vehicle’s placard.
2. Determine the combined weight of the driver and passengers that will be
riding in your vehicle.
3. Subtract the combined weight of the driver and passengers from XXX kg
or XXX lbs.
4. The resulting figure equals the available amount of cargo and luggage
load capacity. For example, if the “XXX” amount equals 1,400 lbs. and
there will be five 150 lb. passengers in your vehicle, the amount of
available cargo and luggage load capacity is 650 lbs. (1,400 - 750 (5 x 150)
= 650 lbs.)
5. Determine the combined weight of luggage and cargo being loaded on
the vehicle. That weight may not safely exceed the available cargo and
luggage load capacity calculated in step 4.
6. If your vehicle will be towing a trailer, load from your trailer will be
transferred to your vehicle. Consult the Owner’s Manual on the Owner
Information CD or at owners.honda.com (U.S.) or myhonda.ca (Canada)
to determine how this reduces the available cargo and luggage load
capacity of your vehicle.
In addition, the total weight of the vehicle, all occupants, accessories,
cargo, and trailer tongue load must not exceed the Gross Vehicle Weight
Rating (GVWR) or the Gross Axle Weight Rating (GAWR). Both are on a label
on the driver’s doorjamb.
Load Limits Example
Ex ample 1
Max load
1,340 lbs (608 kg ) Passenger weight
150 lbs x 2 = 300 lbs
(68 kg x 2 = 136 kg )Cargo weight
1, 040 lbs
(472 kg)
Example 2
Max load
1,340 lbs (608 kg ) Passenger weight
150 lbs x 5 = 750 lbs
(68 kg x 5 = 340 kg) Cargo Weight
590 lbs
(268 kg)
Towing a Trailer
Your vehicle can tow a trailer if you carefully observe the load limits, use the proper
equipment, and follow the towing guidelines. See the Owner’s Manual on the Owner
Information CD or at owners.honda.com (U.S.) or www.myhonda.ca (Canada) for
more information.
Towing Load Limits
Total trailer weight
Do not exceed the maximum allowable weight of
the trailer, cargo, and everything in or on it shown in
the table below. Towing loads in excess of this can
seriously affect vehicle handling and performance
and can damage the engine and drivetrain.
To ng ue Loa d
Total load
Tongue load
The weight of the tongue with a fully loaded trailer
on the hitch should be approximately 10% of the
total trailer weight.
•
Excessive tongue load reduces front tire traction
and steering control. Too little tongue load can
make the trailer unstable and cause it to sway.
• To achieve a proper tongue load, start by loading
60% of the load toward the front of the trailer and
40% toward the rear. Readjust the load as needed.
To ng ue Loa dTongue load
Number of occupantsEquip with ATF cooler
23,500 lbs (1,587 kg )
33,350 lbs (1,520 kg)
43,200 lbs (1,451 kg)
53,050 lbs (1,383 kg)
62,900 lbs (1,315 kg)
71,450 lbs (658 kg)
8Towing not recommended
Each weight limit is calculated based on the following conditions:
• Occupants fill seats from the front of the vehicle to the back
• Each occupant weighs 150 lbs (68 kg)
Any additional weight, cargo or accessories reduce the maximum trailer weight
and maximum tongue load.
Page 51 of 80
94 || 95
DRIVING
DRIVING
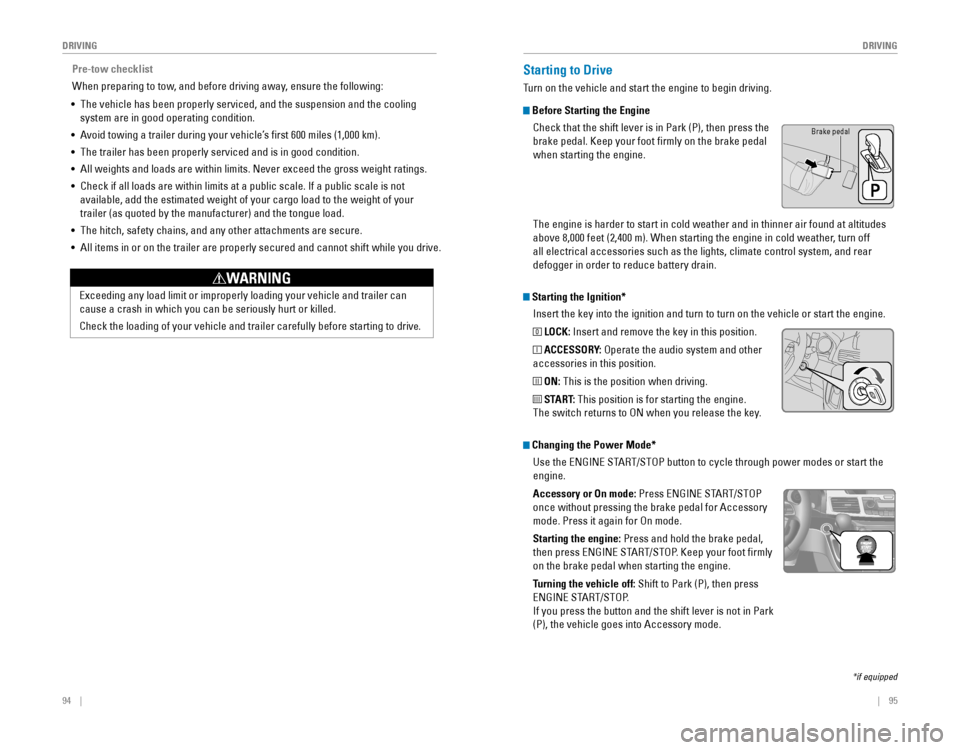
Starting the Ignition*
Insert the key into the ignition and turn to turn on the vehicle or start the engine.
0 LOCK: Insert and remove the key in this position.
I ACCESSORY: Operate the audio system and other
accessories in this position.
II ON: This is the position when driving.
III START: This position is for starting the engine.
The switch returns to ON when you release the key.
Starting to Drive
Turn on the vehicle and start the engine to begin driving.
Before Starting the Engine
Check that the shift lever is in Park (P), then press the
brake pedal. Keep your foot firmly on the brake pedal
when starting the engine.
Brake pedal
The engine is harder to start in cold weather and in thinner air found a\
t altitudes
above 8,000 feet (2,400 m). When starting the engine in cold weather, turn off
all electrical accessories such as the lights, climate control system, a\
nd rear
defogger in order to reduce battery drain.
*if equipped
Changing the Power Mode*Use the
ENGINE START/STOP button to cycle through power modes or start the
engine.
Accessory or On mode:
Press ENGINE START/STOP
once without pressing the brake pedal for Accessory
mode. Press it again for On mode.
Starting the engine:
Press and hold the brake pedal,
then press ENGINE START/STOP. Keep your foot firmly
on the brake pedal when starting the engine.
Turning the vehicle off: Shift to Park (P), then press
ENGINE START/STOP.
If you press the button and the shift lever is not in Park
(P), the vehicle goes into Accessory mode.
Pre-tow checklist
When preparing to tow, and before driving away, ensure the following:
• The vehicle has been properly serviced, and the suspension and the cooling
system are in good operating condition.
•
Avoid towing a trailer during your vehicle’s first 600 miles (1,000 km).
• The trailer has been properly serviced and is in good condition.
• All weights and loads are within limits. Never exceed the gross weight r\
atings.
•
Check if all loads are within limits at a public scale. If a public scale is not
available, add the estimated weight of your cargo load to the weight of your
trailer (as quoted by the manufacturer) and the tongue load.
• The hitch, safety chains, and any other attachments are secure.
• All items in or on the trailer are properly secured and cannot shift whi\
le you drive.
Exceeding any load limit or improperly loading your vehicle and trailer can
cause a crash in which you can be seriously hurt or killed.
Check the loading of your vehicle and trailer carefully before starting to drive.
WARNING
Page 52 of 80
96 || 97
DRIVING
DRIVING
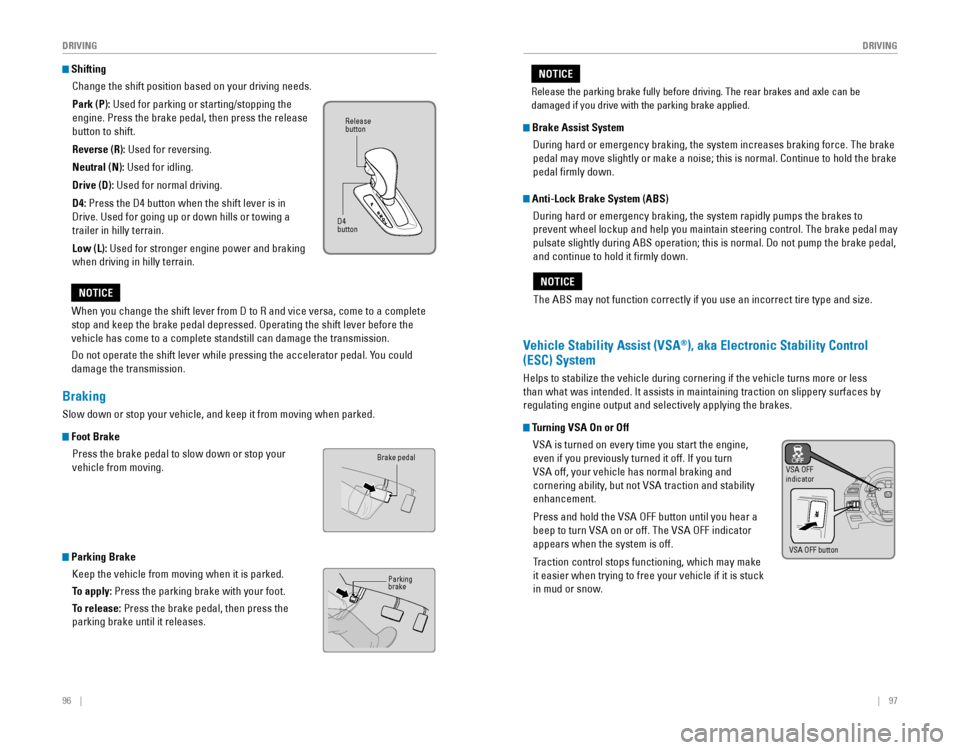
Shifting
Change the shift position based on your driving needs.
Park (P): Used for parking or starting/stopping the
engine. Press the brake pedal, then press the release
button to shift.
Reverse (R): Used for reversing.
Neutral (N): Used for idling.
Drive (D): Used for normal driving.
D4:
Press the D4 button when the shift lever is in
Drive. Used for going up or down hills or towing a
trailer in hilly terrain.
Low (L):
Used for stronger engine power and braking
when driving in hilly terrain.
When you change the shift lever from D to R and vice versa, come to a complete
stop and keep the brake pedal depressed. Operating the shift lever before the
vehicle has come to a complete standstill can damage the transmission.
Do not operate the shift lever while pressing the accelerator pedal. You could
damage the transmission.
NOTICE
Release button
D4
button
Braking
Slow down or stop your vehicle, and keep it from moving when parked.
Foot Brake
Press the brake pedal to slow down or stop your
vehicle from moving.
Parking Brake
Keep the vehicle from moving when it is parked.
To apply:
Press the parking brake with your foot.
To release: Press the brake pedal, then press the
parking brake until it releases.
Brake pedal
Parkingbrake
The ABS may not function correctly if you use an incorrect tire type and size.
NOTICE
Brake Assist System
During hard or emergency braking, the system increases braking force. The brake
pedal may move slightly or make a noise; this is normal. Continue to hold the brake
pedal firmly down.
Anti-Lock Brake System (ABS)
During hard or emergency braking, the system rapidly pumps the brakes to
prevent wheel lockup and help you maintain steering control. The brake pedal may
pulsate slightly during ABS operation; this is normal. Do not pump the brake pedal,
and continue to hold it firmly down.
Vehicle Stability Assist (VSA®), aka Electronic Stability Control
(ESC) System
Helps to stabilize the vehicle during cornering if the vehicle turns more or less
than what was intended. It assists in maintaining traction on slippery surfaces by
regulating engine output and selectively applying the brakes.
Turning VSA On or Off
VSA is turned on every time you start the engine,
even if you previously turned it off. If you turn
VSA off, your vehicle has normal braking and
cornering ability, but not VSA traction and stability
enhancement.
Press and hold the VSA OFF button until you hear a
beep to turn VSA on or off. The VSA OFF indicator
appears when the system is off.
Traction control stops functioning, which may make
it easier when trying to free your vehicle if it is stuck
in mud or snow.
VSA OFFindicator
VSA OFF button
Release the parking brake fully before driving. The rear brakes and axle can be
damaged if you drive with the parking brake applied.
NOTICE
Page 59 of 80
110 || 111
HANDLING THE UNEXPECTED
HANDLING THE UNEXPECTED
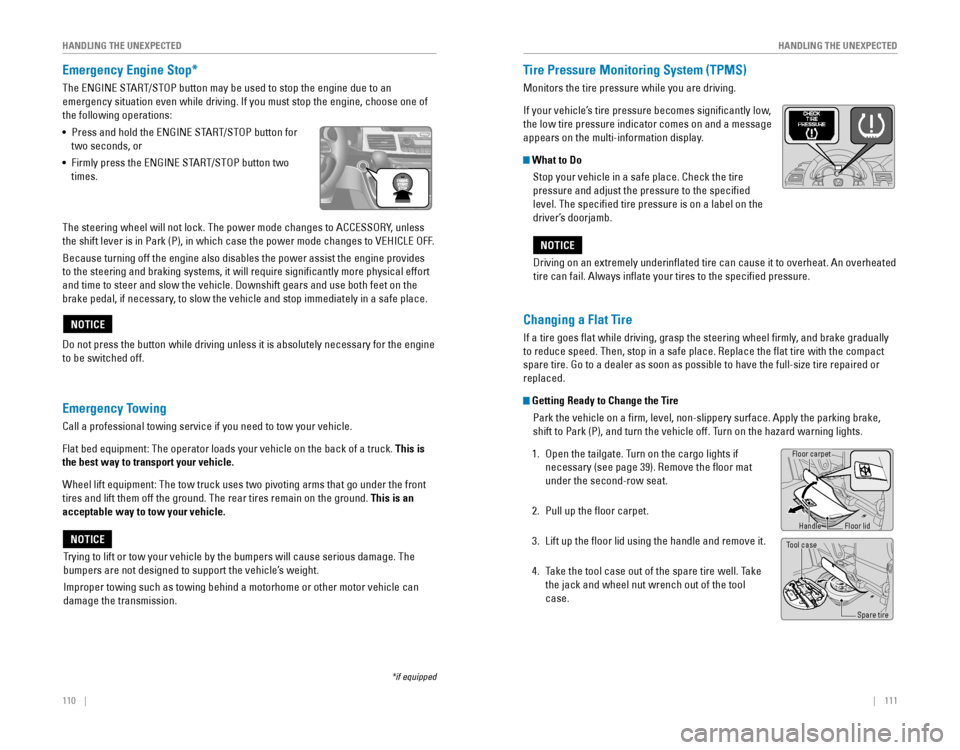
Emergency Engine Stop*
The ENGINE START/STOP button may be used to stop the engine due to an
emergency situation even while driving. If you must stop the engine, choose one of
the following operations:
•
Press and hold the ENGINE START/STOP button for
two seconds, or
•
Firmly press the ENGINE START/STOP button two
times.
Emergency Towing
Call a professional towing service if you need to tow your vehicle.
Flat bed equipment: The operator loads your vehicle on the back of a truck. This is
the best way to transport your vehicle.
Wheel lift equipment: The tow truck uses two pivoting arms that go under the front
tires and lift them off the ground. The rear tires remain on the ground.\
This is an
acceptable way to tow your vehicle.
Trying to lift or tow your vehicle by the bumpers will cause serious damage. The
bumpers are not designed to support the vehicle’s weight.
Improper towing such as towing behind a motorhome or other motor vehicle can
damage the transmission.
NOTICE
NOTICE
*if equipped
The steering wheel will not lock. The power mode changes to ACCESSORY, unless
the shift lever is in Park (P), in which case the power mode changes to VEHICLE OFF.
Because turning off the engine also disables the power assist the engine provides
to the steering and braking systems, it will require significantly more physical effort
and time to steer and slow the vehicle. Downshift gears and use both feet on the
brake pedal, if necessary, to slow the vehicle and stop immediately in a safe place.
Do not press the button while driving unless it is absolutely necessary for the engine
to be switched off.
Driving on an extremely underinflated tire can cause it to overheat. An overheated
tire can fail. Always inflate your tires to the specified pressure.
NOTICE
Tire Pressure Monitoring System (TPMS)
Monitors the tire pressure while you are driving.
If your vehicle’s tire pressure becomes significantly low,
the low tire pressure indicator comes on and a message
appears on the multi-information display.
What to Do
Stop your vehicle in a safe place. Check the tire
pressure and adjust the pressure to the specified
level. The specified tire pressure is on a label on the
driver’s doorjamb.
Changing a Flat Tire
If a tire goes flat while driving, grasp the steering wheel firmly, and brake gradually
to reduce speed. Then, stop in a safe place. Replace the flat tire wit\
h the compact
spare tire. Go to a dealer as soon as possible to have the full-size tire repaired or
replaced.
Getting Ready to Change the Tire
Park the vehicle on a firm, level, non-slippery surface. Apply the parking brake,
shift to Park (P), and turn the vehicle off. Turn on the hazard warning lights.
1. Open the tailgate. Turn on the cargo lights if
necessary (see page 39). Remove the floor mat
under the second-row seat.
2. Pull up the floor carpet.
3. Lift up the floor lid using the handle and remove it.
4. Take the tool case out of the spare tire well. Take
the jack and wheel nut wrench out of the tool
case.
Floor carpet
Handle
Tool case
Spare tire
Floor lid
Page 61 of 80
114 || 115
HANDLING THE UNEXPECTED
HANDLING THE UNEXPECTED
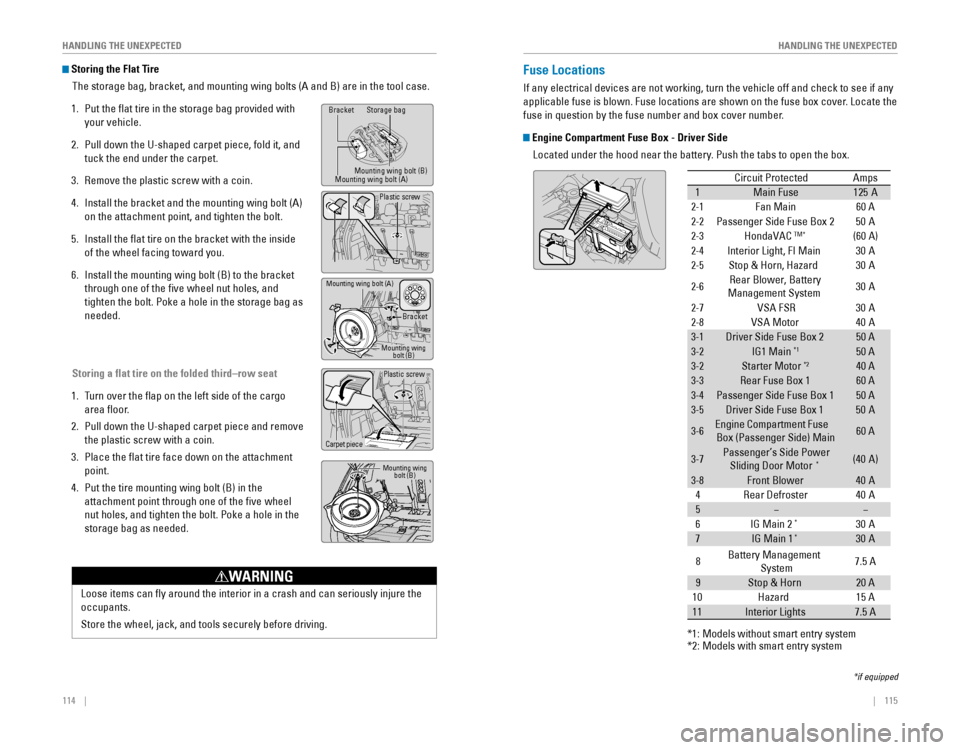
Storing the Flat Tire
The storage bag, bracket, and mounting wing bolts (A and B) are in the tool case.
1. Put the flat tire in the storage bag provided with
your vehicle.
2. Pull down the U-shaped carpet piece, fold it, and
tuck the end under the carpet.
3. Remove the plastic screw with a coin.
4. Install the bracket and the mounting wing bolt (A)
on the attachment point, and tighten the bolt.
5. Install the flat tire on the bracket with the inside
of the wheel facing toward you.
6. Install the mounting wing bolt (B) to the bracket
through one of the five wheel nut holes, and
tighten the bolt. Poke a hole in the storage bag as
needed.
Storing a flat tire on the folded third–row seat
1. Turn over the flap on the left side of the cargo
area floor.
2. Pull down the U-shaped carpet piece and remove
the plastic screw with a coin.
3. Place the flat tire face down on the attachment
point.
4. Put the tire mounting wing bolt (B) in the
attachment point through one of the five wheel
nut holes, and tighten the bolt. Poke a hole in the
storage bag as needed.
Loose items can fly around the interior in a crash and can seriously i\
njure the
occupants.
Store the wheel, jack, and tools securely before driving.
WARNING
Bracket
Bracket
Plastic screw
Carpet pieceStorage bag
Mounting wing bolt (B)
Mounting wing bolt (B)
Mounting wing bolt (B)
Mounting wing bolt (A)
Mounting wing bolt (A)
Plastic screw
Fuse Locations
If any electrical devices are not working, turn the vehicle off and check to see if any
applicable fuse is blown. Fuse locations are shown on the fuse box cover. Locate the
fuse in question by the fuse number and box cover number.
Engine Compartment Fuse Box - Driver Side
Located under the hood near the battery. Push the tabs to open the box.
Circuit ProtectedAmps
1Main Fuse12 5A
2-1Fan Main 60 A
2-2Passenger Side Fuse Box 2
2-3HondaVACTM*(60 A)
2-4Interior Light, FI Main
2-5Stop & Horn, Hazard
2-6Rear Blower, Battery
Ma nagement System 30
A
30
A
30
A
2-7VSA FSR 30A
50
A
2-8VSA Moto r
3-1Driver Side Fuse Box 250 A
3-2IG1 Main*150 A
3-2Starter Motor*240 A
3-3Rear Fuse Box 160 A
3-4Passenger Side Fuse Box 150 A
3-5Driver Side Fuse Box 150 A
3-6Engine Compartment Fuse
Box (Passenger Side) Main60 A
3-7Passenger’s Side Power
Sliding Door Moto r*(40A )
3-8Front Blower40A
40 A
40
A
4Rear Defroster
5��
6I G Main 2*30A
7IG Main 1*30A
*1: M odels without smart entry system*2: M odels with smart entry system
8 Battery Management
System 7.5
A
9Stop & Hor n20 A
15 A
10 Hazard
11Interior Lights7.5 A
*if equipped
Page 64 of 80
120 || 121
MAINTENANCE
HANDLING THE UNEXPECTED
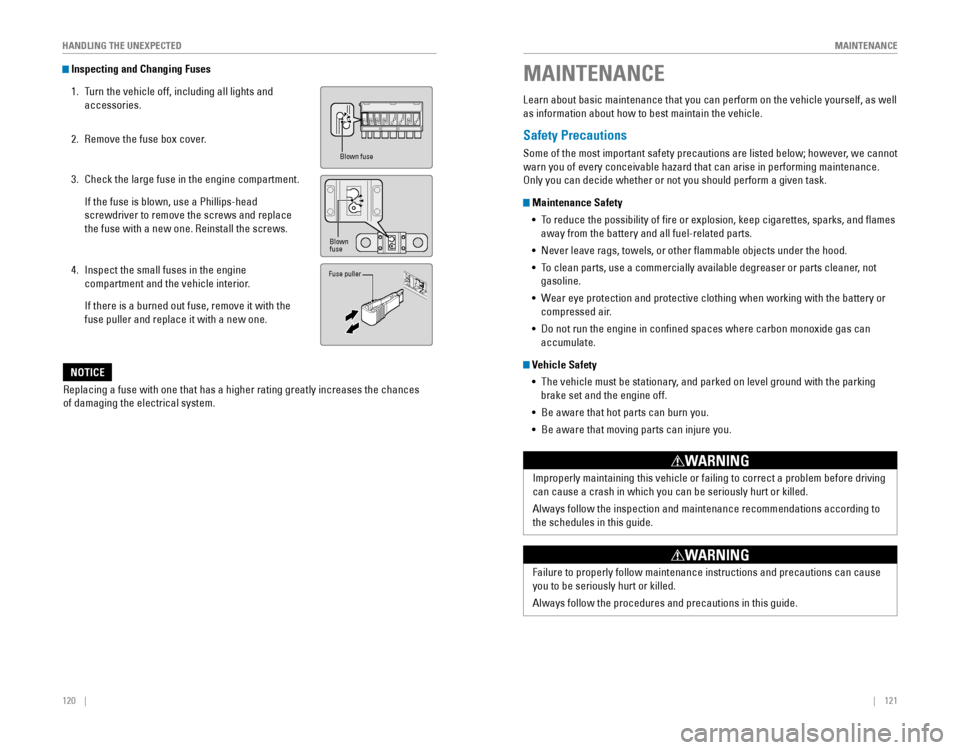
Inspecting and Changing Fuses
1. Turn the vehicle off, including all lights and
accessories.
2. Remove the fuse box cover.
3. Check the large fuse in the engine compartment.
If the fuse is blown, use a Phillips-head
screwdriver to remove the screws and replace
the fuse with a new one. Reinstall the screws.
4. Inspect the small fuses in the engine
compartment and the vehicle interior.
If there is a burned out fuse, remove it with the
fuse puller and replace it with a new one.
Replacing a fuse with one that has a higher rating greatly increases the\
chances
of damaging the electrical system.
NOTICE
Blown fuse
Blown
fuse
Fuse puller
Safety Precautions
Some of the most important safety precautions are listed below; however, we cannot
warn you of every conceivable hazard that can arise in performing maintenance.
Only you can decide whether or not you should perform a given task.
Maintenance Safety •
To reduce the possibility of fire or explosion, keep cigarettes, sparks, and flames
away from the battery and all fuel-related parts.
• Never leave rags, towels, or other flammable objects under the hood.
• To clean parts, use a commercially available degreaser or parts cleaner, not
gasoline.
•
Wear eye protection and protective clothing when working with the battery or
compressed air.
•
Do not run the engine in confined spaces where carbon monoxide gas can
accumulate.
Vehicle Safety •
The vehicle must be stationary, and parked on level ground with the parking
brake set and the engine off.
• Be aware that hot parts can burn you.
• Be aware that moving parts can injure you.
Improperly maintaining this vehicle or failing to correct a problem before driving
can cause a crash in which you can be seriously hurt or killed.
Always follow the inspection and maintenance recommendations according t\
o
the schedules in this guide.
Failure to properly follow maintenance instructions and precautions can \
cause
you to be seriously hurt or killed.
Always follow the procedures and precautions in this guide.
WARNING
WARNING
Learn about basic maintenance that you can perform on the vehicle yourself, as well
as information about how to best maintain the vehicle.
MAINTENANCE
Page 66 of 80
124 || 125
MAINTENANCE
MAINTENANCE
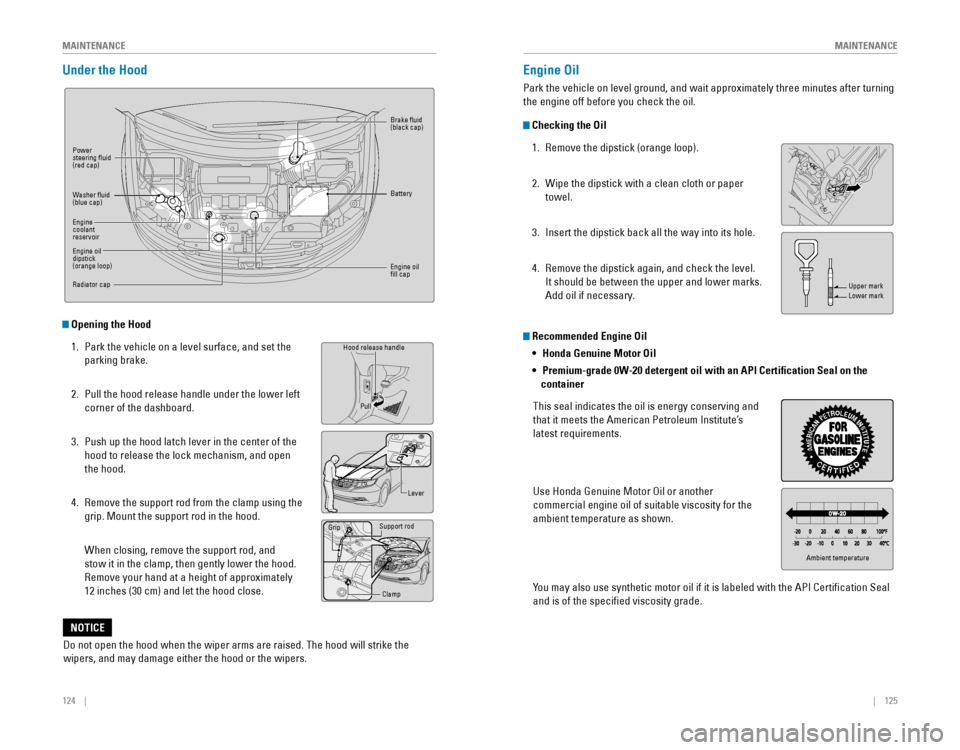
Under the Hood
Opening the Hood
1. Park the vehicle on a level surface, and set the
parking brake.
2. Pull the hood release handle under the lower left
corner of the dashboard.
3. Push up the hood latch lever in the center of the
hood to release the lock mechanism, and open
the hood.
4. Remove the support rod from the clamp using the
grip. Mount the support rod in the hood.
When closing, remove the support rod, and
stow it in the clamp, then gently lower the hood.
Remove your hand at a height of approximately
12 inches (30 cm) and let the hood close.
Do not open the hood when the wiper arms are raised. The hood will strike the
wipers, and may damage either the hood or the wipers.
NOTICE
Power steering fluid
(red cap) Brake fluid
(black cap)
Battery
Engine oil fill cap
Hood release handle
Lever
Support rod
Grip
Clamp
Pull
Washer fluid
(blue cap)
Engine coolant
reservoir
Engine oil dipstick
(orange loop)
Radiator cap
Recommended Engine Oil
•
Honda Genuine Motor Oil
• Premium-grade 0W-20 detergent oil with an API Certification Seal on the
container
This seal indicates the oil is energy conserving and
that it meets the American Petroleum Institute’s
latest requirements.
Use Honda Genuine Motor Oil or another
commercial engine oil of suitable viscosity for the
ambient temperature as shown.
You may also use synthetic motor oil if it is labeled with the API Certification Seal
and is of the specified viscosity grade.
Engine Oil
Park the vehicle on level ground, and wait approximately three minutes after turning
the engine off before you check the oil.
Checking the Oil
1. Remove the dipstick (orange loop).
2. Wipe the dipstick with a clean cloth or paper
towel.
3. Insert the dipstick back all the way into its hole.
4. Remove the dipstick again, and check the level.
It should be between the upper and lower marks.
Add oil if necessary.Upper markLower mark
Ambient temperature