ECO mode HONDA ODYSSEY 2017 RC1-RC2 / 5.G Quick Guide
[x] Cancel search | Manufacturer: HONDA, Model Year: 2017, Model line: ODYSSEY, Model: HONDA ODYSSEY 2017 RC1-RC2 / 5.GPages: 81, PDF Size: 15.25 MB
Page 43 of 81
| 79
INDEX
VOICE COMMAND INDEX
CUSTOMER
INFORMATION
SPECIFICATIONS
MAINTENANCE
HANDLING THE UNEXPECTED
DRIVING
NAVIGATION
78 | AUDIO AND CONNECTIVITY
TABLE OF CONTENTS
VISUAL INDEX
SAFETY
INFORMATION
INSTRUMENT PANEL
VEHICLE
CONTROLS
AUDIO AND
CONNECTIVITY
BLUETOOTH®
HANDSFREELINK®
HONDALINK®
1. Connect a second source through the rear auxiliary or HDMI input (see
page 76).
2. From the rear control panel, press DUAL.
3. Select which side the second source plays on.
4. Press SOURCe to select AUX-vIDeO or AUX-HDMI.
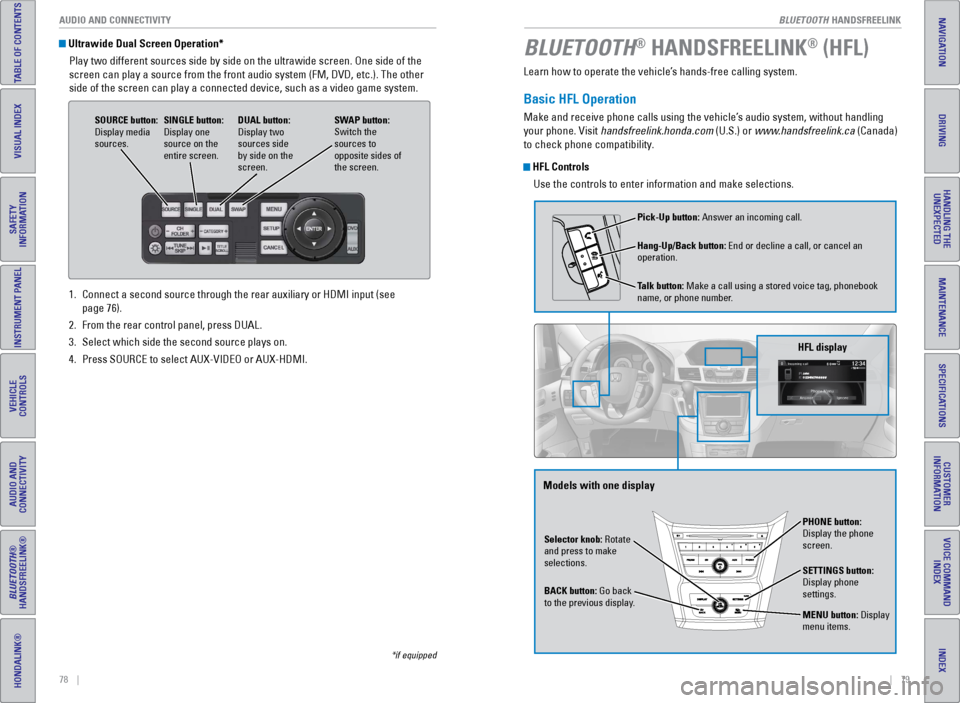
Ultrawide Dual Screen Operation*
Play two different sources side by side on the ultrawide screen. One sid\
e of the
screen can play a source from the front audio system (FM, DvD, etc.). The other
side of the screen can play a connected device, such as a video game system.
SOURCE button:
Display media
sources. DUAL button:
Display two
sources side
by side on the
screen.
SINGLE button:
Display one
source on the
entire screen.
SWAP button:
Switch the
sources to
opposite sides of
the screen.
*if equipped
Learn how to operate the vehicle’s hands-free calling system.
Basic HFL Operation
Make and receive phone calls using the vehicle’s audio system, without handling
your phone. visit handsfreelink.honda.com (U.S.) or www.handsfreelink.ca (Canada)
to check phone compatibility.
HFL Controls
Use the controls to enter information and make selections.
BLUETOOTH® HANDSFREELINK® (HFL)
Selector knob: Rotate
and press to make
selections.
BACK button: Go back
to the previous display. PHONE button:
Display the phone
screen.
SETTINGS button:
Display phone
settings.
MENU button: Display
menu items.
HFL display
Pick-Up button: Answer an incoming call.
Hang-Up/Back button: end or decline a call, or cancel an
operation.
Talk button: Make a call using a stored voice tag, phonebook
name, or phone number.
Models with one display
BLUETOOTH HANDSFReeLINK
BLUETOOTH HANDSFReeLINK
Page 44 of 81
80 || 81
TABLE OF CONTENTS
INDEX
VISUAL INDEX
VOICE COMMAND
INDEX
SAFETY
INFORMATION
CUSTOMER
INFORMATION
INSTRUMENT PANEL
SPECIFICATIONS
VEHICLE
CONTROLS
MAINTENANCE
AUDIO AND
CONNECTIVITY
HANDLING THE UNEXPECTED
BLUETOOTH®
HANDSFREELINK®
DRIVING
HONDALINK®
NAVIGATION
Talk Button Tips
On models with navigation, you can say voice commands to operate system
functions. Below are some helpful tips:
• When using the Talk button, wait for the beep before saying a command.
• To bypass the system prompts, simply press the Talk button again to say your
command.
• When the Talk button is pressed, all available voice commands are highlighted
in yellow.
• The system recognizes only the commands listed in the v oice Command Index
(see page 144)
• Speak in a clear, natural voice.
• Reduce all background noise.
• Adjust the dashboard and side vents away from the microphone in the ceil\
ing.
• Close the windows and moonroof.
To reduce the potential for driver distraction, certain manual functions \
may be
inoperable or grayed out while the vehicle is moving. Stop or pull over \
to perform
the function.
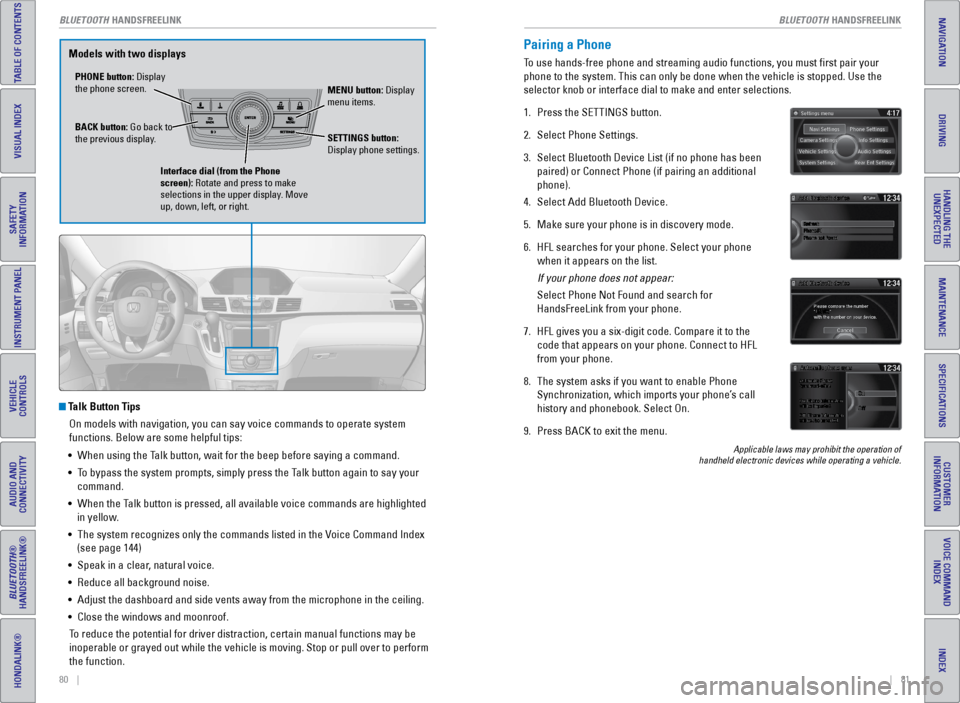
PHONE button: Display
the phone screen. MENU button: Display
menu items.
BACK button: Go back to
the previous display. SETTINGS button:
Display phone settings.
Interface dial (from the Phone
screen): Rotate and press to make
selections in the upper display. Move
up, down, left, or right.
Models with two displaysPairing a Phone
To use hands-free phone and streaming audio functions, you must first p\
air your
phone to the system. This can only be done when the vehicle is stopped. \
Use the
selector knob or interface dial to make and enter selections.
1. Press the SeTTINGS button.
2. Select Phone Settings.
3. Select Bluetooth Device List (if no phone has been
paired) or Connect Phone (if pairing an additional
phone).
4. Select Add Bluetooth Device.
5. Make sure your phone is in discovery mode.
6. HFL searches for your phone. Select your phone
when it appears on the list.
If your phone does not appear:
Select Phone Not Found and search for
HandsFreeLink from your phone.
7. HFL gives you a six-digit code. Compare it to the
code that appears on your phone. Connect to HFL
from your phone.
8. The system asks if you want to enable Phone
Synchronization, which imports your phone’s call
history and phonebook. Select On.
9. Press BACK to exit the menu.
Applicable laws may prohibit the operation of
handheld electronic devices while operating a vehicle.
BLUETOOTH HANDSFReeLINK
BLUETOOTH HANDSFReeLINK
Page 46 of 81
| 85
NAVIGATION
INDEX
VOICE COMMAND
INDEX
CUSTOMER
INFORMATION
SPECIFICATIONS
MAINTENANCE
HANDLING THE UNEXPECTED
DRIVING
NAVIGATION
84 |
TABLE OF CONTENTS
VISUAL INDEX
SAFETY
INFORMATION
INSTRUMENT PANEL
VEHICLE
CONTROLS
AUDIO AND
CONNECTIVITY
BLUETOOTH®
HANDSFREELINK®
HONDALINK®
SMS Text Messaging and E-Mail
Certain phones can receive and send messages from your paired and connec\
ted
phone. visit handsfreelink.honda.com (U.S.) or www.handsfreelink.ca (Canada) to
check phone compatibility. Standard message rates apply. This feature is limited
while the vehicle is moving.
Models with two displays
Receiving and Responding to Messages
When you receive a new message, a pop-up appears on the display. Use the
selector knob or interface dial to view the message when the vehicle is \
stopped.
You can also reply to it using fixed phrases or call the sender.
1. When the prompt appears, select Read.
2. The message is displayed, and the system reads
it aloud.
On models with one display, press the selector
knob to display the options.
To reply: Select Reply, and choose one of the six available responses. Select
Send to send the message. You cannot create a new text message.
To call the sender: Select Call.
Selecting an Account
If your phone has both text message and e-mail accounts, you can select \
only one
of them at a time to be active and receive notifications. Use the inte\
rface dial to
make and enter selections.
1. Press SeTTINGS.
2. Select Phone Settings.
3. Select Select Account.
4. Select Text Messages or an e-mail account.
*if equipped
Learn how to enter a destination and operate the navigation system.
Basic Navigation Operation
A real-time navigation system uses GPS and a map database to show your current
location and help guide you to a desired destination. You can operate the system
using voice commands or the system controls.
To reduce the potential for driver distraction, certain manual functions \
may be
inoperable or grayed out while the vehicle is moving. Voice commands are always
available.
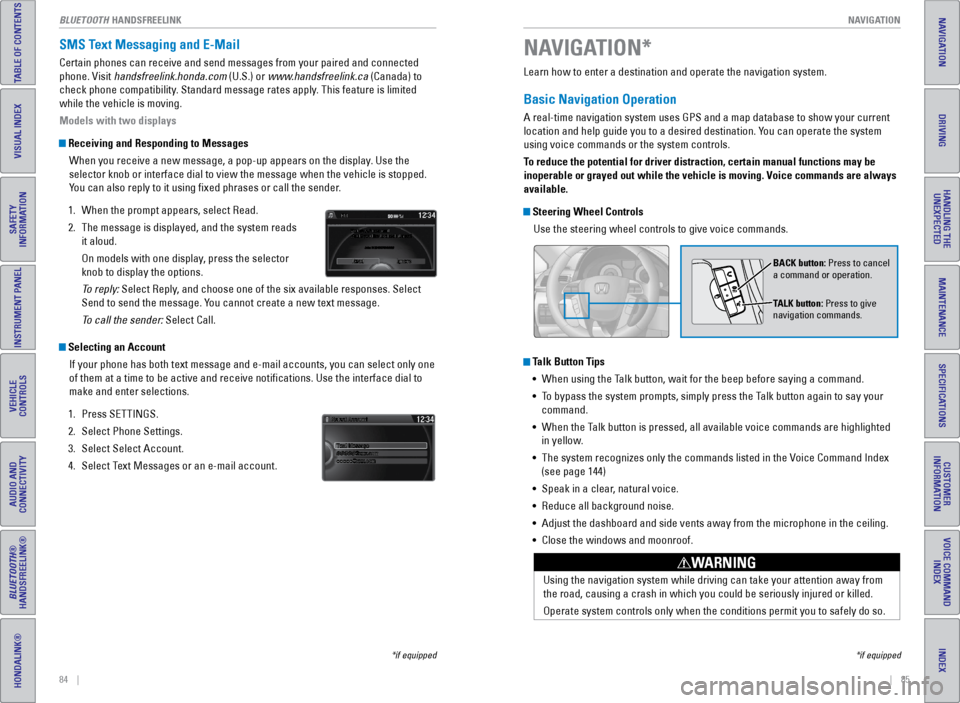
Steering Wheel Controls
Use the steering wheel controls to give voice commands.
Talk Button Tips• When using the Talk button, wait for the beep before saying a command.
• To bypass the system prompts, simply press the Talk button again to say your
command.
• When the Talk button is pressed, all available voice commands are highlighted
in yellow.
• The system recognizes only the commands listed in the v oice Command Index
(see page 144)
• Speak in a clear, natural voice.
• Reduce all background noise.
• Adjust the dashboard and side vents away from the microphone in the ceil\
ing.
• Close the windows and moonroof.
Using the navigation system while driving can take your attention away f\
rom
the road, causing a crash in which you could be seriously injured or kil\
led.
Operate system controls only when the conditions permit you to safely do\
so.
WARNING
NAVIGATION*
BACK button: Press to cancel
a command or operation.
TALK button: Press to give
navigation commands.
*if equipped
BLUeTOOTH HANDSFREELINK
Page 59 of 81
110 || 111
HANDLING THE UNEXPECTED
HANDLING THE UNEXPECTED
TABLE OF CONTENTS
INDEX
VISUAL INDEX
VOICE COMMAND
INDEX
SAFETY
INFORMATION
CUSTOMER
INFORMATION
INSTRUMENT PANEL
SPECIFICATIONS
VEHICLE
CONTROLS
MAINTENANCE
AUDIO AND
CONNECTIVITY
HANDLING THE UNEXPECTED
BLUETOOTH®
HANDSFREELINK®
DRIVING
HONDALINK®
NAVIGATION
Overheating
If the temperature gauge needle is at the H mark, the engine suddenly lo\
ses power,
or steam or spray comes out from under the hood, your engine is overheat\
ing.
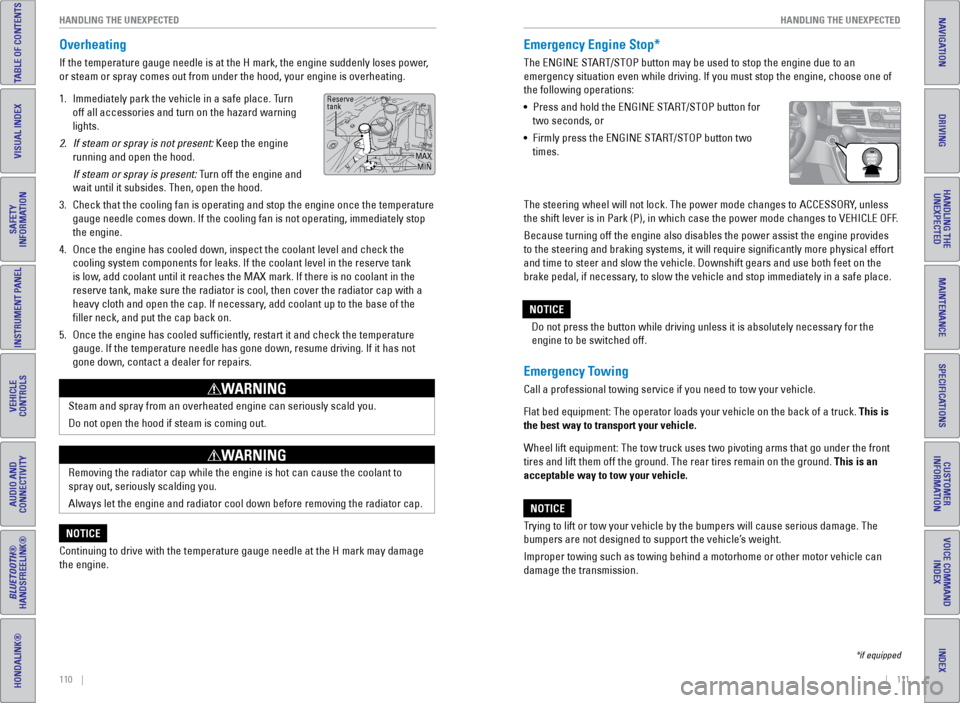
1. Immediately park the vehicle in a safe place. Turn
off all accessories and turn on the hazard warning
lights.
2. If steam or spray is not present: Keep the engine
running and open the hood.
If steam or spray is present: Turn off the engine and
wait until it subsides. Then, open the hood.
3. Check that the cooling fan is operating and stop the engine once the tem\
perature
gauge needle comes down. If the cooling fan is not operating, immediatel\
y stop
the engine.
4. Once the engine has cooled down, inspect the coolant level and check the\
cooling system components for leaks. If the coolant level in the reserve\
tank
is low, add coolant until it reaches the MAX mark. If there is no coolant in t\
he
reserve tank, make sure the radiator is cool, then cover the radiator ca\
p with a
heavy cloth and open the cap. If necessary, add coolant up to the base of the
filler neck, and put the cap back on.
5. Once the engine has cooled sufficiently, restart it and check the temperature
gauge. If the temperature needle has gone down, resume driving. If it ha\
s not
gone down, contact a dealer for repairs.
Steam and spray from an overheated engine can seriously scald you.
Do not open the hood if steam is coming out.
WARNING
Removing the radiator cap while the engine is hot can cause the coolant \
to
spray out, seriously scalding you.
Always let the engine and radiator cool down before removing the radiato\
r cap.
WARNING
Continuing to drive with the temperature gauge needle at the H mark may \
damage
the engine.
NOTICE
Reserve
tank
MAXMIN
Emergency Engine Stop*
The eNGINe START/STOP button may be used to stop the engine due to an
emergency situation even while driving. If you must stop the engine, cho\
ose one of
the following operations:
• Press and hold the eNGINe START/STOP button for
two seconds, or
• Firmly press the eNGINe START/STOP button two
times.
Emergency Towing
Call a professional towing service if you need to tow your vehicle.
Flat bed equipment: The operator loads your vehicle on the back of a tru\
ck. This is
the best way to transport your vehicle.
Wheel lift equipment: The tow truck uses two pivoting arms that go under\
the front
tires and lift them off the ground. The rear tires remain on the ground.\
This is an
acceptable way to tow your vehicle.
Trying to lift or tow your vehicle by the bumpers will cause serious dama\
ge. The
bumpers are not designed to support the vehicle’s weight.
Improper towing such as towing behind a motorhome or other motor vehicle\
can
damage the transmission.
NOTICE
*if equipped
The steering wheel will not lock. The power mode changes to ACCeSSORY, unless
the shift lever is in Park (P), in which case the power mode changes t\
o veHICLe OFF.
Because turning off the engine also disables the power assist the engine\
provides
to the steering and braking systems, it will require significantly mor\
e physical effort
and time to steer and slow the vehicle. Downshift gears and use both fee\
t on the
brake pedal, if necessary, to slow the vehicle and stop immediately in a safe place. Do not press the button while driving unless it is absolutely necessary \
for the
engine to be switched off.
NOTICE
Page 65 of 81
122 || 123
MAINTENANCE
MAINTENANCE
TABLE OF CONTENTS
INDEX
VISUAL INDEX
VOICE COMMAND
INDEX
SAFETY
INFORMATION
CUSTOMER
INFORMATION
INSTRUMENT PANEL
SPECIFICATIONS
VEHICLE
CONTROLS
MAINTENANCE
AUDIO AND
CONNECTIVITY
HANDLING THE UNEXPECTED
BLUETOOTH®
HANDSFREELINK®
DRIVING
HONDALINK®
NAVIGATION
Learn about basic maintenance that you can perform on the vehicle yourse\
lf, as well
as information about how to best maintain the vehicle.
Safety Precautions
Some of the most important safety precautions are listed below; however, we cannot
warn you of every conceivable hazard that can arise in performing mainte\
nance.
Only you can decide whether or not you should perform a given task.
Maintenance Safety
• To reduce the possibility of fire or explosion, keep cigarettes, sparks\
, and flames
away from the battery and all fuel-related parts.
• Never leave rags, towels, or other flammable objects under the hood. H\
eat from
the engine and exhaust can ignite them, causing a fire.
• To clean parts, use a commercially available degreaser or parts cleaner, not
gasoline.
• Wear eye protection and protective clothing when working with the battery\
or
compressed air.
• Do not run the engine in confined spaces where carbon monoxide gas can\
accumulate.
Vehicle Safety
• The vehicle must be stationary, and parked on level ground with the parking
brake set and the engine off.
• Be aware that hot parts can burn you.
• Be aware that moving parts can injure you.
Improperly maintaining this vehicle or failing to correct a problem befo\
re
driving can cause a crash in which you can be seriously hurt or killed. \
Always follow the inspection and maintenance recommendations according
to the schedules in this guide.
WARNING
Failure to properly follow maintenance instructions and precautions can \
cause you to be seriously hurt or killed.
Always follow the procedures and precautions in this guide.
WARNING
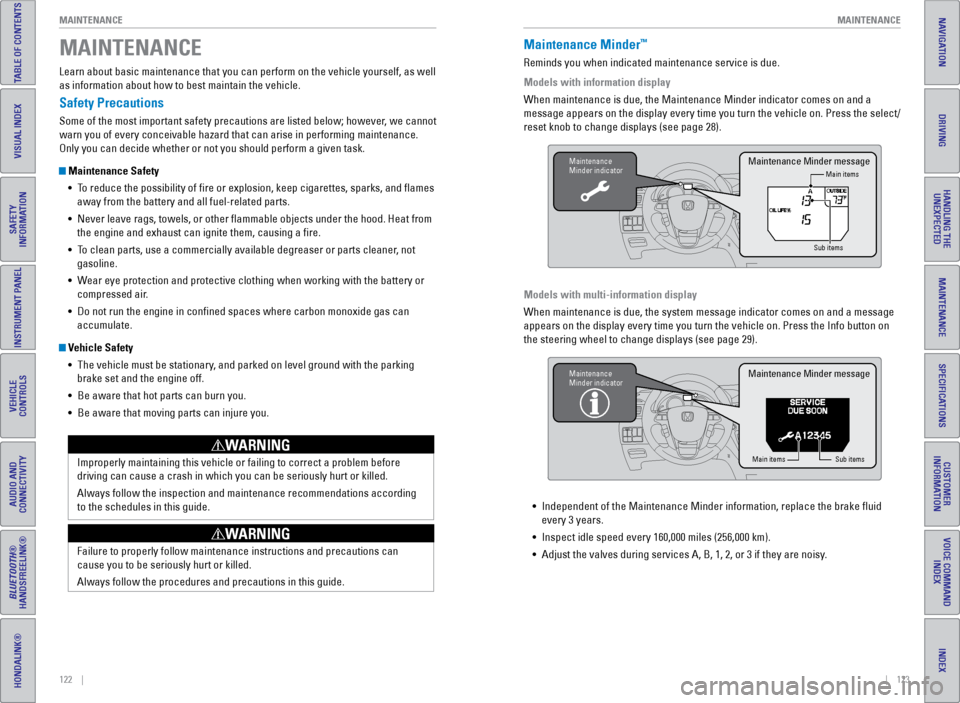
MAINTENANCEMaintenance Minder™
Reminds you when indicated maintenance service is due.
Models with information display
When maintenance is due, the Maintenance Minder indicator comes on and a\
message appears on the display every time you turn the vehicle on. Press\
the select/
reset knob to change displays (see page 28).
Models with multi-information display
When maintenance is due, the system message indicator comes on and a mes\
sage
appears on the display every time you turn the vehicle on. Press the Inf\
o button on
the steering wheel to change displays (see page 29).
Maintenance
Minder indicator
Main items
Sub itemsMaintenance Minder message
Maintenance
Minder indicator
Main items Sub items
Maintenance Minder message
• Independent of the Maintenance Minder information, replace the brake fl\
uid
every 3 years.
• Inspect idle speed every 160,000 miles (256,000 km).
• Adjust the valves during services A, B, 1, 2, or 3 if they are noisy.
Page 67 of 81
126 || 127
MAINTENANCE
MAINTENANCE
TABLE OF CONTENTS
INDEX
VISUAL INDEX
VOICE COMMAND
INDEX
SAFETY
INFORMATION
CUSTOMER
INFORMATION
INSTRUMENT PANEL
SPECIFICATIONS
VEHICLE
CONTROLS
MAINTENANCE
AUDIO AND
CONNECTIVITY
HANDLING THE UNEXPECTED
BLUETOOTH®
HANDSFREELINK®
DRIVING
HONDALINK®
NAVIGATION
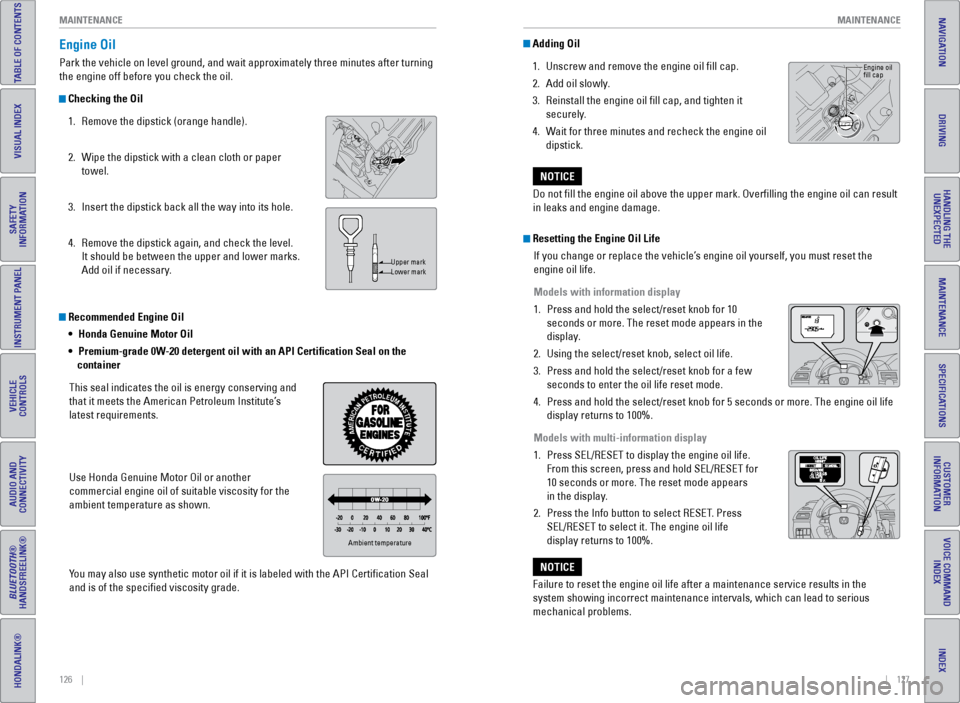
Recommended Engine Oil
• Honda Genuine Motor Oil
• Premium-grade 0W-20 detergent oil with an API Certification Seal on the
container
This seal indicates the oil is energy conserving and
that it meets the American Petroleum Institute’s
latest requirements.
Use Honda Genuine Motor Oil or another
commercial engine oil of suitable viscosity for the
ambient temperature as shown.
You may also use synthetic motor oil if it is labeled with the API Certifi\
cation Seal
and is of the specified viscosity grade.
Engine Oil
Park the vehicle on level ground, and wait approximately three minutes after turning
the engine off before you check the oil.
Checking the Oil 1. Remove the dipstick (orange handle).
2. Wipe the dipstick with a clean cloth or paper
towel.
3. Insert the dipstick back all the way into its hole.
4. Remove the dipstick again, and check the level.
It should be between the upper and lower marks.
Add oil if necessary.
Upper mark
Lower mark
Ambient temperature
Adding Oil
1. Unscrew and remove the engine oil fill cap.
2. Add oil slowly.
3. Reinstall the engine oil fill cap, and tighten it
securely.
4. Wait for three minutes and recheck the engine oil
dipstick.
Do not fill the engine oil above the upper mark. Overfilling the eng\
ine oil can result
in leaks and engine damage.
NOTICE
Resetting the Engine Oil Life If you change or replace the vehicle’s engine oil yourself, you must reset the
engine oil life.
Models with information display
1. Press and hold the select/reset knob for 10
seconds or more. The reset mode appears in the
display.
2. Using the select/reset knob, select oil life.
3. Press and hold the select/reset knob for a few
seconds to enter the oil life reset mode.
4. Press and hold the select/reset knob for 5 seconds or more. The engine o\
il life
display returns to 100%.
Models with multi-information display
1. Press SeL/ReSeT to display the engine oil life.
From this screen, press and hold SeL/ReSeT for
10 seconds or more. The reset mode appears
in the display.
2. Press the Info button to select ReSeT. Press
SeL/ReSeT to select it. The engine oil life
display returns to 100%.
Failure to reset the engine oil life after a maintenance service results\
in the
system showing incorrect maintenance intervals, which can lead to seriou\
s
mechanical problems.
NOTICE
engine oil
fill cap
Page 68 of 81
128 || 129
MAINTENANCE
MAINTENANCE
TABLE OF CONTENTS
INDEX
VISUAL INDEX
VOICE COMMAND
INDEX
SAFETY
INFORMATION
CUSTOMER
INFORMATION
INSTRUMENT PANEL
SPECIFICATIONS
VEHICLE
CONTROLS
MAINTENANCE
AUDIO AND
CONNECTIVITY
HANDLING THE UNEXPECTED
BLUETOOTH®
HANDSFREELINK®
DRIVING
HONDALINK®
NAVIGATION
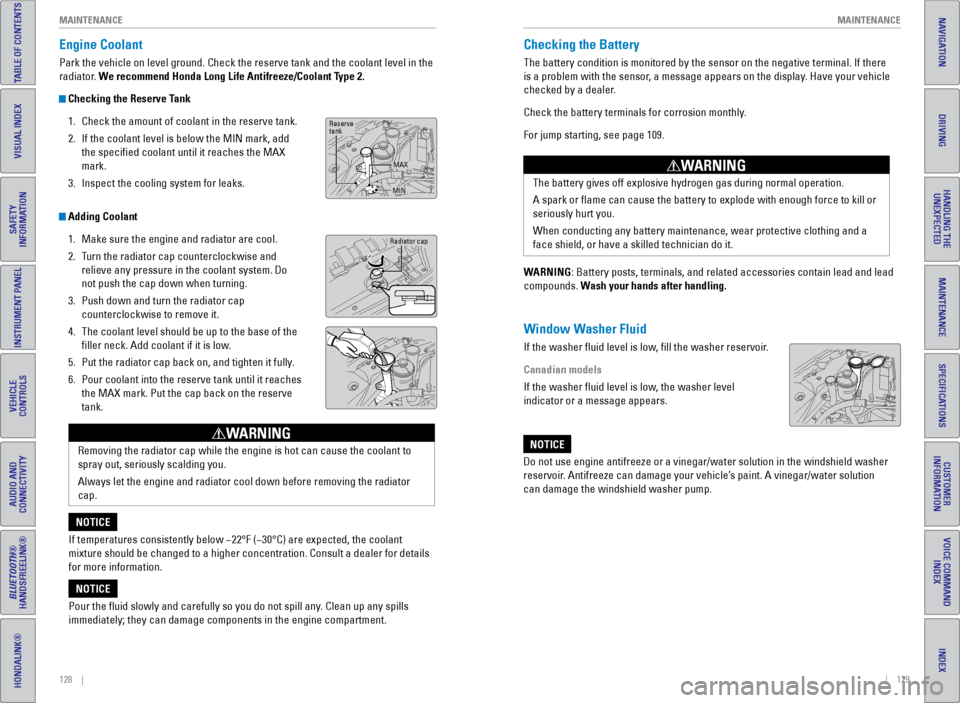
Engine Coolant
Park the vehicle on level ground. Check the reserve tank and the coolant\
level in the
radiator. We recommend Honda Long Life Antifreeze/Coolant Type 2.
Checking the Reserve Tank
1. Check the amount of coolant in the reserve tank.
2. If the coolant level is below the MIN mark, add
the specified coolant until it reaches the MAX
mark.
3. Inspect the cooling system for leaks.
Adding Coolant
1. Make sure the engine and radiator are cool.
2. Turn the radiator cap counterclockwise and
relieve any pressure in the coolant system. Do
not push the cap down when turning.
3. Push down and turn the radiator cap
counterclockwise to remove it.
4. The coolant level should be up to the base of the
filler neck. Add coolant if it is low.
5. Put the radiator cap back on, and tighten it fully.
6. Pour coolant into the reserve tank until it reaches
the MAX mark. Put the cap back on the reserve
tank.
Removing the radiator cap while the engine is hot can cause the coolant \
to
spray out, seriously scalding you.
Always let the engine and radiator cool down before removing the radiato\
r
cap.
WARNING
If temperatures consistently below −22°F (−30°C) are expec\
ted, the coolant
mixture should be changed to a higher concentration. Consult a dealer fo\
r details
for more information.
NOTICE
Pour the fluid slowly and carefully so you do not spill any. Clean up any spills
immediately; they can damage components in the engine compartment.
NOTICE
Radiator cap
Reserve
tank MAX
MIN
Checking the Battery
The battery condition is monitored by the sensor on the negative termina\
l. If there
is a problem with the sensor, a message appears on the display. Have your vehicle
checked by a dealer.
Check the battery terminals for corrosion monthly.
For jump starting, see page 109.
WARNING: Battery posts, terminals, and related accessories contain lead and lea\
d
compounds. Wash your hands after handling.
Window Washer Fluid
If the washer fluid level is low, fill the washer reservoir.
Canadian models
If the washer fluid level is low, the washer level
indicator or a message appears. The battery gives off explosive hydrogen gas during normal operation.
A spark or flame can cause the battery to explode with enough force to\
kill or
seriously hurt you.
When conducting any battery maintenance, wear protective clothing and a \
face shield, or have a skilled technician do it.
WARNING
Do not use engine antifreeze or a vinegar/water solution in the windshie\
ld washer
reservoir. Antifreeze can damage your vehicle’s paint. A vinegar/water solution
can damage the windshield washer pump.
NOTICE
Page 72 of 81
136 || 137
MAINTENANCE
MAINTENANCE
TABLE OF CONTENTS
INDEX
VISUAL INDEX
VOICE COMMAND
INDEX
SAFETY
INFORMATION
CUSTOMER
INFORMATION
INSTRUMENT PANEL
SPECIFICATIONS
VEHICLE
CONTROLS
MAINTENANCE
AUDIO AND
CONNECTIVITY
HANDLING THE UNEXPECTED
BLUETOOTH®
HANDSFREELINK®
DRIVING
HONDALINK®
NAVIGATION
DOT Tire Quality Grading
The tires on your vehicle meet all U.S. Federal Safety Requirements. All\
tires are
also graded for treadwear, traction, and temperature performance according
to Department of Transportation (DOT) standards. The following explains these
gradings.
Uniform Tire Quality Grading
Quality grades can be found where applicable on the tire sidewall betwee\
n tread
shoulder and maximum section width.
For example:
Treadwear 200
Traction AA
Temperature A
All passenger car tires must conform to Federal Safety Requirements in a\
ddition
to these grades.
TreadwearThe treadwear grade is a comparative rating based on the wear rate of th\
e tire
when tested under controlled conditions on a specified government test\
course.
For example, a tire graded 150 would wear one and one-half (1 1/2) tim\
es as well
on the government course as a tire graded 100. The relative performance \
of
tires depends upon the actual conditions of their use, however, and may depart
significantly from the norm due to variations in driving habits, servi\
ce practices,
and differences in road characteristics and climate.
TractionThe traction grades, from highest to lowest, are AA, A, B, and C. Those \
grades
represent the tire’s ability to stop on wet pavement as measured under controlled
conditions on specified government test surfaces of asphalt and concre\
te. A tire
marked C may have poor traction performance.
WARNING: The traction grade assigned to this tire is based on straight-ahead
braking traction tests, and does not include acceleration, cornering, hy\
droplaning,
or peak traction characteristics.
TemperatureThe temperature grades are A (the highest), B, and C, representing the\
tire’s
resistance to the generation of heat and its ability to dissipate heat w\
hen tested
under controlled conditions on a specified indoor laboratory test whee\
l. Sustained
high temperature can cause the material of the tire to degenerate and re\
duce
tire life, and excessive temperature can lead to sudden tire failure. Th\
e grade
C corresponds to a level of performance which all passenger car tires must
meet under the Federal Motor v ehicle Safety Standard No. 109. Grades B and
A represent higher levels of performance on the laboratory test wheel th\
an the
minimum required by law.
WARNING: The temperature grade for this tire is established for a tire that
is properly inflated and not overloaded. excessive speed, underinflation, or
excessive loading, either separately or in combination, can cause heat b\
uildup
and possible tire failure.
Tire Pressure Monitoring System (TPMS) - Required Federal
Explanation
U.S. models only
each tire, including the spare (if provided), should be checked monthly\
when cold and inflated to the inflation pressure recommended by the \
vehicle manufacturer on the vehicle placard or tire inflation pressure\
label.
(If your vehicle has tires of a different size than the size indicated \
on the
vehicle placard or tire inflation pressure label, you should determine\
the
proper tire inflation pressure for those tires.)
As an added safety feature, your vehicle has been equipped with
a tire pressure monitoring system (TPMS) that illuminates a low
tire pressure telltale when one or more of your tires is significantly\
under-inflated.
Accordingly, when the low tire pressure telltale illuminates, you should stop
and check your tires as soon as possible, and inflate them to the prop\
er
pressure.
Driving on a significantly under-inflated tire causes the tire to overheat and
can lead to tire failure. Under-inflation also reduces fuel efficiency and tire
tread life, and may affect the vehicle’s handling and stopping ability.
Please note that the TPMS is not a substitute for proper tire maintenanc\
e,
and it is the driver’s responsibility to maintain correct tire pressure, even if
under-inflation has not reached the level to trigger illumination of the TP\
MS
low tire pressure telltale.
Page 73 of 81
138 || 139
MAINTENANCE
MAINTENANCE
TABLE OF CONTENTS
INDEX
VISUAL INDEX
VOICE COMMAND
INDEX
SAFETY
INFORMATION
CUSTOMER
INFORMATION
INSTRUMENT PANEL
SPECIFICATIONS
VEHICLE
CONTROLS
MAINTENANCE
AUDIO AND
CONNECTIVITY
HANDLING THE UNEXPECTED
BLUETOOTH®
HANDSFREELINK®
DRIVING
HONDALINK®
NAVIGATION
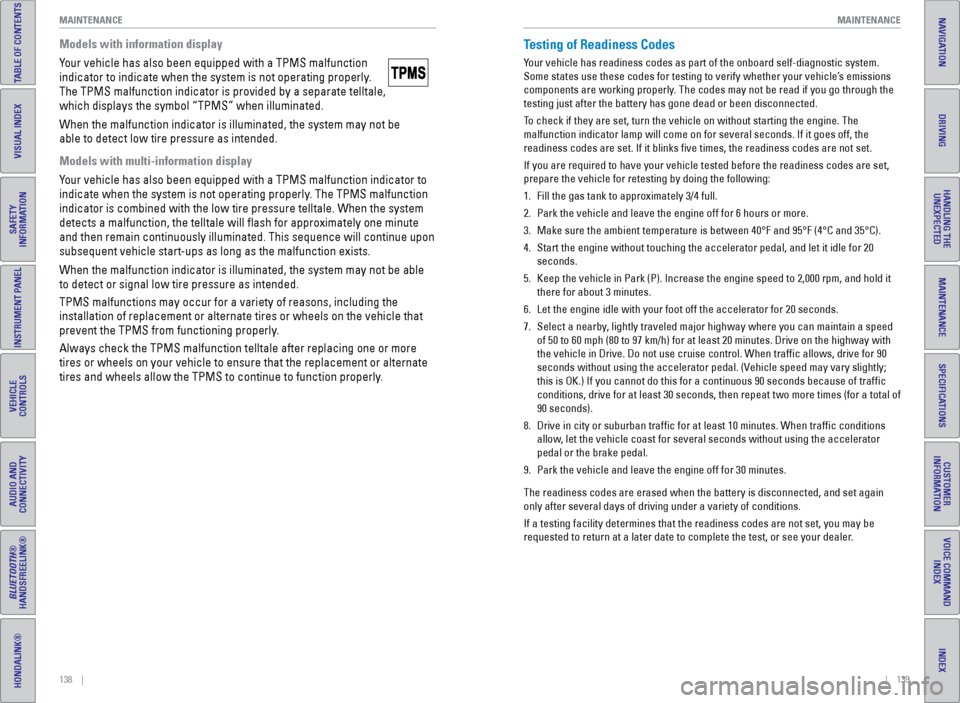
Models with information display
Your vehicle has also been equipped with a TPMS malfunction
indicator to indicate when the system is not operating properly.
The TPMS malfunction indicator is provided by a separate telltale,
which displays the symbol “TPMS” when illuminated.
When the malfunction indicator is illuminated, the system may not be
able to detect low tire pressure as intended.
Models with multi-information display
Your vehicle has also been equipped with a TPMS malfunction indicator to \
indicate when the system is not operating properly. The TPMS malfunction
indicator is combined with the low tire pressure telltale. When the syst\
em
detects a malfunction, the telltale will flash for approximately one m\
inute
and then remain continuously illuminated. This sequence will continue up\
on
subsequent vehicle start-ups as long as the malfunction exists.
When the malfunction indicator is illuminated, the system may not be abl\
e
to detect or signal low tire pressure as intended.
TPMS malfunctions may occur for a variety of reasons, including the
installation of replacement or alternate tires or wheels on the vehicle \
that
prevent the TPMS from functioning properly.
Always check the TPMS malfunction telltale after replacing one or more
tires or wheels on your vehicle to ensure that the replacement or altern\
ate
tires and wheels allow the TPMS to continue to function properly.Testing of Readiness Codes
Your vehicle has readiness codes as part of the onboard self-diagnostic s\
ystem.
Some states use these codes for testing to verify whether your vehicle’\
s emissions
components are working properly. The codes may not be read if you go through the
testing just after the battery has gone dead or been disconnected.
To check if they are set, turn the vehicle on without starting the engine\
. The
malfunction indicator lamp will come on for several seconds. If it goes \
off, the
readiness codes are set. If it blinks five times, the readiness codes \
are not set.
If you are required to have your vehicle tested before the readiness cod\
es are set,
prepare the vehicle for retesting by doing the following:
1. Fill the gas tank to approximately 3/4 full.
2. Park the vehicle and leave the engine off for 6 hours or more.
3. Make sure the ambient temperature is between 40°F and 95°F (4°\
C and 35°C).
4. Start the engine without touching the accelerator pedal, and let it idle\
for 20
seconds.
5. Keep the vehicle in Park (P). Increase the engine speed to 2,000 rpm, \
and hold it
there for about 3 minutes.
6. Let the engine idle with your foot off the accelerator for 20 seconds.
7. Select a nearby, lightly traveled major highway where you can maintain a speed
of 50 to 60 mph (80 to 97 km/h) for at least 20 minutes. Drive on the \
highway with
the vehicle in Drive. Do not use cruise control. When traffic allows, \
drive for 90
seconds without using the accelerator pedal. (v ehicle speed may vary slightly;
this is OK.) If you cannot do this for a continuous 90 seconds because \
of traffic
conditions, drive for at least 30 seconds, then repeat two more times (\
for a total of
90 seconds).
8. Drive in city or suburban traffic for at least 10 minutes. When traffi\
c conditions
allow, let the vehicle coast for several seconds without using the accelerator
pedal or the brake pedal.
9. Park the vehicle and leave the engine off for 30 minutes.
The readiness codes are erased when the battery is disconnected, and set\
again
only after several days of driving under a variety of conditions.
If a testing facility determines that the readiness codes are not set, y\
ou may be
requested to return at a later date to complete the test, or see your de\
aler.
Page 74 of 81
140 || 141
CUSTOMER INFORMATION
SPECIFICATIONS
TABLE OF CONTENTS
INDEX
VISUAL INDEX
VOICE COMMAND
INDEX
SAFETY
INFORMATION
CUSTOMER
INFORMATION
INSTRUMENT PANEL
SPECIFICATIONS
VEHICLE
CONTROLS
MAINTENANCE
AUDIO AND
CONNECTIVITY
HANDLING THE UNEXPECTED
BLUETOOTH®
HANDSFREELINK®
DRIVING
HONDALINK®
NAVIGATION
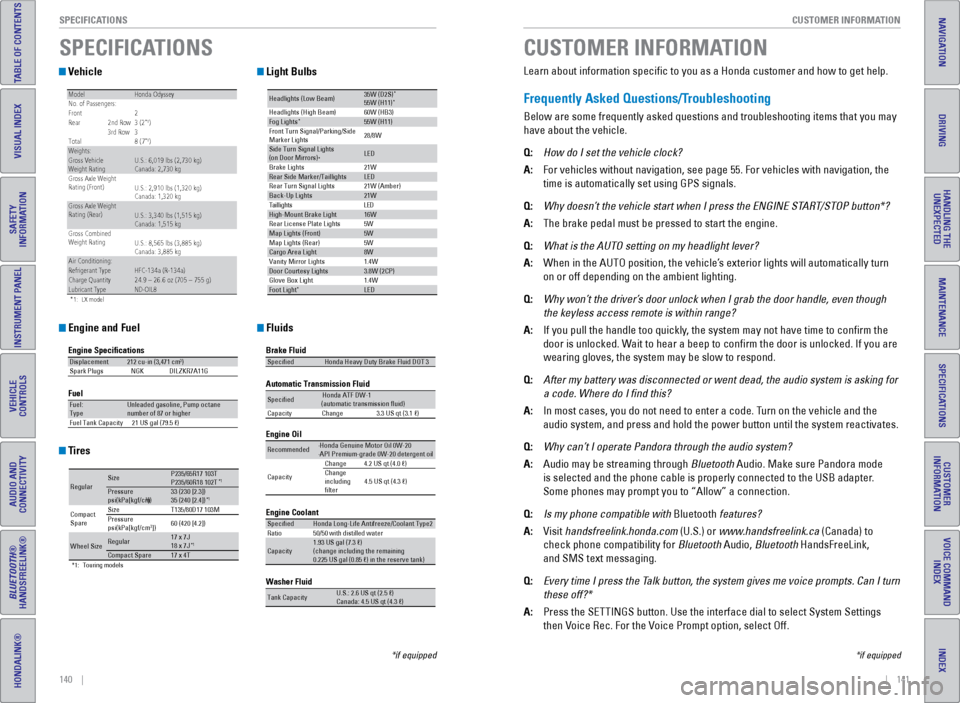
Vehicle
Engine and Fuel
Tires
Light Bulbs
Fluids
*1: LX mode l
ModelHonda OdysseyNo. of Passengers:
Front 2
Rear 2nd Row3 (2
*1)
3r d Row3
Tota l
8 (7*1)Weights:
Gross Vehicle
Weight Rating Gross Axle Weight U.S.: 6,019 lbs (2,730 kg
)
Canada: 2,730 kgRating (Front)
Gross Axle Weight U.S.: 2,910 lbs (1,320 kg
)
Canada: 1,320 kgRating (Rear)
Gross Combined U.S.: 3,340 lbs (1,515 kg
)
Canada: 1,515 kg
Weight Rating
U.S.: 8,565 lbs (3,885 kg )
Canada: 3,885 kg
Air Conditioning:Refrigerant Type Charge Quantit yLubricant Type
HFC-134a (R-134a)
24.9 – 26.6 oz (705 – 755 g)
ND-OIL8
Engine Speci�cation s
FuelDisplacement212 cu-in (3,471 cm3)
Spark Plug sN GKDILZKR7A11 G
Fuel:
TypeUnleaded gasoline, Pump octane
number of 87 or higher
Fuel Tank Capacit y21 US gal (79.5 �)
*1:T ouring models
Regula rSizeP235/65R17 103TP235/60R18 102T*1Pressure
psi(kPa[kgf/cm2])33 (23 0 [2.3])
35 (24 0 [2.4])*1
Compact
Spar e Size
T135/80D17 103M
Pressure
ps i(kPa[kgf/cm2]) 60 (42
0 [4.2])
Wheel Siz eRegular17 x 7J
18 x 7J*1Compact Spar e17 x 4T
Headlights (Low Beam)35W (D2S )*55W (H11)
60W (HB3 )
21W
5W 21W (Amber)*Head lights (High Beam )Fog Lights*55W (H11)
Front Turn Signal/Park ing/Side
Marker Lights 28/8
W
Side Turn Si gnal Lights
(on Door Mirrors)*
LE
D
Brake Lights
Rear Side Marker/TaillightsLE D
Rear Turn Signal Lights
Back-Up Lights21W D
E
L
s
t
h
g
i
l
l
i
a
T
High-Mount Brake Ligh t16W
Rear License Plate Lights
Map Lights (F ront)5W
5W
1.4W
1.4W
Map Lights (Rear)
Cargo Area Ligh
t8W
Vanity Mirror Lights
Door Courtesy Lights3.8W (2CP )
Glove Box Li ght
Foot Ligh t*LED
Brake Fluid
Automatic Transmission Flui
d
Speci�e dHonda Heavy Duty Brake Fluid DOT 3
Speci�edHonda ATF DW- 1
(automatic transmission �uid )
Ca pacity Change 3.3 US qt (3.1�)
Engine Oil
Engine Coolant
Recommended·Honda Genuine Motor Oil 0W-2 0
·API Premium-grade 0W-20 detergent oi l
Capacity Change
4.2 US qt (4.0 �)
Change
including
�lter 4.5 US qt (4.3 �)
Speci�e
dHonda Long-Life Anti freeze/Coolant Type2
Rati o5 0/50 with distilled wate r
Capacity1.93 US gal (7.3 �)
(change in cluding the remaining
0.225 US gal (0.85 �) in the reserve tank )
Washer Fluid
Tank CapacityU.S.: 2.6 US qt (2.5 �)
Canada: 4.5 US qt (4.3 �)
SPECIFICATIONS
*if equipped
Learn about information specific to you as a Honda customer and how to\
get help.
Frequently Asked Questions/Troubleshooting
Below are some frequently asked questions and troubleshooting items that\
you may
have about the vehicle.
Q: How do I set the vehicle clock?
A: For vehicles without navigation, see page 55. For vehicles with navigati\
on, the
time is automatically set using GPS signals.
Q: Why doesn’t the vehicle start when I press the ENGINE START/STOP button*?
A: The brake pedal must be pressed to start the engine.
Q: What is the AUTO setting on my headlight lever?
A: When in the AUTO position, the vehicle’s exterior lights will automatically turn
on or off depending on the ambient lighting.
Q: Why won’t the driver’s door unlock when I grab the door handle, even though
the keyless access remote is within range?
A: If you pull the handle too quickly, the system may not have time to confirm the
door is unlocked. Wait to hear a beep to confirm the door is unlocked. If you are
wearing gloves, the system may be slow to respond.
Q: After my battery was disconnected or went dead, the audio system is aski\
ng for
a code. Where do I find this?
A: In most cases, you do not need to enter a code. Turn on the vehicle and the
audio system, and press and hold the power button until the system react\
ivates.
Q: Why can’t I operate Pandora through the audio system?
A: Audio may be streaming through Bluetooth Audio. Make sure Pandora mode
is selected and the phone cable is properly connected to the USB adapter\
.
Some phones may prompt you to “Allow” a connection.
Q: Is my phone compatible with Bluetooth features?
A: visit handsfreelink.honda.com (U.S.) or www.handsfreelink.ca (Canada) to
check phone compatibility for Bluetooth Audio, Bluetooth HandsFreeLink,
and SMS text messaging.
Q: Every time I press the Talk button, the system gives me voice prompts. Can I turn
these off?*
A: Press the SeTTINGS button. Use the interface dial to select System Settings
then v oice Rec. For the v oice Prompt option, select Off.
CUSTOMER INFORMATION
*if equipped