seats HONDA ODYSSEY 2019 (in English) User Guide
[x] Cancel search | Manufacturer: HONDA, Model Year: 2019, Model line: ODYSSEY, Model: HONDA ODYSSEY 2019Pages: 767, PDF Size: 47.46 MB
Page 55 of 767
53
uuAirbags uFront Airbags (SRS)
Safe DrivingThe airbags have advanced features to help reduce the likelihood of airbag related
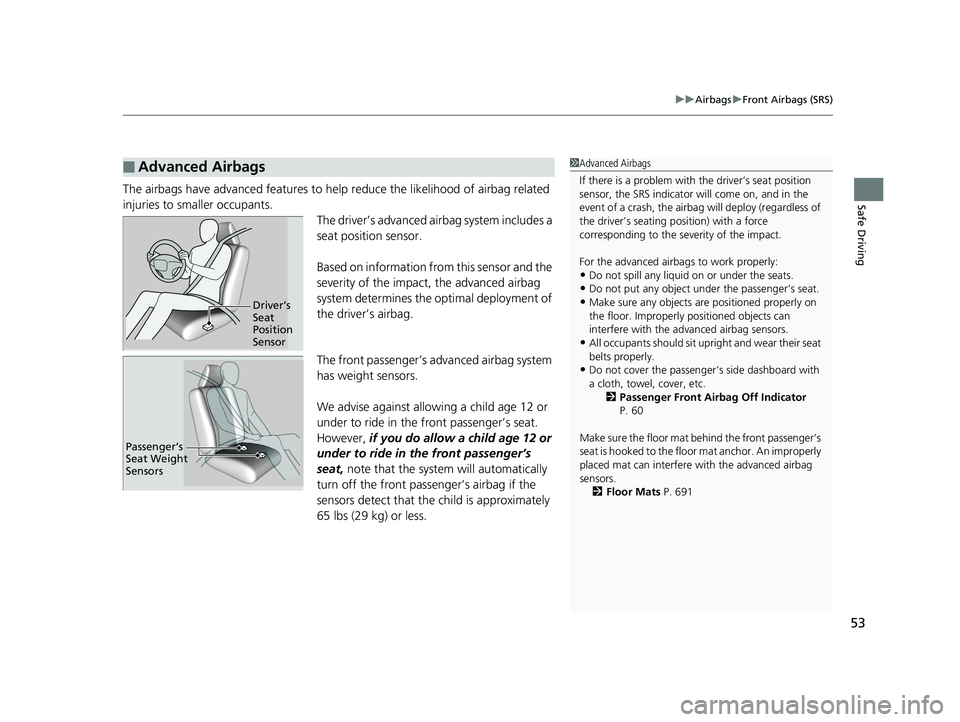
injuries to smaller occupants. The driver’s advanced airbag system includes a
seat position sensor.
Based on information from this sensor and the
severity of the impact, the advanced airbag
system determines the optimal deployment of
the driver’s airbag.
The front passenger’s ad vanced airbag system
has weight sensors.
We advise against allowi ng a child age 12 or
under to ride in the front passenger’s seat.
However, if you do allow a child age 12 or
under to ride in the front passenger’s
seat, note that the system will automatically
turn off the front passenger’s airbag if the
sensors detect that the child is approximately
65 lbs (29 kg) or less.
■Advanced Airbags1 Advanced Airbags
If there is a problem with the driver’s seat position
sensor, the SRS indicator wi ll come on, and in the
event of a crash, the airbag will deploy (regardless of
the driver’s seating position) with a force
corresponding to the se verity of the impact.
For the advanced airbags to work properly:
•Do not spill any liquid on or under the seats.
•Do not put any object under the passenger’s seat.
•Make sure any objects are positioned properly on
the floor. Improperly pos itioned objects can
interfere with the advanced airbag sensors.
•All occupants should sit upri ght and wear their seat
belts properly.
•Do not cover the passenger ’s side dashboard with
a cloth, towel, cover, etc. 2Passenger Front Airbag Off Indicator
P. 60
Make sure the floor mat behind the front passenger’s
seat is hooked to the floor mat anchor. An improperly
placed mat can interfere with the advanced airbag
sensors. 2 Floor Mats P. 691
Driver’s
Seat
Position
Sensor
Passenger’s
Seat Weight
Sensors
19 ODYSSEY-31THR6120.book 53 ページ 2018年12月6日 木曜日 午後4時35分
Page 60 of 767
58
uuAirbags uSide Curtain Airbags
Safe Driving
Side Curtain Airbags
The side curtain airbags help protect the heads of the driver and passengers in the
outer seating positions during a moderate-to -severe side impact. The side curtain
airbags equipped in th is vehicle are also designed to help reduce the likelihood of
partial and complete ejection of vehicle occupants through side windows in crashes,
particularly rollover crashes.
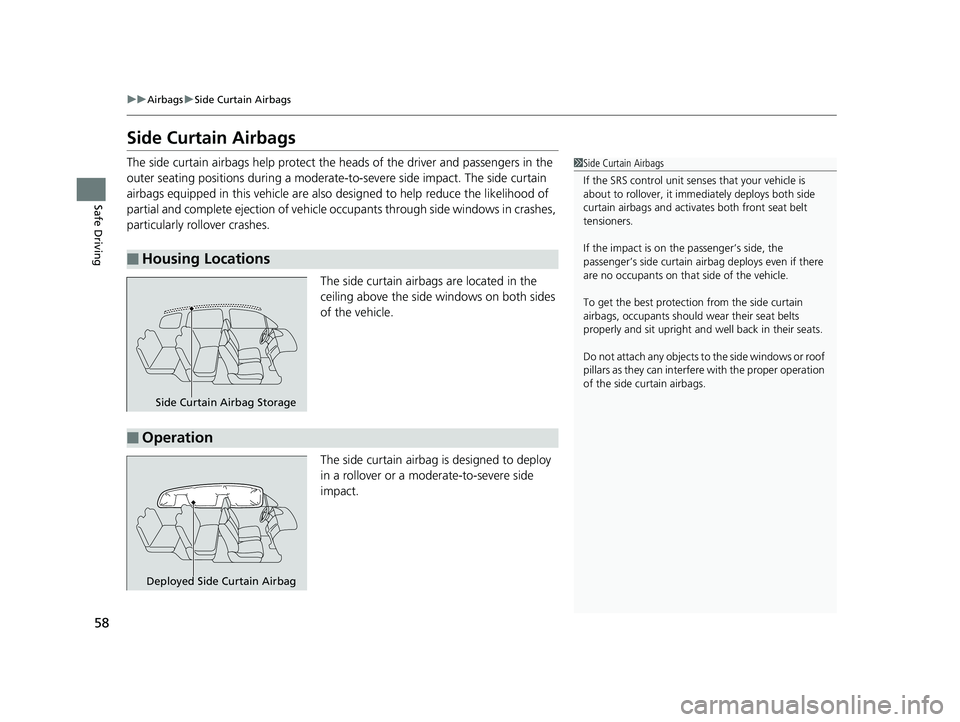
The side curtain airbags are located in the
ceiling above the side windows on both sides
of the vehicle.
The side curtain airbag is designed to deploy
in a rollover or a moderate-to-severe side
impact.
■Housing Locations
1Side Curtain Airbags
If the SRS control unit sens es that your vehicle is
about to rollover, it imme diately deploys both side
curtain airbags and activates both front seat belt
tensioners.
If the impact is on the passenger’s side, the
passenger’s side curtain airbag deploys even if there
are no occupants on that side of the vehicle.
To get the best protecti on from the side curtain
airbags, occupants should wear their seat belts
properly and sit upr ight and well back in their seats.
Do not attach any objects to the side windows or roof
pillars as they can interfere with the proper operation
of the side curtain airbags.
Side Curtain Airbag Storage
■Operation
Deployed Side Curtain Airbag
19 ODYSSEY-31THR6120.book 58 ページ 2018年12月6日 木曜日 午後4時35分
Page 66 of 767
64
uuChild Safety uSafety of Infants and Small Children
Safe Driving
Safety of Infants and Small Children
An infant must be properly restrained in a rear-facing, reclining child seat until the
infant reaches the seat manufacturer’s weig ht or height limit for the seat, and the
infant is at least one year old.
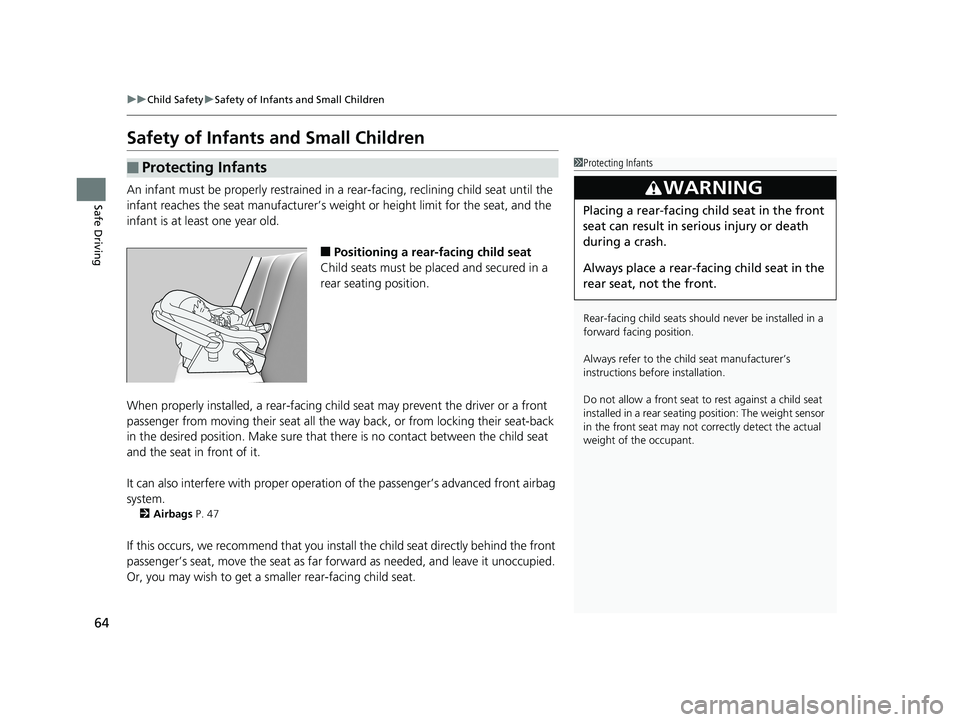
■Positioning a rear-facing child seat
Child seats must be placed and secured in a
rear seating position.
When properly installed, a rear-facing child seat may prevent the driver or a front
passenger from moving their seat all the way back, or from locking their seat-back
in the desired position. Make sure that th ere is no contact between the child seat
and the seat in front of it.
It can also interfere with pr oper operation of the passenger’s advanced front airbag
system.
2 Airbags P. 47
If this occurs, we recommend that you install the child seat directly behind the front
passenger’s seat, move the seat as far fo rward as needed, and leave it unoccupied.
Or, you may wish to get a sm aller rear-facing child seat.
■Protecting Infants1Protecting Infants
Rear-facing child seats should never be installed in a
forward facing position.
Always refer to the child seat manufacturer’s
instructions before installation.
Do not allow a front seat to rest against a child seat
installed in a rear seating position: The weight sensor
in the front seat may not co rrectly detect the actual
weight of the occupant.
3WARNING
Placing a rear-facing child seat in the front
seat can result in serious injury or death
during a crash.
Always place a rear-fac ing child seat in the
rear seat, not the front.
19 ODYSSEY-31THR6120.book 64 ページ 2018年12月6日 木曜日 午後4時35分
Page 68 of 767
uuChild Safety uSafety of Infants and Small Children
66
Safe DrivingMost child seats are LATCH-compatible (L ower Anchors and Tethers for CHildren).
Some have a rigid-type conn ector while others have a flexible-type connector. Both
are equally easy to use. Some existing and previously owned child seats can only be
installed using the seat belt. Whichever type you choose, follow the child seat
manufacturer’s use and care instructions including recommended expiration dates
as well as the instructions in this manual. Proper installation is key to maximizing
your child’s safety.
In seating positions and vehicles not equipped with LATCH, a LATCH-compatible
child seat can be installed using the seat belt and a top tether for added security.
This is because all child seats are required to be designed so that they can be secured
with a lap belt or the lap part of a lap/sh oulder belt. In addition, the child seat
manufacturer may advise that a seat belt be used to attach a LATCH-compatible seat
once a child reaches a specified weight. Please read the child seat owner’s manual
for proper installation instructions.
■Important consideration when selecting a child seat
Make sure the child seat meets th e following three requirements:
• The child seat is the correct type and size for the child.
• The child seat is the correct type for the seating position.
• The child seat is compliant with Federal Motor Vehicle Safety Standard 213 or
Canadian Motor Vehicle Safety Standard 213.
■Selecting a Child Seat1Selecting a Child Seat
Installation of a LATCH-co mpatible child seat is
simple.
LATCH-compatible child s eats have been developed
to simplify the installati on process and reduce the
likelihood of injuries caused by incorrect installation.
19 ODYSSEY-31THR6120.book 66 ページ 2018年12月6日 木曜日 午後4時35分
Page 69 of 767
Continued67
uuChild Safety uSafety of Infants and Small Children
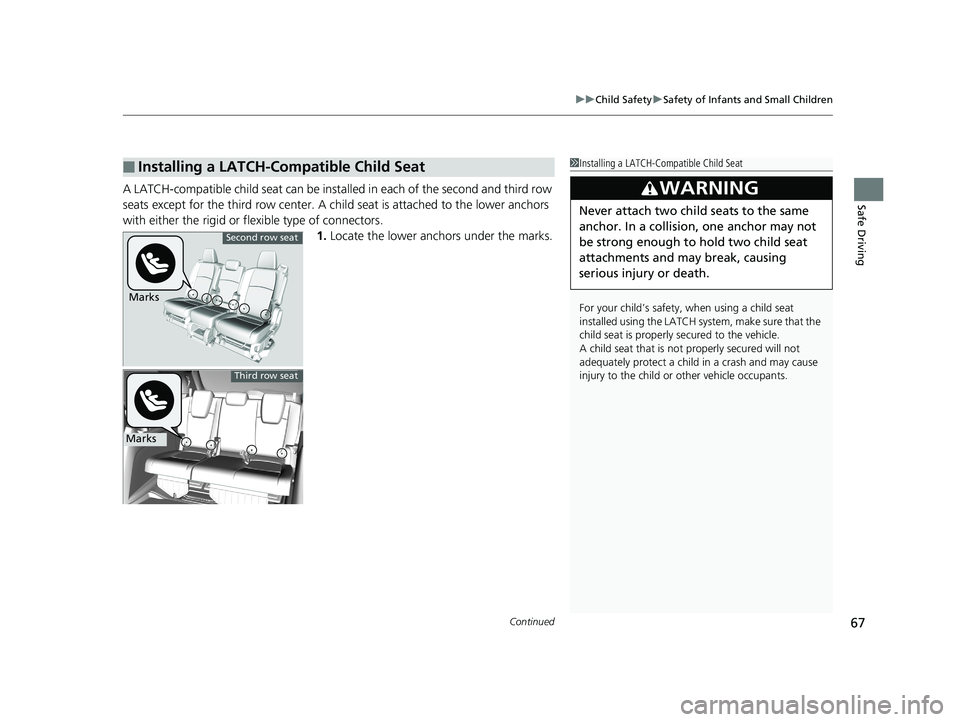
Safe DrivingA LATCH-compatible child seat can be inst alled in each of the second and third row
seats except for the third row center. A chil d seat is attached to the lower anchors
with either the rigid or fl exible type of connectors.
1.Locate the lower anchors under the marks.
■Installing a LATCH-Compatible Child Seat1Installing a LATCH-Compatible Child Seat
For your child’s safety, when using a child seat
installed using the LATCH system, make sure that the
child seat is properly secured to the vehicle.
A child seat that is not properly secured will not
adequately protect a child in a crash and may cause
injury to the child or other vehicle occupants.
3WARNING
Never attach two child seats to the same
anchor. In a collision, one anchor may not
be strong enough to hold two child seat
attachments and may break, causing
serious injury or death.
Marks
Second row seat
Marks
Third row seat
19 ODYSSEY-31THR6120.book 67 ページ 2018年12月6日 木曜日 午後4時35分
Page 70 of 767
uuChild Safety uSafety of Infants and Small Children
68
Safe Driving
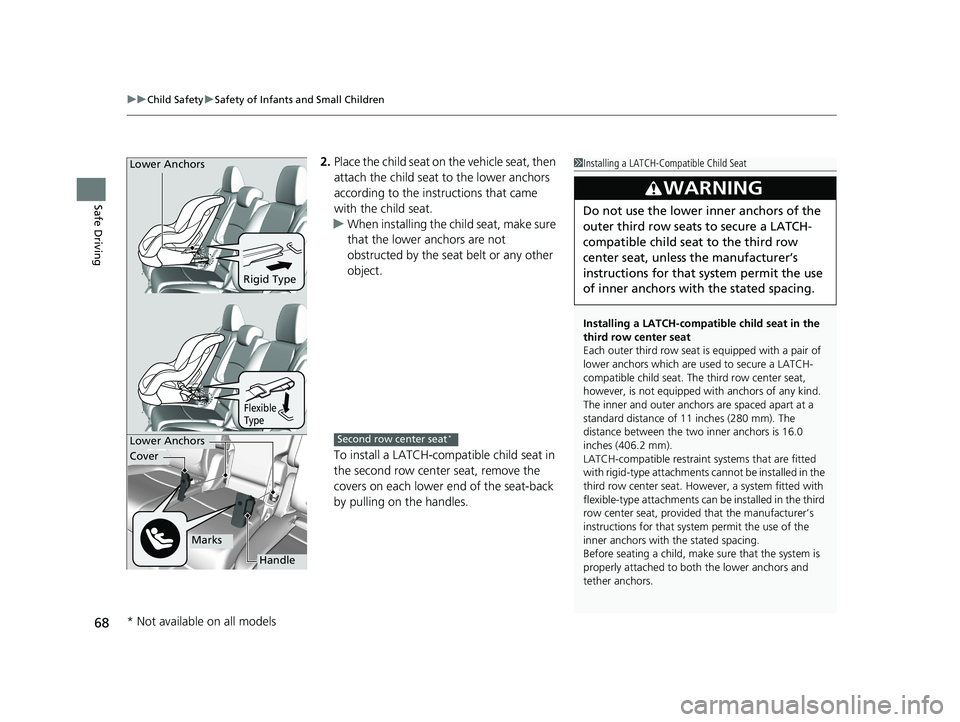
2. Place the child seat on the vehicle seat, then
attach the child seat to the lower anchors
according to the instructions that came
with the child seat.
u When installing the child seat, make sure
that the lower anchors are not
obstructed by the seat belt or any other
object.
To install a LATCH-compatible child seat in
the second row center seat, remove the
covers on each lower end of the seat-back
by pulling on the handles.1 Installing a LATCH-Compatible Child Seat
Installing a LATCH-compatible child seat in the
third row center seat
Each outer third row seat is equipped with a pair of
lower anchors which are used to secure a LATCH-
compatible child seat. The third row center seat,
however, is not equipped wi th anchors of any kind.
The inner and outer anchors are spaced apart at a
standard distance of 11 inches (280 mm). The
distance between the two inner anchors is 16.0
inches (406.2 mm).
LATCH-compatible restraint systems that are fitted
with rigid-type attachments cannot be installed in the
third row center seat. However, a system fitted with
flexible-type attachments can be installed in the third
row center seat, provided that the manufacturer’s
instructions for that system permit the use of the
inner anchors with the stated spacing.
Before seating a child, make sure that the system is
properly attached to both the lower anchors and
tether anchors.
3WARNING
Do not use the lower inner anchors of the
outer third row seats to secure a LATCH-
compatible child seat to the third row
center seat, unless the manufacturer’s
instructions for that system permit the use
of inner anchors with the stated spacing.
Rigid Type
Lower Anchors
Flexible
Type
Lower Anchors
Handle
Marks
Cover
Second row center seat*
* Not available on all models
19 ODYSSEY-31THR6120.book 68 ページ 2018年12月6日 木曜日 午後4時35分
Page 76 of 767
uuChild Safety uSafety of Infants and Small Children
74
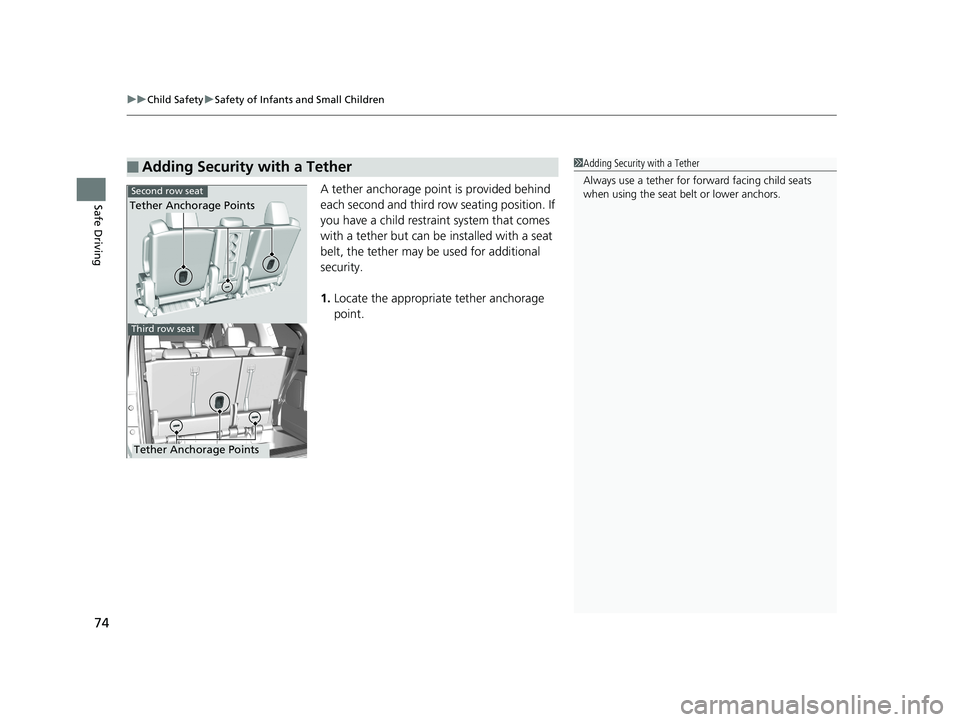
Safe DrivingA tether anchorage point is provided behind
each second and third row seating position. If
you have a child restraint system that comes
with a tether but can be installed with a seat
belt, the tether may be used for additional
security.
1. Locate the appropriate tether anchorage
point.
■Adding Security with a Tether1Adding Security with a Tether
Always use a tether for forward facing child seats
when using the seat be lt or lower anchors.
Second row seat
Third row seat
Tether Anchorage Points
Tether Anchorage Points
19 ODYSSEY-31THR6120.book 74 ページ 2018年12月6日 木曜日 午後4時35分
Page 81 of 767
79
uuChild Safety uSafety of Larger Children
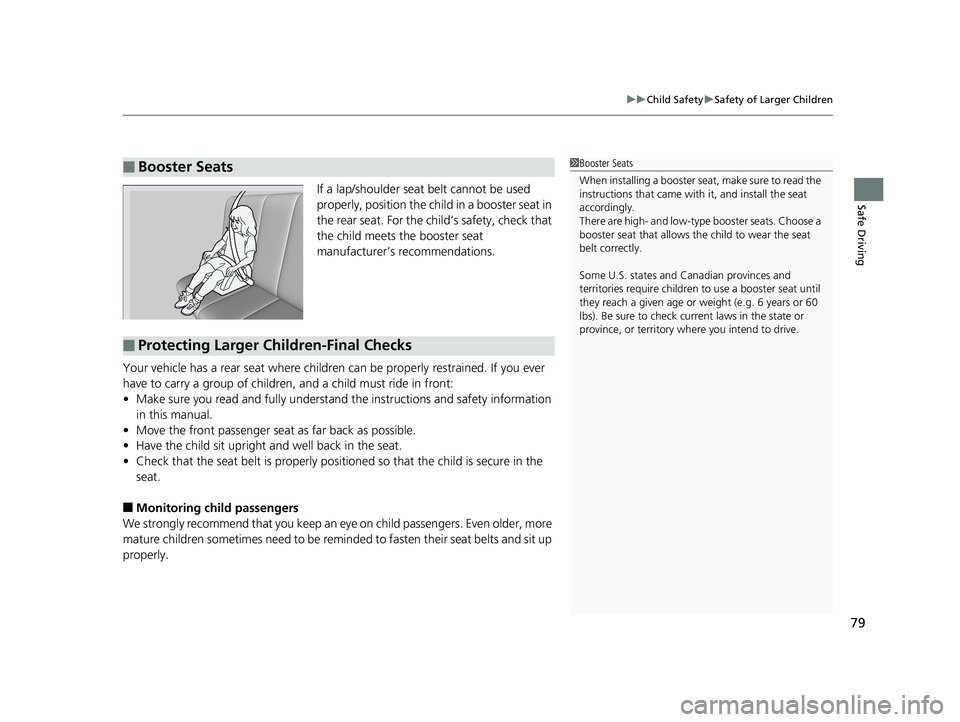
Safe DrivingIf a lap/shoulder seat belt cannot be used
properly, position the child in a booster seat in
the rear seat. For the child’s safety, check that
the child meets the booster seat
manufacturer’s recommendations.
Your vehicle has a rear seat where children can be properly restrained. If you ever
have to carry a group of children, and a child must ride in front:
• Make sure you read and fully understand the instructions and safety information
in this manual.
• Move the front passenger seat as far back as possible.
• Have the child sit upright and well back in the seat.
• Check that the seat belt is properly positi oned so that the child is secure in the
seat.
■Monitoring child passengers
We strongly recommend that you keep an ey e on child passengers. Even older, more
mature children sometimes need to be remind ed to fasten their seat belts and sit up
properly.
■Booster Seats1 Booster Seats
When installing a booster seat, make sure to read the
instructions that came with it, and install the seat
accordingly.
There are high- and low-type booster seats. Choose a
booster seat that allows the child to wear the seat
belt correctly.
Some U.S. states and Canadian provinces and
territories require children to use a booster seat until
they reach a given age or weight (e.g. 6 years or 60
lbs). Be sure to check current laws in the state or
province, or territory where you intend to drive.
■Protecting Larger Children-Final Checks
19 ODYSSEY-31THR6120.book 79 ページ 2018年12月6日 木曜日 午後4時35分
Page 143 of 767
141
Controls
This chapter explains how to operate the various controls necessary for driving.
Clock.................................................. 142
Locking and Unlocking the Doors Key Types and Functions .................. 144
Low Remote Signal Strength ............ 146
Locking/Unlocking the Doors from the Outside .... 147
Locking/Unlocking the Doors from the Inside ...154
Childproof Door Locks ..................... 157
Auto Door Locking/Unlocking .......... 158
Opening and Closing the Tailgate ... 159
Opening and Closing the Sliding Doors..... 170Security System
Immobilizer System .......................... 179
Security System Alarm ...................... 179
Opening and Closing the Windows.... 182Opening and Closing the Moonroof*..... 185
Operating the Switches Around the Steering Wheel ENGINE START/STOP Button............. 186
Turn Signals ..................................... 189
Light Switches.................................. 189
Fog Lights
*...................................... 192
Daytime Running Lights ................... 193
Auto High-Beam
*............................ 194
Wipers and Washers ........................ 197
Brightness Control ........................... 200
Rear Defogger/Heated Door Mirror* Button...201
Heated Windshield Button ............... 202
Driving Position Memory System*.... 203
Adjusting the Steering Wheel........... 205
Canadian models
Adjusting the Mirrors ....................... 206
Interior Rearview Mirror ................... 206
Power Door Mirrors .............................. 207
Adjusting the Seats Front Seats ........................................... 209
Head Restraints .................................... 212
Maintain a Proper Sitting Position ......... 215
Interior Lights/Interior Convenience Items...... 225Interior Lights ....................................... 225
Interior Convenience Items ................... 227
Climate Control System
Using Automatic Climate Control ......... 248
Using Automatic Climate Control ......... 252
Automatic Climate Control Sensors ...... 257
Dual-zone climate control system
Tri-zone climate control system
* Not available on all models
19 ODYSSEY-31THR6120.book 141 ページ 2018年12月6日 木曜日 午後4時35分
Page 208 of 767
206
Controls
Adjusting the Mirrors
Interior Rearview Mirror
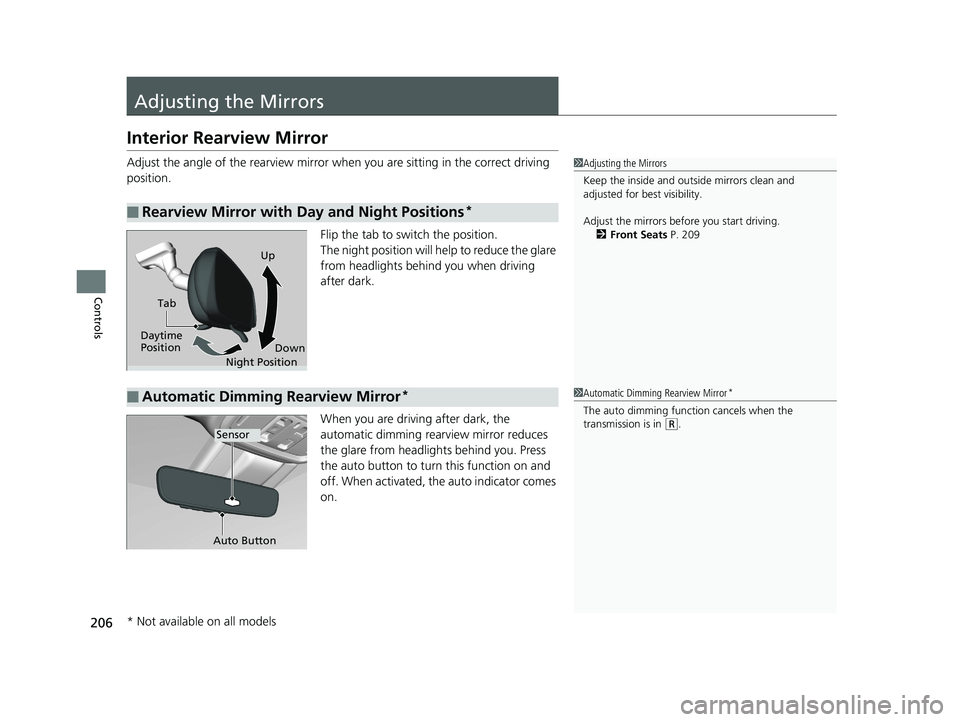
Adjust the angle of the rearview mirror when you are sitting in the correct driving
position.
Flip the tab to switch the position.
The night position will help to reduce the glare
from headlights behind you when driving
after dark.
When you are driving after dark, the
automatic dimming rearview mirror reduces
the glare from headlights behind you. Press
the auto button to turn this function on and
off. When activated, the auto indicator comes
on.
■Rearview Mirror with Day and Night Positions*
1Adjusting the Mirrors
Keep the inside and out side mirrors clean and
adjusted for best visibility.
Adjust the mirrors befo re you start driving.
2 Front Seats P. 209
Tab
Daytime
Position Night PositionUp
Down
■Automatic Dimming Rearview Mirror*1Automatic Dimming Rearview Mirror*
The auto dimming function cancels when the
transmission is in
(R.Sensor
Auto Button
* Not available on all models
19 ODYSSEY-31THR6120.book 206 ページ 2018年12月6日 木曜日 午後4時35分