ECO mode HONDA PASSPORT 2020 (in English) Repair Manual
[x] Cancel search | Manufacturer: HONDA, Model Year: 2020, Model line: PASSPORT, Model: HONDA PASSPORT 2020Pages: 667, PDF Size: 39.71 MB
Page 200 of 667
198
Controls
Interior Lights/Interior Convenience Items
Interior Lights
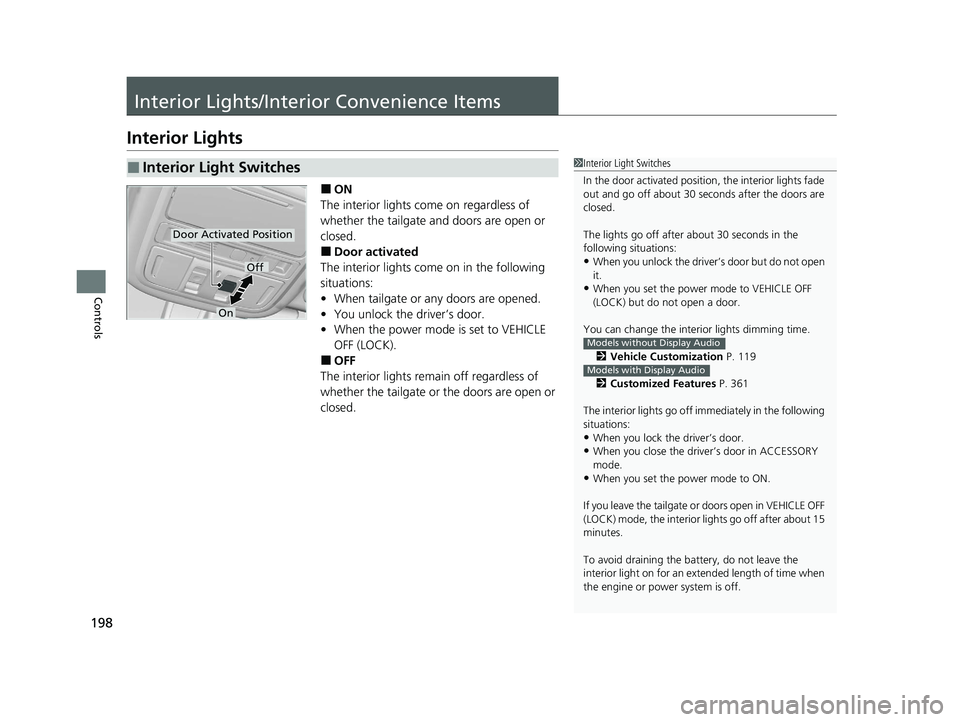
■ON
The interior lights come on regardless of
whether the tailgate and doors are open or
closed.
■Door activated
The interior lights come on in the following
situations:
• When tailgate or any doors are opened.
• You unlock the driver’s door.
• When the power mode is set to VEHICLE
OFF (LOCK).
■OFF
The interior lights remain off regardless of
whether the tailgate or the doors are open or
closed.
■Interior Light Switches1 Interior Light Switches
In the door activated position, the interior lights fade
out and go off about 30 se conds after the doors are
closed.
The lights go off after about 30 seconds in the
following situations:
•When you unlock the driver’s door but do not open
it.
•When you set the power mode to VEHICLE OFF
(LOCK) but do not open a door.
You can change the interi or lights dimming time.
2 Vehicle Customization P. 119
2 Customized Features P. 361
The interior lights go off im mediately in the following
situations:
•When you lock the driver’s door.
•When you close the driver’s door in ACCESSORY
mode.
•When you set the power mode to ON.
If you leave the tailgate or doors open in VEHICLE OFF
(LOCK) mode, the interior lights go off after about 15
minutes.
To avoid draining the ba ttery, do not leave the
interior light on for an extended length of time when
the engine or power system is off.
Models without Display Audio
Models with Display Audio
Door Activated Position
Off
On
20 PASSPORT-31TGS6100.book 198 ページ 2019年8月30日 金曜日 午後6時22分
Page 209 of 667
Continued207
uuInterior Lights/Interior Convenience Items uInterior Convenience Items
Controls
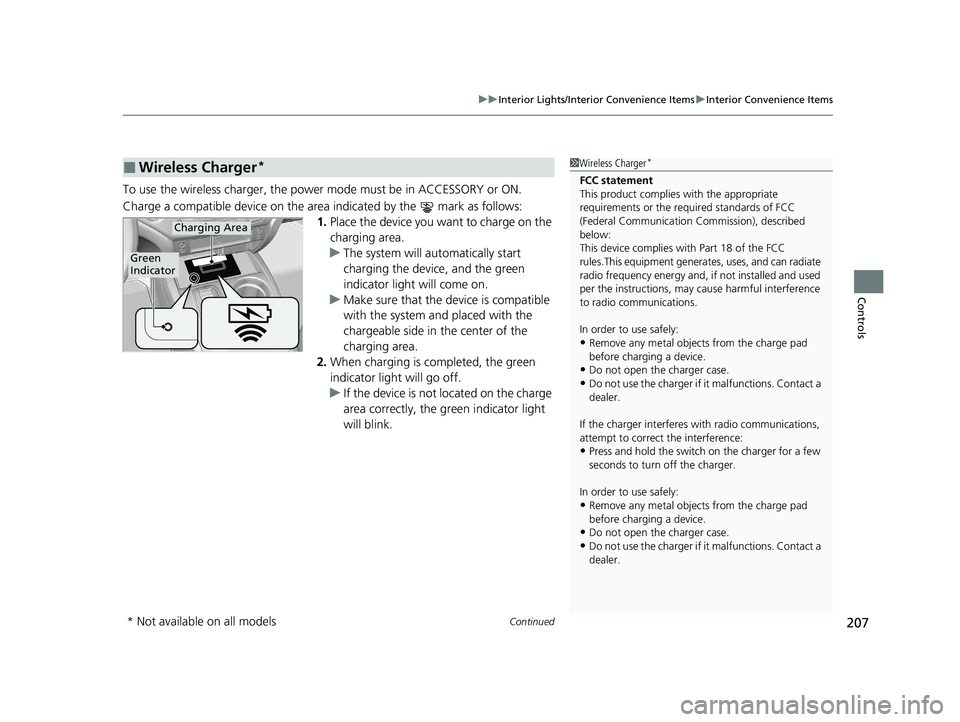
To use the wireless charger, the power mode must be in ACCESSORY or ON.
Charge a compatible device on the ar ea indicated by the mark as follows:
1. Place the device you want to charge on the
charging area.
u The system will au tomatically start
charging the device, and the green
indicator light will come on.
u Make sure that the device is compatible
with the system and placed with the
chargeable side in the center of the
charging area.
2. When charging is completed, the green
indicator light will go off.
u If the device is not located on the charge
area correctly, the green indicator light
will blink.
■Wireless Charger*1Wireless Charger*
FCC statement
This product complies with the appropriate
requirements or the requ ired standards of FCC
(Federal Communication Commission), described
below:
This device complies with Part 18 of the FCC
rules.This equipment generates, uses, and can radiate
radio frequency energy and, if not installed and used
per the instructions, may cause harmful interference
to radio communications.
In order to use safely:
•Remove any metal objects from the charge pad
before charging a device.
•Do not open the charger case.
•Do not use the charger if it malfunctions. Contact a
dealer.
If the charger interferes with radio communications,
attempt to correct the interference:
•Press and hold the switch on the charger for a few
seconds to turn off the charger.
In order to use safely:
•Remove any metal objects from the charge pad
before charging a device.
•Do not open the charger case.
•Do not use the charger if it malfunctions. Contact a
dealer.
Green
Indicator
Charging Area
* Not available on all models
20 PASSPORT-31TGS6100.book 207 ページ 2019年8月30日 金曜日 午後6時22分
Page 211 of 667
Continued209
uuInterior Lights/Interior Convenience Items uInterior Convenience Items
Controls
1Wireless Charger*
This system consumes a lot of power. Do not use the
system for a long time when the engine is not
running. This may weaken the battery, making it
difficult to start the engine.
When using the wireless charger, check the user’s
manual that came with th e compatible device you
want to charge.
NOTICE
Do not place any magneti c recording media or
precision machines within the charging area while
charging.
The data on your cards such as credit cards can be
lost because of the magneti c effect. Also precision
machines such as watches can go wrong.
“Qi” and marks are the registered trademarks
owned by Wire less Power Consortium (WPC).
In the following cases, ch arging may stop or not start:
•The device is already fully charged.
•The temperature of the device is extremely high
while charging.
•You are at a place that emits strong
electromagnetic waves or noises, such as a TV
station, electric power plant, or gas station.
A device may not charge if the size or shape of its
chargeable side is not a ppropriate for use with the
charging area.
* Not available on all models
20 PASSPORT-31TGS6100.book 209 ページ 2019年8月30日 金曜日 午後6時22分
Page 221 of 667
219Continued
Controls
Climate Control System
Using Automatic Climate Control
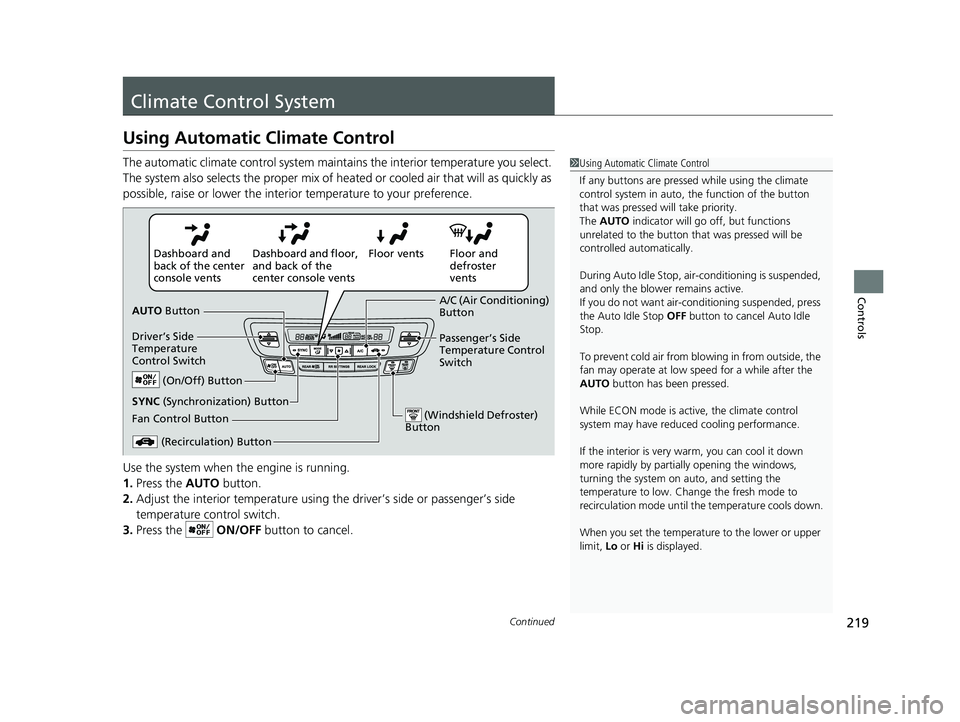
The automatic climate control system maintains the interior temperature you select.
The system also selects the proper mix of h eated or cooled air that will as quickly as
possible, raise or lower the interior temperature to your preference.
Use the system when the engine is running.
1. Press the AUTO button.
2. Adjust the interior temperature using the driver’s side or passenger’s side
temperature control switch.
3. Press the ON/OFF button to cancel.1Using Automatic Climate Control
If any buttons are presse d while using the climate
control system in auto, the function of the button
that was pressed will take priority.
The AUTO indicator will go off, but functions
unrelated to the button th at was pressed will be
controlled automatically.
During Auto Idle Stop, air- conditioning is suspended,
and only the blower remains active.
If you do not want air-cond itioning suspended, press
the Auto Idle Stop OFF button to cancel Auto Idle
Stop.
To prevent cold air from bl owing in from outside, the
fan may operate at low speed for a while after the
AUTO button has been pressed.
While ECON mode is active, the climate control
system may have reduced cooling performance.
If the interior is very warm, you can cool it down
more rapidly by partial ly opening the windows,
turning the system on auto, and setting the
temperature to low. Change the fresh mode to
recirculation mode until the temperature cools down.
When you set the temperat ure to the lower or upper
limit, Lo or Hi is displayed.
Floor and
defroster
vents
Floor vents
Dashboard and floor,
and back of the
center console vents
Dashboard and
back of the center
console vents
AUTO Button
Driver’s Side
Temperature
Control Switch
(Recirculation) Button
Fan Control Button A/C (Air Conditioning)
Button
Passenger’s Side
Temperature Control
Switch
(On/Off) Button
(Windshield Defroster)
Button
SYNC (Synchronization) Button
20 PASSPORT-31TGS6100.book 219 ページ 2019年8月30日 金曜日 午後6時22分
Page 225 of 667
223
uuClimate Control System uRear Climate Control System
Continued
Controls
Rear Climate Control System
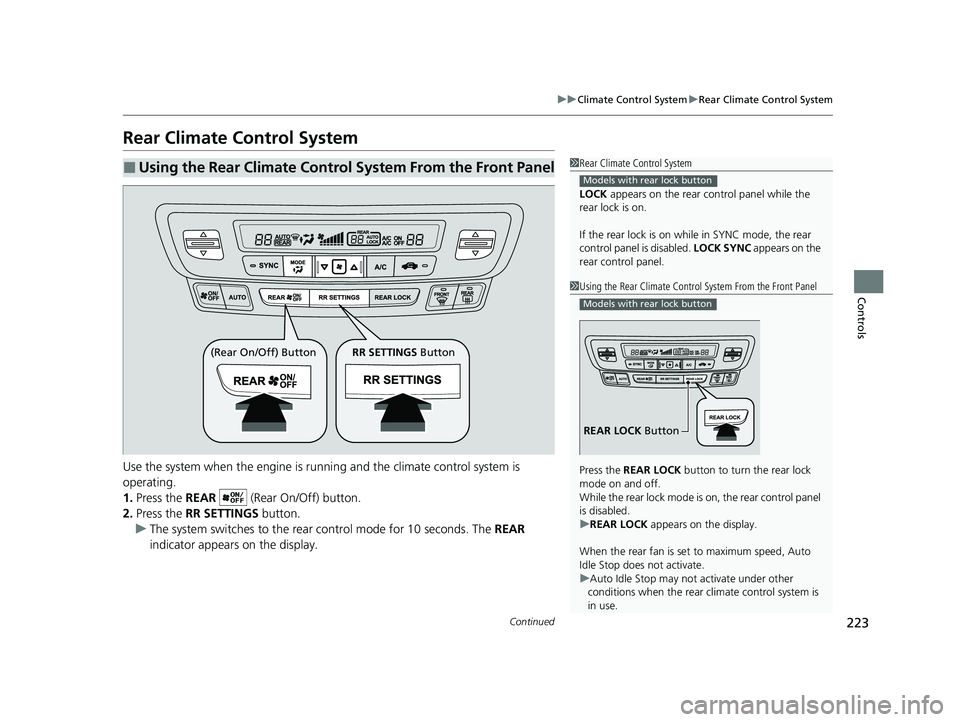
Use the system when the engine is runni ng and the climate control system is
operating.
1. Press the REAR (Rear On/Off) button.
2. Press the RR SETTINGS button.
u The system switches to the rear control mode for 10 seconds. The REAR
indicator appears on the display.
■Using the Rear Climate Control System From the Front Panel1 Rear Climate Control System
LOCK appears on the rear control panel while the
rear lock is on.
If the rear lock is on while in SYNC mode, the rear
control panel is disabled. LOCK SYNC appears on the
rear control panel.
Models with rear lock button
1 Using the Rear Climate Control System From the Front Panel
Press the REAR LOCK button to turn the rear lock
mode on and off.
While the rear lock mode is on, the rear control panel
is disabled.
u REAR LOCK appears on the display.
When the rear fan is set to maximum speed, Auto
Idle Stop does not activate.
u Auto Idle Stop may not activate under other
conditions when the rear climate control system is
in use.
Models with rear lock button
REAR LOCK Button
(Rear On/Off) Button RR SETTINGS Button
20 PASSPORT-31TGS6100.book 223 ページ 2019年8月30日 金曜日 午後6時22分
Page 231 of 667
229
uuAudio System uUSB Ports
Continued
Features
USB Ports
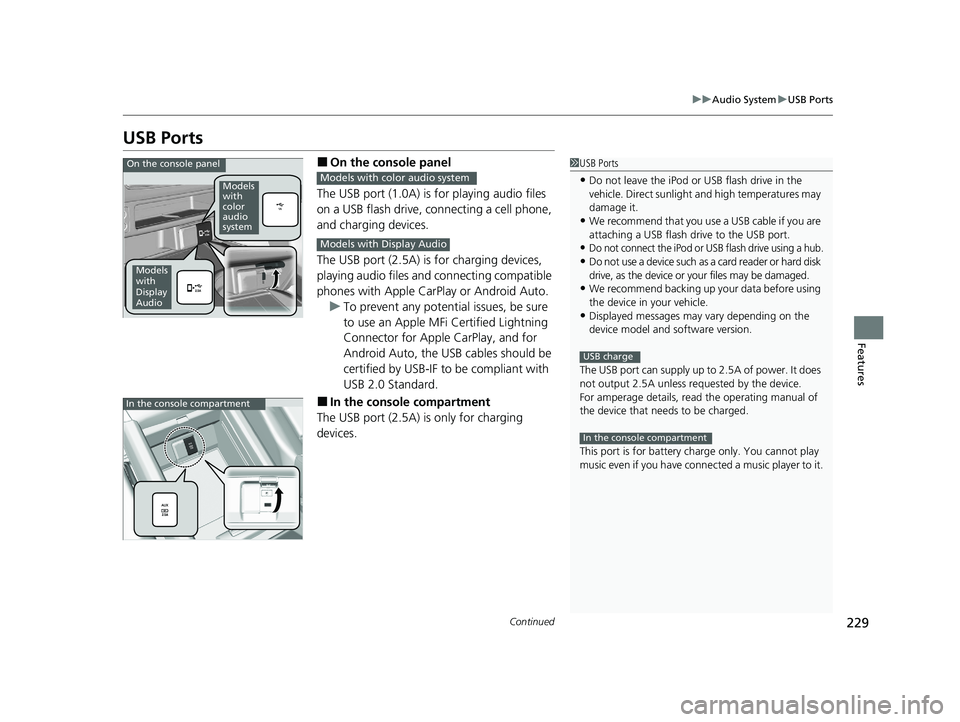
■On the console panel
The USB port (1.0A) is for playing audio files
on a USB flash drive, connecting a cell phone,
and charging devices.
The USB port (2.5A) is for charging devices,
playing audio files and connecting compatible
phones with Apple CarPlay or Android Auto. u To prevent any potenti al issues, be sure
to use an Apple MFi Certified Lightning
Connector for Apple CarPlay, and for
Android Auto, the USB cables should be
certified by USB-IF to be compliant with
USB 2.0 Standard.
■In the consol e compartment
The USB port (2.5A) is only for charging
devices.
1 USB Ports
•Do not leave the iPod or USB flash drive in the
vehicle. Direct sunlight and high temperatures may
damage it.
•We recommend that you us e a USB cable if you are
attaching a USB flash drive to the USB port.
•Do not connect the iPod or USB flash drive using a hub.
•Do not use a device such as a card reader or hard disk
drive, as the device or your files may be damaged.
•We recommend backing up yo ur data before using
the device in your vehicle.
•Displayed messages may vary depending on the
device model and software version.
The USB port can supply up to 2.5A of power. It does
not output 2.5A unless requested by the device.
For amperage details, read the operating manual of
the device that ne eds to be charged.
This port is for battery charge only. You cannot play
music even if you have conne cted a music player to it.
USB charge
In the console compartment
Models
with
color
audio
system
Models
with
Display
Audio
On the console panel
Models with color audio system
Models with Display Audio
In the console compartment
20 PASSPORT-31TGS6100.book 229 ページ 2019年8月30日 金曜日 午後6時22分
Page 233 of 667
231
uuAudio System uAudio System Theft Protection
Features
Audio System Theft Protection
The audio system is disabled when it is disconnected from the power source, such as
when the battery is disconnected or goes dead. In certain conditions, the system
may display a code entry screen. If this occurs, reactivate the audio system.
■Reactivating the audio system
1. Set the power mode to ON.
2. Turn on the audio system.
3. Press and hold the audio system powe r button for more than two seconds.
u The audio system is reac tivated when the audio co ntrol unit establishes a
connection with the vehicl e control unit. If the control unit fails to recognize
the audio unit, you must go to a dealer and have the audio unit checked.
20 PASSPORT-31TGS6100.book 231 ページ 2019年8月30日 金曜日 午後6時22分
Page 237 of 667
235
Features
Audio System Basic Operation
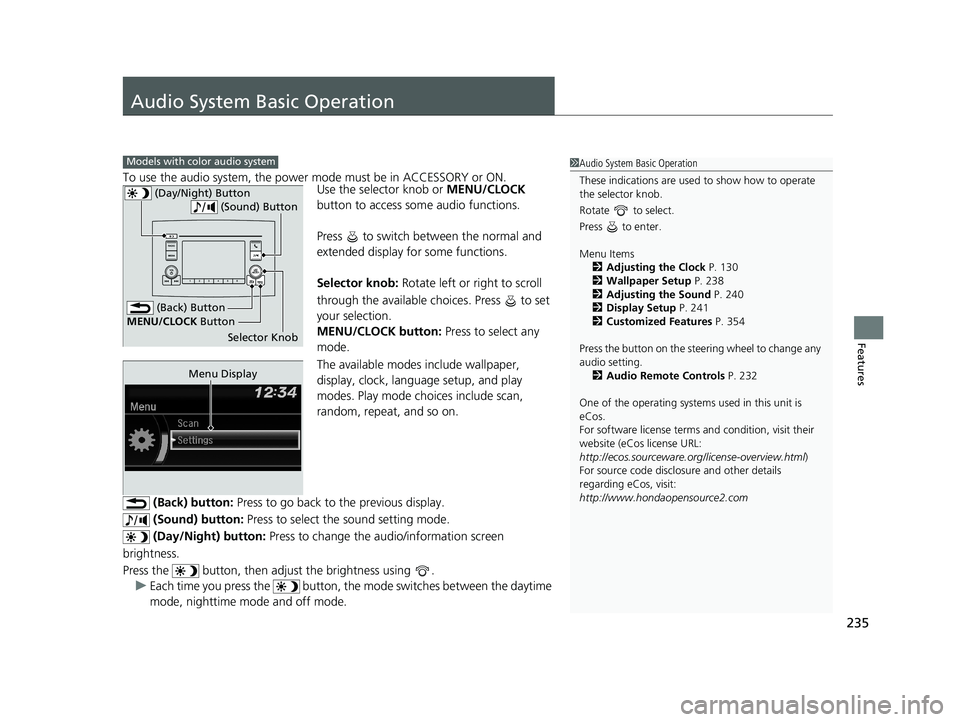
To use the audio system, the power mode must be in ACCESSORY or ON.Use the selector knob or MENU/CLOCK
button to access some audio functions.
Press to switch between the normal and
extended display fo r some functions.
Selector knob: Rotate left or right to scroll
through the available choices. Press to set
your selection.
MENU/CLOCK button: Press to select any
mode.
The available modes include wallpaper,
display, clock, language setup, and play
modes. Play mode choices include scan,
random, repeat, and so on.
(Back) button: Press to go back to the previous display.
(Sound) button: Press to select the sound setting mode.
(Day/Night) button: Press to change the audio/information screen
brightness.
Press the button, then adjust the brightness using . u Each time you press the button, the mode switches between the daytime
mode, nighttime mode and off mode.
Models with color audio system1 Audio System Basic Operation
These indications are used to show how to operate
the selector knob.
Rotate to select.
Press to enter.
Menu Items 2 Adjusting the Clock P. 130
2 Wallpaper Setup P. 238
2 Adjusting the Sound P. 240
2 Display Setup P. 241
2 Customized Features P. 354
Press the button on the stee ring wheel to change any
audio setting. 2 Audio Remote Controls P. 232
One of the operating system s used in this unit is
eCos.
For software license terms and condition, visit their
website (eCos license URL:
http://ecos.sourceware.org/license-overview.html )
For source code disclo sure and other details
regarding eCos, visit:
http://www.hondaopensource2.com
(Back) Button
Selector Knob
MENU/CLOCK
Button
(Day/Night) Button
(Sound) Button
Menu Display
20 PASSPORT-31TGS6100.book 235 ページ 2019年8月30日 金曜日 午後6時22分
Page 245 of 667
243
uuAudio System Basic Operation uPlaying AM/FM Radio
Features
Provides text data information related to your selected RDS capable FM station.
■To find an RDS station from Station List
1. Press while listening to an FM station.
2. Rotate to select the station, then press .
■Update List
Updates your available st ation list at any time.
1. Press while listening to an FM station.
2. Rotate to select Update List, then press .
■Radio text
Displays the radio text information of the selected RDS station.
1. Press the MENU/CLOCK button.
2. Rotate to select Settings, then press .
3. Rotate to select RDS Settings, then press .
4. Rotate to select Radio Text, then press .
■Scan
Samples each of the strongest stations on the selected band for 10 seconds.
1. Press the MENU/CLOCK button.
2. Rotate to select Scan, then press .
To turn off scan, press .
■Radio Data System (RDS)1 Playing AM/FM Radio
The ST indicator appears on the display indicating
stereo FM broadcasts.
Stereo reproduction in AM is not available.
You can store 6 AM stations and 12 FM stations into
reset button memory. FM1 and FM2 let you store 6
stations each.
Switching the Audio Mode
Press the SOURCE button on the steering wheel.
2 Audio Remote Controls P. 232
1Radio Data System (RDS)
When you select an RDS-capable FM station, the RDS
automatically turns on, and the frequency display
changes to the station name. However, when the
signals of that station become weak, the display
changes from the statio n name to the frequency.
20 PASSPORT-31TGS6100.book 243 ページ 2019年8月30日 金曜日 午後6時22分
Page 249 of 667
247
uuAudio System Basic Operation uPlaying a USB Flash Drive
Continued
Features
Playing a USB Flash Drive
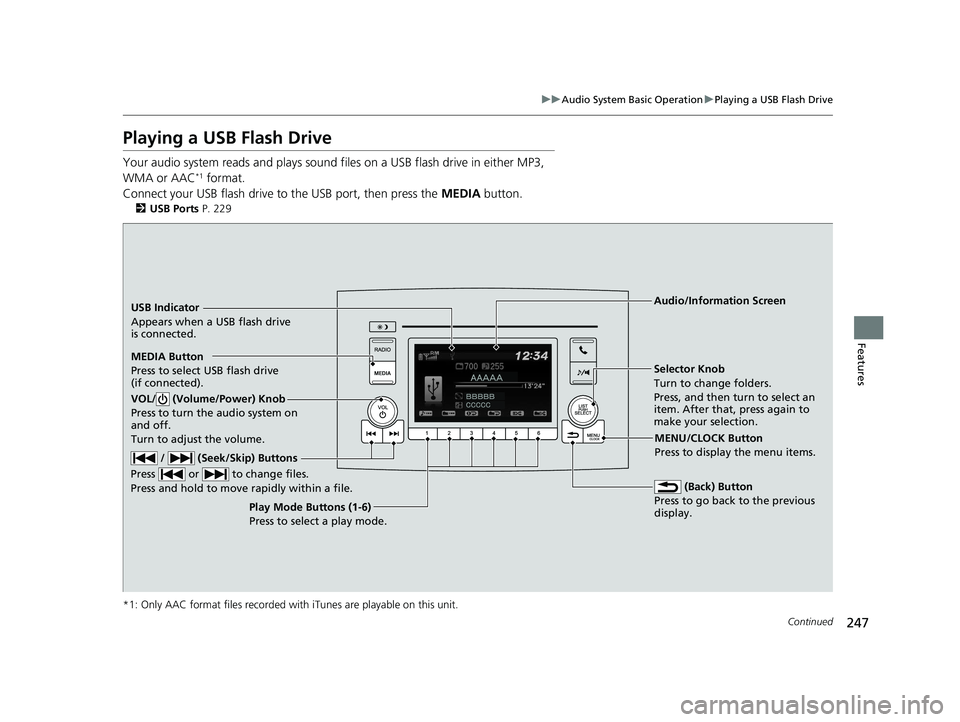
Your audio system reads and plays sound files on a USB flash drive in either MP3,
WMA or AAC*1 format.
Connect your USB flash drive to the USB port, then press the MEDIA button.
2USB Ports P. 229
*1: Only AAC format files recorded with iTunes are playable on this unit.
USB Indicator
Appears when a USB flash drive
is connected.
MEDIA Button
Press to select USB flash drive
(if connected). (Back) Button
Press to go back to the previous
display.
/ (Seek/Skip) Buttons
Press or to change files.
Press and hold to move rapidly within a file.
VOL/ (Volume/Power) Knob
Press to turn the audio system on
and off.
Turn to adjust the volume.
Selector Knob
Turn to change folders.
Press, and then turn to select an
item. After that, press again to
make your selection.
MENU/CLOCK Button
Press to display the menu items.
Audio/Information Screen
Play Mode Buttons (1-6)
Pres
s to select a play mode.
20 PASSPORT-31TGS6100.book 247 ページ 2019年8月30日 金曜日 午後6時22分