buttons HONDA PILOT 2011 2.G Navigation Manual
[x] Cancel search | Manufacturer: HONDA, Model Year: 2011, Model line: PILOT, Model: HONDA PILOT 2011 2.GPages: 159, PDF Size: 3.39 MB
Page 11 of 159
Navigation System11
Getting Started
Display Mode button
Switches the display between Day
mode, Night mode, and OFF. See
page98.
AUDIO button
Press to display the audio screen.
For more information on audio system
features, see the Audio section of your
Owner’s Manual.
Other buttons
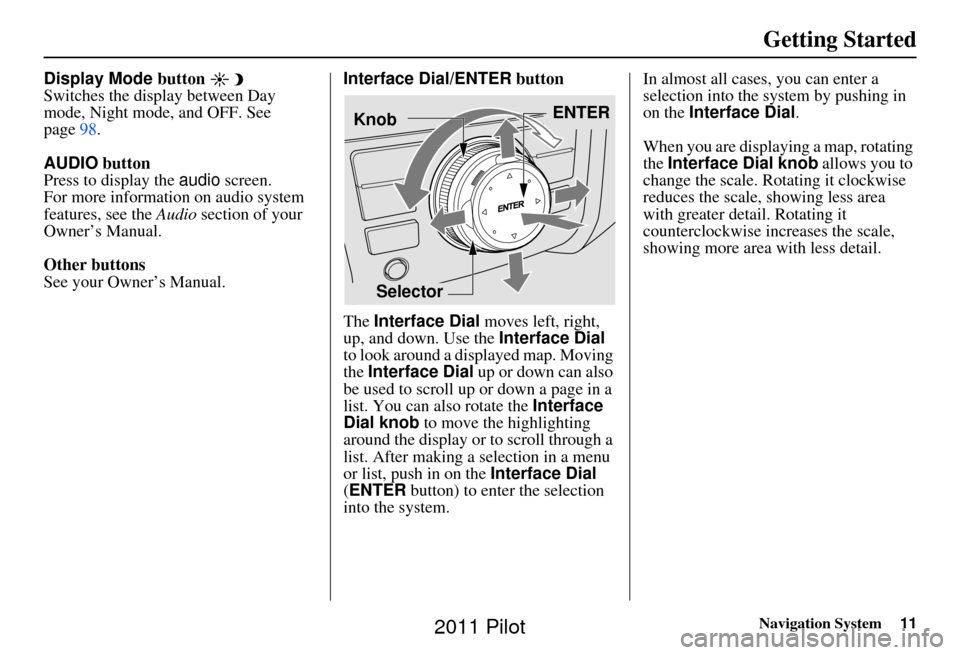
See your Owner’s Manual. Interface Dial/ENTER
button
The Interface Dial moves left, right,
up, and down. Use the Interface Dial
to look around a displayed map. Moving
the Interface Dial up or down can also
be used to scroll up or down a page in a
list. You can also rotate the Interface
Dial knob to move the highlighting
around the display or to scroll through a
list. After making a selection in a menu
or list, push in on the Interface Dial
(ENTER button) to enter the selection
into the system. In almost all cases
, you can enter a
selection into the system by pushing in
on the Interface Dial .
When you are displaying a map, rotating
the Interface Dial knob allows you to
change the scale. Rotating it clockwise
reduces the scale, showing less area
with greater detail. Rotating it
counterclockwise increases the scale,
showing more area with less detail.
Selector ENTER
Knob
2011 Pilot
Page 13 of 159
Navigation System13
Getting Started
Voice Control Basics
Your vehicle has a voice control system
that allows hands-free operation of most
of the navigation system functions. You
can also control the audio and climate
control system. The voice control
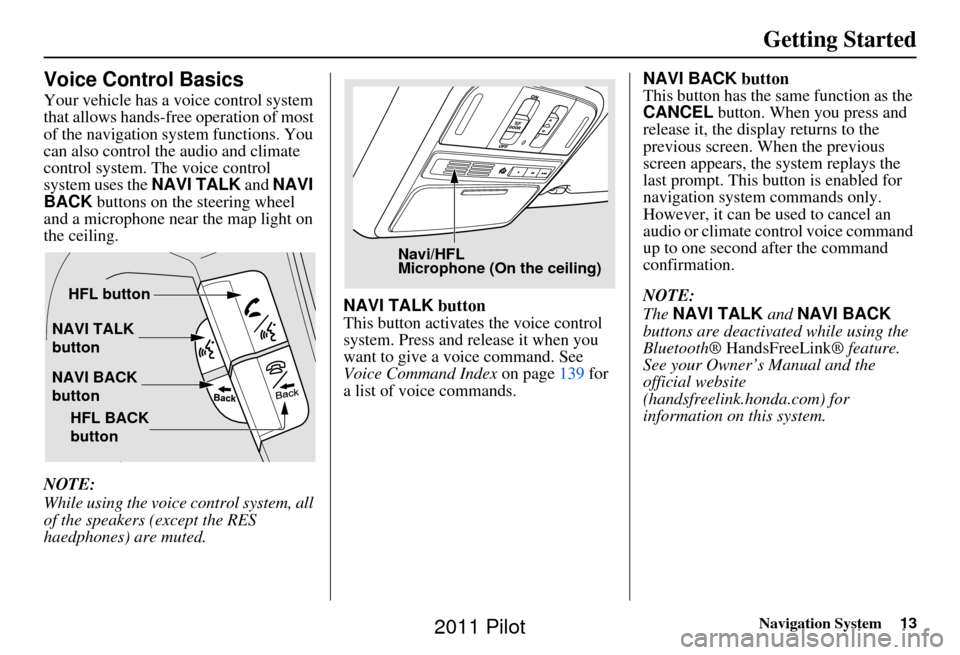
system uses the NAVI TALK and NAVI
BACK buttons on the steering wheel
and a microphone near the map light on
the ceiling.
NOTE:
While using the voice control system, all
of the speakers (except the RES
haedphones) are muted. NAVI TALK
button
This button activates the voice control
system. Press and release it when you
want to give a voice command. See
Voice Command Index on page139 for
a list of voice commands. NAVI BACK
button
This button has the same function as the
CANCEL button. When you press and
release it, the display returns to the
previous screen. When the previous
screen appears, the system replays the
last prompt. This button is enabled for
navigation system commands only.
However, it can be used to cancel an
audio or climate control voice command
up to one second after the command
confirmation.
NOTE:
The NAVI TALK and NAVI BACK
buttons are deactivated while using the
Bluetooth® HandsFreeLink ® feature.
See your Owner’s Manual and the
official website
(handsfreelink.honda.com) for
information on this system.
NAVI TALK
button
NAVI BACK
button HFL button
HFL BACK
button
Navi/HFL
Microphone (On the ceiling)
2011 Pilot
Page 15 of 159
Navigation System15
Getting Started
• If more than one person is speaking at
the same time, the system may
misinterpret your command.
• After pressing and releasing the NAVI TALK button, wait for the
beep, then give a voice command
while the icon is displayed on the
top left of the screen.
• Give a voice command in a clear, natural speaking voice without
pausing between words.
• If the system cannot recognize your command because of background
noise, speak louder.
• If you are still having trouble with the voice control sy stem, refer to Voice
Command Help on the
Information screen or say “Help”
while the icon is displayed on the
top left of the screen.
NOTE:
The voice control system can be used
only in the driver’s seat because the
microphone unit removes noises from
the front passenger’s side.Selecting an Item (Button)
on the Screen
On most screens, there are items that
can be selected (like buttons with titles
such as OK or Return ). To select an
item on any screen, do one of the
following:
• Use the voice control system and say the name of the desired item. Almost
all selectable items on the screen,
including some listed items, are
recognized by the voice control
system.
• Move the highlighting to the desired item with the Interface Dial or its
knob , then push in on the Interface
Dial .
Tip:
If items are grayed out, this means that
they cannot be selected.
Selecting an Item in a List
To scroll through a list, do one of the
following:
• Rotate the Interface Dial knob to
scroll one item at a time.
• Use the voice control system to scroll page by page. For example, to scroll
up, say “Up” or “Previous.” To scroll
down, say “Next” or “Down.”
• Move the Interface Dial up or down
to scroll through the list page by
page.
If you cannot find the desired name, or
have made an error, return to the
previous screen by pressing the
CANCEL or the NAVI BACK button
on the steering wheel.
To select the desired item in the list, do
one of the following:
• Use the voice control system, and say the item number of the desired item.
• Rotate the Interface Dial knob to
move the highlighting to the item,
then push in on the Interface Dial.
2011 Pilot
Page 17 of 159
Navigation System17
Getting Started
System Start-up
When you turn the ignition to ON (II), it
takes several seconds for the navigation
system to boot up.
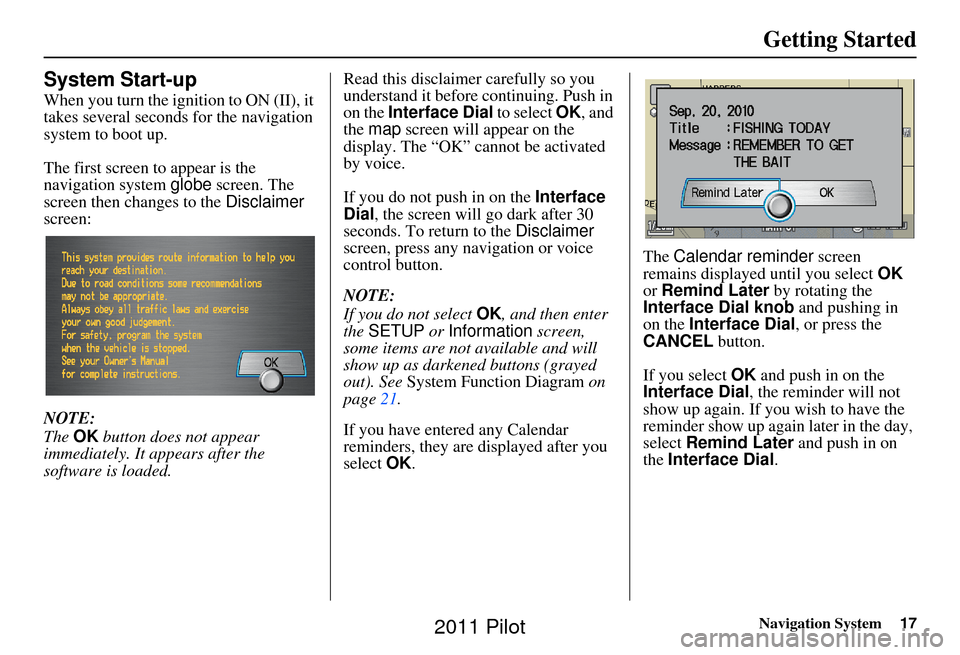
The first screen to appear is the
navigation system globe screen. The
screen then changes to the Disclaimer
screen:
NOTE:
The OK button does not appear
immediately. It appears after the
software is loaded. Read this disclaimer carefully so you
understand it before continuing. Push in
on the Interface Dial
to select OK, and
the map screen will appear on the
display. The “OK” cannot be activated
by voice.
If you do not push in on the Interface
Dial , the screen will go dark after 30
seconds. To return to the Disclaimer
screen, press any navigation or voice
control button.
NOTE:
If you do not select OK, and then enter
the SETUP or Information screen,
some items are not available and will
show up as darkened buttons (grayed
out). See System Function Diagram on
page 21.
If you have entered any Calendar
reminders, they are displayed after you
select OK. The
Calendar reminder screen
remains displayed until you select OK
or Remind Later by rotating the
Interface Dial knob and pushing in
on the Interface Dial , or press the
CANCEL button.
If you select OK and push in on the
Interface Dial , the reminder will not
show up again. If you wish to have the
reminder show up agai n later in the day,
select Remind Later and push in on
the Interface Dial .
2011 Pilot
Page 101 of 159
Navigation System101
System Setup
System Information
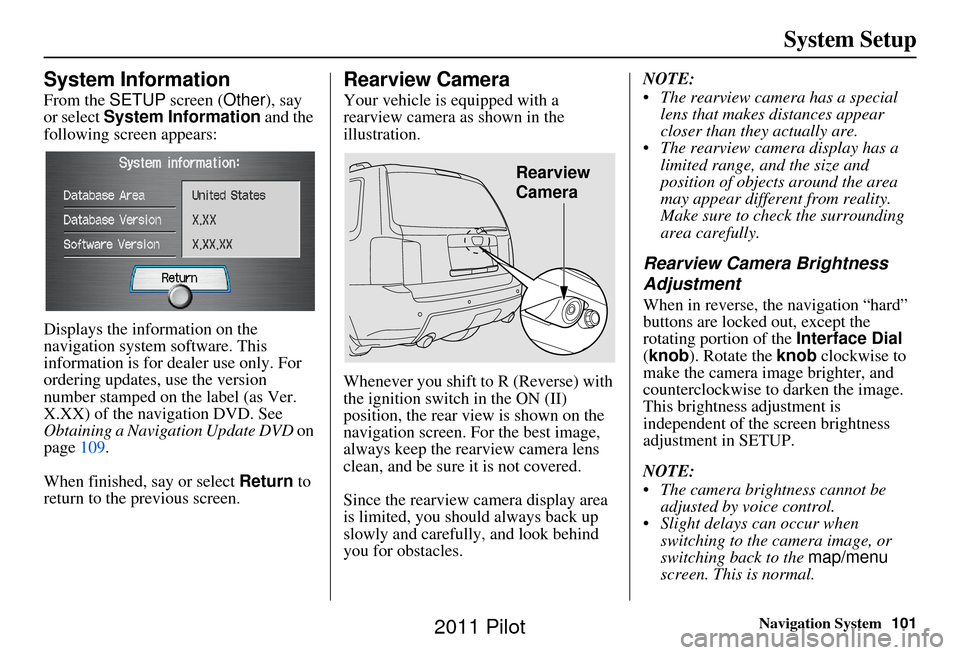
From the SETUP screen ( Other), say
or select System Information and the
following screen appears:
Displays the information on the
navigation system software. This
information is for de aler use only. For
ordering updates, use the version
number stamped on the label (as Ver.
X.XX) of the navigation DVD. See
Obtaining a Navigation Update DVD on
page 109.
When finished, say or select Return to
return to the previous screen.
Rearview Camera
Your vehicle is equipped with a
rearview camera as shown in the
illustration.
Whenever you shift to R (Reverse) with
the ignition switch in the ON (II)
position, the rear view is shown on the
navigation screen. For the best image,
always keep the rearview camera lens
clean, and be sure it is not covered.
Since the rearview camera display area
is limited, you should always back up
slowly and carefully, and look behind
you for obstacles. NOTE:
The rearview camera has a special
lens that makes distances appear
closer than they actually are.
The rearview camera display has a limited range, and the size and
position of objects around the area
may appear different from reality.
Make sure to check the surrounding
area carefully.
Rearview Camera Brightness
Adjustment
When in reverse, the navigation “hard”
buttons are locked out, except the
rotating portion of the Interface Dial
(knob). Rotate the knob clockwise to
make the camera im age brighter, and
counterclockwise to darken the image.
This brightness adjustment is
independent of the screen brightness
adjustment in SETUP.
NOTE:
The camera brightness cannot be adjusted by voice control.
Slight delays can occur when switching to the ca mera image, or
switching back to the map/menu
screen. This is normal.
Rearview
Camera
2011 Pilot
Page 135 of 159
Navigation System135
Troubleshooting
* If the error persists, or is shown for a wide area, see your dealer.
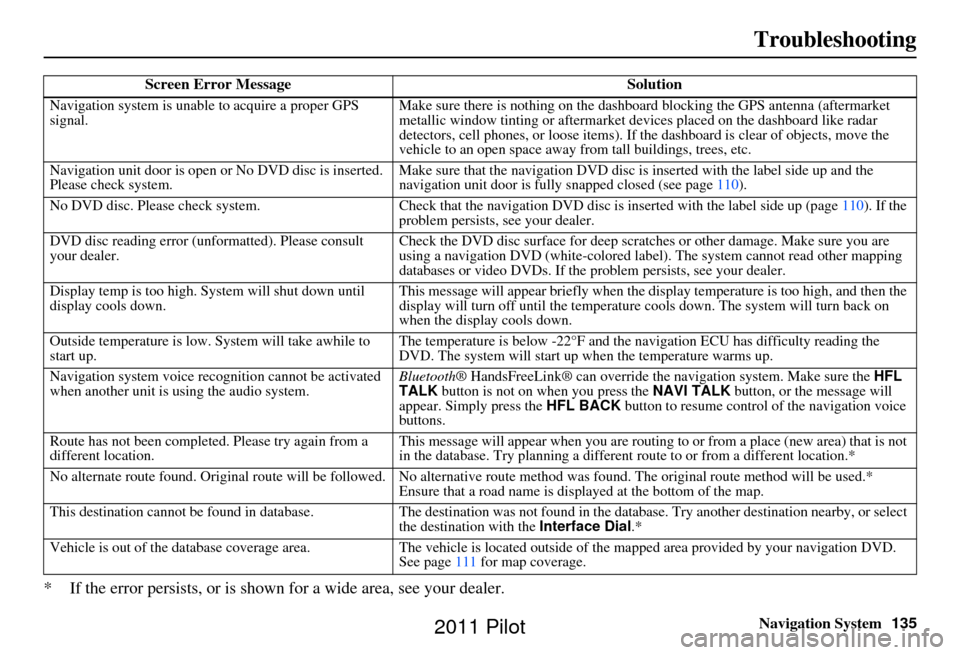
Screen Error Message Solution
Navigation system is unable to acquire a proper GPS
signal.Make sure there is nothing on the dashboard
blocking the GPS antenna (aftermarket
metallic window tinting or aftermarket devices placed on the dashboard like radar
detectors, cell phones, or loose items). If the dashboard is clear of objects, move the
vehicle to an open space away from tall buildings, trees, etc.
Navigation unit door is open or No DVD disc is inserted.
Please check system. Make sure that the navigation DVD disc is
inserted with the label side up and the
navigation unit door is fully snapped closed (see page 110).
No DVD disc. Please check system. Check that the navigation DVD disc is inserted with the label side up (page 110). If the
problem persists, see your dealer.
DVD disc reading error (unformatted). Please consult
your dealer. Check the DVD disc surface for deep scratches or other damage. Make sure you are
using a navigation DVD (white-colored labe
l). The system cannot read other mapping
databases or video DVDs. If the problem persists, see your dealer.
Display temp is too high. System will shut down until
display cools down. This message will appear briefly when the display temperature is too high, and then the
display will turn off until the temperature
cools down. The system will turn back on
when the display cools down.
Outside temperature is low. System will take awhile to
start up. The temperature is below -22°F and the na
vigation ECU has difficulty reading the
DVD. The system will start up when the temperature warms up.
Navigation system voice rec ognition cannot be activated
when another unit is using the audio system. Bluetooth® HandsFreeLink® can override the navigation system. Make sure the
HFL
TALK button is not on when you press the NAVI TALK button, or the message will
appear. Simply press the HFL BACK button to resume control of the navigation voice
buttons.
Route has not been complete d. Please try again from a
different location. This message will appear when you are routing to or from a place (new area) that is not
in the database. Try planning a different
route to or from a different location.*
No alternate route found. Original route wi ll be followed. No alternative route method was found. The original route method will be used.*
Ensure that a road name is displayed at the bottom of the map.
This destination cannot be found in database .The destination was not found in the database. Try another destination nearby, or select
the destination with the Interface Dial.*
Vehicle is out of the database coverage area. The vehicle is located outside of the mapped area provided by your navigation DVD.
See page 111 for map coverage.
2011 Pilot
Page 138 of 159
138Navigation System
Glossary
Vehicle Speed Sensor - Provides speed
signal to the navigation system for
moving the VP icon on the map.
Verified Streets - These streets consist
of the detailed metropolitan coverage
areas and all other inter-town
connection roads. These roads are
shown in black on the map.
Voice Control - See VR.
VP - Vehicle Position. When in map
mode, this circular icon shows the
vehicle position on the map. Push in
on the Interface Dial , select Show
Icon on Map , move the Interface
Dial left to select Current
Position . It shows the latitude,
longitude, and elevation of your
current position.
VR - Voice Recognition. This allows
voice control of many of the
navigation functions. The hardware
consists of the microphone, voice
control switch ( NAVI TALK/NAVI
BACK buttons), and the front
speakers. Waypoint -
A temporary destination
you may enter while en route (e.g., a
gas station, ATM, etc.). See page 66.
Yaw Rate Sensor - Senses when the
vehicle makes a turn, which makes
the VP change direction on the map
as you turn.
Zagat Ratings - Restaurant ratings information prov ided by Zagat
Survey. See the Information screen
on page 74 for an explanation of the
ratings.
2011 Pilot
Page 144 of 159
144Navigation System
Voice Command Index
Radio Voice Commands
The system accepts these commands on
most screens.Audio on*
Audio off*
Radio on* (or Radio play)
Radio off*
Radio select FM1
Radio select FM2
Radio select AM
Radio tune to # FM (#: frequency.
Example Radio 95.5 FM)
Radio tune to # AM (#: frequency.
Example Radio 1020 AM )
Radio seek up
Radio seek down
Radio next station (same as Radio
seek)
Radio preset # (#: 1-6)
Radio FM preset # (#: 1-6)
Radio FM1 preset # (#: 1-6)
Radio FM2 preset # (#: 1-6)
Radio AM preset # (#: 1-6)
Radio auto select*
Radio scan*
Radio select XM1
Radio select XM2 XM channel #
(#: 1-255)
XM channel up
XM channel down
XM category up
XM category down
XM preset # (#: 1-6)
XM1 preset # (#: 1-6)
XM2 preset # (#: 1-6)
XM scan*
XM category scan*
XM channel scan*
XM category mode
XM channel mode
* Repeating these commands switches (toggles) the function between On
and Off, so the action that occurs
may not match the command you
speak.
NOTE:
Radio volume l evels cannot be
controlled using voice control. Use the
buttons on your stee ring wheel. See your
Owner’s Manual for more information.
CD Voice Commands
The system accepts these commands on
most screens.
CD play
CD play disc # (#: 1-6)
CD play track # (#: 1-30)
CD play disc #1 track #2 (#1: 1-6,
#2: 1-30)
CD skip forward
CD skip back
CD play next disc
CD play previous disc
CD track random*
CD track repeat*
CD disc repeat*
CD track scan*
CD disc scan*
CD normal play (resumes “Play”
from these commands: “CD track
random,” “CD track repeat,” and
“CD track scan”)
CD track list
* Repeating these commands switches (toggles) the function between On
and Off, so the action that occurs
may not match the command you
speak.
2011 Pilot