brake light HONDA PILOT 2013 2.G User Guide
[x] Cancel search | Manufacturer: HONDA, Model Year: 2013, Model line: PILOT, Model: HONDA PILOT 2013 2.GPages: 488, PDF Size: 10.18 MB
Page 336 of 488
Continued335
uuTowing a TraileruTowing Preparation
Driving
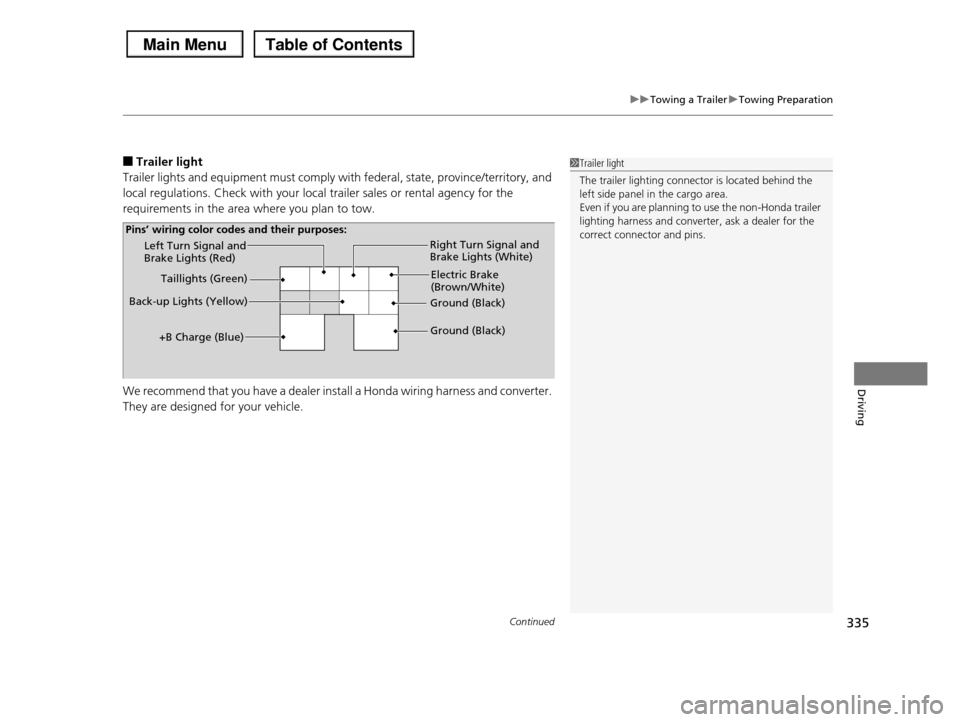
■Trailer light
Trailer lights and equipment must comply with federal, state, province/territory, and
local regulations. Check with your local trailer sales or rental agency for the
requirements in the area where you plan to tow.
We recommend that you have a dealer install a Honda wiring harness and converter.
They are designed for your vehicle.
1Trailer light
The trailer lighting connector is located behind the left side panel in the cargo area.
Even if you are planning to use the non-Honda trailer
lighting harness and converter, ask a dealer for the correct connector and pins.Left Turn Signal and Brake Lights (Red)
Back-up Lights (Yellow)
Electric Brake (Brown/White)
Right Turn Signal and Brake Lights (White)
Ground (Black)
Ground (Black)
Taillights (Green)
+B Charge (Blue)
Pins’ wiring color codes and their purposes:
Page 337 of 488
336
uuTowing a TraileruTowing Preparation
Driving
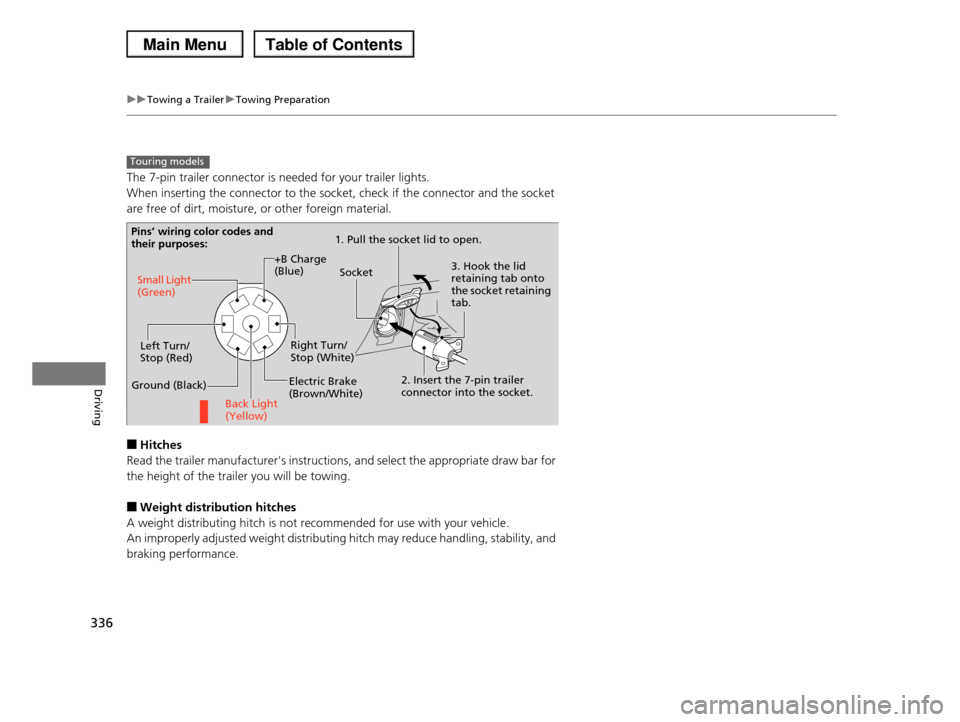
The 7-pin trailer connector is needed for your trailer lights.
When inserting the connector to the socket, check if the connector and the socket
are free of dirt, moisture, or other foreign material.
■Hitches
Read the trailer manufacturer's instructions, and select the appropriate draw bar for
the height of the trailer you will be towing.
■Weight distribution hitches
A weight distributing hitch is not recommended for use with your vehicle.
An improperly adjusted weight distributing hitch may reduce handling, stability, and
braking performance.
Touring models
Pins’ wiring color codes and their purposes:1. Pull the socket lid to open.
3. Hook the lid retaining tab onto the socket retaining tab.
2. Insert the 7-pin trailer connector into the socket.
Socket
Back Light (Yellow)
Left Turn/Stop (Red)
Electric Brake (Brown/White)
Right Turn/Stop (White)
Ground (Black)
Small Light (Green)
+B Charge (Blue)
Page 339 of 488
338
uuTowing a TraileruDriving Safely with a Trailer
Driving
Driving Safely with a Trailer
•Have the trailer properly serviced and keep it in good condition.
•Make sure that all the weights and load in the vehicle and trailer are within limits.
2Towing Load Limits P. 329
•When towing more than 3,500lbs (1,590 kg), use of gasoline with a pump octane
number of 91 or higher is recommended.
uTowing performance can be affected by high altitude, high temperature, or
steep uphill.
•Securely attach the hitch, safety chains, and other necessary parts to the trailer.
•Securely store all the items in and on the trailer so that they do not shift while
driving.
•Check if the lights and brakes on the trailer are working properly.
•Check the pressures of the trailer tires, including the spare.
•Drive slower than normal.
•Obey posted speed limits for vehicles with trailers.
•Use the (D position when towing a trailer on level roads.
•Turn more slowly and with a wider turning arc than normal.
•Allow more time and distance for braking.
•Do not brake or turn suddenly.
■Things You Need To Know Before Towing a Trailer
■Towing Speeds and Gears
■Turning and Braking
1Driving Safely with a Trailer
Parking In addition to the normal precautions, place wheel
chocks at each of the trailer's tires.
Page 343 of 488
342
Driving
When Driving
Starting the Engine
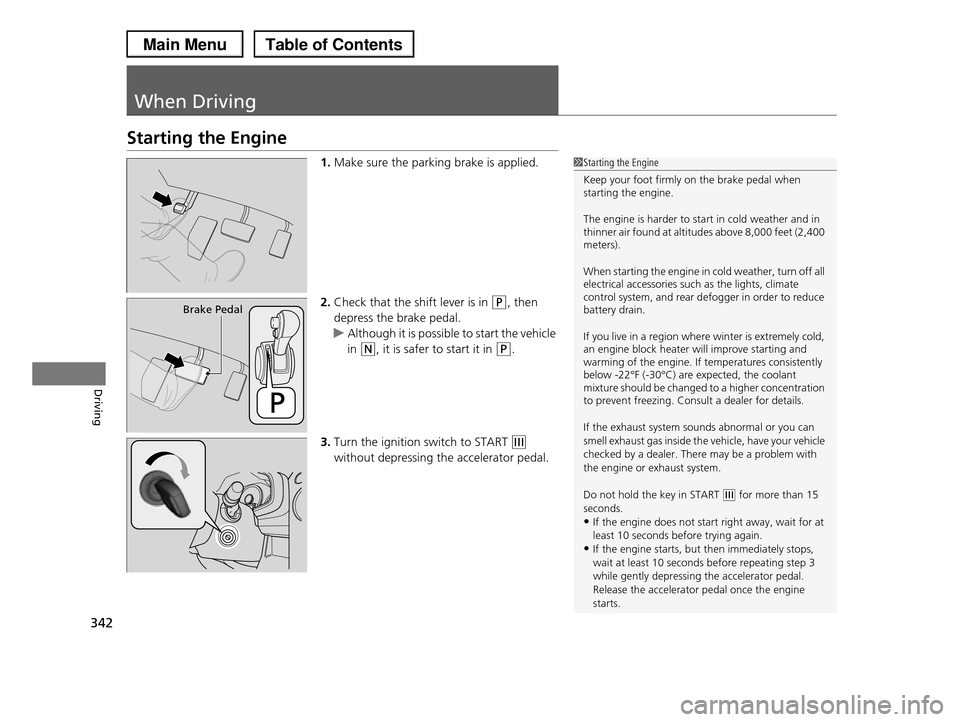
1.Make sure the parking brake is applied.
2.Check that the shift lever is in (P, then
depress the brake pedal.
uAlthough it is possible to start the vehicle
in (N, it is safer to start it in (P.
3.Turn the ignition switch to START (e
without depressing the accelerator pedal.
1Starting the Engine
Keep your foot firmly on the brake pedal when starting the engine.
The engine is harder to start in cold weather and in thinner air found at altitudes above 8,000 feet (2,400 meters).
When starting the engine in cold weather, turn off all electrical accessories such as the lights, climate control system, and rear defogger in order to reduce battery drain.
If you live in a region where winter is extremely cold, an engine block heater will improve starting and warming of the engine. If temperatures consistently below -22°F (-30°C) are expected, the coolant mixture should be changed to a higher concentration to prevent freezing. Consult a dealer for details.
If the exhaust system sounds abnormal or you can
smell exhaust gas inside the vehicle, have your vehicle
checked by a dealer. There may be a problem with the engine or exhaust system.
Do not hold the key in START (e for more than 15 seconds.
•If the engine does not start right away, wait for at
least 10 seconds before trying again.•If the engine starts, but then immediately stops,
wait at least 10 seconds before repeating step 3
while gently depressing the accelerator pedal.Release the accelerator pedal once the engine
starts.
Brake Pedal
Page 347 of 488
346
uuWhen DrivinguShifting
Driving
Shifting
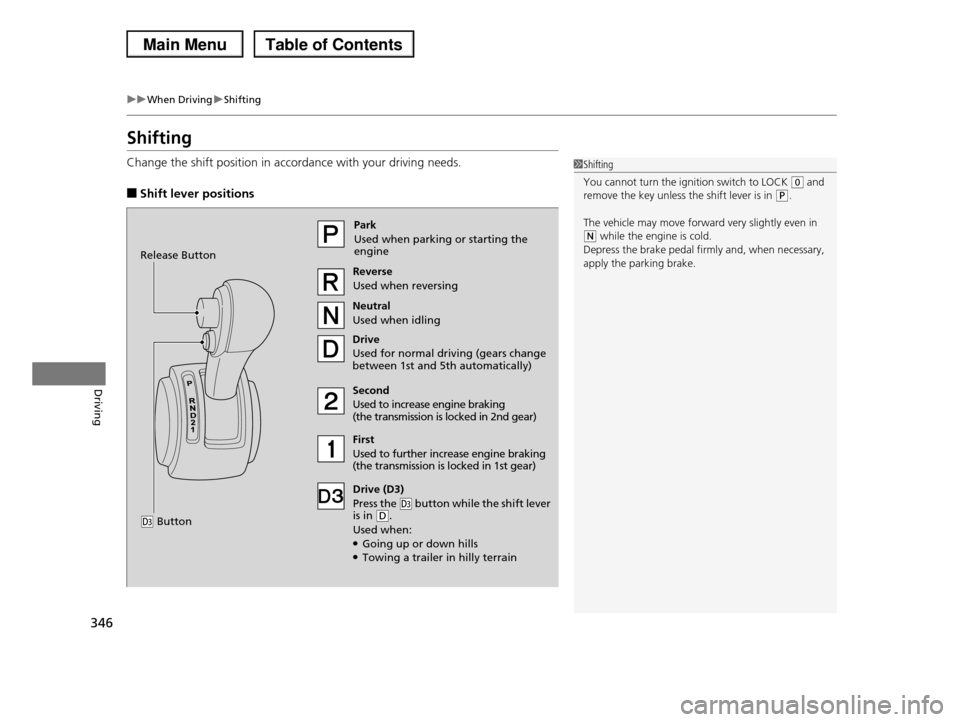
Change the shift position in accordance with your driving needs.
■Shift lever positions
1Shifting
You cannot turn the ignition switch to LOCK (0 and remove the key unless the shift lever is in (P.
The vehicle may move forward very slightly even in (N while the engine is cold.
Depress the brake pedal firmly and, when necessary,
apply the parking brake.
Park
Used when parking or starting the engine
Reverse
Used when reversing
Neutral
Used when idling
Drive
Used for normal driving (gears change between 1st and 5th automatically)
Drive (D3)
Press the (d button while the shift lever is in (D.
Used when:●Going up or down hills●Towing a trailer in hilly terrain
Second
Used to increase engine braking (the transmission is locked in 2nd gear)
First
Used to further increase engine braking (the transmission is locked in 1st gear)
Release Button
(d Button
Page 348 of 488
347
uuWhen DrivinguShifting
Driving
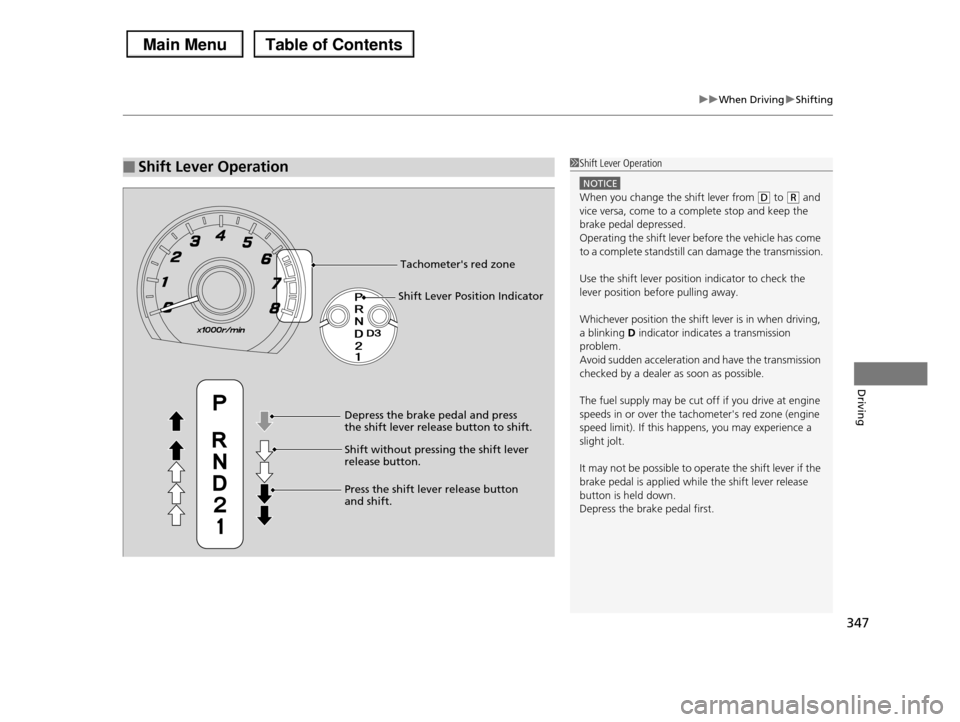
■Shift Lever Operation1Shift Lever Operation
NOTICE
When you change the shift lever from (D to (R and vice versa, come to a complete stop and keep the
brake pedal depressed.
Operating the shift lever before the vehicle has come to a complete standstill can damage the transmission.
Use the shift lever position indicator to check the lever position before pulling away.
Whichever position the shift lever is in when driving, a blinking D indicator indicates a transmission
problem.
Avoid sudden acceleration and have the transmission checked by a dealer as soon as possible.
The fuel supply may be cut off if you drive at engine speeds in or over the tachometer's red zone (engine
speed limit). If this happens, you may experience a
slight jolt.
It may not be possible to operate the shift lever if the
brake pedal is applied while the shift lever release button is held down.
Depress the brake pedal first.
Tachometer's red zone
Shift Lever Position Indicator
Depress the brake pedal and press the shift lever release button to shift.
Shift without pressing the shift lever release button.
Press the shift lever release button and shift.
Page 362 of 488
361
uuBrakinguBrake System
Driving
Your vehicle is equipped with disc brakes at all four wheels. A vacuum power assist
helps reduce the effort needed on the brake pedal. The brake assist system increases
the stopping force when you depress the brake pedal hard in an emergency
situation. The anti-lock brake system (ABS) helps you retain steering control when
braking very hard.
2Brake Assist System P. 363
2ABS (Anti-lock Brake System) P. 362
■Foot Brake1Foot Brake
Check the brakes after driving through deep water, or if there is a buildup of road surface water. If
necessary, dry the brakes by lightly depressing the
pedal several times.
If you hear a continuous metallic friction sound when
applying the brakes, the brake pads need to be replaced. Have the vehicle checked by a dealer.
Constantly using the brake pedal while going down a long hill builds up heat, which reduces the brake
effectiveness. Apply engine braking by taking your
foot off the accelerator pedal and downshifting to a lower gear.
Do not rest your foot on the brake pedal while driving, as it will lightly apply the brakes and cause
them to lose effectiveness over time and reduce pad
life. It will also confuse drivers behind you.
Page 363 of 488
362
uuBrakinguABS (Anti-lock Brake System)
Driving
ABS (Anti-lock Brake System)
Helps prevent the wheels from locking up, and helps you retain steering control by
pumping the brakes rapidly, much faster than you.
The electronic brake distribution (EBD) system, which is part of the ABS, also
balances the front-to-rear braking distribution according to vehicle loading.
You should never pump the brake pedal. Let the ABS work for you by always
keeping firm, steady pressure on the brake pedal. This is sometimes referred to as
“stomp and steer.”
■ABS operation
The brake pedal may pulsate slightly when the ABS is working. Keep holding the
pedal firmly down. On dry pavement, you will need to press on the brake pedal very
hard before the ABS activates. However, you may feel the ABS activate immediately
if you are trying to stop on snow or ice.
When the vehicle speed goes under 6 mph (10 km/h), the ABS stops.
■ABS1ABS (Anti-lock Brake System)
NOTICE
The ABS may not function correctly if you use an incorrect tire type and size.
When the ABS indicator comes on while driving, there may be a problem with the system.
While normal braking is not affected, there is a
possibility of the ABS not operating. Have the vehicle checked by a dealer immediately.
The ABS does not reduce the time or distance it takes to stop the vehicle. It only helps with steering control
during hard braking.
In the following cases, your vehicle may need more stopping distance than a vehicle without the ABS:
•When driving on rough road surfaces, including
when driving on uneven surfaces, such as gravel or snow.
•When tire chains are installed.
You may hear a motor sound coming from the
engine compartment while system checks are being
performed immediately after starting the engine or while driving. This is normal.
Page 364 of 488
363
uuBrakinguBrake Assist System
Driving
Brake Assist System
Designed to assist the driver by generating greater braking force when you depress
the brake pedal hard during emergency braking.
■Brake assist system operation
Press the brake pedal firmly for more powerful braking.
When brake assist operates, the pedal may wiggle slightly and an operating noise
may be heard. This is normal. Keep holding the brake pedal firmly down.
Page 378 of 488
377
Maintenance
This chapter discusses basic maintenance.
Before Performing MaintenanceInspection and Maintenance ............ 378Safety When Performing Maintenance..... 379Parts and Fluids Used in Maintenance Service ........................................... 380Maintenance Minder™.................... 381Maintenance Under the HoodMaintenance Items Under the Hood ..... 389Opening the Hood ........................... 390 Recommended Engine Oil ................ 392 Oil Check ......................................... 393Adding Engine Oil ............................ 394Changing the Engine Oil and Oil Filter ..... 395
Engine Coolant ................................ 397Transmission Fluid ............................ 399Brake Fluid ....................................... 400 Power Steering Fluid ........................ 400 Refilling Window Washer Fluid......... 401Replacing Light Bulbs....................... 402Checking and Maintaining Wiper Blades.... 410Checking and Maintaining TiresChecking Tires ................................. 414Tire and Loading Information Label ...... 415Tire Labeling .................................... 415DOT Tire Quality Grading (U.S. Vehicles)....... 417Wear Indicators................................ 419
Tire Service Life ................................ 419Tire and Wheel Replacement ........... 420Tire Rotation .................................... 421 Winter Tires ..................................... 422Battery............................................... 423Remote Transmitter CareReplacing the Button Battery ........... 424Remote Control and Wireless Headphone Care*........................... 425Climate Control System Maintenance..... 427Cleaning
Interior Care .................................... 428 Exterior Care.................................... 430
* Not available on all models