window HONDA PILOT 2015 2.G Navigation Manual
[x] Cancel search | Manufacturer: HONDA, Model Year: 2015, Model line: PILOT, Model: HONDA PILOT 2015 2.GPages: 175, PDF Size: 5.87 MB
Page 5 of 175
Navigation System5
Introduction
The navigation system applies location,
direction, and speed information to the
maps and calculates a route to the
destination you enter. As you drive to
that destination, the system provides
map and voice guidance.
The navigation system is easy to use.
The locations of many places of
business and entertainment are already
entered in the system. You can select
any of them as a des tination by using the
Interface Dial or voice control.
There are several ways to enter a
destination, such as by point of interest
(POI), by address, by phone number,
and by selecting it from the map. The
last 50 destinations are saved for reuse
at a later date. The system also allows
you to store a home address to simplify
returning home from your destination.
Accessories PrecautionsIf you have front or side window tinting
installed, be aware that if the tint has
metallic properties, it can seriously
degrade or prevent GPS reception. This
is because the GPS antenna is located in
the dashboard.
If you plan to install electronic
components such as radar detectors,
vehicle tracking devices, remote
starters, additional amplifiers, or other
audio components, ensure that they are
not located near the navigation display,
or near the GPS antenna in the
dashboard. Signal noise emanating from
these devices can cause intermittent
disruption of the navigation system.
Important Safety Information The navigation system can distract your
attention from the road if you focus on
the screen or operate the system’s
controls while driving.
Enter as much info rmation as possible
into the system before you begin
driving, or when the vehicle is stopped.
Then, as you drive, listen to the audio
instructions and use voice commands
when possible.
Page 14 of 175
14
Navigation System
Getting StartedUsing the Voice Control SystemYou should use the voice control system
as much as possible, and consider
manual entry using the Interface Dial
as a backup method.
Most of the system’s functions can be
controlled by voice commands activated
with the TALK button. To control the
navigation system by voice:
• Press and release the TALK button. A
guidance prompt will be played, and
a pop-up voice icon ( ) will appear
in the upper left corner of the screen.
• Wait for the beep.
• Give a voice command. (Voice commands that the system recognizes
are highlighted.)
Once the microphone picks up your
command, the system changes the
display in response to the command.
Press the TALK button to get a
guidance prompt for the next command.
NOTE:
To interrupt guidance prompts, press
the TALK button again. Wait for the
beep, and give a command. If the system does not understand a
command or you wait too long to give a
command, it responds with “Pardon? No
comment was heard. Please press the
Talk button and say a command.” If the
system cannot perform a command or
the command is not
appropriate for the
screen you are on, a beep will sound.
You can find out which voice
commands are available for a particular
screen by saying “Help.” The system
will display and read the list of available
commands to you. (When Help is
grayed out, this feature cannot be used.)
When you give a command, the system
either performs the command or
transitions to the next step in a task.
NOTE:
Guidance prompts can be turned off.
See page 53. If you hear a prompt such as “Please use
the
Interface Dial to...” or “Please
choose an area with the Interface Dial,”
the system is asking for input that
cannot be performed using the voice
control system.
Improving Voice RecognitionTo achieve optimum voice recognition
when using the voice control system, the
following guidelines should be
followed:
NOTE:
Make sure the correct screen is
displayed for the voice command that
you are using. See Voice Command
Index on page 154.
• It is best if the windows and moonroof are closed. If they are open,
speak a little louder to overcome the
wind noises.
Page 53 of 175
Navigation System53
Driving to Your Destination
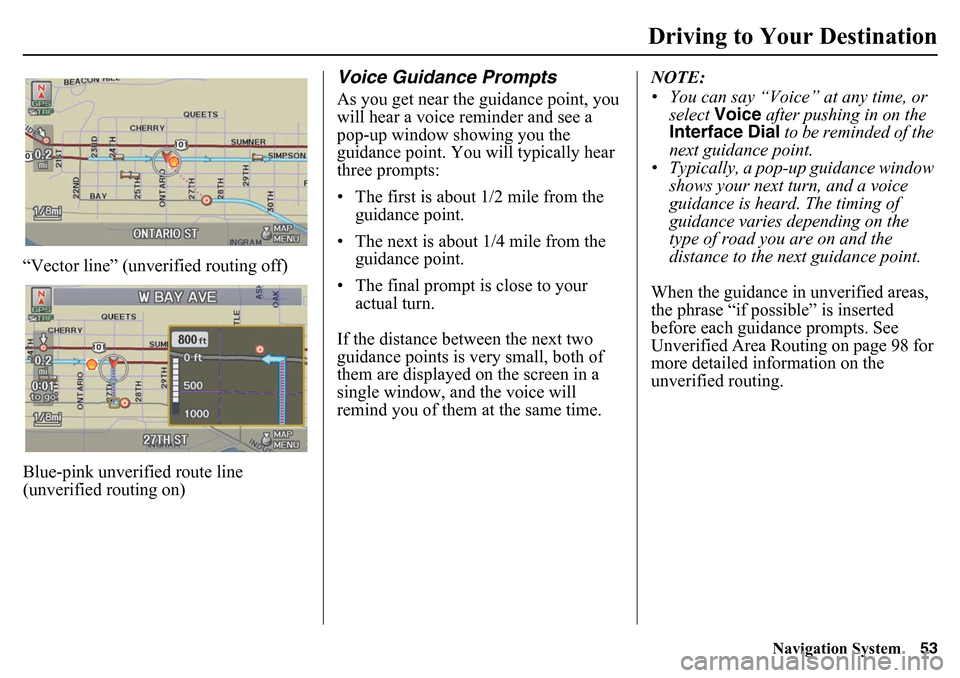
“Vector line” (unverified routing off)
Blue-pink unverified route line
(unverified routing on)
Voice Guidance PromptsAs you get near the guidance point, you
will hear a voice reminder and see a
pop-up window showing you the
guidance point. You will typically hear
three prompts:
• The first is about 1/2 mile from the
guidance point.
• The next is about 1/4 mile from the guidance point.
• The final prompt is close to your actual turn.
If the distance between the next two
guidance points is very small, both of
them are displayed on the screen in a
single window, and the voice will
remind you of them at the same time. NOTE:
• You can say “Voice” at any time, or
select Voice after pushing in on the
Interface Dial to be reminded of the
next guidance point.
• Typically, a pop-up guidance window shows your next turn, and a voice
guidance is heard. The timing of
guidance varies depending on the
type of road you are on and the
distance to the next guidance point.
When the guidance in unverified areas,
the phrase “if possible” is inserted
before each guid ance prompts. See
Unverified Area Routing on page 98 for
more detailed information on the
unverified routing.
Page 58 of 175
58
Navigation System
Driving to Your DestinationExit Info. (Freeway Exit
Information)You can search freeway exit
information (gas stations, restaurants,
ATMs, etc.) and add new destinations or
waypoints to the calculated route. Select
Exit Info. on the Guidance menu
screen, and a list of freeway exits for the
route is displayed.
If you select the freeway exit you plan
on taking, a list of businesses in the area
will be displayed. You can choose a
listing to set as a new destination or
waypoint, and say or select OK. On the
map screen, you can display
Freeway Exit information using the
Interface Dial . The Exit Info icon will
only be displayed on the map screen if
there is any freeway exit information
available. Choose the 1/4, 1/2, or 1 mile
scale, then move the crosshairs to the
desired Exit Info icon and push in on the
Interface Dial . Choose a place from
the list and set it as a new destination or
waypoint.
NOTE:
To turn on “Freeway exit information”
on the map screen, display the icon bar
and select the icon (see page 59).
Guidance ModeWhen en route to a destination, you
have two display options: single-screen
mode (the factory default) or split-
screen mode.
If you select Guidance Mode on the
Guidance menu screen, the Select a
guidance mode screen will appear.
Single-screen mode - While the map
screen is displayed, only the map is
shown with occasional guidance pop-up
windows as you approach a guidance
point. When you press the MAP/
GUIDE button and switch to the
guidance screen, only the guidance
screen is displayed.
Split-screen mode - While the map
screen is displayed, the map is on the
left of the screen, and the next guidance
point is on the right side of the screen.
You will see the same screen setup
when you press the MAP/GUIDE
button.
Page 59 of 175
Navigation System59
Driving to Your Destination
Guidance mode can be changed in
SETUP (see Guidance Mode on
page 105).
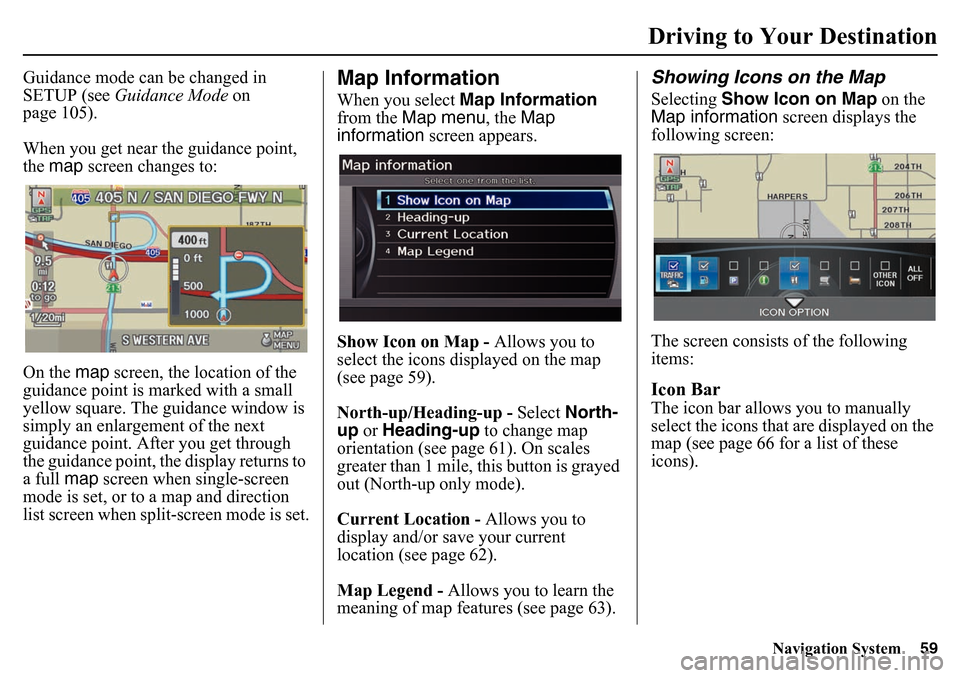
When you get near the guidance point,
the map screen changes to:
On the map screen, the location of the
guidance point is ma rked with a small
yellow square. The guidance window is
simply an enlargement of the next
guidance point. After you get through
the guidance point, the display returns to
a full map screen when single-screen
mode is set, or to a map and direction
list screen when split-screen mode is set.
Map InformationWhen you select Map Information
from the Map menu , the Map
information screen appears.
Show Icon on Map - Allows you to
select the icons displayed on the map
(see page 59).
North-up/Heading-up - Select North-
up or Heading-up to change map
orientation (see page 61). On scales
greater than 1 mile, this button is grayed
out (North-up only mode).
Current Location - Allows you to
display and/or save your current
location (see page 62).
Map Legend - Allows you to learn the
meaning of map features (see page 63).
Showing Icons on the MapSelecting Show Icon on Map on the
Map information screen displays the
following screen:
The screen consists of the following
items:Icon BarThe icon bar allows you to manually
select the icons that are displayed on the
map (see page 66 for a list of these
icons).
Page 101 of 175
Navigation System101
System Setup
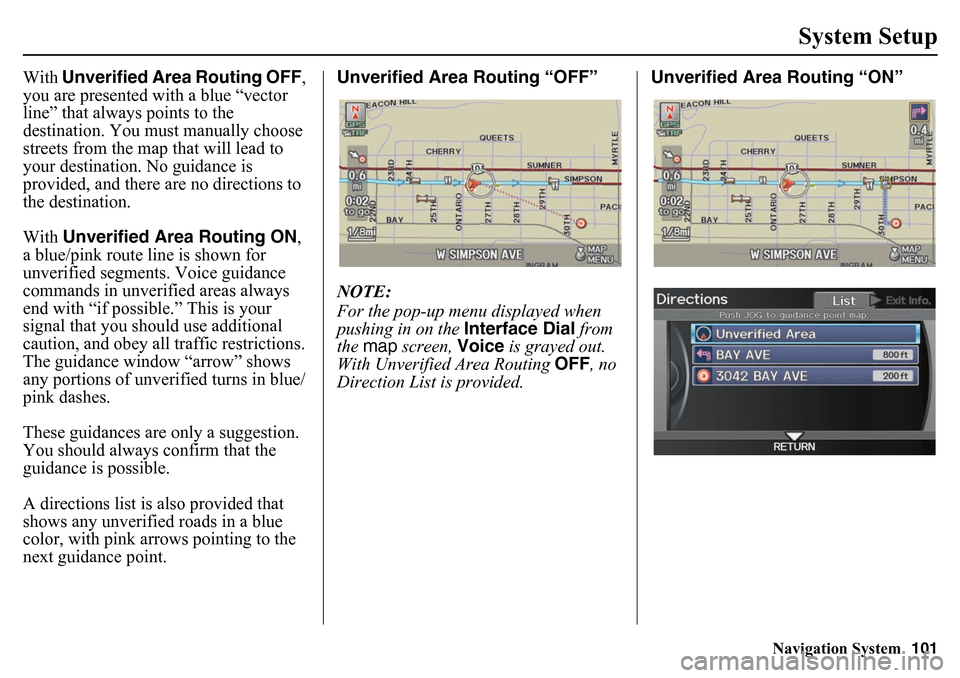
With Unverified Area Routing OFF ,
you are presented with a blue “vector
line” that always points to the
destination. You must manually choose
streets from the map that will lead to
your destination. No guidance is
provided, and there are no directions to
the destination.
With Unverified Area Routing ON ,
a blue/pink route line is shown for
unverified segments. Voice guidance
commands in unverified areas always
end with “if possible.” This is your
signal that you should use additional
caution, and obey all traffic restrictions.
The guidance window “arrow” shows
any portions of unverified turns in blue/
pink dashes.
These guidances are only a suggestion.
You should always confirm that the
guidance is possible.
A directions list is also provided that
shows any unverified roads in a blue
color, with pink a rrows pointing to the
next guidance point. Unverified Area Routing “OFF”
NOTE:
For the pop-up menu displayed when
pushing in on the
Interface Dial from
the map screen, Voice is grayed out.
With Unverified Area Routing OFF, no
Direction List is provided. Unverified Area Routing “ON”
Page 105 of 175
Navigation System105
System Setup
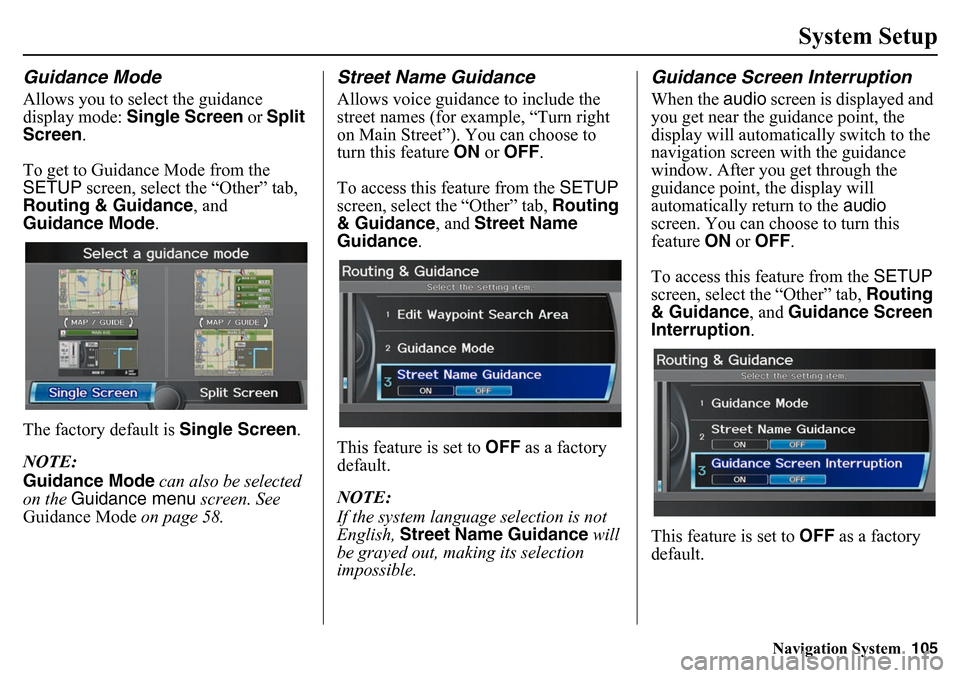
Guidance ModeAllows you to select the guidance
display mode: Single Screen or Split
Screen.
To get to Guidan ce Mode from the
SETUP screen, select the “Other” tab,
Routing & Guidance , and
Guidance Mode .
The factory default is Single Screen.
NOTE:
Guidance Mode can also be selected
on the Guidance menu screen. See
Guidance Mode on page 58.
Street Name GuidanceAllows voice guidance to include the
street names (for example, “Turn right
on Main Street”). You can choose to
turn this feature ON or OFF .
To access this feature from the SETUP
screen, select the “Other” tab, Routing
& Guidance , and Street Name
Guidance.
This feature is set to OFF as a factory
default.
NOTE:
If the system language selection is not
English, Street Name Guidance will
be grayed out, making its selection
impossible.
Guidance Screen InterruptionWhen the audio screen is displayed and
you get near the guidance point, the
display will automatic ally switch to the
navigation screen with the guidance
window. After you get through the
guidance point, the display will
automatically return to the audio
screen. You can choo se to turn this
feature ON or OFF .
To access this feature from the SETUP
screen, select the “Other” tab, Routing
& Guidance , and Guidance Screen
Interruption .
This feature is set to OFF as a factory
default.
Page 112 of 175
112
Navigation System
System SetupTime AdjustmentAdjusts the current time in hours and
minutes. Select ADJUST TIME by
moving the Interface Dial up, and then
switch HOUR and MINUTE by moving
the Interface Dial to the left and right
and changing the value by rotating the
Interface Dial knob . Selecting OK
returns you to the previous screen.Clock FormatSets clock format selection 12H or 24H . Resetting the Clock SettingsSelecting Reset clears any changes you
made to “Auto Daylight,” “Auto Time
Zone” settings, time adjustment, or
“Clock Format”. Depending on your
location, you may need to adjust these
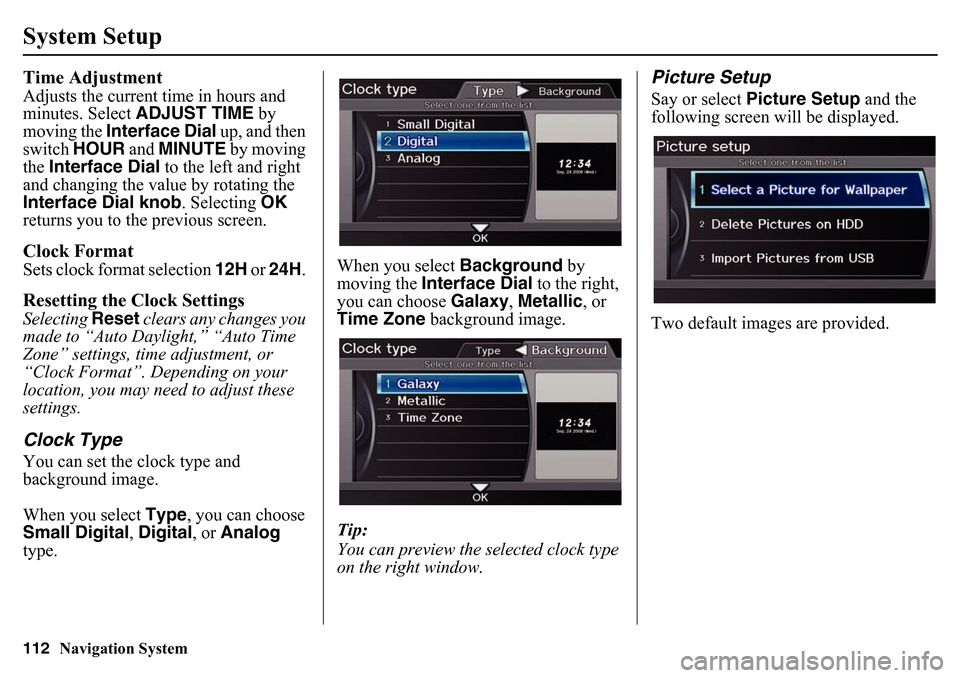
settings.Clock TypeYou can set the clock type and
background image.
When you select Type, you can choose
Small Digital, Digital , or Analog
type. When you select
Background by
moving the Interface Dial to the right,
you can choose Galaxy, Metallic , or
Time Zone background image.
Tip:
You can preview the selected clock type
on the right window.
Picture SetupSay or select Picture Setup and the
following screen w ill be displayed.
Two default images are provided.
Page 114 of 175
114
Navigation System
System SetupImporting Pictures from USBTo use a wallpaper image other than the
factory defaults, you can import pictures
from a USB thumb drive or similar
device.
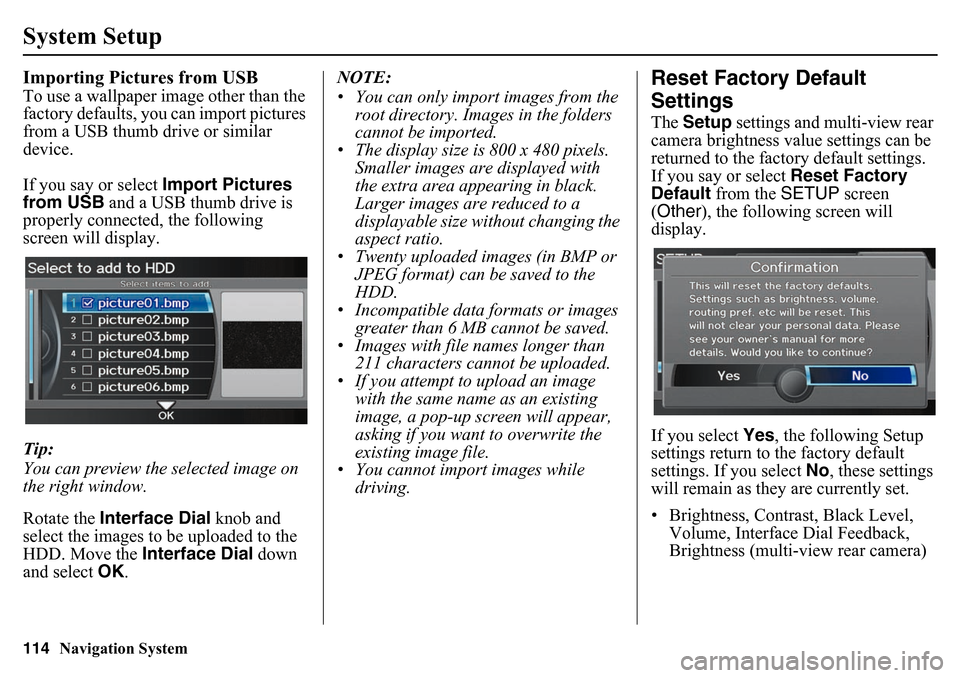
If you say or select Import Pictures
from USB and a USB thumb drive is
properly connected, the following
screen will display.
Tip:
You can preview the selected image on
the right window.
Rotate the Interface Dial knob and
select the images to be uploaded to the
HDD. Move the Interface Dial down
and select OK. NOTE:
• You can only import images from the
root directory. Images in the folders
cannot be imported.
• The display size is 800 x 480 pixels.
Smaller images are displayed with
the extra area appearing in black.
Larger images are reduced to a
displayable size without changing the
aspect ratio.
• Twenty uploaded images (in BMP or
JPEG format) can be saved to the
HDD.
• Incompatible data formats or images
greater than 6 MB cannot be saved.
• Images with file na mes longer than
211 characters cannot be uploaded.
• If you attempt to upload an image with the same name as an existing
image, a pop-up s creen will appear,
asking if you want to overwrite the
existing image file.
• You cannot import images while
driving.
Reset Factory Default
SettingsThe Setup settings and multi-view rear
camera brightness value settings can be
returned to the factory default settings.
If you say or select Reset Factory
Default from the SETUP screen
(Other ), the following screen will
display.
If you select Yes, the following Setup
settings return to the factory default
settings. If you select No , these settings
will remain as they are currently set.
• Brightness, Contrast, Black Level, Volume, Interface Dial Feedback,
Brightness (multi-view rear camera)
Page 120 of 175
120
Navigation System
System LimitationsAlso, depending on your current view of
the sky and the position of the satellites,
the elevation may be shown incorrectly.
You may also notice some delay of the
vehicle position icon at intersections;
this is normal.GPS Reception IssuesThe signals received from the GPS
satellites are extremely weak (less than
a millionth of the strength of a local FM
station) and require an unobstructed
view of sky. The signal can easily be
interrupted or interfered with by the
following:
• Aftermarket metallic window tint above or to the sides of the GPS
antenna (located in the dashboard)
• Cell phones, PDAs, or other electronic devices docked in a cradle
or lying loose on the dashboard
• Remote starters or “hidden” vehicle tracking systems mounted near the
navigation unit • Other aftermarket audio electronic
devices mounted near the navigation
unit
• Trees, tall buildings, freeway overpasses, tunnels, or overhead
electrical power wires
Although the system will direct you to
your desired destination, it may not
always generate what you consider to be
the most direct route. Try changing the
method of routing. See Changing the
Route Preference on page 51. You may
also have Unverified Area Routing set
to OFF. See Unverified Area Routing on
page 98.
Additionally, the mapping database
contains verified and unverified maps.
See Map Overview on page 6. A
Disclaimer screen will warn you if your
route includes unverified streets.
Unverified streets may be missing from
the map, in the wrong location, or have
an incorrect name or address range.
Exercise additional caution when
driving in these unverified areas. The destination icon shows the
approximate location of
the destination.
This occurs because a city block can
have as many as 100 possible addresses
(for example, the 1400 block is followed
by the 1500 block) Since most cities use
only a portion of the 100 possible
addresses (for example, in the 1400
block, the addresses may only go up to
1425 before the 1500 block starts), the
address 1425 will be shown a quarter of
the way down the block by the system
instead of at the end of the block where
the destination is actually located.
You may find that the system
occasionally reboots. This is indicated
by the display returning to the
navigation system globe screen. A
reboot can be caused by a number of
things, such as extreme temperatures or
shock from bumpy roads. It does not
necessarily indicate a problem that
requires service. If this happens
frequently, please see your dealer.