brake HONDA PILOT 2023 Owners Manual
[x] Cancel search | Manufacturer: HONDA, Model Year: 2023, Model line: PILOT, Model: HONDA PILOT 2023Pages: 814, PDF Size: 29.02 MB
Page 703 of 814

702
uuMaintenance MinderTMuTo Use Maintenance MinderTM
Maintenance
Canadian models
*1: If a Maintenance Minder message does not appear more than 12 months after the display is reset,
change the engine oil every year.
*2: If you drive in dusty conditions, replace the air cleaner element every 24,000 km (15,000 miles).
*3: If you drive primarily in urban areas that have high concentrations of soot in the air from industry and from diesel-powered vehicles, replace the dust and pollen filter every 24,000 km (15,000 miles).
*4: If you drive regularly in very high temperatures (over 43°C, 110°F), in very low temperatures (under -29°C, -20°F), or towing a trailer, replace every 100,000 km (60,000 miles).
*5: Driving in mountainous areas at very low vehicle speeds or trailer towing results in higher level of mechanical (Shear) stress to fluid. This requires differential fluid changes more frequently than
recommended by the Maintenance Minder. If you regularly drive your vehicle under these conditions,
have the differential fluid changed at 12,000 km (7,500 miles), then every 24,000 km (15,000 miles).
*6: If a Maintenance Minder message does not appear more than 36 months after the display for item 7 is reset, change the brake fluid every 3 years.
# : See information on maintenance and emissions warranty.
CODEMaintenance Main Items
A
●Replace engine oil*1
0●Replace engine oil*1 and oil filter
CODEMaintenance Sub Items
1
●Rotate tires
2●Replace air cleaner element*2
●Replace dust and pollen filter*3
●Inspect drive belt
3
●Replace transmission fluid●Replace transfer fluid
4●Replace spark plugs●Replace timing belt and inspect water pump*4
5●Replace engine coolant
6●Replace rear differential fluid*5
7●Replace brake fluid*6
9●Service front and rear brakes●Inspect these items: • Tie rod ends, steering gearbox, and boots
• Suspension components
• Driveshaft boots
• Brake hoses and lines (including ABS/VSA ®)
• All fluid levels and condition of fluids
• Exhaust system
#
•Fuel lines and connections#
23 PILOT-31T906000_03.book 702 ページ 2022年10月31日 月曜日 午前10時26分
Page 706 of 814

Washer Fluid
Radiator CapEngine Coolant
Reserve Tank
Engine Oil Fill Cap
Battery
Engine Oil Dipsti")
705
Maintenance
Maintenance Under the Hood
Maintenance Items Under the Hood
Brake Fluid
(Black Cap)
Washer Fluid
Radiator CapEngine Coolant
Reserve Tank
Engine Oil Fill Cap
Battery
Engine Oil Dipstick
(Orange)
23 PILOT-31T906000_03.book 705 ページ 2022年10月31日 月曜日 午前10時26分
Page 707 of 814
706
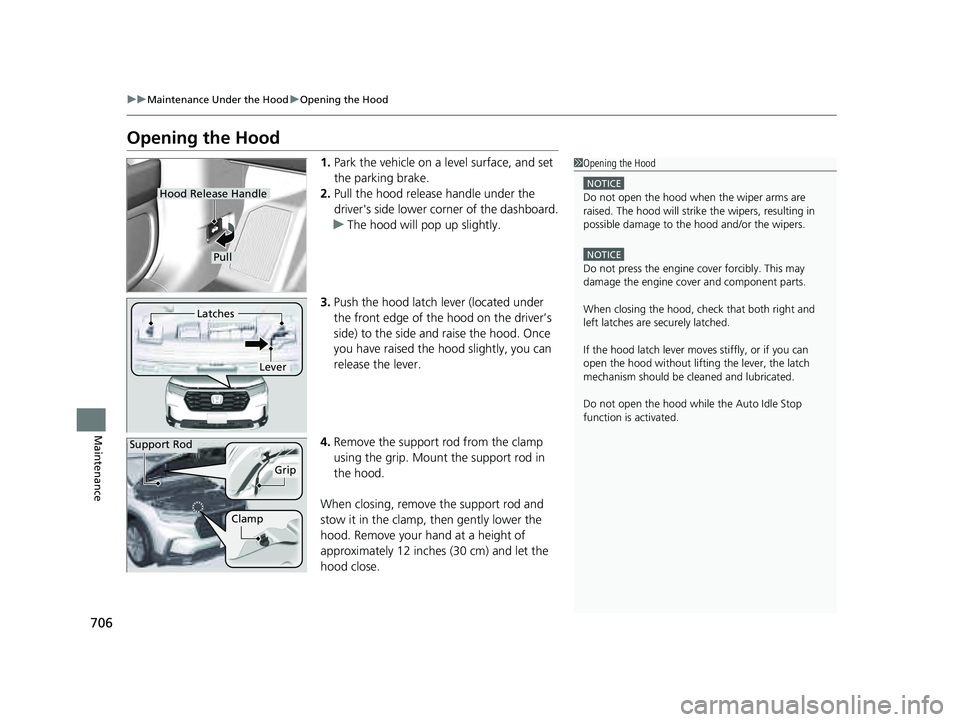
uuMaintenance Under the Hood uOpening the Hood
Maintenance
Opening the Hood
1. Park the vehicle on a level surface, and set
the parking brake.
2. Pull the hood release handle under the
driver's side lower corner of the dashboard.
u The hood will pop up slightly.
3. Push the hood latch lever (located under
the front edge of the hood on the driver’s
side) to the side and raise the hood. Once
you have raised the hood slightly, you can
release the lever.
4. Remove the support rod from the clamp
using the grip. Mount the support rod in
the hood.
When closing, remove the support rod and
stow it in the clamp, then gently lower the
hood. Remove your hand at a height of
approximately 12 inches (30 cm) and let the
hood close.1 Opening the Hood
NOTICE
Do not open the hood when the wiper arms are
raised. The hood will strike the wipers, resulting in
possible damage to the hood and/or the wipers.
NOTICE
Do not press the engine cover forcibly. This may
damage the engine cover and component parts.
When closing the hood, check that both right and
left latches are securely latched.
If the hood latch lever moves stiffly, or if you can
open the hood without lifti ng the lever, the latch
mechanism should be cl eaned and lubricated.
Do not open the hood while the Auto Idle Stop
function is activated.
Hood Release Handle
Pull
Lever
Latches
Support Rod
Grip
Clamp
23 PILOT-31T906000_03.book 706 ページ 2022年10月31日 月曜日 午前10時26分
Page 718 of 814

717
uuMaintenance Under the Hood uBrake Fluid
Maintenance
Brake Fluid
The fluid level should be between the MIN
and MAX marks on the side of the reserve
tank.
Refilling Window Washer Fluid
Open the cap and check the amount of
window washer fluid.
If the level is low, fill the washer reservoir.
If the washer fluid is low, a message appears
on the driver information interface.
Pour the washer fluid carefully. Do not overflow the reservoir.
Specified fluid: Honda Heavy Duty Brake Fluid DOT 3
■Checking the Brake Fluid
1Brake Fluid
NOTICE
Brake fluid marked DOT 5 is not compatible with your
vehicle’s braking system and can cause extensive
damage.
If the specified br ake fluid is not av ailable, you should
use only DOT 3 or DOT 4 fluid from a sealed
container as a temporary replacement.
Using any non-Honda brake fluid can cause corrosion
and decrease the longevity of the system. Have the
brake system flushed and re filled with Honda Heavy
Duty Brake Fluid DOT 3 as soon as possible.
If the brake fluid level is at or below the MIN mark,
have a dealer inspect the vehicle for leaks or worn
brake pads as soon as possible.
Brake Reservoir
MIN
MAX
1 Refilling Window Washer Fluid
NOTICE
Do not use engine antifreeze or a vinegar/water
solution in the windshield washer reservoir.
Antifreeze can damage y our vehicle’s paint. A
vinegar/water solution ca n damage the windshield
washer pump.
Use only commercially avai lable windshield washer
fluid. Avoid prolonged use of hard water to prevent
lime scale buildup.Models without washer level sensor
Models with washer level sensor
23 PILOT-31T906000_03.book 717 ページ 2022年10月31日 月曜日 午前10時26分
Page 720 of 814

719
uuReplacing Light Bulbs uBrake Lights, Taillights, Rear Side Marker Lights, and Rear Turn Signal Light Bulbs
Continued
Maintenance
Brake Lights, Taillights, Rear Side Marker Lights, and
Rear Turn Signal Light Bulbs
When replacing, use the following bulbs.
1.Pry on the edge of the cover using a flat-tip
screwdriver to remove the cover.
u Wrap the flat-tip screwdriver with a cloth
to prevent scratches.
2. Remove the bolts.
Brake Ligh t: LED
Taillight: LED
Rear Side Marker Light: LED
Rear Turn Signal Light: 21 W (Amber)
1 Brake Lights, Taillights, Rear Side Marker Lights, and Rear Turn
Signal Light Bulbs
Brake lights, taillights, and rear side marker lights are
LED type. Have an authorized Honda dealer inspect
and replace the light assembly.
Cover
Bolt
23 PILOT-31T906000_03.book 719 ページ 2022年10月31日 月曜日 午前10時26分
Page 721 of 814

720
uuReplacing Light Bulbs uBrake Lights, Taillights, Rear Side Marker Lights, and Rear Turn Signal Light Bulbs
Maintenance
3.Pull the light assembly out of the rear pillar.
4. Turn the socket counter-clockwise and
remove it.
5. Remove the old bulb and insert a new bulb.
6. Align the pins with the body grommets,
then push in unt il they fully seat.
Bulb
Socket
23 PILOT-31T906000_03.book 720 ページ 2022年10月31日 月曜日 午前10時26分
Page 723 of 814

722
uuReplacing Light Bulbs uHigh-Mount Brake Light
Maintenance
High-Mount Brake Light
High-mount brake light is LED type. Have an authorized Honda dealer inspect and
replace the light assembly.
Puddle Lights*
Puddle lights are LED type. Have an authoriz ed Honda dealer inspect and replace the
light assembly.
* Not available on all models
23 PILOT-31T906000_03.book 722 ページ 2022年10月31日 月曜日 午前10時26分
Page 737 of 814

736
uuChecking and Maintaining Tires uWinter Tires
Maintenance
Winter Tires
If driving on snowy or frozen roads, mount all season marked M+S tires, snow tires,
or tire chains; reduce speed; and maintain sufficient distance between vehicles when
driving.
Be particularly careful when operating the steering wheel or brakes to prevent
skidding.
Use tire chains, snow tires, or all season ti res when necessary or according to the law.
When mounting, refer to the following points.
For winter tires:
• Select the size and load ranges that are the same as the original tires.
• Mount the tires to all four wheels.
For tire chains:
• Install them on the front tires only.
• Because your vehicle has limited tire cl earance, we strongly recommend using the
chains listed below:
• Follow the chain manufacturer’s instruction when installing. Mount them as
tightly as you can.
• Check that the chains do not to uch the brake lines or suspension.
• Drive slowly.
Cable-type: Kenig XB-16 265
Cable-type: Peerless Auto-Trac 0232605
1Winter Tires
NOTICE
Traction devices that are the wrong size or improperly
installed can damage your vehicle’s brake lines,
suspension, body, and wheels. Stop driving if they are
hitting any part of the vehicle.
When tire chains are mounted, follow the chain
manufacturer’s instructi ons regarding vehicle
operational limits.
If your vehicle is equipp ed with summer tires, be
aware that these tires are not designed for winter
driving conditions. For more information, contact a
dealer.
3WARNING
Using the wrong chains, or not properly
installing chains, can damage the brake
lines and cause a crash in which you can be
seriously injured or killed.
Follow all instruction s in this owner’s
manual regarding the selection and use of
tire chains.
Models with 255/60R18 tires
Models with 255/50R20 tires
Models with 265/60R18 tires
23 PILOT-31T906000_03.book 736 ページ 2022年10月31日 月曜日 午前10時26分
Page 739 of 814

738
uuBattery uCharging the AGM Battery
Maintenance
Charging the AGM Battery
AGM labeled batteries like those installe d in your vehicle require a compatible
charger to be properly charged. Damage to the battery can result if the battery is
charged improperly or with the wrong equipment. For more information on how to
charge your vehicle’s AGM battery, consult a dealer.1Battery
The battery installed in this vehicle is specifically
designed for a model wi th Auto Idle Stop.
Using a battery other than this specified type may
shorten the battery life, a nd prevent Auto Idle Stop
from activating. If you need to replace the battery,
make sure to select the specified type and size. Ask a
dealer for more details.
The Vehicle Stability Assist
TM (VSA ®) system, Adaptive
Cruise Control (ACC) with Low Speed Follow, brake
system (amber), and safety support indicators may
come on in amber along with a message in the driver
information interface when you set the power mode
to ON after reconnecting the battery.
Drive a short distance at more than 12 mph
(20 km/h). Each indicator should go off. If any does
not, have your vehicle checked by a dealer.
23 PILOT-31T906000_03.book 738 ページ 2022年10月31日 月曜日 午前10時26分
Page 747 of 814
 may fog temporarily
if you have driven in the rain, or after the vehicle has been run")
746
uuCleaning uExterior Care
Maintenance
The inside lenses of exterior lights (headli ghts, brake lights, etc.) may fog temporarily
if you have driven in the rain, or after the vehicle has been run through a car wash.
Dew condensation also may build up inside the lenses when there is a significant
enough difference between the ambient and inside lens temperatures (similar to
vehicle windows fogging up in rainy conditions). These conditions are natural
processes, not structural design problems in the exterior lights.
Lens design characteristics may result in mo isture developing on the light lens frame
surfaces. This also is not a malfunction.
However, if you see large amounts of wa ter accumulation, or large water drops
building up inside the lenses, have your vehicle inspected by a dealer.
■Fogged Exterior Light Lenses
23 PILOT-31T906000_03.book 746 ページ 2022年10月31日 月曜日 午前10時26分