check engine HONDA PRELUDE 1990 Owner's Manual
[x] Cancel search | Manufacturer: HONDA, Model Year: 1990, Model line: PRELUDE, Model: HONDA PRELUDE 1990Pages: 143, PDF Size: 2.07 MB
Page 102 of 143
Fuse Replacement (cont'd)
CAUTION:
A blown fuse may be just a symptom of some other problem. If a new fuse blows right away, the cause should be diagnosed and
corrected by a qualified Honda technician. Never replace a fuse with anything but another fuse of the same or lower rating. A
higher capacity fuse could cause damage and even start a fire.
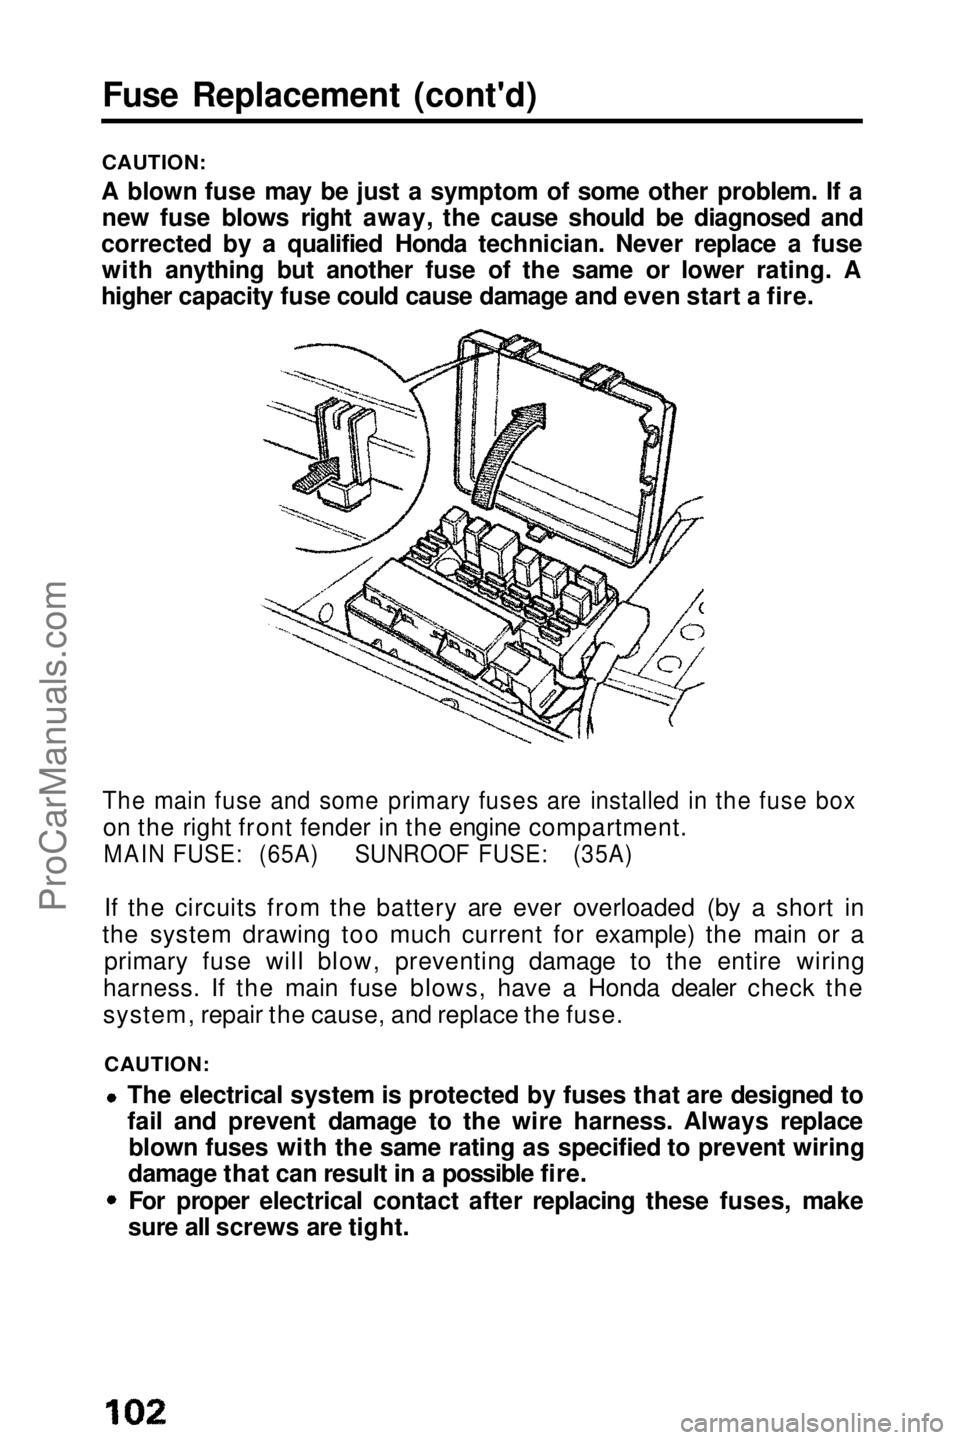
The main fuse and some primary fuses are installed in the fuse box
on the right front fender in the engine compartment.
MAIN FUSE: (65A) SUNROOF FUSE: (35A)
If the circuits from the battery are ever overloaded (by a short in
the system drawing too much current for example) the main or a primary fuse will blow, preventing damage to the entire wiring
harness. If the main fuse blows, have a Honda dealer check the
system, repair the cause, and replace the fuse.
CAUTION:
The electrical system is protected by fuses that are designed to
fail and prevent damage to the wire harness. Always replaceblown fuses with the same rating as specified to prevent wiring
damage that can result in a possible fire.
For proper electrical contact after replacing these fuses, make
sure all screws are tight.ProCarManuals.comMain Menu t s
Page 108 of 143
Air Conditioner Care
Condenser and Radiator
Check the engine radiator and the air conditioner condenser (in front
of the radiator) for accumulated dirt, insects or leaves. Carefully brush or hose them off to assure maximum cooling performance.
CAUTION:
Radiator and condenser fins are very thin and easily damaged; do
not bend them with the high water pressure or brush.
Compressor Drive Belt Check the compressor bett tension monthly, during periods when
you use the air conditioner a lot.
If the engine has been running, some engine components may be
hot enough to burn you.
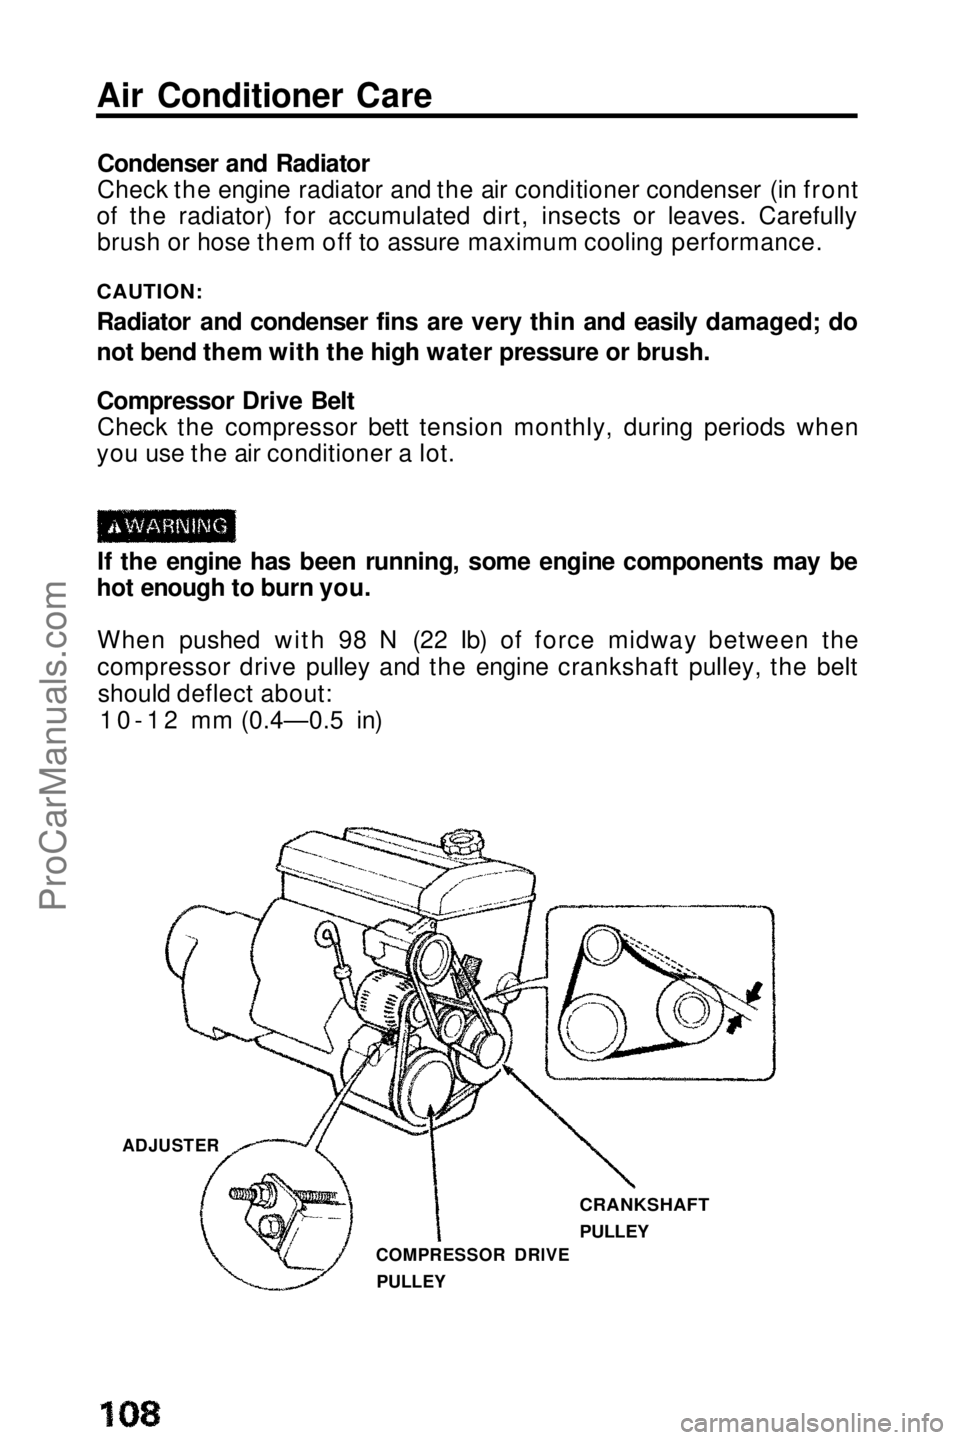
When pushed with 98 N (22 Ib) of force midway between the
compressor drive pulley and the engine crankshaft pulley, the beltshould deflect about: 10-12 mm (0.4—0.5 in)
ADJUSTER COMPRESSOR DRIVE
PULLEY
CRANKSHAFT
PULLEYProCarManuals.comMain Menu t s
Page 119 of 143
Jump Starting
To start a car with a dead battery, use another battery of the same voltage, and the proper jumper cables. Procedures other than those below could cause injury or
damage from battery acid spray, explosion or charging system
overload.
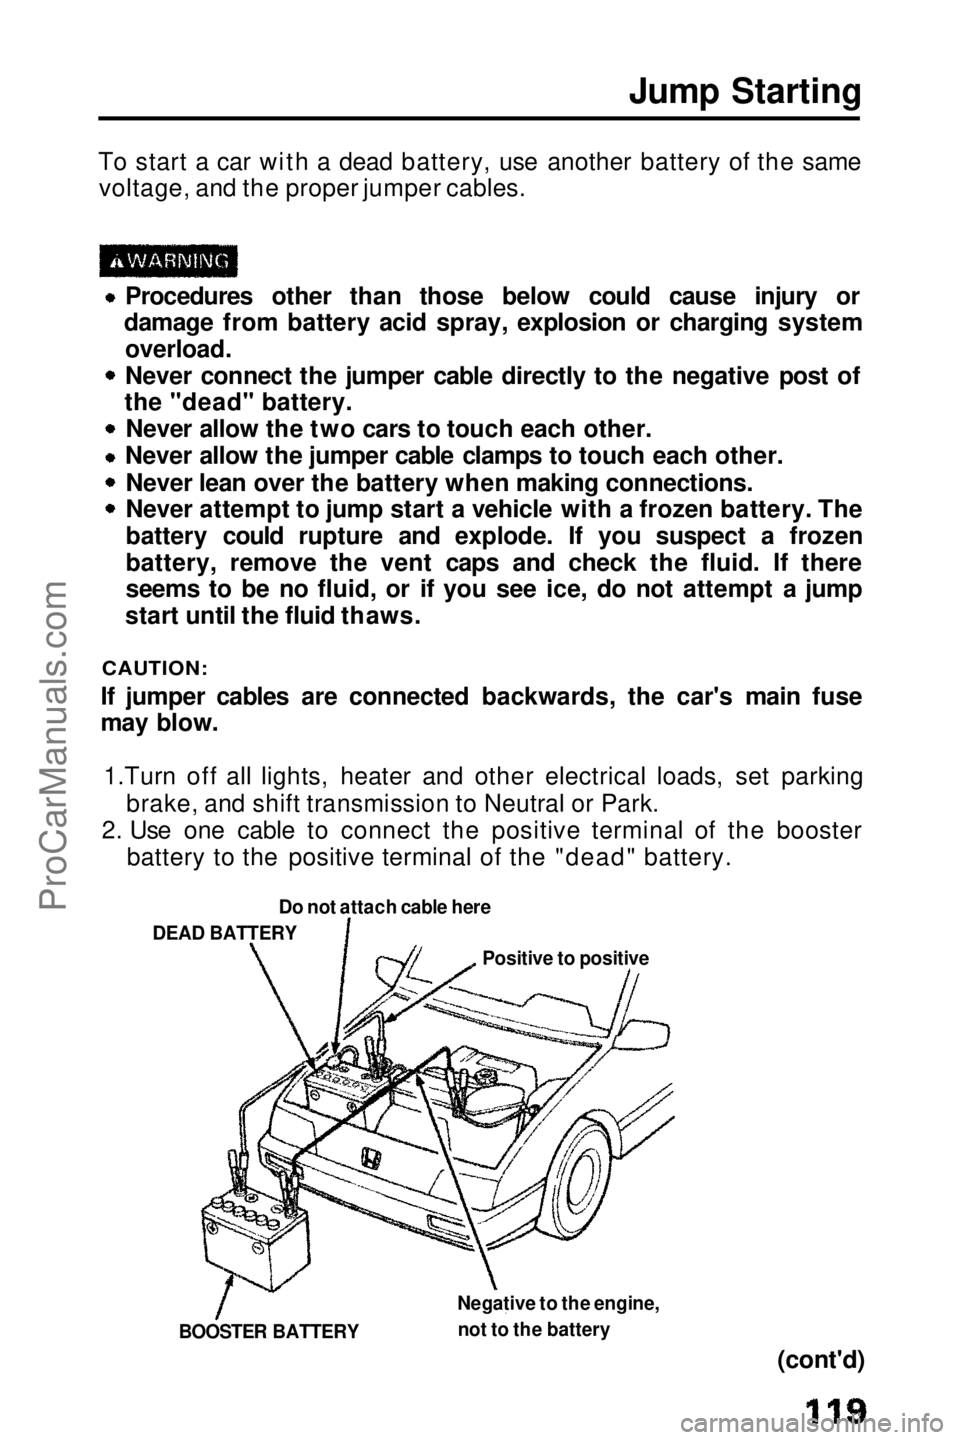
Never connect the jumper cable directly to the negative post of
the "dead" battery.
Never allow the two cars to touch each other.
Never allow the jumper cable clamps to touch each other.
Never lean over the battery when making connections.
Never attempt to jump start a vehicle with a frozen battery. The
battery could rupture and explode. If you suspect a frozen
battery, remove the vent caps and check the fluid. If there
seems to be no fluid, or if you see ice, do not attempt a jump
start until the fluid thaws.
CAUTION:
If jumper cables are connected backwards, the car's main fuse
may blow.
1.Turn off all lights, heater and other electrical loads, set parking
brake, and
shift transmission to Neutral or Park.
2. Use one cable to connect the positive terminal of the booster battery to the positive terminal of the "dead" battery.
(cont'd)
Do not attach cable here
DEAD BATTERY
Positive to positive
Negative to the engine, not to the battery
BOOSTER BATTERYProCarManuals.comMain Menu t s
Page 120 of 143

Jump Starting (cont'd)
3. Use the other cable to connect the negative terminal of the booster battery to the engine at the ground cable as shown.
4.To remove the cables, reverse the above procedures exactly.
DO NOT push or tow a car to start it. The forward surge when the
engine starts could cause a collision. Also, under some conditions,
the catalytic converter could be damaged. A car equipped with an
automatic transmission cannot be started by pushing or towing.
NOTE:
After jump-starting the car, there is a possibility that the ALB
warning light may come on due to insufficient battery voltage. After
the battery is sufficiently recharged and the engine is turned off and restarted, the ALB warning light should indicate that the ALB
system is OK, by coming on for a few seconds each time the engine is started. If the light remains on after recharging, have it checked
by a Honda dealer.ProCarManuals.comMain Menu t s
Page 121 of 143
If towing is necessary, contact a professional towing service. Your
authorized Honda dealer can assist you with detailed towing
instructions.
Never use tow chains or rope to tow a car; your ability to safety
control the car may be adversely affected.
We recommend the following:
Flat Bed Equipment — Entire car is winched on a flat bed vehicle.
This is the best way of transporting your Honda.
Wheel Lift Type — Tow with the front wheels off the ground.
If the
car can only be towed with the front wheels on the ground:
make sure the transmission is full of fluid (see page 86 — 87)
and tow with the transmission in neutral (N) and the ignition key in
the I position.
CAUTION:
To avoid serious damage on automatic transmission cars, first start the engine and shift to D, then to N and shut the engine off. If
the engine does not run or the transmission cannot be shifted
while the engine is running, the car must be transported on flatbed equipment.
Check local regulations for towing.
CAUTION:
Do not exceed 35 mph (55 km/h) or tow for distances of more
than 50 miles (80 km). If a Sling Type tow is used, the tow truck driver should position
wood spacer blocks between your car's frame and the chains
and lift straps to avoid damaging the bumper and the body. Do not use the bumpers to lift the car or to support the car's
weight while towing.
When towing a car with 4WS even with the front wheels off the ground, turn the wheels straight ahead and tie the steering wheel in place. TowingProCarManuals.comMain Menu s t
Page 134 of 143
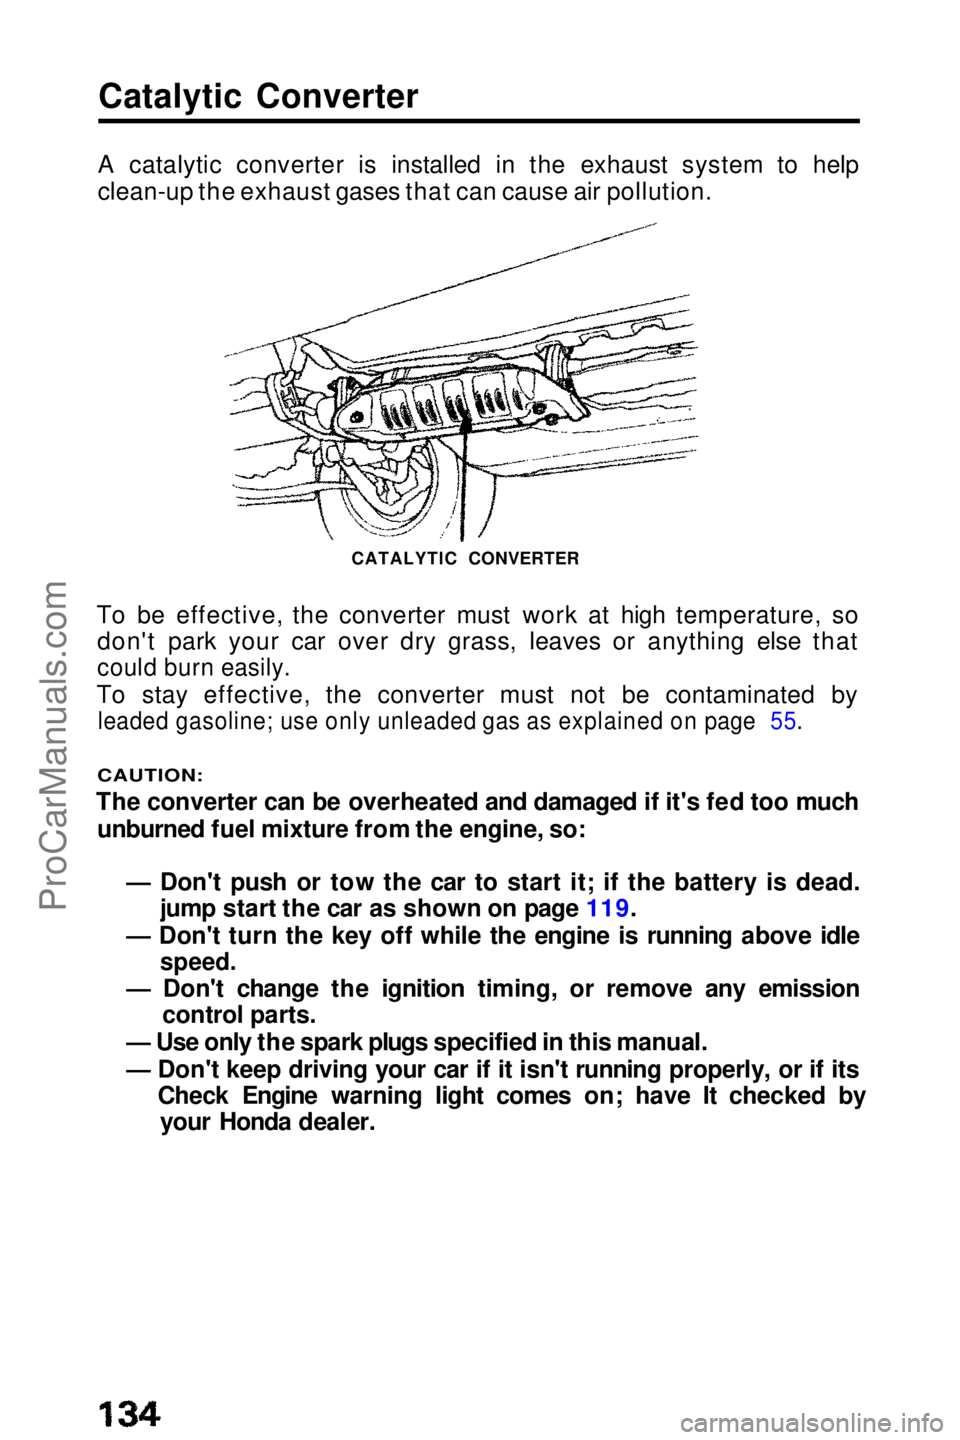
Catalytic Converter
A catalytic converter is installed in the exhaust system to help
clean-up the exhaust gases that can cause air pollution.
To be effective, the converter must work at high temperature, so don't park your car over dry grass, leaves or anything else that
could burn easily.
To stay effective, the converter must not be contaminated by
leaded gasoline; use only unleaded gas as explained on page 55.
CAUTION:
The converter can be overheated and damaged if it's fed too much unburned fuel mixture from the engine, so:
— Don't push or tow the car to start it; if the battery is dead. jump start the car as shown on page 119.
— Don't turn the key off while the engine is running above idle
speed.
— Don't change the ignition timing, or remove any emission control parts.
— Use only the spark plugs specified in this manual.
— Don't keep driving your car if it isn't running properly, or if its Check Engine warning light comes on; have It checked byyour Honda dealer. CATALYTIC CONVERTERProCarManuals.comMain Menu t s
Page 138 of 143
Index (cont'd)
Emission Controls.........................130
Engine
Coolant.......................................88
Coolant Temperature
Gauge....................................20
Identification Number .............127
Oil and Filter...............................83
Oil Pressure
Warning
Light .......................................22
Specification ...........................125
Exhaust Controls....................131
Engine Exhaust Ga
s Warning
....................................................64
Evaporative Emission Control
System ....................................131
Exhaust Gas Recirculation...........132
Exterior Care.................................110
Filters
Air...........................................94
Engine Oil ...................................84
Fuel.............................................96
Fluid .....................................See "Oil"
Foreign Countries, Operation in ...............................56
Four Wheel Steering.......................59 Front Seat
Adjustment..................................5
Fuel
Filter Door and Cap...................56
Fuel Reserve
Warning
Light .......................................22
Gauge.........................................20
Gasohol......................................55
Gasoline ......................................55
Requirement..............................55
Filter...........................................96
Fuse
Checking and Replacing .........101
Specification...........................126 Gasoline............................See"Fuel"
Gas Station Information
...........................................back cover
Gauges............................................20
Glove Box ........................................39
Hazard Warning
Indicator Light ...........................21
Hazard Warning System................33
Headlights
Flasher.......................................31
Headlight Motor
Switch ...........32
High Beam Indicator..................21
High Beam/Low
Beam
Switch...................................31
If the
Retractable Headlights
do not operate ...................123
Reminder Chime
.......................30
Retractable Headlight Motor Warning Light .......................25
Switch.......................................30
Headlight High
Beam Indicator
Light ...........................................21
Head Restraints.................................8
Heating.............................................45
High Bea
m
Switch .......................................31
Indicator Light ...........................21
Hood Latch.....................................39
Identification Numbers.................127
Ignition
Keys.............................................3
Switch........................................58
Indicator Lights ...............................20
Inflation Pressures, Tire..............105
Instrument Panel....................19
Instrument Panel
Brightness
Control.......................................33
Interior light .....................................33
Interior Trim Care .........................110 Jack .............................................116
Jump Starting ...............................119ProCarManuals.comMain Menu t s
Page 143 of 143
Gas Station Information
Gasoline: UNLEADED onlyPump octane of 86 or higher.
Gas Tank-Capacity: 60 l (15.9 US gal, 13.2 Imp gal)
Tire Pressure (measured cold): Front/ Rear 195 kPa (28 psi) 180 kPa (26 psi)
Si (with 4WS) 195 kPa (28 psi) 195 kPa (28 psi)
Compact Spare Tire 415 kPa (60 psi)
Other Tire Information: Label on driver's door edge.
Hood Release: Pull handle under left side of dash.
Engine Oil: An "Energy Conserving II" SG grade oil is recommended. See page 83 for viscosity
recommendations.
Capacity (including filter):
3.8 l ( 4.0 US qt, 3.3 Imp qt)
Manual Transmission Oil: Recommended type—SAE 10W—30 or10W—40 weight, grade SE or SF.
Capacity (including differential):
2.1 l (2.2 US qt, 1.8 Imp qt)
Automatic Transmission Fluid:
Use DEXRON® II type Automatic Transmission Fluid
(ATF). Unscrew dipstick in right end of transmission,
wipe off, reinsert, remove and read fluid level-do not screw-in to check fluid level.
Capacity (Including differential):
2.8 l (3.0 US qt, 2.5 Imp qt)
Power Steering Fluid: Use only Honda power steering fluid: do not use ATF
or any other brand of power steering fluid because it
will damage the system.
AMERICAN HONDA MOTOR CO., INC.
1919 Torrance Blvd., Torrance, California 90501
1990 Honda Motor Co., Ltd. — All Rights Reserved
31SF1621
00X31-SF1-6211CRESTEC5009806 L PRINTED IN U.S.A.
ProCarManuals.comMain Menu t s