ignition HONDA PRELUDE 1992 Owner's Manual
[x] Cancel search | Manufacturer: HONDA, Model Year: 1992, Model line: PRELUDE, Model: HONDA PRELUDE 1992Pages: 225, PDF Size: 2.1 MB
Page 63 of 225
Digital Clock
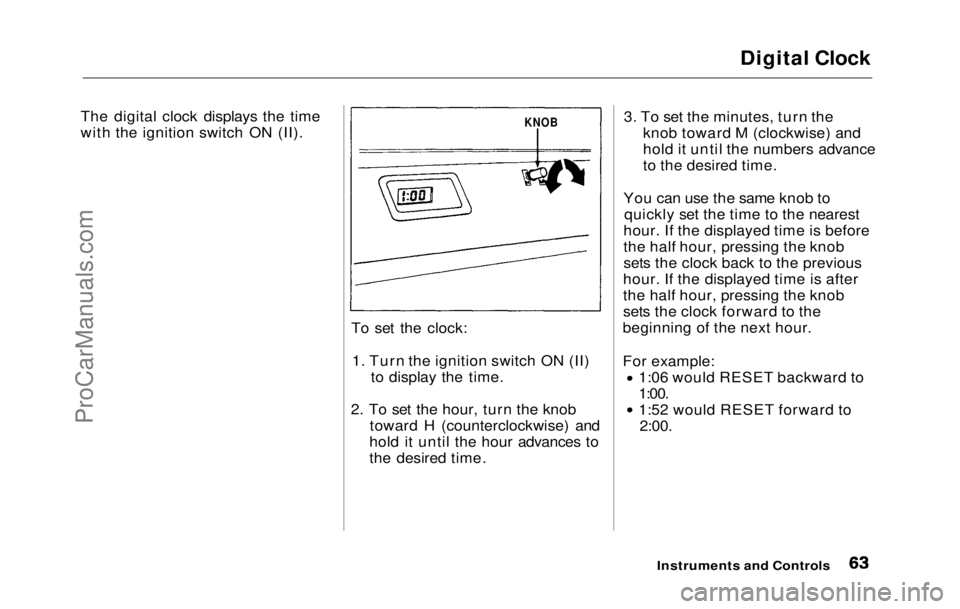
The digital clock displays the time
with the ignition switch ON (II).
To set the clock:1. Turn the ignition switch ON (II)
to display the time.
2. To
set the hour, turn the knob
toward H (counterclockwise) and
hold it until the hour advances to
the desired time.
3. To
set the minutes, turn the
knob toward M (clockwise) and
hold it until the numbers advance
to the desired time.
You ca
n
use the same knob to
quickly set the time to the nearest
hour. If the displayed time is before
the half hour, pressing the knob
sets the clock back to the previous
hour. If the displayed time is after
the half hour, pressing the knob
sets the clock forward to the
beginning of the next hour.
For example: 1:06 would RESET backward to
1:00. 1:52 would RESET forward to
2:00.
Instruments and
Controls
KNOBProCarManuals.comMain Menu Table of Contents s t
Page 65 of 225
Cigarette Lighter, Ashtray
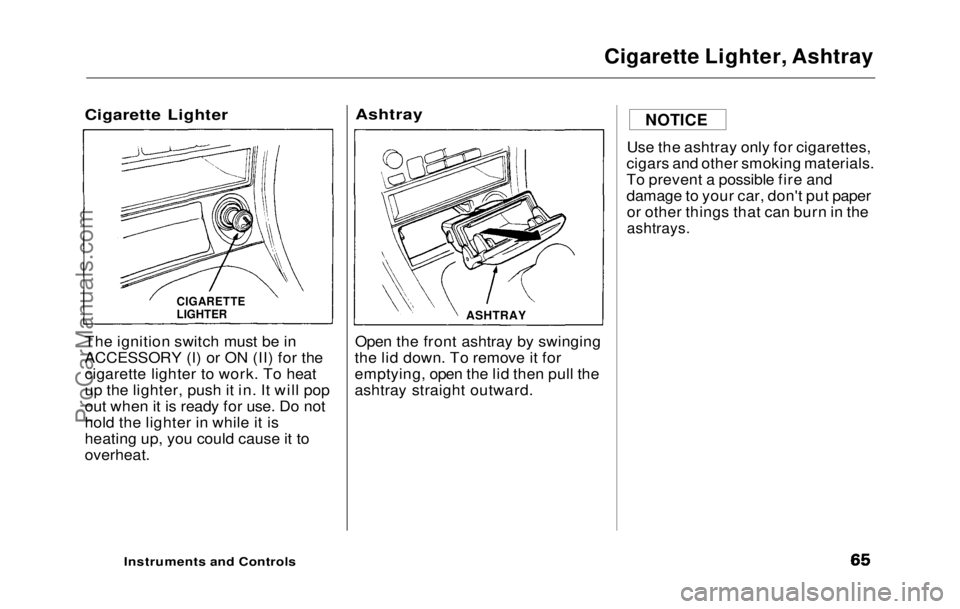
Cigarette Lighter
The ignition switch must be in
ACCESSORY (I) or ON (II) for the
cigarette lighter to work. To heat
up the lighter, push it in. It will pop
out when it is ready for use. Do not
hold the lighter in while it is
heating up, you could cause it to
overheat.
Ashtray
Open the front ashtray by swinging
the lid down. To remove it for
emptying, open the lid then pull the
ashtray straight outward. Use the ashtray only for cigarettes,
cigars and other smoking materials.
To prevent a possible fire and
damage to your car, don't put paper or other things that can burn in the
ashtrays.
Instruments and Controls
NOTICE
ASHTRAY
CIGARETTE
LIGHTERProCarManuals.comMain Menu Table of Contents s t
Page 66 of 225
Interior Lights
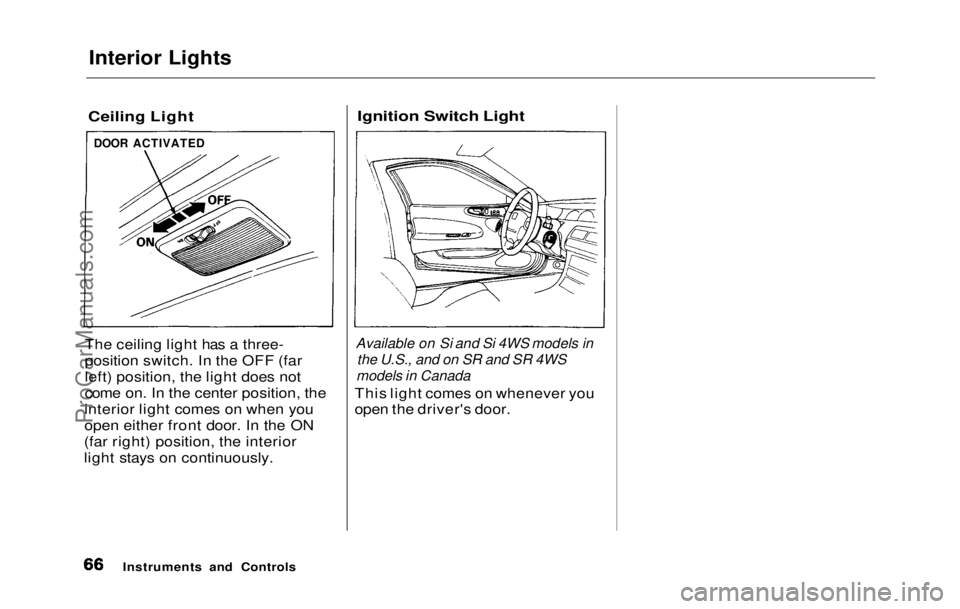
Ceiling Light
The ceiling light has a three-
position switch. In the OFF (far
left) position, the light does not
come on. In the center position, the
interior light comes on when you
open either front door. In the ON
(far right) position, the interior
light stays on continuously.
Ignition Switch Light
Available on Si and Si 4WS models in
the U.S., and
on
SR and
SR
4
WS
models in Canada
This ligh t
comes on whenever you
open the driver's door.
Instruments and Controls
DOOR ACTIVATEDProCarManuals.comMain Menu Table of Contents s t
Page 77 of 225
Audio System (S)
Operating the Radio
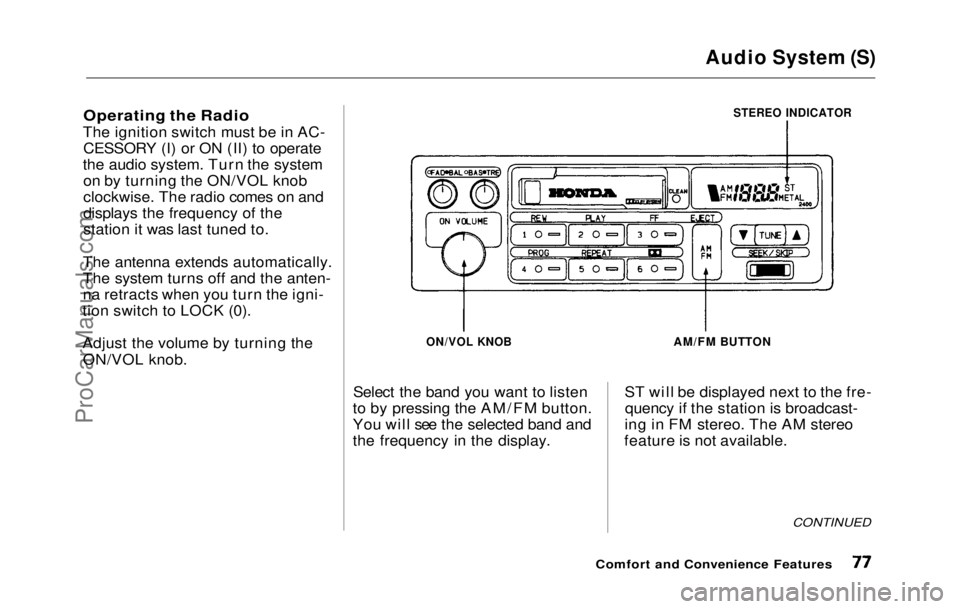
The ignition switch must be in AC- CESSORY (I) or ON (II) to operate
the audio system. Turn the system on by turning the ON/VOL knob
clockwise. The radio comes on and
displays the frequency of the
station it was last tuned to.
The antenna extends automatically.
The system turns off and the anten-
na retracts when you turn the igni-
tion switch to LOCK (0).
Adjust the volume by turning the
ON/VOL knob.
STEREO INDICATOR
ON/VOL KNOB
Select the band you want to listen
to by pressing the AM/FM button.
You will see the selected band and
the frequency in the display.
AM/FM BUTTON
ST will be displayed next to the fre- quency if the station is broadcast-
ing in FM stereo. The AM stereo
feature is not available.
CONTINUED
Comfort and Convenience FeaturesProCarManuals.comMain Menu Table of Contents s t
Page 81 of 225
Audio System (S)
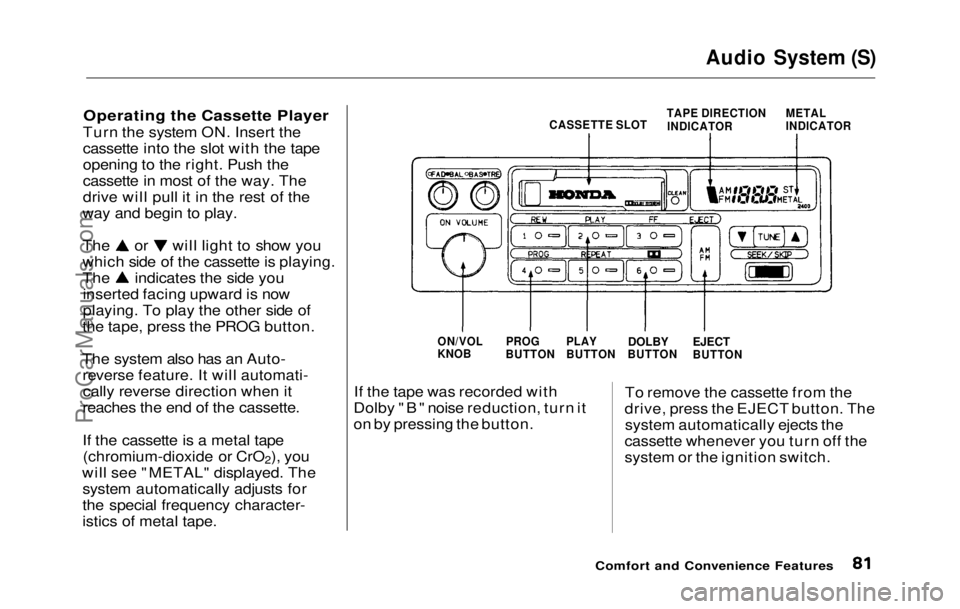
Operating the Cassette Player
Turn the system ON. Insert the
cassette into the slot with the tape
opening to the right. Push the
cassette in most of the way. The
drive will pull it in the rest of the
way and begin to play. The or will light to show you
which side of the cassette is playing.
The indicates the side you
inserted facing upward is now
playing. To play the other side of
the tape, press the PROG button.
The system also has an Auto- reverse feature. It will automati-cally reverse direction when it
reaches the end of the cassette.
If the cassette is a metal tape (chromium-dioxide or CrO 2), you
will see "METAL" displayed . The
system automaticall y
adjusts for
the special frequency character-
istics of metal tape. If the tape was recorded with
Dolby "B" noise reduction, turn it
on by pressing the button. To remove the cassette from the
drive, press the EJECT button. The system automatically ejects the
cassette whenever you turn off the
system or the ignition switch.
Comfort and Convenience Features
METAL
INDICATOR
TAPE DIRECTION
INDICATOR
CASSETTE SLOT
EJECT
BUTTON
DOLBY
BUTTON
PLAY
BUTTON
PROG
BUTTON
ON/VOL
KNOBProCarManuals.comMain Menu Table of Contents s t
Page 86 of 225
Audio System (Si, SR)
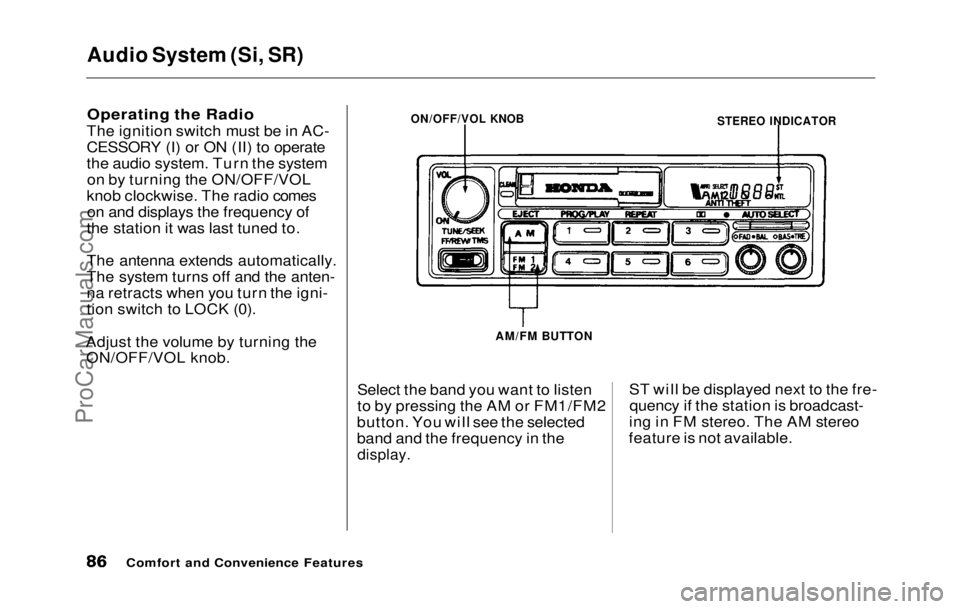
Operating the Radio
The ignition switch must be in AC-
CESSORY (I) or ON (II) to operate
the audio system. Turn the system on by turning the ON/OFF/VOL
knob clockwise. The radio comes on and displays the frequency of
the station it was last tuned to.
The antenna extends automatically.
The system turns off and the anten-
na retracts when you turn the igni-
tion switch to LOCK (0).
Adjust the volume by turning the ON/OFF/VOL knob.
Select the band you want to listen
to by pressing the AM or FM1/FM2
button. You will see the selected
band and the frequency in the
display.
ST will be displayed next to the fre-
quency if the station is broadcast-
ing in FM stereo. The AM stereo
feature is not available.
Comfort and Convenience Features
STEREO INDICATOR
ON/OFF/VOL KNOB
AM/FM BUTTONProCarManuals.comMain Menu Table of Contents s t
Page 91 of 225
Audio System (Si, SR)
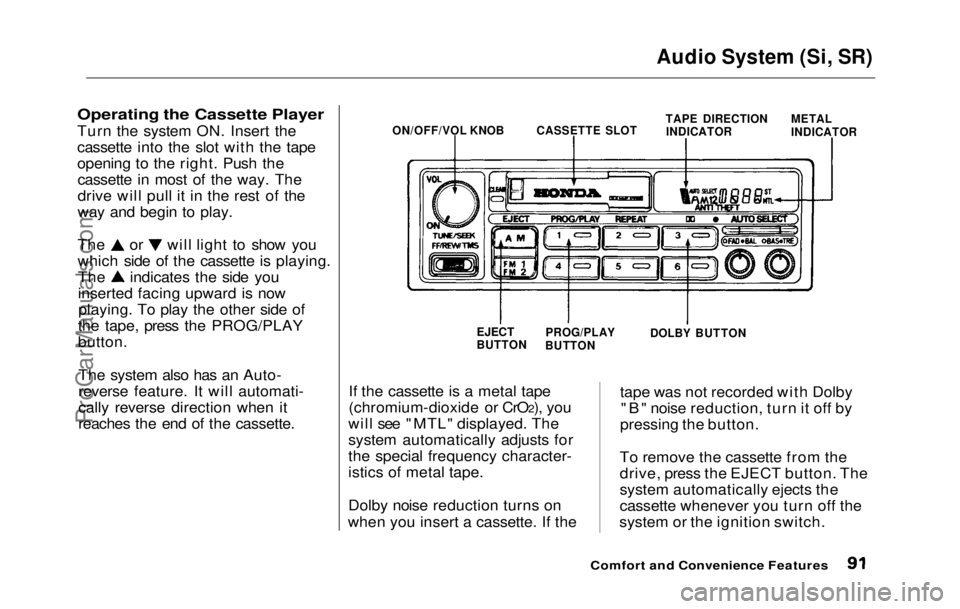
Operating the Cassette Player
Turn the
system ON. Insert the
cassette into the slot with the tape
opening to the right. Push the cassette in most of the way. The
drive will pull it in the rest of the
way and begin to play. The or will light to show you
which side of the cassette is playing.
The indicates the side you
inserted facing upward is now
playing. To play the other side of
the tape, press the PROG/PLAY
button.
The system also has an Auto-
reverse feature. It will automati-
cally reverse direction when it
reaches the end of the cassette. If the cassette is a metal tape
(chromium-dioxide or CrO2), you
will see "MTL" displayed. The
system automatically adjusts for
the special frequency character-
istics of metal tape.
Dolby noise reduction turns on
when you insert a cassette. If the tape was not recorded with Dolby
"B" noise reduction, turn it off by
pressing the button.
To remove the cassette from the
drive, press the EJECT button. The
system automatically ejects the
cassette whenever you turn off the
system or the ignition switch.
Comfort and Convenience Features
ON/OFF/VOL KNOB
CASSETTE SLOT
TAPE DIRECTION
INDICATOR METAL
INDICATOR
EJECT
BUTTON PROG/PLAY
BUTTON DOLBY BUTTONProCarManuals.comMain Menu Table of Contents s t
Page 107 of 225
Preparing to Drive
You should do the following checks and adjustments every day before
you drive your car.
1. Make sure all windows, mirrors, and outside lights are clean and
unobstructed. Remove frost,
snow, or ice.
2. Check that the hood and trunk are fully closed.
3. Check that any items you may be carrying with you inside are
stored properly or fastened down
securely. 4. Check the adjustment of the seat
(see page 51 ).
5. Check the adjustment of the
inside and outside mirrors (see
page 59 ).
6. Chec k
the adjustment of the
steering wheel (see page 43 ).
7. Make sure the doors are securely
closed and locked.
8. Fasten your seat belt. Check that your passengers have fastened
their seat belts (see page 7 ). 9. Turn the ignition ON (II). Check
the indicator lights in the instru-
ment panel.
10.Start th
e
engine.
11.Check the gauges and indicator
lights in the instrument panel
(see page 31 ).
Driving
ProCarManuals.comMain Menu Table of Contents s t
Page 108 of 225

Starting the Engine
5-Speed Transmission 1. Apply the parking brake.
2. In cold weather, turn off all electrical accessories to reduce
the drain on the battery.
3. Push the clutch pedal down all the way. START (III) does not
function unless the clutch pedal
is depressed.
4. Without touching the accelerator pedal, turn the ignition key to the
START (III) position. If the
engine does not start right away,
do not hold the key in START
(III) for more than 15 seconds at
a time. Pause for at least 10
seconds before trying again. 5. If the engine does not start
within 15 seconds, or starts butstalls right away, repeat step 4
with the accelerator pedal pressed half-way down. If theengine starts, release pressure on
the accelerator pedal so the
engine does not race.
6. If the
engine still does not start,
press the accelerator pedal all the
way down and hold it there while
starting i n
order to clear flooding.
As before, keep the ignition key in the START (III) position for
no more than 15 seconds. Return
to step 5 if the engine does not
start. If it starts, lift your foot off
the accelerator pedal so the
engine does not race.
Automatic Transmissio
n
1
. Apply the parking brake.
2. In cold weather, turn off all electrical accessories to reduce
the drain on the battery.
3. Make sure the shift lever is in Park. Press on the brake pedal.
4. Without touching the accelerator pedal, turn the ignition key to the
START (III) position. If the
engine does not start right away,
do not hold the key in START
(III) for more than 15 seconds at
a time. Pause for at least 10
seconds before trying again.
CONTINUED
DrivingProCarManuals.comMain Menu Table of Contents s t
Page 109 of 225

Starting the Engine
5. If the engine does not start within 15 seconds, or starts butstalls right away, repeat step 4
with the accelerator pedal pressed half-way down. If theengine starts, release pressure on
the accelerator pedal so the
engine does not race.
6. If
the engine still does not start,
press the accelerator pedal all the
way down and hold it there while
starting in order to clear flooding.
As before, keep the
ignition key
in the START (III) position for
no more than 15 seconds. Return
to step 5 if the engine does not start. If it starts, lift your foot off
the accelerator pedal so the engine does not race.
Starting in Cold Weather at
High Altitude (Above 2,400
meters/8,000 feet)
An engine is harder to start in cold
weather. The thinner air found at
high altitude above 2,400 meters (8,000 feet) adds to the problem.
Use the following procedure:
1.
Turn off all electrical accessories
to reduce the drain on the
battery.
2. Push the accelerator pedal half-
way t o
the floor and hold it there
while starting the engine. Do not
hold the ignition key in START
(III) for more than 15 seconds.
When the engine starts, release
the accelerator pedal gradually
as the engine speeds up and
smooths out.
3. If the engine fails to start in step
2, push the accelerator pedal tothe floor and hold it there while
you try to start the engine for no
more than 15 seconds. If the
engine does not start, return to
step 2.
DrivingProCarManuals.comMain Menu Table of Contents s t