engine HONDA PRELUDE 1992 Owner's Guide
[x] Cancel search | Manufacturer: HONDA, Model Year: 1992, Model line: PRELUDE, Model: HONDA PRELUDE 1992Pages: 225, PDF Size: 2.1 MB
Page 123 of 225
Towing a Trailer
Towing Safety
Your car will not stop as quickly
with a trailer in tow. Leave extra distance between your car and
other vehicles. Avoid braking or
turning suddenly. This could cause
the trailer to jackknife or possibly
turn over.
Keep in mind that your total
vehicle is now much longer. Leave
more room when making turns.
The trailer tracks a smaller arc than the car and can hit or run over
something that the car misses.
When passing another vehicle,
make sure the trailer is clear before changing lanes. The car/trailer combination is more
affected by crosswinds and buffet-
ing. When being passed by a large
vehicle, keep a constant speed and steer straight ahead. If there is too
much wind buffeting, slow down to
get out of the other vehicle's air
turbulence.
Towing a trailer puts an extra load on your car. You should have your
car serviced according to the
"Maintenance schedule under
severe driving conditions" on page
130.
This extra load is magnified when
you are driving in hilly terrain.
Watch the temperature gauge
closely when climbing hills. If it
gets near the hot area, turn off the
air conditioner (if it is on). If this
does not reduce the heat, it may be
necessary to pull to the side of the
road and wait for the engine to cool. If the automatic transmission shifts
frequently between 3rd and 4th
gears, put it in D3. This will help
prevent the transmission from
overheating. Help keep the brakes
from overheating by shifting to a
lower gear when going downhill. If you have to stop while going up-
hill, do not hold the car in place by pressing on the accelerator. This
can cause the automatic transmis-
sion to overheat. Use the parking
brake or footbrake.
DrivingProCarManuals.comMain Menu Table of Contents s t
Page 125 of 225
Maintenance
Regularly maintaining your Honda
is the best way to protect your investment. You will be rewarded
with safer, more economical,
trouble-free driving. This section
lists items that need to be checked
regularly and explains how to check them. It also details some
simple maintenance tasks you can
do yourself. The maintenance
schedules for normal and severe
driving conditions show you when
these things need to be done.
If you are interested in how to per-
form more complex maintenance
on your Honda, you can purchase
the Service Manual. See page 221 for information on how to
obtain a copy, or see your Honda
dealer.
Maintenance Schedule................ 128
Maintenance Record................ 131
Periodic Checks............................ 133
Fluid Locations............................. 134
Engine Oil...................................... 135
Checking Engine Oil................ 135
Adding........................................ 135
Recommended Oil.................... 136
Additives.................................... 136 Oil and Filter Changes ............ 137
Cooling System............................. 139 Checking the Coolant Level... 139
Adding Radiator Coolant........ 139
Replacing Coolant.................... 140
Windshield Washers.................... 143
Transmission Oil.......................... 144
Automatic Transmission........ 144
5-speed Transmission.............. 145
Brake and Clutch Fluid............... 146
Brake System............................ 146
Anti-lock Brake System ......... 147 Clutch System........................... 147
Power Steering............................. 148
Air Filter....................................... 149
Fuel Filter..................................... 150
Spark Plugs.................................. .
150
Replacement.............................. 150
Specification.............................. 152
Battery............................................ 152
Windshield Wipers....................... 155
Air Conditioner............................. 157 Engine Belts.................................. 158
Tires................................................ 158 Inflation...................................... 158
Inspection................................... 159
Maintenance.............................. 160
Tire Rotation............................ 160
Replacing Tires ........................ 161
Wheels and Tires...................... 161
DOT Tire Quality Grading..... 161 Treadwear............................. 161
Traction................................. 162
Temperature......................... 162
Winter Driving.......................... 163 Snow Tires............................ 163
Tire Chains............................ 163
Lights.............................................. 164
Replacing Bulbs........................ 164
Storing Your Car.......................... 173
MaintenanceProCarManuals.comMain Menu s t
Page 126 of 225
Maintenance Schedule
The Required Maintenance Schedule specifies how often you
should have your car serviced, and
what things need attention. It is
essential that your car be serviced
as scheduled to retain its high level of safety, dependability, and
emission control performance.
The services and time or mileage intervals shown in the maintenance
schedule assume you will use your
car as normal transportation for
passengers and their possessions.
You should:
Avoid exceeding your car's loadlimit. This puts excess strain on
the engine, brakes, and many
other parts of your car. The load
limit is shown on the label in the
glove box. Operate your car on reasonable
roads within the legal speed limit. Drive your car regularly over a
distance of several miles.
Always use unleaded gasoline
with the proper octane (see page
98).
Your authorized Honda dealer
knows your car best, and can provide competent, efficient
service. However, service at a
dealer is not mandatory to keep
your warranties in effect. Mainte-
nance may be done by any qualified
service facility or person who is
skilled in this type of automotive
service. Keep all the receipts as
proof of completion, and have the
person who does the work fill out
the maintenance record on page 131. Check your warranty booklet
for more information. We recommend the use of Genuine
Honda parts and fluids or their
equivalent whenever you have
maintenance done. These are the
same high-quality items that went
into your car when it was new, so you can be sure they fit and
perform flawlessly.
U.S. Cars:
Maintenance, replacement or
repair of emission control
devices and systems may be
done by any automotive re-
pair establishment or indi-
vidual using parts that are "certified" to EPA standards.
Vehicles sold in California have
slightly different maintenance
requirements. These are noted in
the Required Maintenance Sche-
dule. Other maintenance operations
are required by California regula-
tions, and condition the emission
warranty.
MaintenanceProCarManuals.comMain Menu Table of Contents s t
Page 127 of 225
Maintenance Schedule
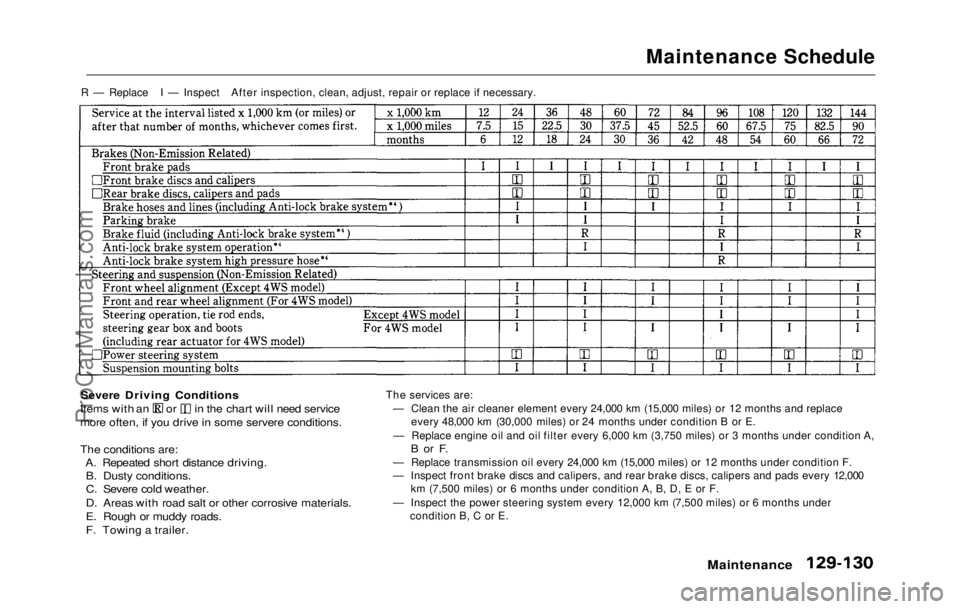
R — Replace I — Inspect After inspection, clean, adjust, repair or replace if necessary.
Severe Driving Conditions Items with an or in the chart will need service
more often, if you drive in some servere conditions.
The conditions are:
A. Repeated short distance driving.B. Dusty conditions.
C. Severe cold weather.
D. Areas with road salt or other corrosive materials.
E. Rough or muddy roads.
F. Towing a trailer.
The services are:
— Clean the air cleaner element every 24,000 km (15,000 miles) or 12 months and replace every 48,000 km (30,000 miles) or 24 months under condition B or E.
— Replace engine oil and oil filter every 6,000 km (3,750 miles) o r 3 months under condition A,
B or F
.
— Replace transmission oil every 24,000 km (15,000 miles) or 12 months under condition F.
— Inspect front brake discs and calipers, and rear brake discs, calipers and pads every 12,000 km (7,500 miles) or 6 months under condition A, B, D, E or F.
— Inspect the power steering system every 12,000 km (7,500 miles) o
r 6 months under
condition B, C or E.
Maintenance
ProCarManuals.comMain Menu Table of Contents s t
Page 131 of 225
Periodic Checks
You should check the following items at the specified intervals. If
you are unsure of how to perform
any check, turn to the page given. Engine oil level — Check every
time you fill the gas tank. See
page 102.
Engine coolant level — Check
the radiator reserve tank every
time you fill the gas tank. See
page 103.
Windshield washer fluid —
Check the level in the reservoir
monthly. If weather conditions
cause you to use the washers
frequently, check the reservoir each time you stop for gas. See
page 143 .
Automatic transmission — Check the fluid level monthly.
See page 144. Brakes, clutch and power
steering — Check the fluid level
monthly. See page 146.Tires — Check the tire pressure
monthly. Examine the tread for
wear and foreign objects. See
page 159.
Battery — Check its condition
and the terminals for corrosion
monthly. See page 152.
Air conditioner — Check its operation weekly. See page 157.
Lights — Check the operation of
the headlights, parking lights,
taillights, high-mount brake light,
turn signals, brake lights, and
license plate lights monthly. See
page 164.
MaintenanceProCarManuals.comMain Menu Table of Contents s t
Page 132 of 225
Fluid Locations
Maintenance
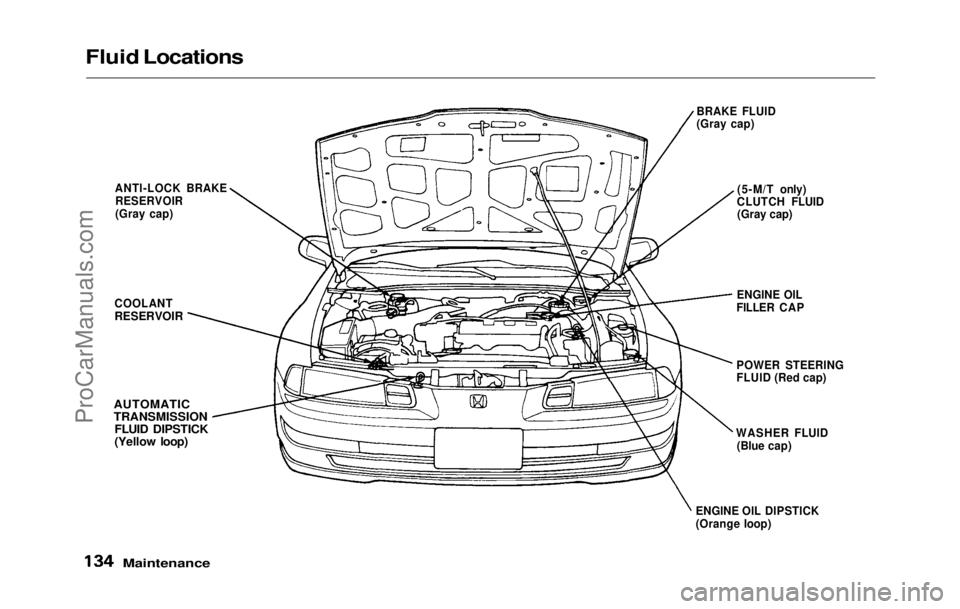
BRAKE FLUID
(Gray cap)
(5-M/T only)
CLUTCH FLUID (Gray cap)
ENGINE OIL
FILLER CAP
POWER STEERING
FLUID (Red cap)
ANTI-LOCK BRAKE
RESERVOIR
(Gray cap)
COOLANT
RESERVOIR
AUTOMATIC
TRANSMISSION FLUID DIPSTICK
(Yellow loop)
ENGINE OIL DIPSTICK
(Orange loop)WASHER FLUID
(Blue cap)ProCarManuals.comMain Menu Table of Contents s t
Page 133 of 225
Engine Oil
Checking Engine Oil
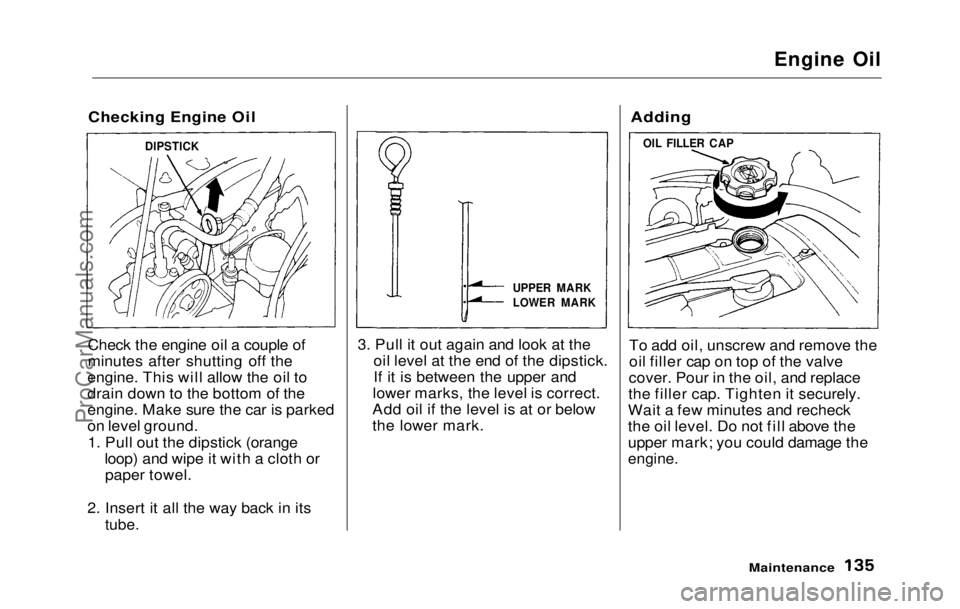
Check the engine oil a couple of
minutes after shutting off the
engine. This will allow the oil to
drain down to the bottom of the
engine. Make sure the car is parked
on level ground.
1. Pull out the dipstick (orange
loop) and wipe it with a cloth orpaper towel.
2. Insert
it all the way back in its
tube.
3. Pull
it out again and look at the
oil level at the end of the dipstick.
If it is between the upper and
lower marks, the level is correct.
Add oil if the level is at or below
the lower mark.
Adding
To add oil, unscrew and remove the
oil filler cap on top of the valve
cover. Pour in the oil, and replace
the filler cap. Tighten it securely.
Wait a few minutes and recheck
the oil level. Do not fill above the
upper mark; you could damage the
engine.
Maintenance
UPPER MARK
LOWER MARK
OIL FILLER CAP
DIPSTICKProCarManuals.comMain Menu Table of Contents s t
Page 134 of 225
Engine Oil
Recommended Oil
Oil is a major contributor to your
engine's performance and longevity.
Always use a premium-grade deter-
gent oil. You can determine an oil's
SAE viscosity and Service Classifi-
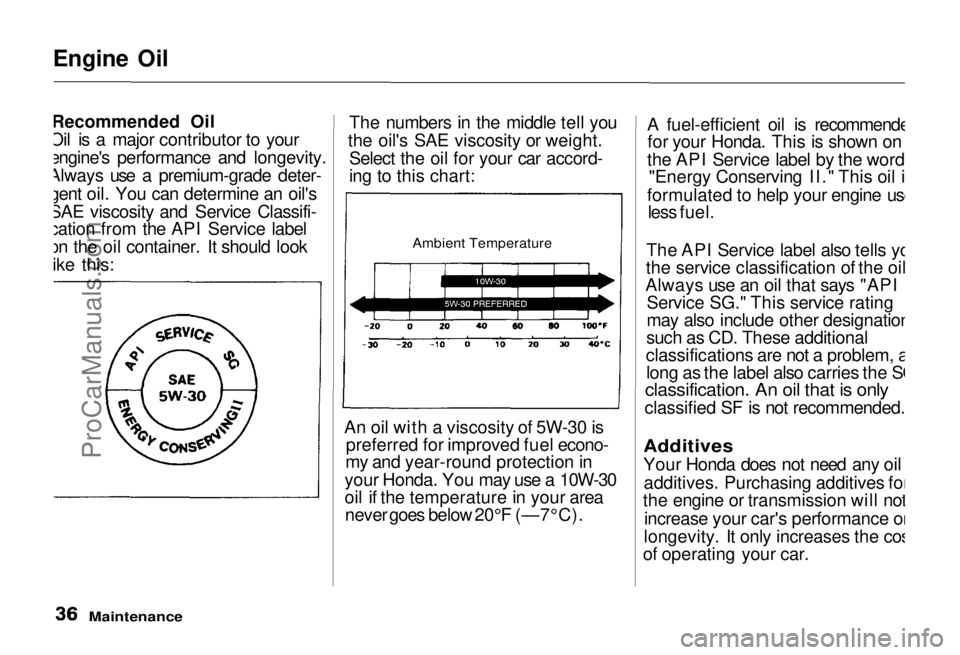
cation from the API Service label
on the oil container. It should look
like this: The numbers in the middle tell you
the oil's SAE viscosity or weight. Select the oil for your car accord-
ing to this chart:
Ambient Temperature
An oil with a viscosity of 5W-30 is preferred for improved fuel econo-
my and year-round protection in
your Honda. You may use a 10W-30
oil if the temperature in your area never goes below 20°F (—7°C). A fuel-efficient oil is recommended
for your Honda. This is shown on
the API Service label by the words "Energy Conserving II." This oil is
formulated to help your engine use less fuel.
The API Service label also tells you
the service classification of the oil.
Always use an oil that says "API
Service SG." This service rating
may also include other designations,
such as CD. These additional
classifications are not a problem, as long as the label also carries the SG
classification. An oil that is only
classified SF is not recommended.
Additives
Your Honda does not need any oil additives. Purchasing additives for
the engine or transmission will not
increase your car's performance or
longevity. It only increases the cost
of operating your car.
MaintenanceProCarManuals.comMain Menu Table of Contents s t
Page 135 of 225
Engine Oil
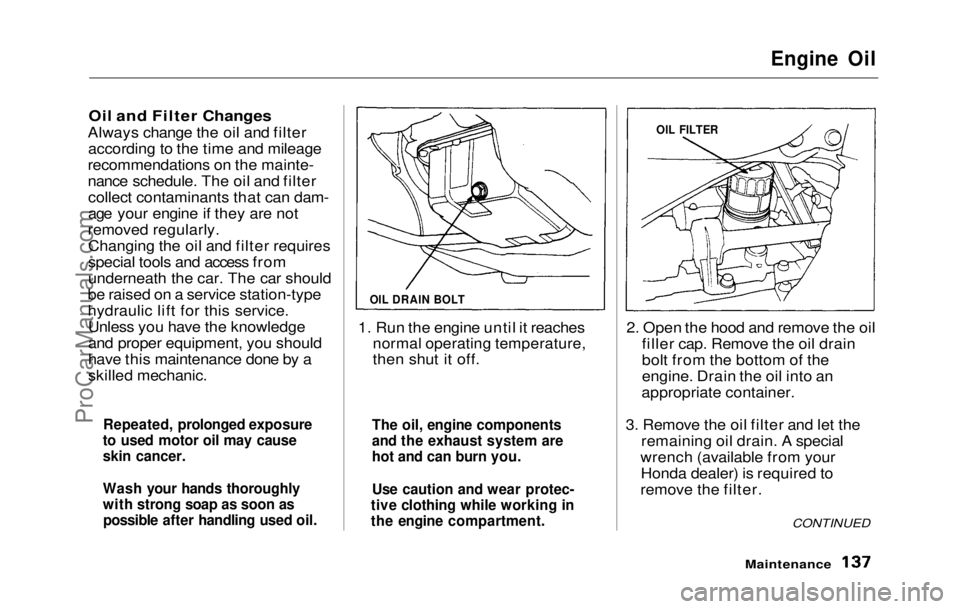
Oil and Filter Changes
Always change the oil and filter according to the time and mileage
recommendations on the mainte-
nance schedule. The oil and filter collect contaminants that can dam-
age your engine if they are not
removed regularly. Changing the oil and filter requires
special tools and access from
underneath the car. The car should
be raised on a service station-type
hydraulic lift for this service. Unless you have the knowledge
and proper equipment, you should
have this maintenance done by a
skilled mechanic. 1. Run the engine until it reaches
normal operating temperature,
then shut it off. 2. Open the hood and remove the oil
filler cap. Remove the oil drain
bolt from the bottom of the
engine. Drain the oil into an
appropriate container.
3. Remove the oil filter and let the remaining oil drain. A special
wrench (available from your Honda dealer) is required to
remove the filter.
Maintenance
CONTINUED
The oil, engine components
and the exhaust system are
hot and can burn you.
Use caution and wear protec-
tive clothing while working in
the engine compartment.
Repeated, prolonged exposure
to used motor oil may cause
skin cancer.
Wash your hands thoroughly
with strong soap as soon as possible after handling used oil. OIL FILTER
OIL DRAIN BOLTProCarManuals.comMain Menu Table of Contents s t
Page 136 of 225

Engine Oil
4. Install a new oil filter according to instructions that come with it.
5. Put a new washer on the drain bolt, then reinstall the drain bolt.
Tighten it to:
40 N .
m (4.0 kg-m , 29 Ib-ft) 6. Refill the engine with the recom-
mended oil.
Engine oil capacity
(including filter):
(US: S, Canada: S)
3.8
(4.0 US qt, 3.3 Imp qt)
(US: Si, Si 4WS, Canada: SR, SR 4WS)
4.3
(4.5 US qt, 3.8 Imp qt)
7. Replace the oil filler cap. Start the engine. The oil pressure
indicator light should go out
within five seconds. If it does not, turn off the engine and reinspect
your work.
8. Let the engine run for several minutes and check the drain bolt
and oil filter for leaks.
9. Turn off the engine, let it sit for several minutes, then check the
oil level. If necessary, add oil to
bring the level to the upper mark
on the dipstick. If you change your own oil, please
dispose of the used oil properly. Put
it in a sealed container and take it
to a recycling center. Do not
discard it in a trash bin or dump it
on the ground.
The oil and filter should be chang-
ed every 6 months or 12,000 km
(7,500 miles), whichever comes first.
Under severe driving conditions,
they should be changed every 3
months or 6,000 km (3,750 miles).
See page 130 for a description of
severe driving conditions.
Maintenance
NOTICE
OIL DRAIN BOLTProCarManuals.comMain Menu Table of Contents s t