engine HONDA PRELUDE 1992 Service Manual
[x] Cancel search | Manufacturer: HONDA, Model Year: 1992, Model line: PRELUDE, Model: HONDA PRELUDE 1992Pages: 225, PDF Size: 2.1 MB
Page 137 of 225
Cooling System
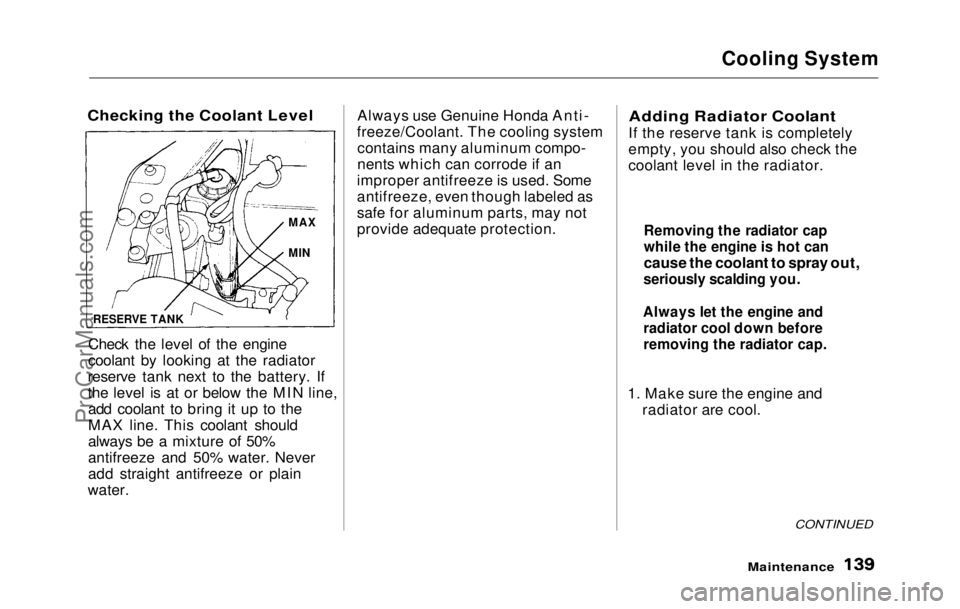
Checking the Coolant Level
Check the level of the engine
coolant by looking at the radiator
reserve tank next to the battery. If
the level is at or below the MIN line, add coolant to bring it up to the
MAX line. This coolant should
always be a mixture of 50%
antifreeze and 50% water. Never
add straight antifreeze or plain
water. Always use Genuine Honda Anti-
freeze/Coolant. The cooling system contains many aluminum compo-
nents which can corrode if an
improper antifreeze is used. Some
antifreeze, even though labeled as
safe for aluminum parts, may not
provide adequate protection.
Adding Radiator Coolant
If the reserve tank is completely
empty, you should also check the
coolant level in the radiator.
1. Make sure the engine and radiator are cool.
CONTINUED
Maintenance
RESERVE TANK
MAX
MIN
Removing the radiator cap
while the engine is hot can
cause the coolant to spray out,
seriously scalding you.
Always let the engine and
radiator cool down before
removing the radiator cap.ProCarManuals.comMain Menu Table of Contents s t
Page 138 of 225
Cooling System
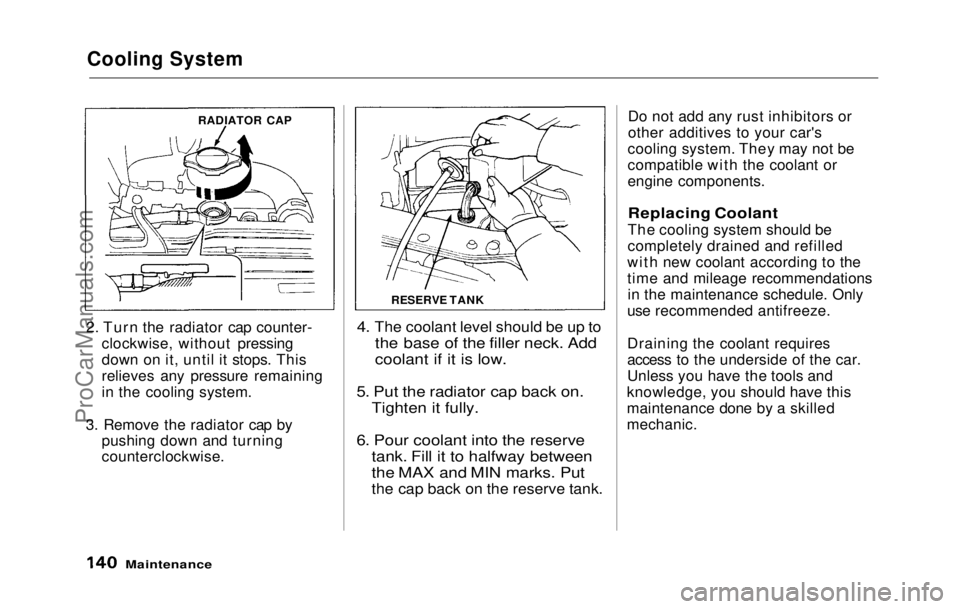
2. Turn the radiator cap counter- clockwise, without pressing
down on it, until it stops. This
relieves any pressure remaining
in the cooling system.
3. Remove the radiator cap by pushing down and turning
counterclockwise.
4. The coolant level should be up to
the base of the filler neck. Add
coolant if it is low.
5. Put
the radiator cap back on.
Tighten it fully.
6. Pour coolant into the reserve tank. Fill it to halfway between
the MAX and MIN marks. Put
the cap back on the reserve tank.
Do no t
add any rust inhibitors or
other additives to your car's
cooling system. They may not be
compatible with the coolant or
engine components.
Replacing Coolant
The cooling system should be
completely drained and refilled
with new coolant according to the
time and mileage recommendations in the maintenance schedule. Only
use recommended antifreeze.
Draining the coolant requires
access to the underside of the car.
Unless you have the tools and
knowledge, you should have this
maintenance done by a skilled
mechanic.
Maintenance
RADIATOR CAP
RESERVE TANKProCarManuals.comMain Menu Table of Contents s t
Page 139 of 225
Cooling System
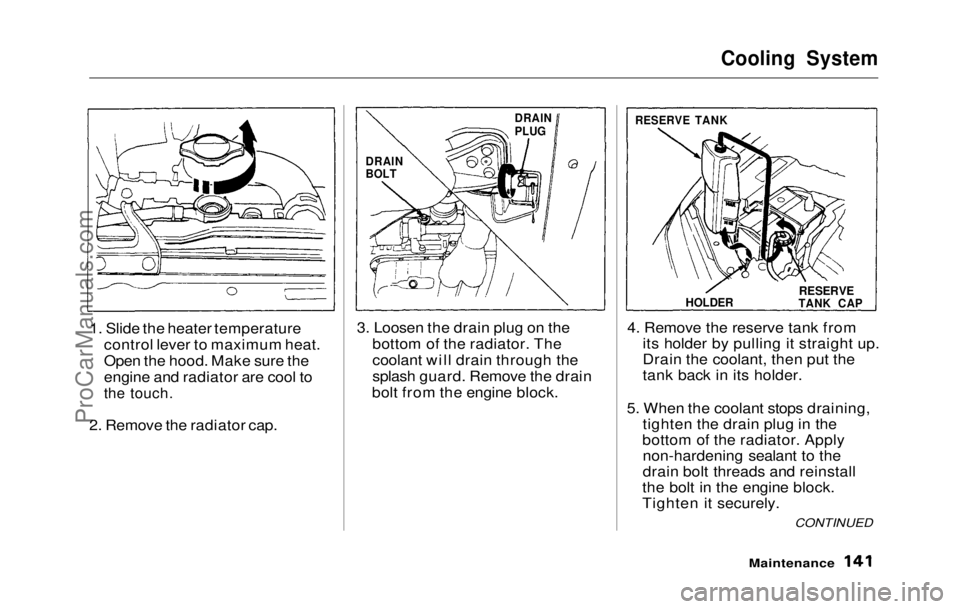
1. Slide the heater temperature control lever to maximum heat.
Open the hood. Make sure the
engine and radiator are cool to
the touch.
2. Remove the radiator cap. 3. Loosen the drain plug on the
bottom of the radiator. The
coolant will drain through the
splash guard. Remove the drain
bolt from the engine block. 4. Remove the reserve tank from
its holder by pulling it straight up.
Drain the coolant, then put the
tank back in its holder.
5. When the coolant stops draining, tighten the drain plug in the
bottom of the radiator. Apply non-hardening sealant to the
drain bolt threads and reinstall
the bolt in the engine block.
Tighten it securely.
Maintenance
DRAIN
PLUG
DRAIN
BOLT RESERVE TANK
HOLDER
RESERVE
TANK CAP
CONTINUEDProCarManuals.comMain Menu Table of Contents s t
Page 140 of 225
Cooling System
6. Mix the recommended antifreeze with an equal amount of purifiedor distilled water in a clean
container. The cooling system
capacity is:
With 5-speed transmission:
(US: S, Canada: S)
3.5
(0.92 US gal, 0.77 Imp gal)
(US: Si, Si 4WS, Canada: SR, SR 4WS)
3.8
(1.00 US gal, 0.84 Imp gal)
With automatic transmission:
(US: S, Canada: S)
3.4
(0.90 US gal, 0.75 Imp gal)
(US: Si, Si 4WS, Canada: SR, SR 4WS)
3.7
(0.98 US gal, 0.81 Imp gal)
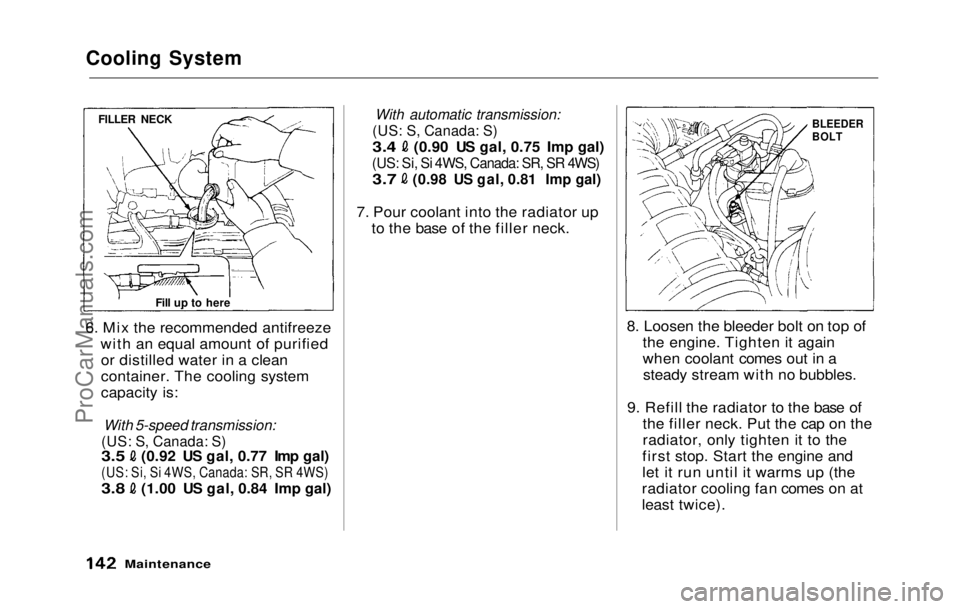
7. Pour coolant into the radiator up to the base of the filler neck.
8. Loosen the bleeder bolt on top ofthe engine. Tighten it again
when coolant comes out in asteady stream with no bubbles.
9. Refill the radiator to the base of the filler neck. Put the cap on the
radiator, only tighten it to the
first stop. Start the engine and
let it run until it warms up (the
radiator cooling fan comes on at
least twice).
Maintenance
FILLER NECK
Fill up to here
BLEEDER
BOLTProCarManuals.comMain Menu Table of Contents s t
Page 141 of 225
Cooling System, Windshield Washers
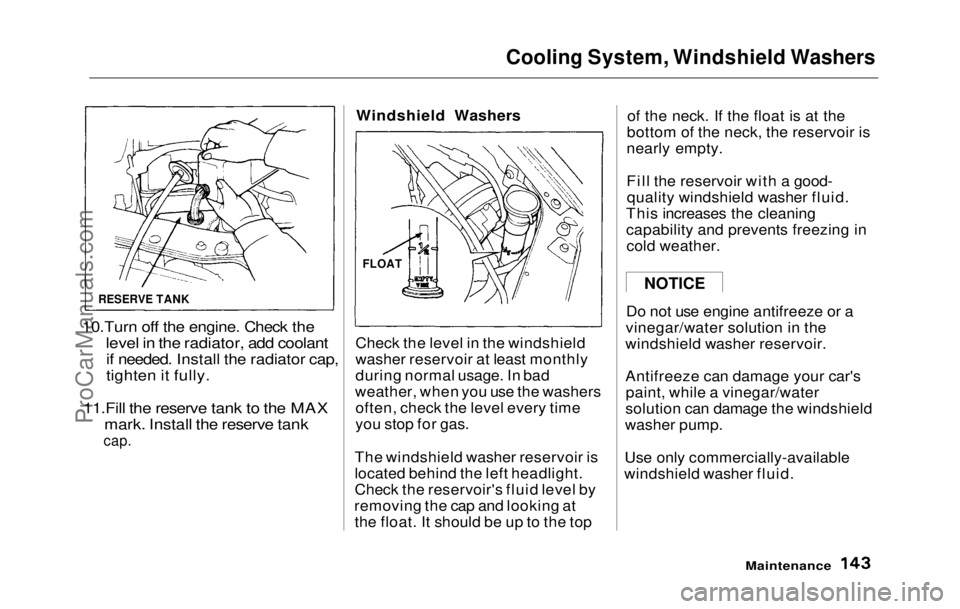
10.Turn off the engine. Check the
level in the radiator, add coolant
if needed. Install the radiator cap,
tighten it fully.
11.Fill the
reserve tank to the MAX
mark. Install the reserve tank
cap.
Windshield Washers
Chec
k the level in the windshield
washer reservoir at least monthly
during normal usage. In bad
weather, when you use the washers often, check the level every time
you stop for gas.
The windshield washer reservoir is
located behind the left headlight.
Check the reservoir's fluid level by
removing the cap and looking at the float. It should be up to the top of the neck. If the float is at the
bottom of the neck, the reservoir is
nearly empty.
Fill the reservoir with a good- quality windshield washer fluid.
This increases the cleaning
capability and prevents freezing in cold weather.
Do not use engine antifreeze or a
vinegar/water solution in the
windshield washer reservoir.
Antifreeze can damage your car's paint, while a vinegar/water
solution can damage the windshield
washer pump.
Use only commercially-available
windshield washer fluid.
Maintenance
NOTICE
RESERVE TANK
FLOATProCarManuals.comMain Menu Table of Contents s t
Page 142 of 225
Transmission Oil
Automatic Transmission
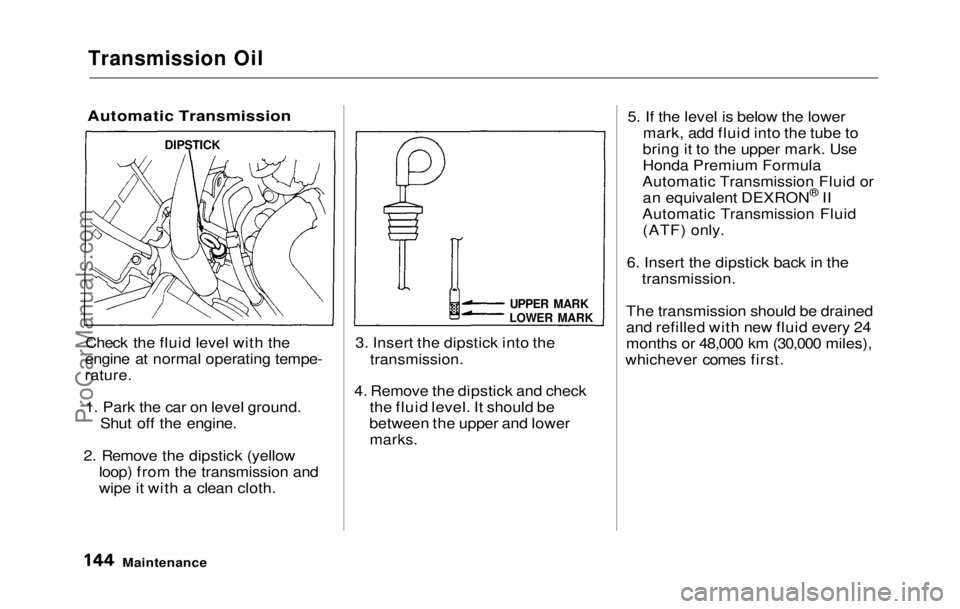
Check the fluid level with the
engine at normal operating tempe-
rature.
1. Park the car on level ground. Shut off the engine.
2. Remove the dipstick (yellow loop) from the transmission and
wipe it with a clean cloth. 3. Insert the dipstick into the
transmission.
4. Remove the dipstick and check the fluid level. It should be
between the upper and lower
marks.
5. If the level is below the lower
mark, add fluid into the tube to
bring it to the upper mark. Use
Honda Premium Formula
Automatic Transmission Fluid or an equivalent DEXRON ®
II
Automatic Transmission Fluid (ATF) only.
6. Insert the dipstick back in the transmission.
The transmission should be drained
and refilled with new fluid every 24
months or 48,000 km (30,000 miles),
whichever comes first.
Maintenance
DIPSTICK
UPPER MARK
LOWER MARKProCarManuals.comMain Menu Table of Contents s t
Page 143 of 225
Transmission Oil
5-Speed Transmission
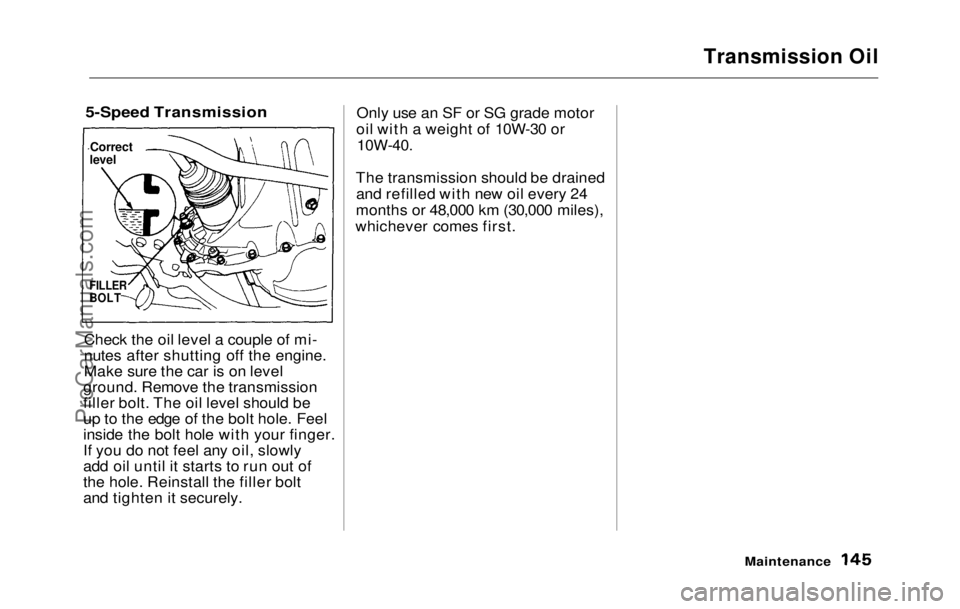
Check the oil level a couple of mi-
nutes after shutting off the engine.
Make sure the car is on level
ground. Remove the transmission
filler bolt. The oil level should be
up to the edge of the bolt hole. Feel
inside the bolt hole with your finger.
If you do not feel any oil, slowly
add oil until it starts to run out of
the hole. Reinstall the filler bolt
and tighten it securely. Only use an SF or SG grade motor
oil with a weight of 10W-30 or
10W-40.
The transmission should be drained and refilled with new oil every 24
months or 48,000 km (30,000 miles),
whichever comes first.
Maintenance
Correct
level
FILLER
BOLTProCarManuals.comMain Menu Table of Contents s t
Page 146 of 225
Power Steering
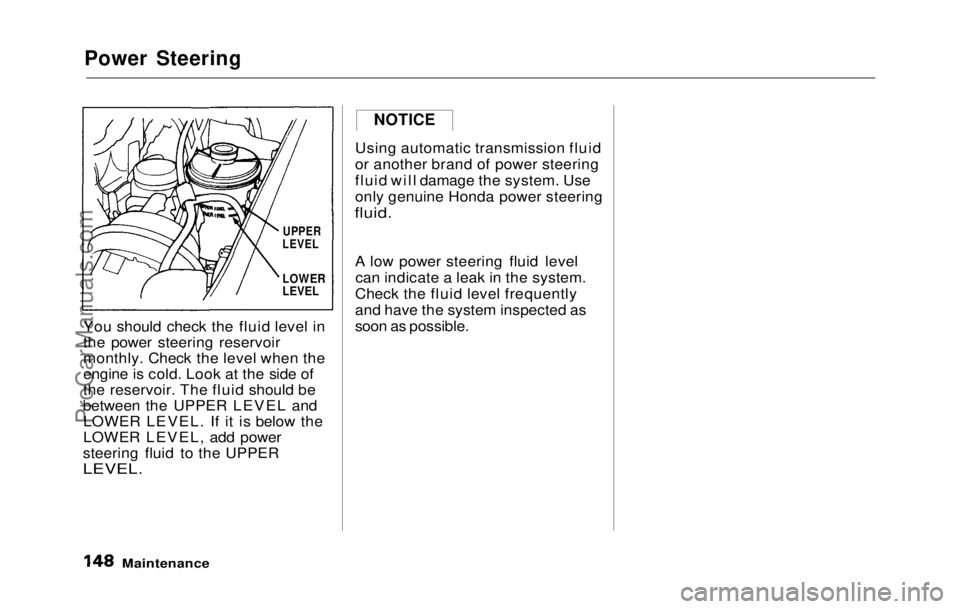
You should check the fluid level in
the power steering reservoir
monthly. Check the level when the
engine is cold. Look at the side of
the reservoir. The fluid should be
between the UPPER LEVEL and LOWER LEVEL. If it is below the
LOWER LEVEL, add power
steering fluid to the UPPER
LEVEL.
Using automatic transmission fluid
or another brand of power steering
fluid will damage the system. Use
only genuine Honda power steering
fluid.
A low power steering fluid levelcan indicate a leak in the system.
Check the fluid level frequently
and have the system inspected as
soon as possible.
Maintenance
UPPER
LEVEL
LOWER
LEVEL
NOTICEProCarManuals.comMain Menu Table of Contents s t
Page 147 of 225
Air Filter
The air filter element should be
replaced every 2 years or 48,000 km
(30,000 miles), whichever comes
first. Under severe driving condi-
tions, it should also be cleaned every 12 months or 24,000 km
(15,000 miles), whichever comes
first.
Cleaning (Severe Conditions)
Clean the air cleaner element by
blowing compressed air through it in the opposite direction to normal
air flow. If you do not have access
to compressed air (such as a gas station), ask your Honda dealer to
do this service.
Follow the replacement procedure
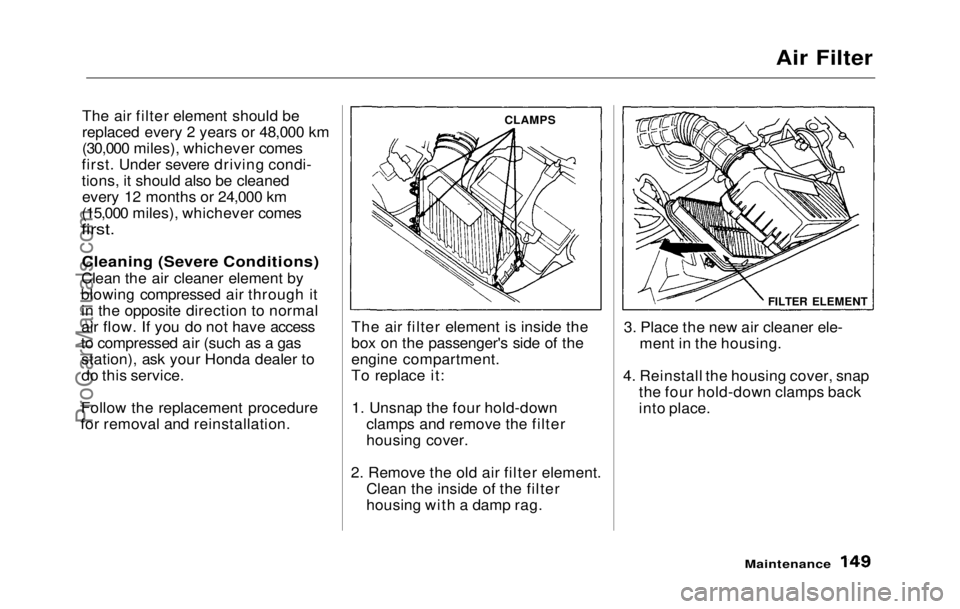
for removal and reinstallation. The air filter element is inside the
box on the passenger's side of the
engine compartment.
To replace it:
1. Unsnap the four hold-down clamps and remove the filter
housing cover.
2. Remove the old air filter element. Clean the inside of the filter
housing with a damp rag. 3. Place the new air cleaner ele-
ment in the housing.
4. Reinstall the housing cover, snap the four hold-down clamps back
into place.
Maintenance
FILTER ELEMENT
CLAMPSProCarManuals.comMain Menu Table of Contents s t
Page 149 of 225
Spark Plugs
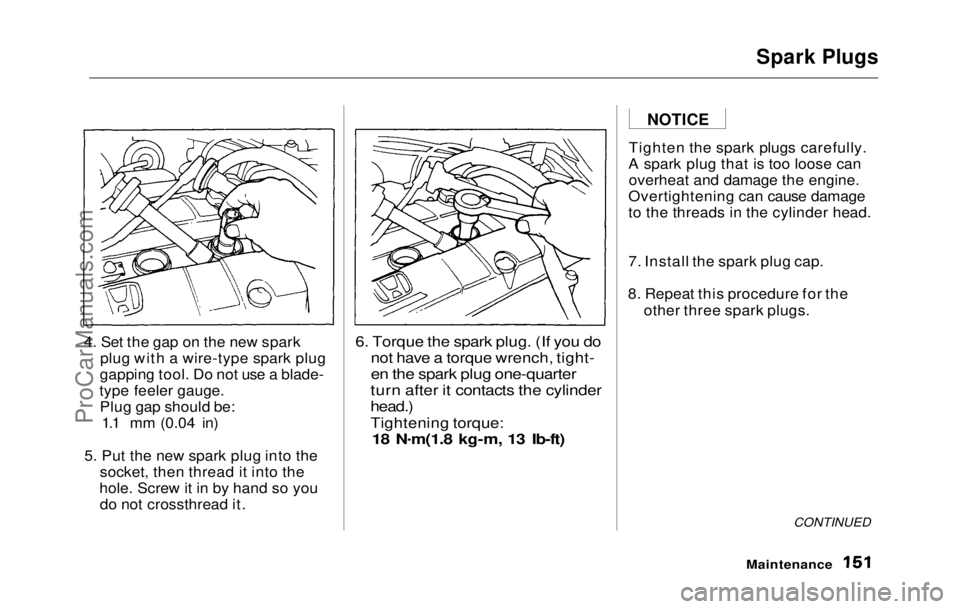
4. Set the gap on the new spark plug with a wire-type spark plug
gapping tool. Do not use a blade-
type feeler gauge. Plug gap should be: 1.1 mm (0.04 in)
5. Put the new spark plug into the socket, then thread it into the
hole. Screw it in by hand so you do not crossthread it.
6. Torque the spark plug. (If you do
not have a torque wrench, tight-
en the spark plug one-quarter
turn after it contacts the cylinder
head.)
Tightening torque:
18 N .
m(1.8 kg-m, 13 Ib-ft)
Tighten the spark plugs carefully.
A spark plug that is too loose can overheat and damage the engine.
Overtightening can cause damage
to the threads in the cylinder head.
7. Install the spark plug cap.
8. Repeat this procedure for the other three spark plugs.
CONTINUED
Maintenance
NOTICEProCarManuals.comMain Menu Table of Contents s t