stop start HONDA PRELUDE 1992 Owners Manual
[x] Cancel search | Manufacturer: HONDA, Model Year: 1992, Model line: PRELUDE, Model: HONDA PRELUDE 1992Pages: 225, PDF Size: 2.1 MB
Page 33 of 225
Indicator Lights
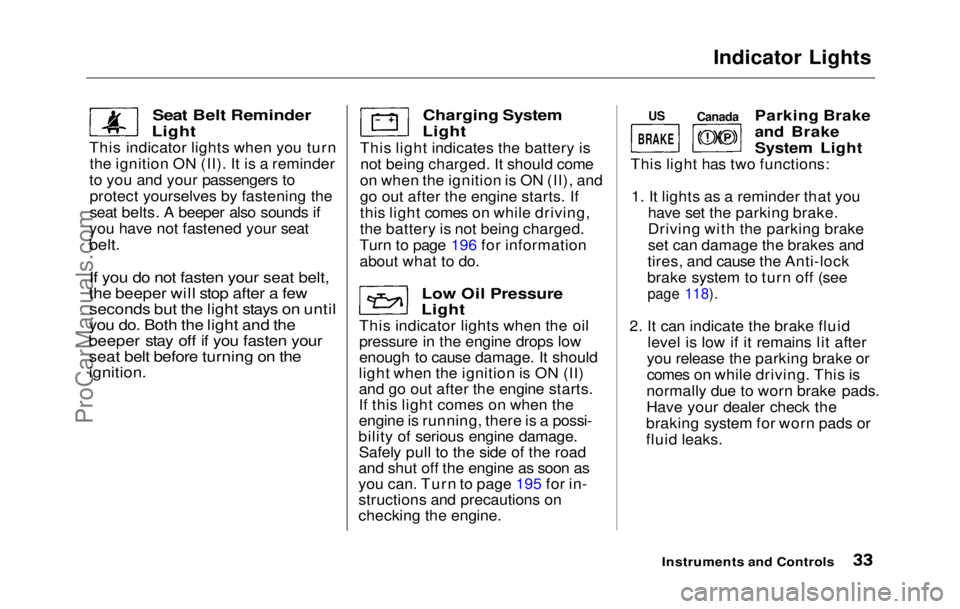
Seat Belt Reminder
Light
This indicator lights when you turn the ignition ON (II). It is a reminder
to you and your passengers to protect yourselves by fastening the
seat belts. A beeper also sounds if
you have not fastened your seat
belt.
If you do not fasten your seat belt,
the beeper will stop after a few seconds but the light stays on until
you do. Both the light and the
beeper stay off if you fasten your seat belt before turning on the
ignition.
Charging System
Light
This light indicates the battery is not being charged. It should come
on when the ignition is ON (II), and
go out after the engine starts. If
this light comes on while driving,
the battery is not being charged.
Turn to page 196 for information
about what to do.
Low Oil Pressure
Light
This indicator lights when the oil
pressure in the engine drops low
enough to cause damage. It should
light when the ignition is ON (II)
and go out after the engine starts.
If this light comes on when the
engine is running, there is a possi-
bility of serious engine damage. Safely pull to the side of the road
and shut off the engine as soon as
you can. Turn to page 195 for in-
structions and precautions on
checking the engine.
Canada
Parking Brake
and Brake
System Light
This light has two functions:
1. It lights as a reminder that you
have set the parking brake.
Driving with the parking brake
set can damage the brakes and
tires, and cause the Anti-lock
brake system to turn off (see
page 118).
2. I t
can indicate the brake fluid
level is low if it remains lit after
you release the parking brake or
comes on while driving. This is
normally due to worn brake pads.
Have your dealer check the
braking system for worn pads o r
flui d
leaks.
Instruments an d
Controls
US
BRAKEProCarManuals.comMain Menu Table of Contents s t
Page 34 of 225
Indicator Lights
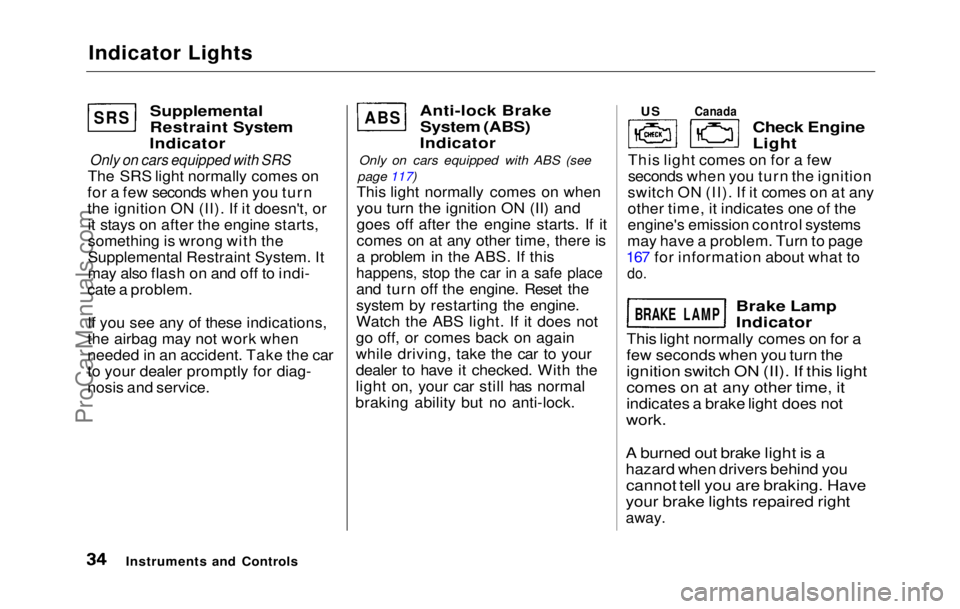
Supplemental
Restraint System
Indicator
Only on cars equipped with SRS
The SRS light normally comes on
for a few seconds when you turn
the ignition ON (II). If it doesn't, or it stays on after the engine starts,
something is wrong with the
Supplemental Restraint System. It
may also flash on and off to indi-
cate a problem.
If you see any of these indications,
the airbag may not work when
needed in an accident. Take the car
to your dealer promptly for diag-
nosis and service.
Anti-lock Brake
System (ABS)
Indicator
Only on cars equipped with ABS (see
page 117)
This light normally comes on whenyou turn the ignition ON (II) and
goes off after the engine starts. If it
comes on a
t any other time, there is
a problem in the ABS. If this
happens, stop the car in a safe place
and tur n
off the engine. Reset the
system by restarting the engine.
Watch the ABS light. If it does not
go off, or comes back on again
while driving, take the car to your
dealer to have it checked. With the
light on, your car still has normal
braking ability but no anti-lock.
Check Engine
Light
This light comes on for a few
seconds when you turn the ignition
switch ON (II). If it comes on at any
other time, it indicates one of the
engine's emission control systems
may have a problem. Turn to page
167 fo r
information about what to
do.
Brake Lam
p
Indicator
This light normally comes on for a
few seconds when you turn the
ignition switc h
ON (II). If this light
comes on at any other time, it
indicates a brake light does not
work.
A burned out brake light is a
hazard when drivers behind you
cannot tell you are braking. Have
your brake lights repaired right
away.
Instruments an d
Controls
SRS ABS US
Canada
BRAKE LAMP
ProCarManuals.comMain Menu Table of Contents s t
Page 35 of 225
Indicator Lights
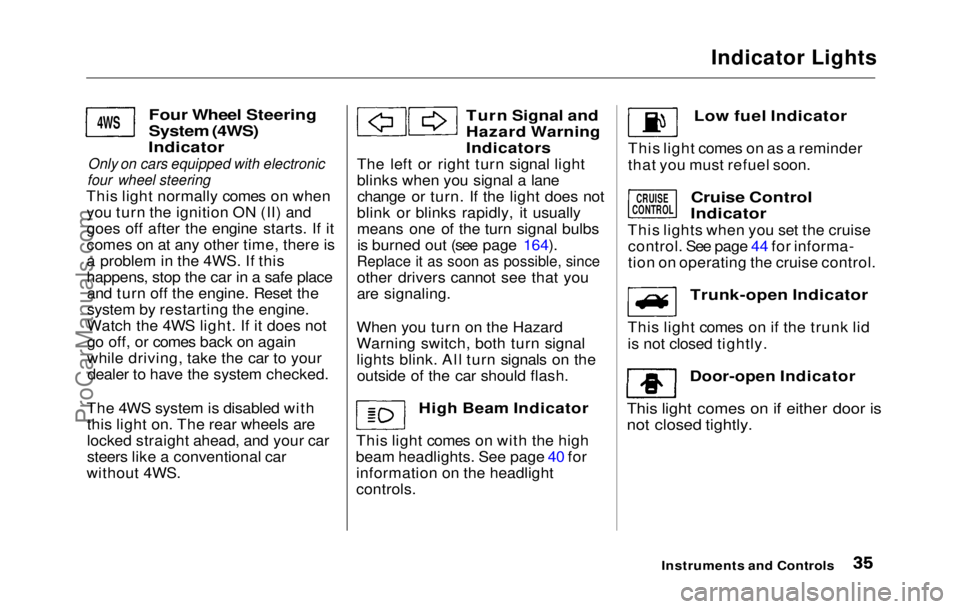
Four Wheel Steering
System (4WS)
Indicator
Only on cars equipped with electronic
four wheel steering
This light normally comes on when you turn the ignition ON (II) and
goes off after the engine starts. If it
comes on at any other time, there is
a problem in the 4WS. If this
happens, stop the car in a safe placeand turn off the engine. Reset the
system by restarting the engine.
Watch the 4WS light. If it does not
go off, or comes back on again
while driving, take the car to yourdealer to have the system checked.
The 4WS system is disabled with this light on. The rear wheels are
locked straight ahead, and your car
steers like a conventional car
without 4WS.
Turn Signal and
Hazard Warning
Indicators
The left or right turn signal light
blinks when you signal a lane change or turn. If the light does not
blink or blinks rapidly, it usually
means one of the turn signal bulbs is burned out (see page 164).Replace it as soon as possible, since
other driver s
cannot see that you
are signaling.
When you turn on the Hazard
Warning switch, both turn signal
lights blink. All turn signals on the outside of the car should flash.
High Beam Indicator
This light comes on with the high
beam headlights. See page 40 for information on the headlight
controls.
Instruments and Controls
4WS
Low fuel Indicator
This light comes on as a reminder
that you must refuel soon.
Cruise Control
Indicator
This lights when you set the cruise control. See page 44 for informa-
tion on operating the cruise control.
Trunk-open Indicator
This light comes on if the trunk lid
is not closed tightly.
Door-open Indicator
This light comes on if either door is
not closed tightly.
CRUISE
CONTROL
ProCarManuals.comMain Menu Table of Contents s t
Page 112 of 225
Automatic Transmission
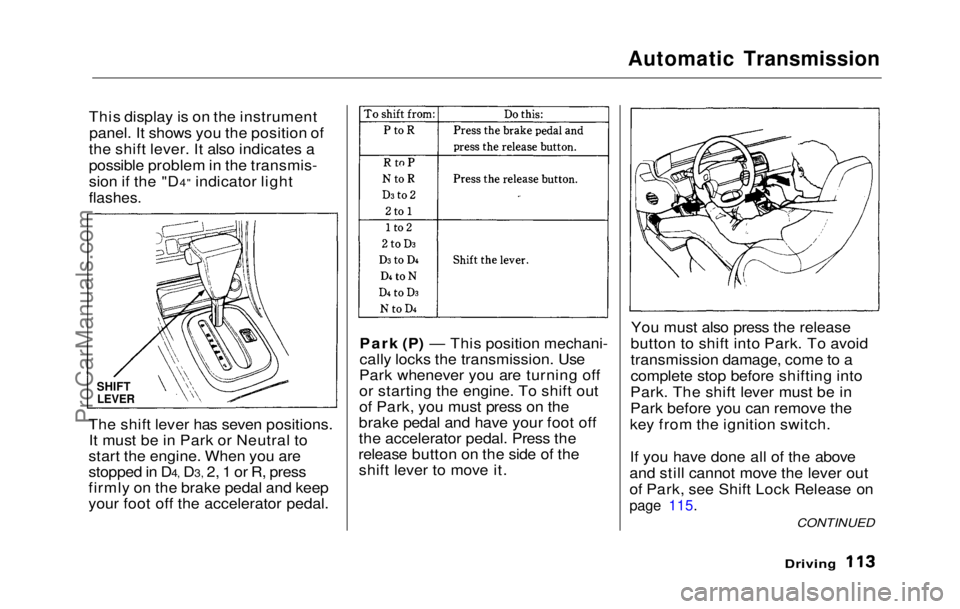
This display is on the instrument panel. It shows you the position of
the shift lever. It also indicates a
possible problem in the transmis-
sion if the "D4" indicator light
flashes.
The shift lever has seven positions. It must be in Park or Neutral to
start the engine. When you are
stopped in D4, D3, 2, 1 or R, press
firmly on the brake pedal and keep
your foot off the accelerator pedal. Park (P) — This position mechani-
cally locks the transmission. Use
Park whenever you are turning off
or starting the engine. To shift out
of Park, you must press on the
brake pedal and have your foot off
the accelerator pedal. Press the
release button on the side of the shift lever to move it. You must also press the release
button to shift into Park. To avoid
transmission damage, come to a
complete stop before shifting into
Park. The shift lever must be in
Park before you can remove the
key from the ignition switch.
If you have done all of the above
and still cannot move the lever out
of Park, see Shift Lock Release on
page 115.
Driving
SHIFT
LEVER
CONTINUEDProCarManuals.comMain Menu Table of Contents s t
Page 113 of 225
Automatic Transmission
Reverse (R) — To shift to Re-
verse from Park, see the explana-
tion under Park. To shift to Re-
verse from Neutral, come to a com-
plete stop and then shift. Press the
release button before shifting into
Reverse from Neutral.
Neutral (N) — Use Neutral if you need to restart a stalled engine, or
if it is necessary to stop briefly with
the engine idling. Shift to Park posi-
tion if you need to leave the car for
any reason. Press on the brake pe-
dal when you are moving the shift
lever from Neutral to another gear.
Drive (D4) — Use this position for
your normal driving. The transmis-
sion automatically selects a suita-
ble gear for your speed and acceler-
ation. You may notice the transmis-
sion shifting up at higher speeds
when the engine is cold. This helps
the engine warm up faster. Drive (D3) — This position is simi-
lar to D4, except only the first three
gears are selected. Use D3 to provide engine braking when going
down a steep hill. D3 can also keep
the transmission from cycling
between third and fourth gears in stop-and-go driving.
For faster acceleration when in D3
or D4, you can get the transmission
to automatically downshift by push-
ing the accelerator pedal to the
floor. The transmission will shift down one or two gears, depending
on your speed.
Second (2) — To shift to Second,
press the release button on the side
of the shift lever. This position
locks the transmission in second
gear. It does not downshift to first
gear when you come to a stop.
Second gives you more power when
climbing, and increased engine
braking when going down steep hills. Use second gear when start-
ing out on a slippery surface or in
deep snow. It will help reduce
wheelspin.
Whenever you move the shift lever
to a lower gear, the transmission
downshifts only if the engine's
redline will not be exceeded in the
lower gear.First (1) — To shift from Second
to First ,
press the release button on
the side of the shift lever. With the
lever in this position, the transmis-
sion locks in First gear. By upshift-
ing and downshifting through 1,2,
D3 and D4, you can operate this
transmission much like a manual
transmission without a clutch pedal.
DrivingProCarManuals.comMain Menu Table of Contents s t
Page 116 of 225

The Braking System
If this happens, you will immediate-
ly notice that the brake pedal goes
down much farther and you need to press on it much harder. A much
longer distance will be needed to stop the car.
Slow the car by downshifting to a
lower gear and removing your foot
from the accelerator pedal. Pull to
the side of the road as soon as it is
safe. Because of the longer stop-
ping distance needed, brake system
failure is very hazardous. It is best
to have your car towed, but if you
must drive the car in this condition,
be extremely cautious. Have your car repaired as soon as possible.
Anti-lock Brakes
The Prelude Si and Si 4WS models
in
the U.S. and SR and SR 4WS
models in Canada have an Anti-
lock Brake System (ABS) as standard equipment.
ABS helps you maintain steering
control. It does this by helping you
to prevent the wheels from locking
up and skidding.
The ABS is always "On". It
requires no special effort or driving
technique. You will feel a pulsation
in the brake pedal when the ABS
activates.
Activation varies with the amount of traction your tires have. On drypavement, you will need to press on
the brake pedal very hard before
you feel the pedal
pulsation that
means the ABS has activated.
However, you may feel the ABS
activate immediately if you are
trying to stop on snow or ice. Under all conditions, the ABS is helping to
prevent the wheels from locking so
you can retain steering
control.
You should continue to press on the
brake pedal with the same force.
You may feel a slight movement of
the brake pedal just after you start
the engine. This
is
the ABS
working.
Driving
CONTINUEDProCarManuals.comMain Menu Table of Contents s t
Page 140 of 225
Cooling System
6. Mix the recommended antifreeze with an equal amount of purifiedor distilled water in a clean
container. The cooling system
capacity is:
With 5-speed transmission:
(US: S, Canada: S)
3.5
(0.92 US gal, 0.77 Imp gal)
(US: Si, Si 4WS, Canada: SR, SR 4WS)
3.8
(1.00 US gal, 0.84 Imp gal)
With automatic transmission:
(US: S, Canada: S)
3.4
(0.90 US gal, 0.75 Imp gal)
(US: Si, Si 4WS, Canada: SR, SR 4WS)
3.7
(0.98 US gal, 0.81 Imp gal)
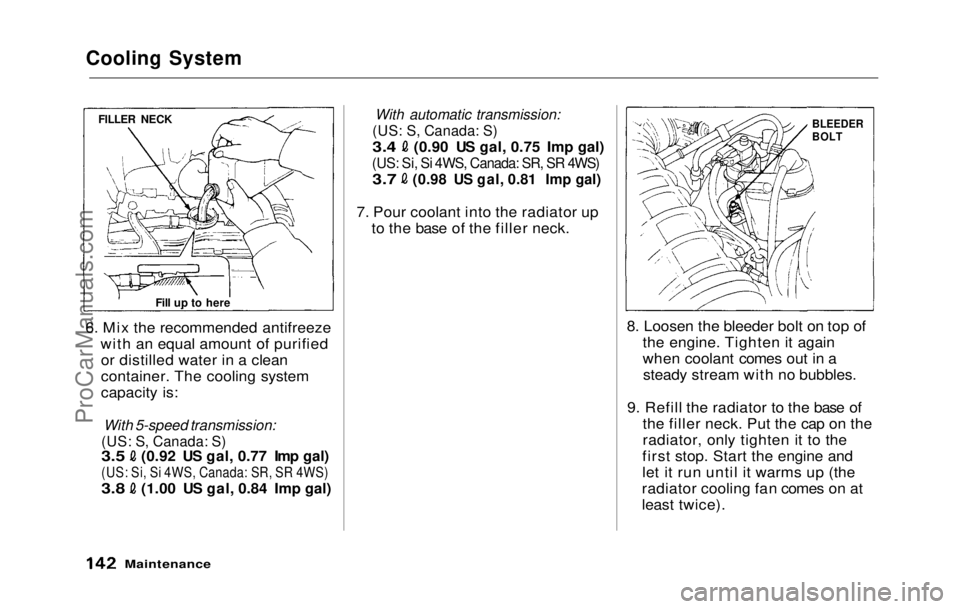
7. Pour coolant into the radiator up to the base of the filler neck.
8. Loosen the bleeder bolt on top ofthe engine. Tighten it again
when coolant comes out in asteady stream with no bubbles.
9. Refill the radiator to the base of the filler neck. Put the cap on the
radiator, only tighten it to the
first stop. Start the engine and
let it run until it warms up (the
radiator cooling fan comes on at
least twice).
Maintenance
FILLER NECK
Fill up to here
BLEEDER
BOLTProCarManuals.comMain Menu Table of Contents s t
Page 190 of 225
If Your Engine Overheats
6. Look for any obvious coolant
leaks, such as a split radiator
hose. Everything is still extreme-
ly hot, so use caution. If you find
a leak, it must be repaired before
you continue driving (see
Towing on page 202 ).
7. If
you don't find an obvious leak,
check the coolant level in the
radiator reserve tank (see page
139). If the level is below the
MIN mark, add coolant to half-
way between the MIN and MAX
marks.
8. I f
there was no coolant in the
reserve tank, you may also have
to add coolant to the radiator. Let the engine cool down until
the temperature gauge registers
below the midpoint, or lower,
before checking the radiator. 9. Using gloves or a large heavy
cloth, turn the radiator cap
counterclockwise, without
pushing down, to the first stop.
This releases any remaining
pressure in the cooling system.
After the pressure releases, push down on the cap and turn it until
it comes off.
10.Start th e
engine and set the
heater control lever to maximum.
Add coolant to the radiator up to
the base of the filler neck. If you
do not have the proper coolant
mixture available, you can add
plain water. Remember to have
the cooling system drained and
refilled with the proper mixture as soon as you can.
11.Put the radiato
r cap back on
tightly. Run the engine and
watch the temperature gauge. If
it illuminates the red marker
again, the engine needs repair.
(See Towing on page
202.)
12.If th e
temperature stays normal,
check the coolant level in the
radiator reserve tank. If it has
gone down, add coolant to the MAX mark. Put the cap back on
tightly.
Taking Care of the Unexpected
Removing the radiator cap
while the engine is hot can
cause the coolant to spray out, seriously scalding you.
Always let the engine and radiator cool down before
removing the radiator cap.ProCarManuals.comMain Menu Table of Contents s t