reset HONDA PRELUDE 1998 Owners Manual
[x] Cancel search | Manufacturer: HONDA, Model Year: 1998, Model line: PRELUDE, Model: HONDA PRELUDE 1998Pages: 278, PDF Size: 2.61 MB
Page 57 of 278
Gauges
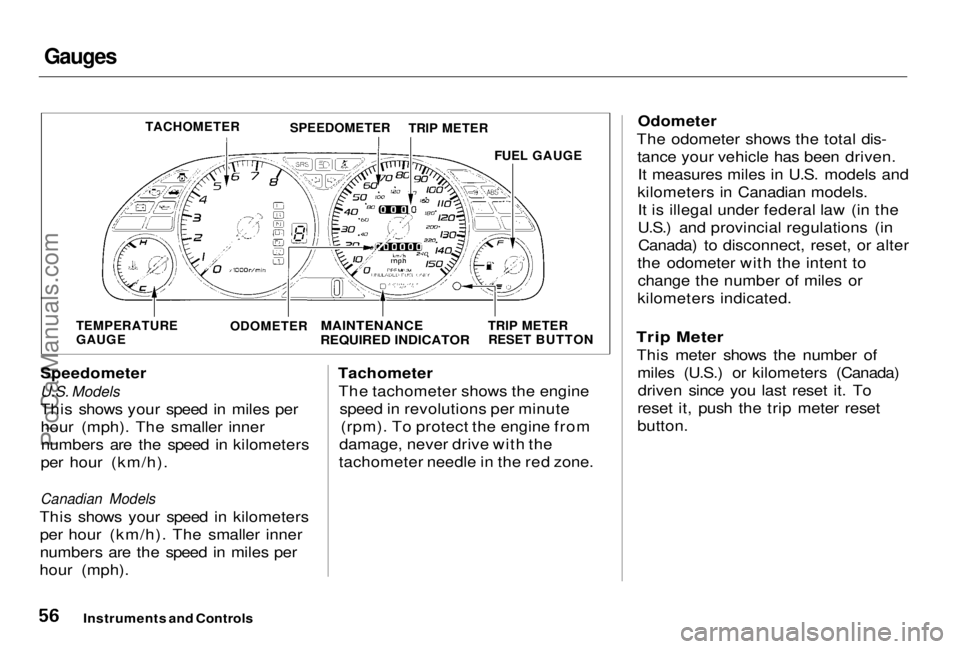
Speedometer
U.S. Models
This shows your speed in miles per hour (mph). The smaller innernumbers are the speed in kilometers
per hour (km/h).
Canadian Models
This shows your speed in kilometers per hour (km/h). The smaller inner
numbers are the speed in miles per
hour (mph). Tachometer
The tachometer shows the engine speed in revolutions per minute(rpm). To protect the engine from
damage, never drive with the
tachometer needle in the red zone. Odometer
The odometer shows the total dis- tance your vehicle has been driven.It measures miles in U.S. models and
kilometers in Canadian models. It is illegal under federal law (in the
U.S.) and provincial regulations (inCanada) to disconnect, reset, or alter
the odometer with the intent to change the number of miles or
kilometers indicated.
Trip Meter
This meter shows the number of miles (U.S.) or kilometers (Canada)driven since you last reset it. To
reset it, push the trip meter reset
button.
Instruments and Controls
TACHOMETER
SPEEDOMETER
TRIP METER
FUEL GAUGE
TEMPERATURE
GAUGE
ODOMETER
MAINTENANCE
REQUIRED INDICATOR
TRIP METER
RESET BUTTONProCarManuals.comMain Menu Table of Contents s t
Page 58 of 278
Gauges
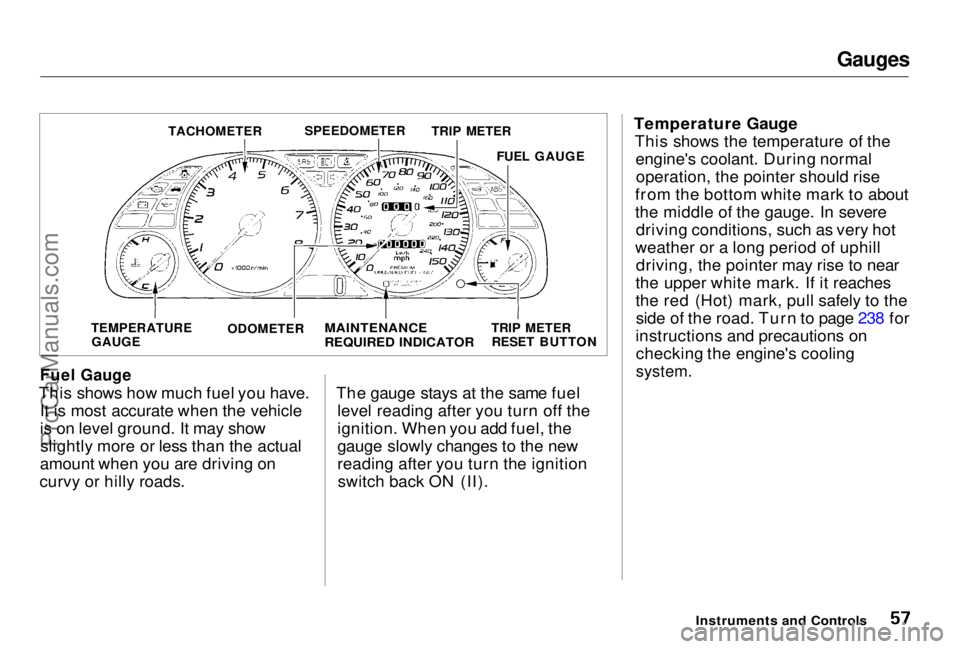
Fuel Gauge
This shows how much fuel you have. It is most accurate when the vehicle
is on level ground. It may showslightly more or less than the actual
amount when you are driving on
curvy or hilly roads. The gauge stays at the same fuel
level reading after you turn off the
ignition. When you add fuel, the
gauge slowly changes to the new
reading after you turn the ignitionswitch back ON (II). Temperature Gauge
This shows the temperature of theengine's coolant. During normaloperation, the pointer should rise
from the bottom white mark to about
the middle of the gauge. In severe driving conditions, such as very hot
weather or a long period of uphill driving, the pointer may rise to near
the upper white mark. If it reaches
the red (Hot) mark, pull safely to the side of the road. Turn to page 238 for
instructions and precautions on checking the engine's cooling
system.
Instruments and Controls
TACHOMETER
SPEEDOMETER
TRIP METER
FUEL GAUGE
TEMPERATURE GAUGE ODOMETER
MAINTENANCE
REQUIRED INDICATOR
TRIP METER
RESET BUTTONProCarManuals.comMain Menu Table of Contents s t
Page 59 of 278
Gauges
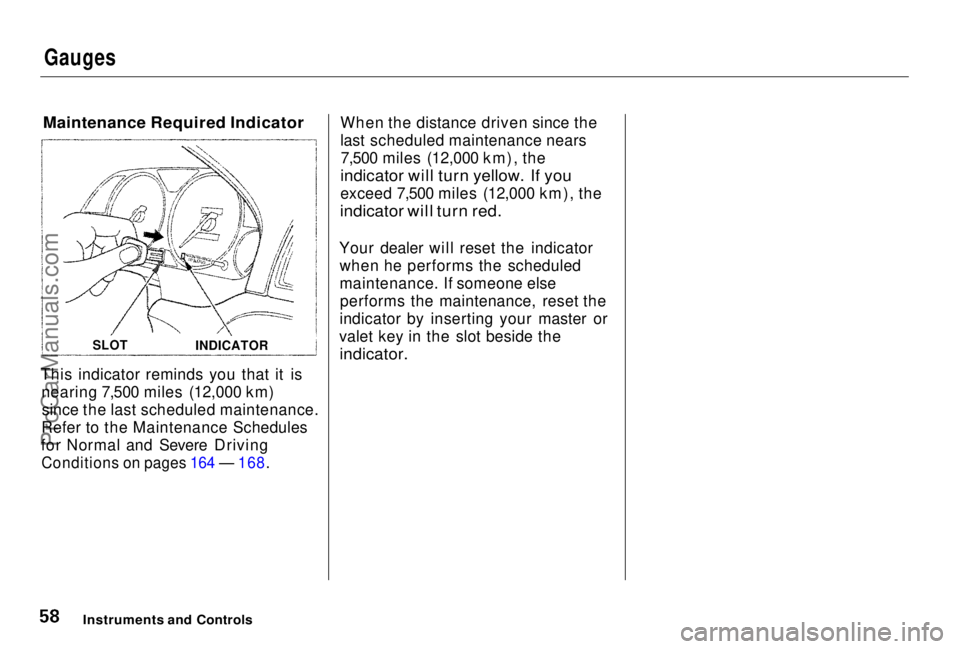
Maintenance Required Indicator
This indicator reminds you that it is nearing 7,500 miles (12,000 km)since the last scheduled maintenance.
Refer to the Maintenance Schedules
for Normal and Severe Driving
Conditions on pages 164 — 168.
When the distance driven since the
last scheduled maintenance nears
7,500 miles (12,000 km), the
indicator will turn yellow. If you
exceed 7,500 miles (12,000 km), the
indicator will turn red.
Your dealer will reset the indicator when he performs the scheduled
maintenance. If someone elseperforms the maintenance, reset the
indicator by inserting your master or
valet key in the slot beside the
indicator.
Instruments and Controls
SLOT
INDICATORProCarManuals.comMain Menu Table of Contents s t
Page 86 of 278
Digital Clock
The digital clock displays the time
with the ignition switch ON (II). To set the clock:
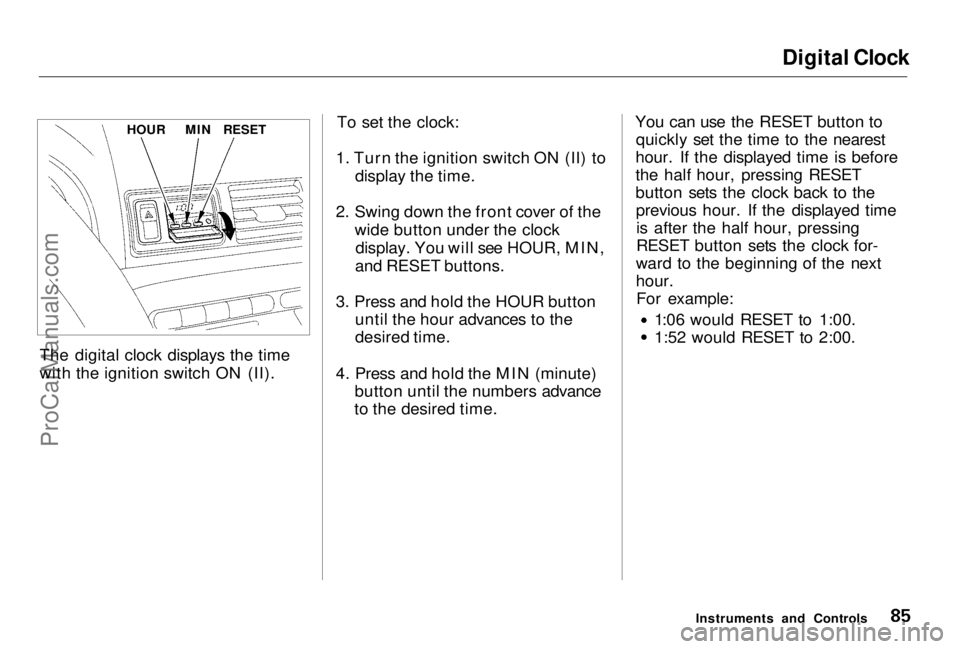
1. Turn the ignition switch ON (II) to display the time.
2. Swing down the front cover of the wide button under the clockdisplay. You will see HOUR, MIN,
and RESET buttons.
3. Press and hold the HOUR button until the hour advances to the
desired time.
4. Press and hold the MIN (minute) button until the numbers advance
to the desired time. You can use the RESET button to
quickly set the time to the nearest
hour. If the displayed time is before
the half hour, pressing RESET
button sets the clock back to the previous hour. If the displayed timeis after the half hour, pressing
RESET button sets the clock for-
ward to the beginning of the next
hour. For example: 1:06 would RESET to 1:00.
1:52 would RESET to 2:00.
Instruments and Controls
HOUR
MIN
RESETProCarManuals.comMain Menu Table of Contents s t
Page 101 of 278

Audio System
AM/FM/CD Audio System
Your Honda's audio system providesclear reception on both AM and FM
bands, while the preset buttons allow
you to easily select your favorite
stations.
The Anti-theft feature will disable the system if it is disconnected from
the vehicle's battery. To get thesystem working again, you must
enter a code number (see page 117).
Comfort and Convenience Features
AM/FM 1-2 BUTTON
TUNE BAR
PWR/VOL KNOB
PRESET BUTTONS
SEEK BARProCarManuals.comMain Menu Table of Contents s t
Page 102 of 278
Audio System
Operating the Radio
The ignition switch must be in
ACCESSORY (I) or ON (II) to operate the audio system. Turn the
system on by pushing the PWR/
VOL knob. Adjust the volume by turning the same knob.
The band and frequency that the radio was last tuned to is displayed.
To change bands, press the AM/FM 1-2 button. On the FM band, ST will
be displayed if the station is broad- casting in stereo. Stereo reproduc-
tion on AM is not available. You can use any of three methods to
find radio stations on the selected
band: TUNE, SEEK, or the Preset
buttons.
TUNE— Use the TUNE bar to tune
the radio to a desired frequency. Press the side of the bar to tune
to a higher frequency, and the side to tune to a lower
frequency. The frequency numbers
will start to change rapidly. Release
the bar when the display reaches the desired frequency. To change the
frequency in small increments, press and release the TUNE bar quickly. SEEK — The SEEK function
searches the band for a station with
a strong signal. To activate it, press the SEEK bar on either the or
side, then release it.
Depending on which side you press,
the system scans upward or down-
ward from the current frequency. It stops when it finds a station with a
strong signal.
Preset — You can store the fre-
quencies of your favorite radiostations in the six preset buttons.
Each button will store one frequency on the AM band, and two on the FM
band.
CONTINUED
Comfort and Convenience Features
ProCarManuals.comMain Menu Table of Contents s t
Page 103 of 278
Audio System
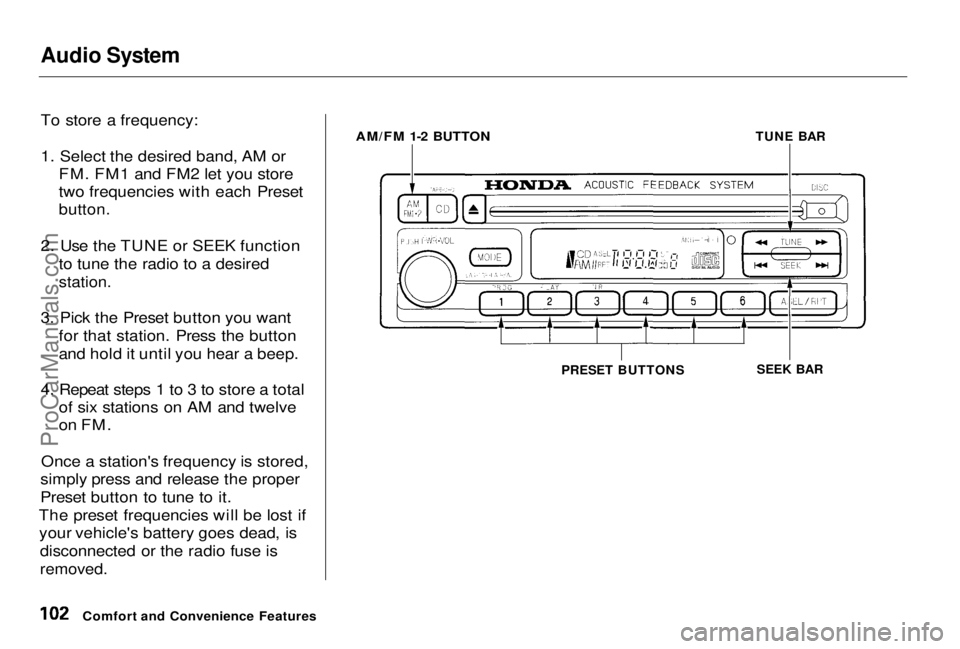
To store a frequency:
1. Select the desired band, AM or
FM. FM1 and FM2 let you store
two frequencies with each Preset
button.
2. Use the TUNE or SEEK function to tune the radio to a desired
station.
3. Pick the Preset button you want for that station. Press the button
and hold it until you hear a beep.
4. Repeat steps 1 to 3 to store a total of six stations on AM and twelve
on FM.
Once a station's frequency is stored,
simply press and release the proper
Preset button to tune to it.
The preset frequencies will be lost if your vehicle's battery goes dead, is
disconnected or the radio fuse is
removed.
Comfort and Convenience Features
AM/FM 1-2 BUTTON
TUNE BAR
PRESET BUTTONS SEEK BARProCarManuals.comMain Menu Table of Contents s t
Page 104 of 278
Audio System
AUTO SELECT — If you are traveling far from home and can no
longer receive the stations you preset, you can use the Auto Select
feature to find stations in the local
area.
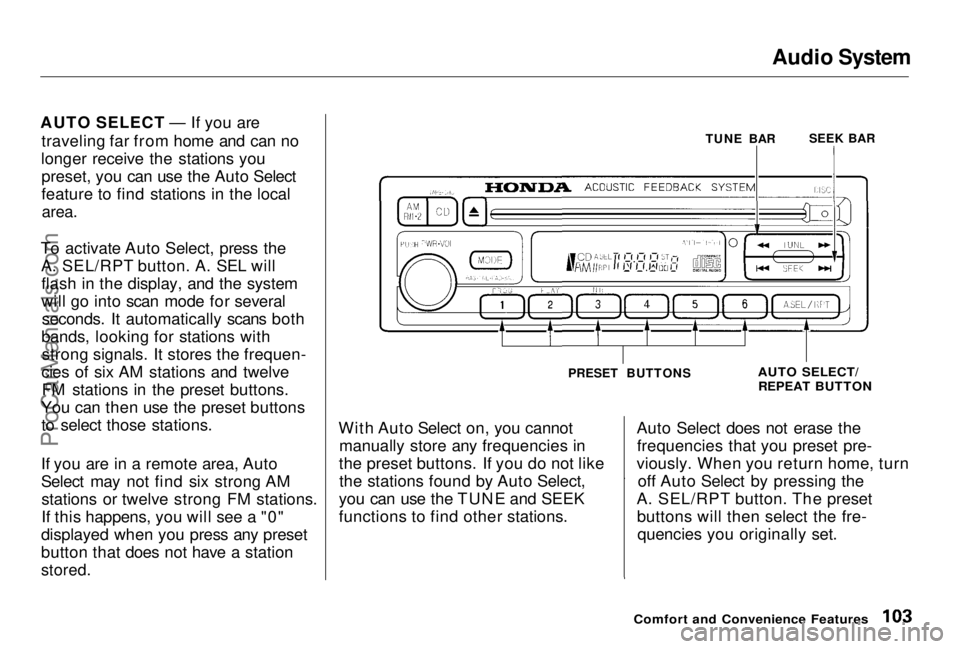
To activate Auto Select, press the A. SEL/RPT button. A. SEL willflash in the display, and the system
will go into scan mode for severalseconds. It automatically scans both
bands, looking for stations with strong signals. It stores the frequen-
cies of six AM stations and twelve FM stations in the preset buttons.
You can then use the preset buttons to select those stations.
If you are in a remote area, Auto
Select may not find six strong AM stations or twelve strong FM stations.
If this happens, you will see a "0"
displayed when you press any preset
button that does not have a station
stored.
With Auto Select on, you cannot
manually store any frequencies in
the preset buttons. If you do not like the stations found by Auto Select,
you can use the TUNE and SEEK
functions to find other stations. Auto Select does not erase the
frequencies that you preset pre-
viously. When you return home, turn off Auto Select by pressing the
A. SEL/RPT button. The preset buttons will then select the fre-quencies you originally set.
Comfort and Convenience Features
SEEK BAR
TUNE BAR
AUTO SELECT/
REPEAT BUTTON
PRESET BUTTONSProCarManuals.comMain Menu Table of Contents s t
Page 110 of 278
Audio System
Operating the CD Changer
(Optional)
A trunk-mounted Compact Disc changer is available for your vehicle.
It holds up to six discs, providing
several hours of continuous
entertainment. You operate this CD
changer with the same controls used
for the in-dash CD player.
Load the desired CD's in the
magazine and load the magazine in
the changer according to the instructions that came with the unit.
Play only standard round discs. Odd-shaped CDs may jam in the drive or
cause other problems.
To select the CD changer, press the CD button. The disc and track
numbers will be displayed. A "0" will
flash for the track number as the CD is loaded, then it will change to a
non-flashing "1".
To select
a different disc, press the
appropriate preset button (1 — 6). If
you select an empty slot in the magazine, the changer will, after
finding that slot empty, try to load the CD in the next slot. Thiscontinues until it finds a CD to load
and play.
If you load a CD in the in-dash player
while the changer is playing a CD, the system will stop the changer and
begin playing the in-dash CD. To select the changer again, press the
CD button. Play will begin where it
left off. Use the CD button to switch between the player and the changer.
If you eject the in-dash CD while it is
playing, the system will automaticallyswitch to the CD changer and begin
play where it left off. If there are no CDs in the changer, the display will
flash. You will have to select another mode (AM or FM) with the button. When you switch back to CD mode,
the system selects the same unit (in-dash or changer) that was playing
when you switched out of CD mode.
To use the SKIP, REPEAT, and RANDOM functions, refer to the in-dash player operating instructions.
Comfort and Convenience FeaturesProCarManuals.comMain Menu Table of Contents s t
Page 118 of 278

Audio System
Theft Protection
Your vehicle's audio system will disable itself if it is disconnected
from electrical power for any reason.
To make it work again, the user must enter a specific five-digit code
in the Preset buttons. Because thereare hundreds of number
combinations possible from five
digits, making the system work
without knowing the exact code is nearly impossible.
You should have received a card that lists your audio system's code
number and serial number. It is best
to store this card in a safe place athome. In addition, you should write
the audio system's serial number in
this Owner's Manual. If you should
happen to lose the card, you must obtain the code number from your
Honda dealer. To do this, you will
need the system's serial number. If your vehicle's battery is discon-
nected or goes dead, the audio system will disable itself. If this
happens, you will see "Code" in the
frequency display the next time you turn on the system. Use the Preset
buttons to enter the five-digit code. If it is entered correctly, the radio willstart playing.
If you make a mistake entering the code, do not start over or try to
correct your mistake. Complete the
five-digit sequence, then enter the correct code. You have three tries to
enter the correct code. If you are
unsuccessful in three attempts, youmust then leave the system on forone hour before trying again. You will have to store your favorite
stations in the Preset buttons after
the system begins working. Your original settings were lost when
power was disconnected.
Comfort and Convenience FeaturesProCarManuals.comMain Menu Table of Contents s t