HONDA PRELUDE 2000 Owner's Manual (in English)
Manufacturer: HONDA, Model Year: 2000, Model line: PRELUDE, Model: HONDA PRELUDE 2000Pages: 293, PDF Size: 3.43 MB
Page 231 of 293
Exterio
r Car e
Washin g
Frequent washing helps preserve
your car's beauty. Dirt and grit can scratch the paint, while tree sap and
bird droppings can permanently ruin
the finish.
Wash your car in a shady area, not in direct sunlight. If the car is parked in
the sun, move it into the shade and
let the exterior cool down before you start.
Only use the solvents and cleaners
recommended in this Owner's
Manual.
Chemical solvents and strong cleaners
can damage the paint, metal, and
plastic on your car.
Rinse the car thoroughly with cool
water to remove loose dirt.
Fill a bucket with cool water. Mix
in a mild detergent, such as dishwashing liquid or a product
made especially for car washing.
Wash the car using the water and detergent solution and a soft-
bristle brush, sponge, or soft cloth. Start at the top and work your waydown. Rinse frequently. Check the body for road tar, tree
sap, etc. Remove these stains with
tar remover or turpentine. Rinse it off immediately so it does not
harm the finish. Remember to re-
wax these areas, even if the rest of the car does not need waxing. When you have washed and rinsed
the whole exterior, dry it with achamois or soft towel. Letting it
air-dry will cause dulling and water
spots.
As you dry the car, inspect it for chips and scratches that could allow
corrosion to start. Repair them with
touch-up paint (see page 229).
Appearanc e Car e
NOTIC
E
Page 232 of 293

Exterio
r Car e
Waxin g
Always wash and dry the whole car before waxing it. You should wax
your car, including the metal trim,
whenever water sits on the surface in large patches. It should form into
beads or droplets after waxing.
You should use a quality liquid or paste wax. Apply it according to theinstructions on the container. In
general, there are two types of
products:
Waxes — A wax coats the finish and protects it from damage by exposure
to sunlight, air pollution, etc. Youshould use a wax on your Honda
when it is new.
Polishes — Polishes and cleaner/
waxes can restore the shine to paint that has oxidized and lost some of itsshine. They normally contain mild
abrasives and solvents that remove
the top layer of the finish. You should use a polish on your Honda if
the finish does not have its original shine after using a wax.
Cleaning tar, insects, etc. with
removers also takes off the wax.
Remember to re-wax those areas,
even if the rest of the car does not
need waxing.
Aluminu m Wheel s
Clean your Honda's aluminum alloy
wheels as you do the rest of the exterior. Wash them with the same
solution, and rinse them thoroughly.
The wheels have a protective clear- coat that keeps the aluminum from
corroding and tarnishing. Using
harsh chemicals, including some commercial wheel cleaners, or stiff
brushes can damage this clear-coat. Only use a mild detergent and soft
brush or sponge to clean the wheels.
Pain
t Touch-u p
Your dealer has touch-up paint to match your car's color. The colorcode is printed on a sticker on thedriver's doorjamb. Take this code to
your dealer so you are sure to get the correct color.
Inspect your car frequently for chips
or scratches in the paint. Repair
them right away to prevent corrosion of the metal underneath. Use the
touch-up paint only on small chips and scratches. More extensive paintdamage should be repaired by a
professional.
Appearance Car e
Page 233 of 293

Interio
r Car e
Carpetin g
Vacuum the carpeting frequently to remove dirt. Ground-in dirt will make
the carpet wear out faster. Periodically shampoo the carpet to
keep it looking new. Use one of the foam-type carpet cleaners on the
market. Follow the instructions that
come with the cleaner, applying it
with a sponge or soft brush. Keep the carpeting as dry as possible by
not adding water to the foam. Fabri
c
Vacuum dirt and dust out of the material frequently. For general
cleaning, use a solution of mild soap
and lukewarm water, letting it air dry.
To clean off stubborn spots, use a commercially-available fabric cleaner.
Test it on a hidden area of the fabric first, to make sure it does not bleachor stain the fabric. Follow the
instructions that come with the
cleaner.
Viny
l
Remove dirt and dust with a vacuum
cleaner. Wipe the vinyl with a soft
cloth dampened in a solution of mild soap and water. Use the same
solution with a soft-bristle brush on
more difficult spots. You can also use commercially-available spray or
foam-type vinyl cleaners.
Appearanc e Car e
Page 234 of 293
Interio
r Car e
Sea t Belt s
If your seat belts get dirty, you can
use a soft brush with a mixture of
mild soap and warm water to clean
them. Do not use bleach, dye, or
cleaning solvents. They can weaken
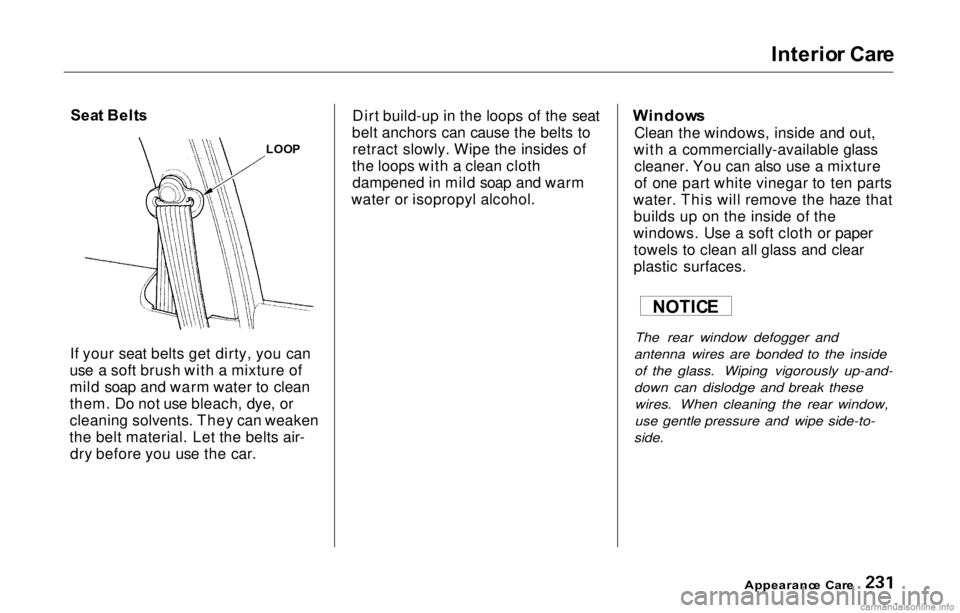
the belt material. Let the belts air- dry before you use the car. Dirt build-up in the loops of the seat
belt anchors can cause the belts to retract slowly. Wipe the insides of
the loops with a clean cloth dampened in mild soap and warm
water or isopropyl alcohol.
Window
s
Clean the windows, inside and out,
with a commercially-available glass cleaner. You can also use a mixture
of one part white vinegar to ten parts
water. This will remove the haze that builds up on the inside of the
windows. Use a soft cloth or paper towels to clean all glass and clear
plastic surfaces.
The rear window defogger and
antenna wires are bonded to the inside of the glass. Wiping vigorously up-and-
down can dislodge and break these wires. When cleaning the rear window,
use gentle pressure and wipe side-to-
side.
Appearance Car e
LOO
P
NOTICE
Page 235 of 293
Interio
r Care , Corrosio n Protectio n
Ai r Freshener s
If you want to use an air freshener/
deodorizer in the interior of your car,
it is best to use a solid type. Some
liquid air fresheners contain chemi-
cals that may cause parts of the
interior trim and fabric to crack or discolor.
If you use a liquid air freshener,
make sure you fasten it securely so it
does not spill as you drive. Corrosio
n Protectio n
Two factors normally contribute to causing corrosion in your car:
1. Moisture trapped in body cavities. Dirt and road salt that collects in
hollows on the underside of the car stays damp, promoting
corrosion in that area.
2. Removal of paint and protective coatings from the exterior and
underside of the car.
Many corrosion-preventive measures are built into your Honda. You can
help keep your car from corroding
by performing some simple periodic
maintenance:
Repair chips and scratches in the
paint as soon as you discover them. Inspect and clean out the drain
holes in the bottom of the doors
and body. Check the floor coverings for
dampness. Carpeting and floor
mats may remain damp for a long-
time, especially in winter. This dampness can eventually cause
the floor panels to corrode. Use a high-pressure spray to clean
the underside of your car. This is especially important in areas that
use road salt in winter. It is also a
good idea in humid climates andareas subject to salt air. Be careful
of the ABS wheel sensors and
wiring at each wheel. Have the corrosion-preventive
coatings on the underside of your
car inspected and repaired
periodically.
Appearanc e Car e
Page 236 of 293

Bod
y Repair s
Body repairs can affect your car's
resistance to corrosion. If your car needs repairs after a collision, pay
close attention to the parts used in
the repair and the quality of the
work.
Make sure the repair facility uses
Genuine Honda replacement body
parts. Some companies make sheet metal pieces that seem to duplicate
the original Honda body parts, but are actually inferior in fit, finish, and
corrosion resistance. Once installed,
they do not give the same high-
quality appearance. When reporting your collision to the
insurance company, tell them you
want Genuine Honda parts used in
the repair. Although most insurers
recognize the quality of original
parts, some may try to specify that
the repairs be done with other available parts. You should investi-
gate this before any repairs have
begun.
Take your car to your authorized Honda dealer for inspection after the
repairs are completed. Your dealer
can make sure that quality materials
were used, and that corrosion-
preventive coatings were applied to all repaired and replaced parts.
Appearance Car e
Page 237 of 293

234
Page 238 of 293

Takin
g Car e o f th e Unexpecte d
This section covers the more- common problems that motorists
experience with their vehicles. It
gives you information about how to safely evaluate the problem and what
to do to correct it. If the problem has stranded you on the side of the road,
you may be able to get going again. If not, you will also find instructions
on getting your car towed. Compact Spare Tire....................... 236
Changing a Flat Tire ..................... 237
If Your Engine Won't Start........... 242
Nothing Happens or theStarter Motor OperatesVery Slowly............................. 243
The Starter Operates Normally................................. 244
Jump Starting................................. 244 If Your Engine Overheats............. 246Low Oil Pressure Indicator.......... 248
Charging System Indicator........... 249
Malfunction Indicator Lamp ........ 250
Brake System Indicator................ 251
Closing the Moonroof................... 252
Fuses...............................................253
Checking and Replacing........... 254
Emergency Towing....................... 258
Takin g Car e o f th e Unexpecte d
Page 239 of 293
Compact Spar e Tir e
Your car has a compact spare tire
that takes up less space. Use thisspare tire as a temporary replace-
ment only. Get your regular tire
repaired or replaced and put back on
your car as soon as you can.
Check the inflation pressure of the
compact spare tire every time you
check the other tires. It should be
inflated to:
60 psi (420 kPa , 4.2 kgf/cm2)
Follow these precautions whenever
you are using the compact spare tire:
Do not exceed 50 mph (80 km/h)
under any circumstances.
This tire gives a harsher ride and less traction on some road sur-
faces than the regular tire. Use greater caution while driving on
this tire.
Do not mount snow chains on the
compact spare.
The wheel of the compact spare tire is designed especially to fit
your car. Do not use your spare tire on another vehicle unless it is
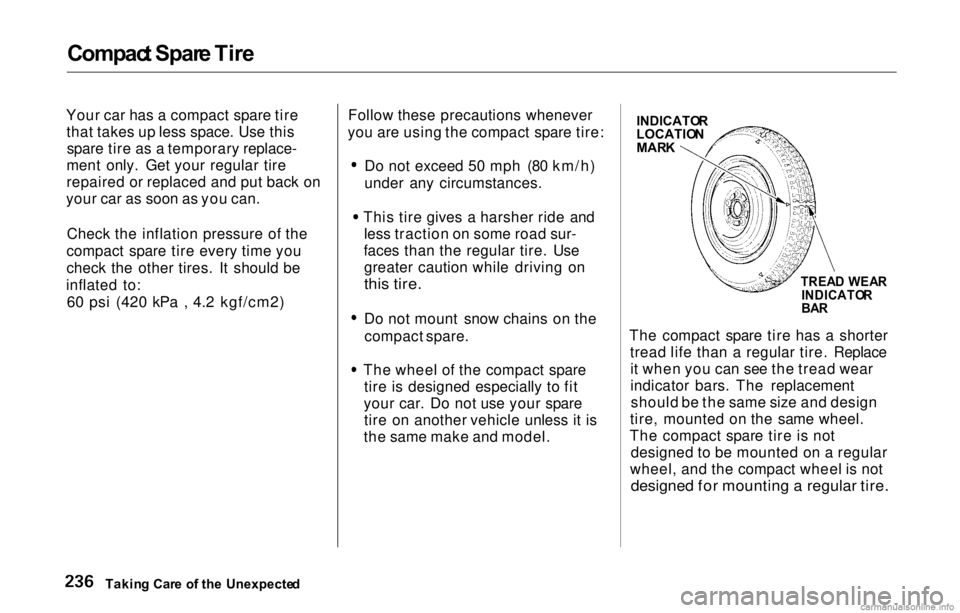
the same make and model. The compact spare tire has a shorter
tread life than a regular tire. Replaceit when you can see the tread wear
indicator bars. The replacementshould be the same size and design
tire, mounted on the same wheel.
The compact spare tire is not designed to be mounted on a regular
wheel, and the compact wheel is not
designed for mounting a regular tire.
Takin g Car e o f th e Unexpecte d INDICATO
R
LOCATIO N
MAR K
TREA D WEA R
INDICATO R
BA R
Page 240 of 293
Changin
g a Fla t Tir e
If you have a flat tire while driving, stop in a safe place to change it.
Stopping in traffic or on the shoulder
of a busy road is dangerous. Drive
slowly along the shoulder until you
get to an exit or an area to stop that is far away from the traffic lanes.
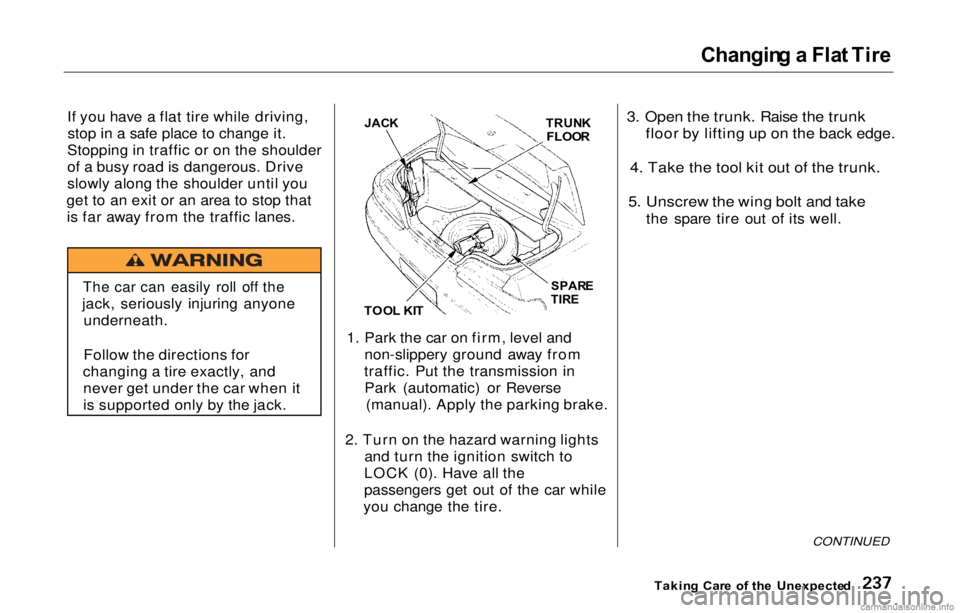
1. Park the car on firm, level andnon-slippery ground away from
traffic. Put the transmission in Park (automatic) or Reverse (manual). Apply the parking brake.
2. Turn on the hazard warning lights and turn the ignition switch to
LOCK (0). Have all the
passengers get out of the car while
you change the tire.
3. Open the trunk. Raise the trunk
floor by lifting up on the back edge.
4. Take the tool kit out of the trunk.
5. Unscrew the wing bolt and take
the spare tire out of its well.
CONTINUED
Takin g Car e o f th e Unexpecte d
JAC
K
TOO L KI T TRUN
K
FLOO R
SPAR E
TIR E
The car can easily roll off the
jack, seriously injuring anyone underneath.
Follow the directions for
changing a tire exactly, and never get under the car when it
is supported only by the jack.