HONDA PRELUDE 2000 Owner's Manual (in English)
Manufacturer: HONDA, Model Year: 2000, Model line: PRELUDE, Model: HONDA PRELUDE 2000Pages: 293, PDF Size: 3.43 MB
Page 211 of 293
Tire
s
Tir e Rotatio n
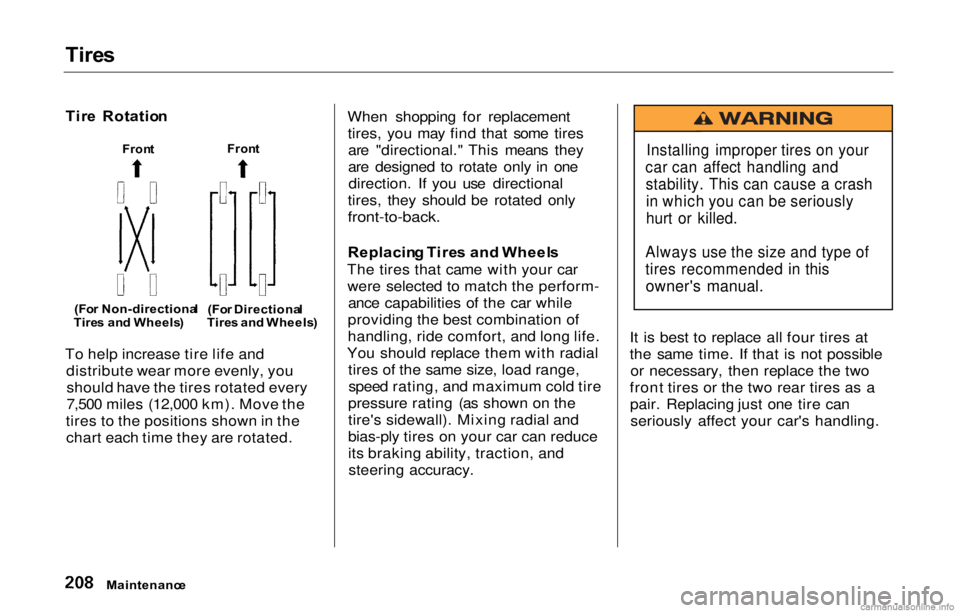
To help increase tire life and distribute wear more evenly, youshould have the tires rotated every
7,500 miles (12,000 km). Move the
tires to the positions shown in the chart each time they are rotated. When shopping for replacement
tires, you may find that some tiresare "directional." This means they
are designed to rotate only in onedirection. If you use directional
tires, they should be rotated only
front-to-back.
Replacin g Tire s an d Wheel s
The tires that came with your car were selected to match the perform- ance capabilities of the car while
providing the best combination of
handling, ride comfort, and long life.
You should replace them with radial tires of the same size, load range,speed rating, and maximum cold tire
pressure rating (as shown on the
tire's sidewall). Mixing radial and
bias-ply tires on your car can reduce
its braking ability, traction, and steering accuracy. It is best to replace all four tires at
the same time. If that is not possible
or necessary, then replace the two
front tires or the two rear tires as a pair. Replacing just one tire canseriously affect your car's handling.
Maintenanc e
Installing improper tires on your
car can affect handling and stability. This can cause a crashin which you can be seriously
hurt or killed.
Always use the size and type of
tires recommended in this
owner's manual.
Fron
t Fron
t
(Fo r Non-directiona l
Tire s an d Wheels )(Fo
r Directiona l
Tire s an d Wheels )
Page 212 of 293
Tire
s
The ABS works by comparing the speed of the wheels. When replacing
tires, use the same size originally supplied with the car. Tire size and
construction can affect wheel speed
and may cause the system to work in-
consistently.
If you ever need to replace a wheel,
make sure the wheel's specifications match those of the original wheel
that came on your car. Replacement
wheels are available at your Honda
dealer.
Wheel
s an d Tire s
Wheel:
16x6 1/2 JJ
Tire:
205/50R1687V
See page 266 for information about
DOT Tire Quality Grading.
Winte
r Drivin g
Tires that are marked "M
+ S" or
"All Season" on the sidewal
l have an
all-weather tread design. They should be suitable for most winter
driving conditions. Tires without
these markings are designed for optimum traction in dry conditions.
They may not provide adequate performance in winter driving.For the best performance in snowy
or icy conditions, you should installsnow tires or tire chains. They may
be required by local laws under certain conditions.
CONTINUED
Maintenanc e
Page 213 of 293
Tire
s
Snow Tires
If you mount snow tires on your
Honda, make sure they are radial
tires of the same size and load range as the original tires. Mount snow
tires on all four wheels to balance
your car's handling in all weather conditions. Keep in mind the traction
provided by snow tires on dry roads
may not be as high as your car's
original equipment tires. You shoulddrive cautiously even when the roads
are clear. Check with the tire dealer
for maximum speed recommenda-
tions.
Tire Chains
Mount traction devices (cable-type)
only when required by driving
conditions or local laws. Make sure
they are the correct size for your
tires. Install them only on the front
tires.
When installing traction devices, follow the manufacturer'sinstructions and mount them as
tightly as you can. Drive slowly with
them installed. If you hear them coming in contact with the body or
chassis, stop and investigate. Make sure the traction devices are
installed tightly, and that they are
not contacting the brakes or
suspension.
Remove them as soon as you start
driving on cleared roads.
Traction devices that are the wrong
size or improperly installed can
damage your car's brake lines,
suspension, body, and wheels. Stop
driving if they are hitting any part of
the car.
Maintenanc e
NOTICE
Page 214 of 293
Light
s
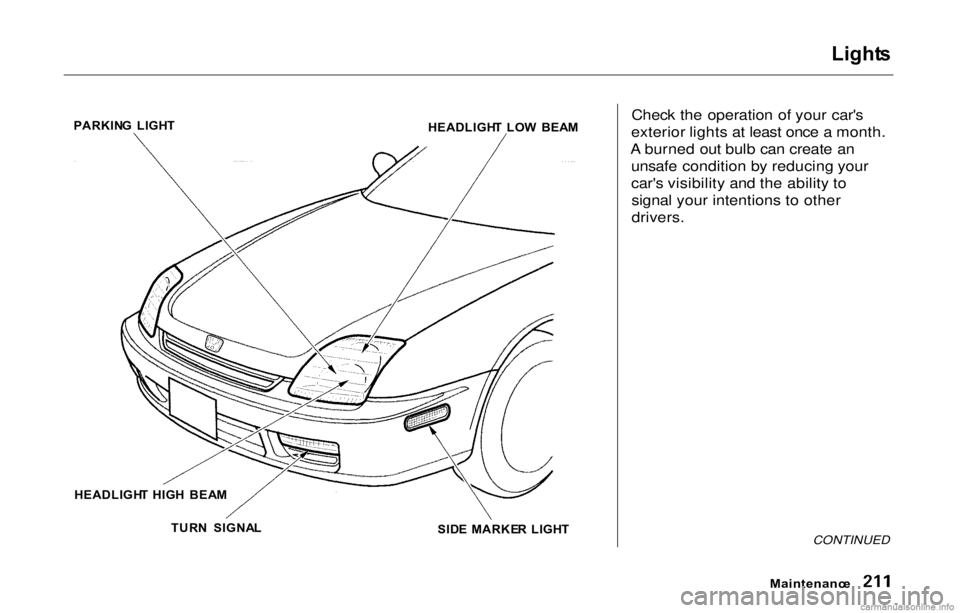
Check the operation of your car's
exterior lights at least once a month.
A burned out bulb can create an unsafe condition by reducing your
car's visibility and the ability tosignal your intentions to other
drivers.
CONTINUED
Maintenanc e
PARKIN
G LIGH T
HEADLIGHT LO W BEA M
SID E MARKE R LIGH T
HEADLIGH
T HIG H BEA M
TUR N SIGNA L
Page 215 of 293
Light
s
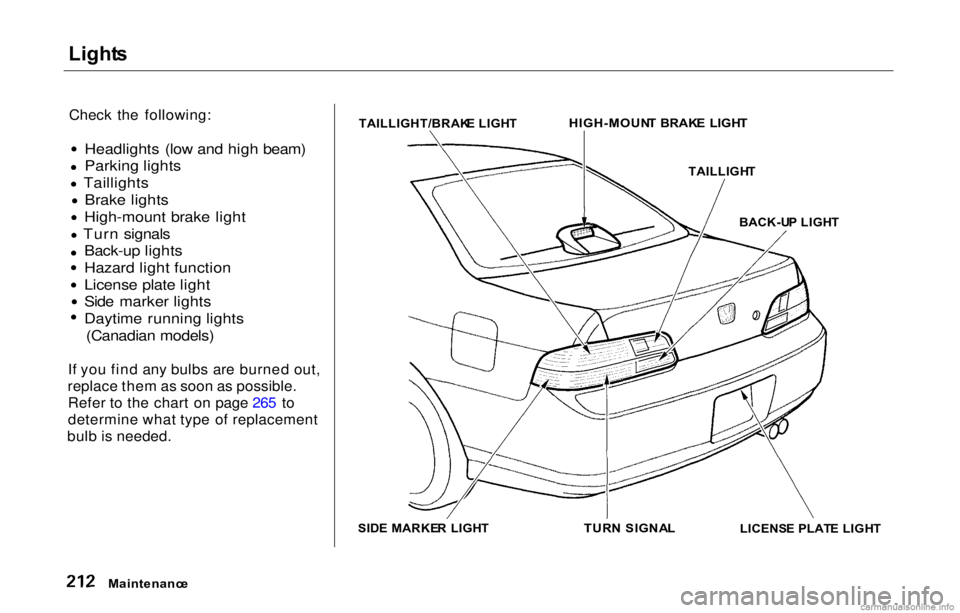
Check the following:
Headlights (low and high beam)
Parking lights
Taillights Brake lights
High-mount brake light
Turn signals Back-up lights
Hazard light function
License plate light
Side marker lights
Daytime running lights
(Canadian models)
If you find any bulbs are burned out,
replace them as soon as possible. Refer to the chart on page 265 to
determine what type of replacement
bulb is needed. TAILLIGHT/BRAK
E LIGH T
HIGH-MOUN
T BRAK E LIGH T
TAILLIGH T
BACK-U P LIGH T
SID E MARKE R LIGH T
TURN SIGNA L
LICENSE PLAT E LIGH T
Maintenanc e
Page 216 of 293
Light
s
Headligh t Aimin g
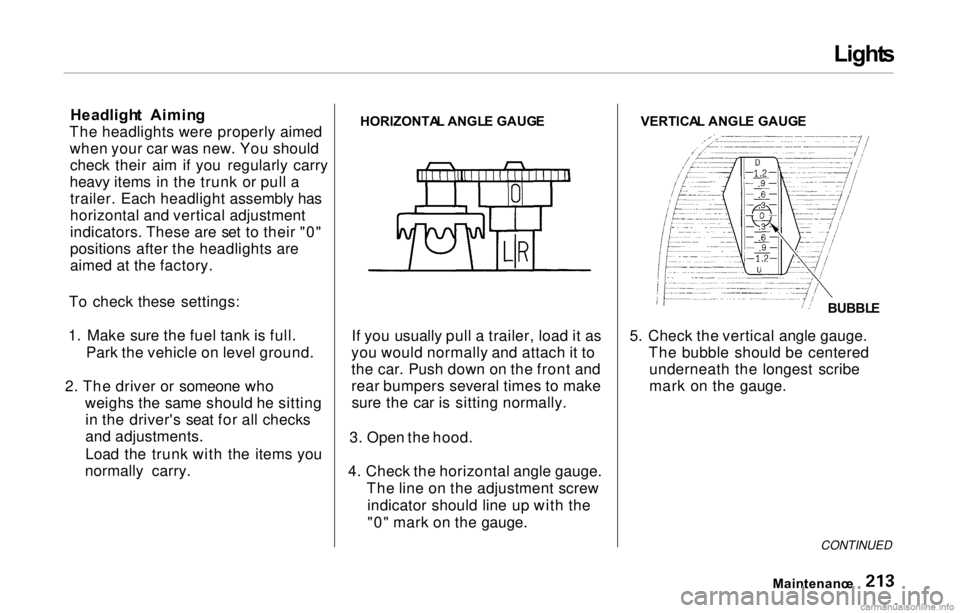
The headlights were properly aimed when your car was new. You shouldcheck their aim if you regularly carry
heavy items in the trunk or pull a trailer. Each headlight assembly has
horizontal and vertical adjustment
indicators. These are set to their "0"
positions after the headlights are
aimed at the factory.
To check these settings:
1. Make sure the fuel tank is full. Park the vehicle on level ground.
2. The driver or someone who weighs the same should he sittingin the driver's seat for all checks
and adjustments.
Load the trunk with the items you
normally carry. HORIZONTA
L ANGL E GAUG E
If you usually pull a trailer, load it as
you would normally and attach it to
the car. Push down on the front and
rear bumpers several times to make sure the car is sitting normally.
3. Open the hood.
4. Check the horizontal angle gauge. The line on the adjustment screwindicator should line up with the
"0" mark on the gauge. VERTICA
L ANGL E GAUG E
5. Check the vertical angle gauge. The bubble should be centeredunderneath the longest scribe
mark on the gauge.
MaintenanceCONTINUED
BUBBLE
Page 217 of 293
Light
s
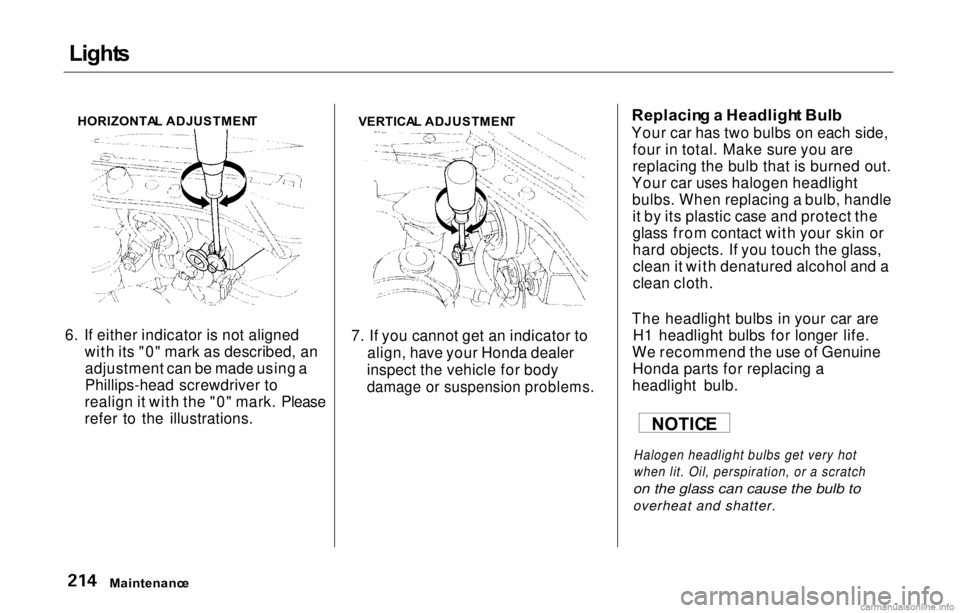
HORIZONTA L ADJUSTMEN T
6. If either indicator is not aligned with its "0" mark as described, anadjustment can be made using a
Phillips-head screwdriver to
realign it with the "0" mark. Please
refer to the illustrations.
VERTICA
L ADJUSTMEN T
7. If you cannot get an indicator to align, have your Honda dealer
inspect the vehicle for body
damage or suspension problems.
Replacin
g a Headligh t Bul b
Your car has two bulbs on each side, four in total. Make sure you are
replacing the bulb that is burned out.
Your car uses halogen headlight bulbs. When replacing a bulb, handleit by its plastic case and protect the
glass from contact with your skin or
hard objects. If you touch the glass,clean it with denatured alcohol and a
clean cloth.
The headlight bulbs in your car are H1 headlight bulbs for longer life.
We recommend the use of Genuine Honda parts for replacing a
headlight bulb.
Halogen headlight bulbs get very hot
when lit. Oil, perspiration, or a scratch
on the glass can cause the bulb to
overheat and shatter.
Maintenanc e
NOTIC
E
Page 218 of 293
Light
s
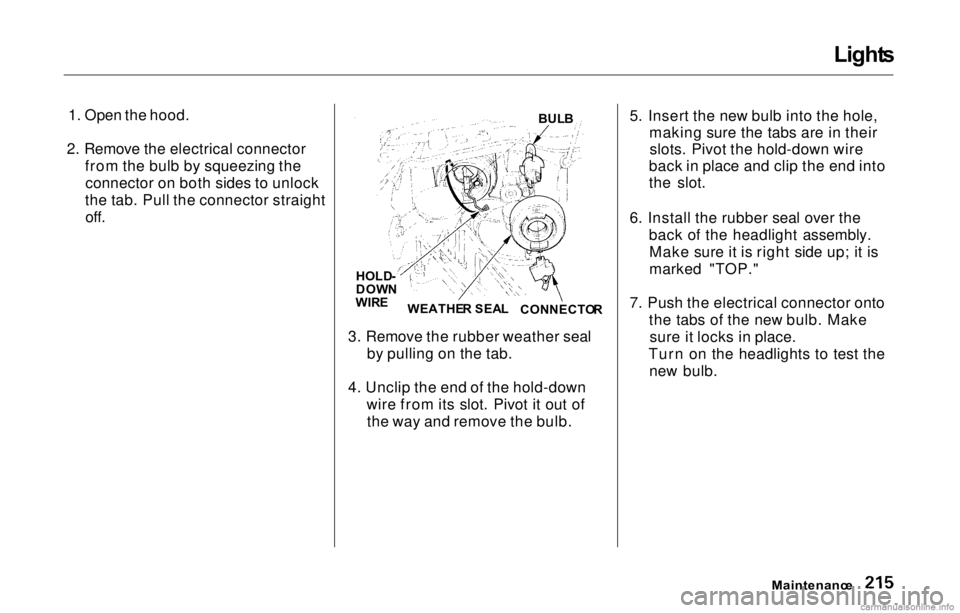
1. Open the hood.
2. Remove the electrical connector from the bulb by squeezing theconnector on both sides to unlock
the tab. Pull the connector straight off.
3. Remove the rubber weather sealby pulling on the tab.
4. Unclip the end of the hold-down wire from its slot. Pivot it out ofthe way and remove the bulb. 5. Insert the new bulb into the hole,
making sure the tabs are in theirslots. Pivot the hold-down wire
back in place and clip the end into
the slot.
6. Install the rubber seal over the back of the headlight assembly.Make sure it is right side up; it is
marked "TOP."
7. Push the electrical connector onto the tabs of the new bulb. Makesure it locks in place.
Turn on the headlights to test the new bulb.
Maintenance
BUL
B
HOLD -
DOW N
WIR E
WEATHE R SEA L
CONNECTO R
Page 219 of 293
Light
s
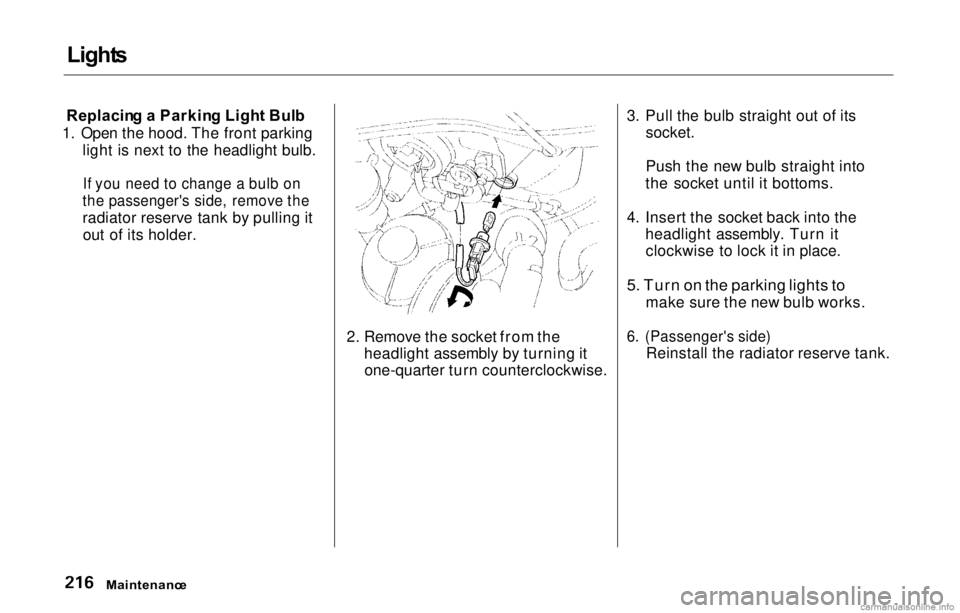
Replacin g a Parkin g Ligh t Bul b
1. Open the hood. The front parking light is next to the headlight bulb.
If you need to change a bulb on
the passenger's side, remove the
radiator reserve tank by pulling it out of its holder.
2. Remove the socket from theheadlight assembly by turning itone-quarter turn counterclockwise. 3. Pull the bulb straight out of its
socket.
Push the new bulb straight into
the socket until it bottoms.
4. Insert the socket back into the headlight assembly. Turn itclockwise to lock it in place.
5. Turn on the parking lights to
make sure the new bulb works.
6. (Passenger's side)
Reinstall the radiator reserve tank.
Maintenanc e
Page 220 of 293
Light
s
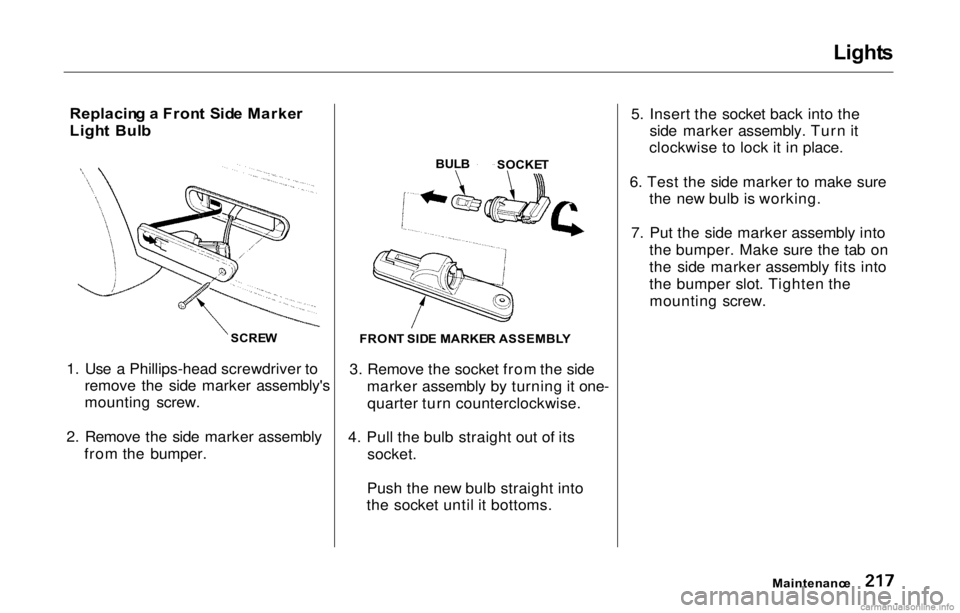
Replacin g a Fron t Sid e Marke r
Ligh t Bul b
1. Use a Phillips-head screwdriver to remove the side marker assembly's
mounting screw.
2. Remove the side marker assembly from the bumper. 3. Remove the socket from the side
marker assembly by turning it one-quarter turn counterclockwise.
4. Pull the bulb straight out of its socket.
Push the new bulb straight into
the socket until it bottoms. 5. Insert the socket back into the
side marker assembly. Turn it
clockwise to lock it in place.
6. Test the side marker to make sure the new bulb is working.
7. Put the side marker assembly into the bumper. Make sure the tab on
the side marker assembly fits into
the bumper slot. Tighten themounting screw.
Maintenance
SCRE
W
BUL
B
SOCKE T
FRON T SID E MARKE R ASSEMBL Y