check HONDA RIDGELINE 2017 2.G Owners Manual
[x] Cancel search | Manufacturer: HONDA, Model Year: 2017, Model line: RIDGELINE, Model: HONDA RIDGELINE 2017 2.GPages: 606, PDF Size: 13.21 MB
Page 535 of 606
534
uuChecking and Maintaining Tires uDOT Tire Quality Grading (U.S. Vehicles)
Maintenance
DOT Tire Quality Grading (U.S. Vehicles)
The tires on your vehicle meet all U.S. Federal Safety
Requirements. All tires are also graded for treadwear, traction,
and temperature performance a ccording to Department of
Transportation (DOT) standards. The following explains these
gradings.
Quality grades can be found where applicable on the tire sidewall
between tread shoulder an d maximum section width.
The treadwear grade is a comparative rating based on the wear
rate of the tire when tested un der controlled conditions on a
specified government test course. For example, a tire graded 150
would wear one and one-half (1 1/2) times as well on the
government course as a tire graded 100. The relative performance
of tires depends upon the actual conditions of their use, however,
and may depart significantly from the norm due to variations in
driving habits, service practices and differences in road
characteristics and climate.
■Uniform Tire Quality Grading
■Treadwear
1 Uniform Tire Quality Grading
For example:
Treadwear 200
Traction AA
Temperature A
All passenger car tires must conform
to Federal Safety Requirements in
addition to these grades.
Page 536 of 606
535
uuChecking and Maintaining Tires uDOT Tire Quality Grading (U.S. Vehicles)
Maintenance
The traction grades, from highest to lowest, are AA, A, B, and C.
Those grades represent the tire’s ability to stop on wet pavement
as measured under controlled conditions on specified
government test surfaces of asph alt and concrete. A tire marked
C may have poor traction performance.
The temperature grades are A (the highest), B, and C,
representing the tire’s resistance to the generation of heat and its
ability to dissipate heat when te sted under controlled conditions
on a specified indoor laboratory test wheel. Sustained high
temperature can cause the material of the tire to degenerate and
reduce tire life, and ex cessive temperature can lead to sudden tire
failure. The grade C corresponds to a level of performance which
all passenger car tires must meet under the Federal Motor Vehicle
Safety Standard No. 109. Grades B and A represent higher levels
of performance on the laboratory test wheel than the minimum
required by law.
■Traction
■Temperature
1 Traction
Warning: The traction grade
assigned to this tire is based on
straight-ahead braking traction tests,
and does not include acceleration,
cornering, hydroplaning, or peak
traction characteristics.
1Temperature
Warning: The temperature grade for
this tire is establishe d for a tire that is
properly inflated and not
overloaded. Excessive speed,
underinflation, or excessive loading,
either separately or in combination,
can cause heat buildup and possible
tire failure.
Page 537 of 606
536
uuChecking and Maintaining Tires uWear Indicators
Maintenance
Wear Indicators
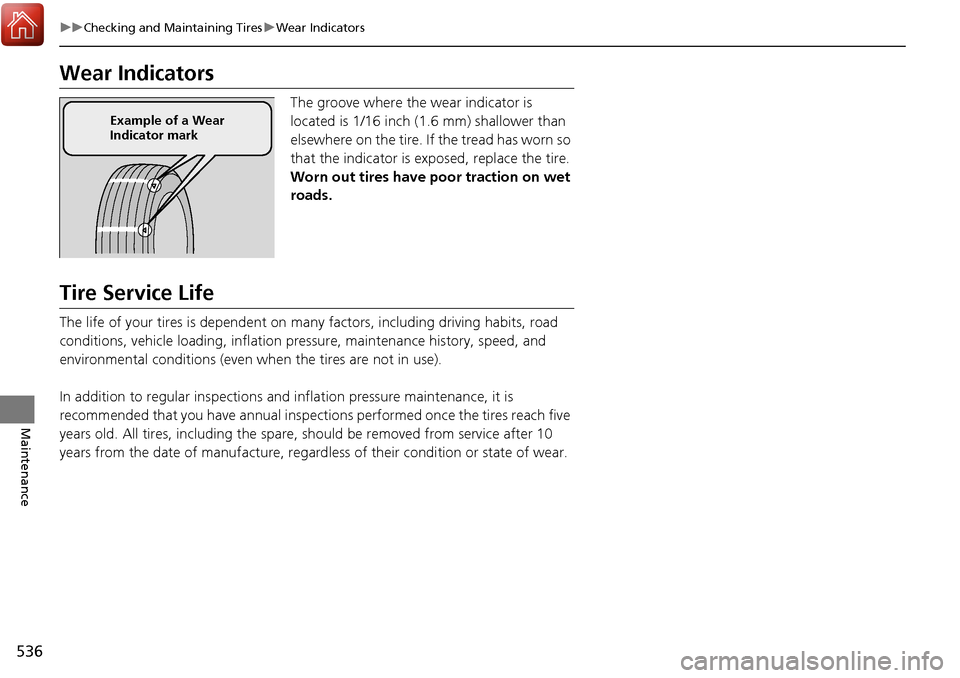
The groove where the wear indicator is
located is 1/16 inch (1.6 mm) shallower than
elsewhere on the tire. If the tread has worn so
that the indicator is exposed, replace the tire.
Worn out tires have poor traction on wet
roads.
Tire Service Life
The life of your tires is dependent on many factors, including driving habits, road
conditions, vehicle loading, inflation pre ssure, maintenance history, speed, and
environmental conditions (even when the tires are not in use).
In addition to regular in spections and inflation pres sure maintenance, it is
recommended that you have annual inspections performed once the tires reach five
years old. All tires, including the spare, should be removed from service after 10
years from the date of manufacture, regard less of their condition or state of wear.
Example of a Wear
Indicator mark
Page 538 of 606
537
uuChecking and Maintaining Tires uTire and Wheel Replacement
Maintenance
Tire and Wheel Replacement
Replace your tires with radials of the sa me size, load range, speed rating, and
maximum cold tire pressure rating (as shown on the tire’s sidewall). Using tires of a
different size or construction can cause the Vehicle Stability Assist (VSA ®), hill start
assist, and the all-wheel drive (AWD)
* systems as well as ABS to work incorrectly.
It is best to replace all four tires at the same time. If that isn’t possible, replace the
front or rear tires in pairs.
If you replace a wheel, only use TPMS spec ified wheels approved for your vehicle.
Make sure that the wheel’s specificati ons match those of the original wheels.
1Tire and Wheel Replacement
3WARNING
Installing improper tires on your vehicle can
affect handling and stability. This can cause
a crash in which you can be seriously hurt or
killed.
Always use the size and type of tires
recommended in this owner’s manual.
* Not available on all models
Page 539 of 606
538
uuChecking and Maintaining Tires uTire Rotation
Maintenance
Tire Rotation
Rotating tires according to the mainte nance messages on the multi-information
display helps to distribute wear mo re evenly and increase tire life.
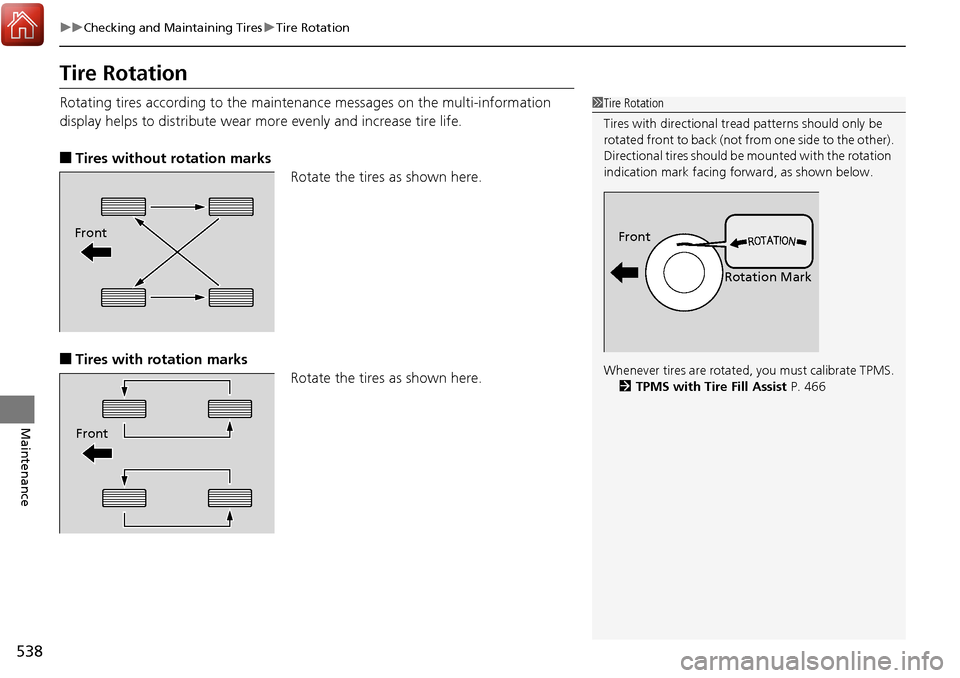
■Tires without rotation marks
Rotate the tires as shown here.
■Tires with rotation marksRotate the tires as shown here.
1Tire Rotation
Tires with directional trea d patterns should only be
rotated front to back (not fr om one side to the other).
Directional tires should be mounted with the rotation
indication mark facing forward, as shown below.
Whenever tires are rotated, you must calibrate TPMS. 2 TPMS with Tire Fill Assist P. 466
Front
Rotation MarkFront
Front
Page 540 of 606
539
uuChecking and Maintaining Tires uWinter Tires
Maintenance
Winter Tires
If driving on snowy or frozen roads, moun t all season marked “M+S” tires, snow
tires, or tire chains; reduce speed; and main tain sufficient distance between vehicles
when driving.
Be particularly careful when operating the steering wheel or brakes to prevent
skidding.
Use tire chains, snow tires, or all season tires when necessary or according to the law.
When mounting, refer to the following points.
For winter tires:
• Select the size and load ranges that are the same as the original tires.
• Mount the tires to all four wheels.
For tire chains:
• Install them on the front tires only.
• Because your vehicle has limited tire clea rance, we strongly recommend using the
chains listed below:
• Follow the chain manufactur er’s instruction when installing. Mount them as
tightly as you can.
• Check that the chains do not touc h the brake lines or suspension.
• Drive slowly.
Cable-type: SCC Super Z LT-ZT735
1Winter Tires
NOTICE
Traction devices that are th e wrong size or improperly
installed can damage your vehicle’s brake lines,
suspension, body, and wheels. Stop driving if they are
hitting any part of the vehicle.
When tire chains are mounted, follow the chain
manufacturer’s instructi ons regarding vehicle
operational limits.
If your vehicle is equipped with summer tires, be
aware that these tires are not designed for winter
driving conditions. For more information, contact a
dealer.
3WARNING
Using the wrong chains, or not properly
installing chains, can damage the brake
lines and cause a crash in which you can be
seriously injured or killed.
Follow all instruction s in this owner’s
manual regarding the selection and use of
tire chains.
Page 541 of 606
540
Maintenance
Battery
Checking the Battery
The condition of the battery is monitored by a sensor located on the negative
terminal of the battery. If there is a prob lem with this sensor, the multi-information
display will display a warning message. If this happens, have you vehicle inspected
by a dealer.
Check the battery termin als for corrosion monthly.
If your vehicle’s battery is disconnected or goes dead:
• The audio system is disabled.
2 Audio System Theft Protection P. 201
•The clock resets.
2 Clock P. 108
Charging the Battery
Disconnect both battery cables to prevent da maging your vehicle’s electrical system.
Always disconnect the negative (–) cable first, and reconnect it last.
1 Battery
WARNING: Battery post, terminals,
and related accessories contain lead
and lead compounds.
Wash your hands after handling.
If you find corrosion, clea n the battery terminals by
applying a baking powder a nd water solution. Clean
the terminals with a damp towel. Cloth/towel dry the
battery. Coat the terminals with grease to help
prevent future corrosion.
3WARNING
The battery gives off explosive hydrogen
gas during normal operation.
A spark or flame can cause the battery to
explode with enough force to kill or
seriously hurt you.
When conducting any battery
maintenance, wear prot ective clothing and
a face shield, or have a skilled technician do
it.
Models without navigation system
Page 550 of 606
549
Maintenance
Accessories and Modifications
Accessories
When installing accessories, check the following:
• Do not install accessories on the windsh ield. They can obstruct your view and
delay your reaction to driving conditions.
• Do not install any accessories over areas marked SRS Airbag, on the sides or backs
of the front seats, on front or side pillars, or near the side windows. Accessories
installed in these areas may interfere with proper operation of the vehicle’s
airbags or may be propelled into you or another occupant if the airbags deploy.
• Be sure electronic accessories do not overload electrical circuits or interfere with
proper operation of your vehicle.
2 Fuses P. 575
•Before installing any electro nic accessory, have the installer contact a dealer for
assistance. If possible, have a deal er inspect the final installation.
• Your vehicle should not be used to carry a slide-in camper. If you install a truck
cap, be sure it is properly installed and does not exceed your vehicle’s load limits.
2Maximum Load Limit P. 399
Modifications
Do not modify your vehicle in a manner that may affect its handling, stability, or
reliability, or install non-genuine Honda pa rts or accessories that may have a similar
effect.
Even minor modifications to vehicle systems can affect overall vehicle performance.
Always make sure all equipment is proper ly installed and maintained, and do not
make any modification to your vehicle or its systems that might cause your vehicle
to no longer meet federal, state, pr ovince, territory, and local regulations.
Do not modify or attempt to repair any of the electrical components.
1Accessories and Modifications
Honda Genuine accessor ies are recommended to
ensure proper operati on on your vehicle.
3WARNING
Improper accessories or modifications can
affect your vehicle’s handling, stability, and
performance, and cause a crash in which
you can be seriously hurt or killed.
Follow all instruction s in this owner’s
manual regarding accessories and
modifications.
Page 552 of 606
551
Handling the Unexpected
This chapter explains how to handle unexpected troubles.
ToolsTypes of Tools .................................. 552
If a Tire Goes Flat Changing a Flat Tire ......................... 553
Engine Does Not Start Checking the Engine ........................ 562
If the Smart Entry Remote Battery is Weak .......................................... 563
Emergency Engine Stop ................... 564
Jump Starting .................................... 565
Shift Lever Does Not Move .............. 568Overheating
How to Handle Overheating............. 569
Indicator, Coming On/Blinking
If the Low Oil Pressure Indicator Comes On ............................................. 571
If the Charging System Indicator Comes
On ................................................. 571
If the Malfunction Indicator Lamp Comes On or Blinks ................................... 572
If the Brake System Indicator (Red) Comes On .................................................... 573
If the Electric Power Steering (EPS) System
Indicator Comes On ........................... 573 If the Low Tire Pressure/Tire Pressure
Monitoring System (TPMS) Indicator Comes
On or Blinks........................................ 574
Fuses
Fuse Locations ................................. 575
Inspecting and Changing Fuses ........ 579
Emergency Towing ........................... 580
When You Cannot Unlock the Fuel Fill Door ................................................. 581
Refueling
Refueling From a Portable Fuel Container ................................... 582
Page 554 of 606
553Continued
Handling the Unexpected
If a Tire Goes Flat
Changing a Flat Tire
If a tire goes flat while driving, grasp the steering wheel firmly, and brake gradually
to reduce speed. Then, stop in a safe plac e. Replace the flat tire with a compact
spare tire. Go to a dealer as soon as possib le to have the full-size tire repaired or
replaced.
1. Park the vehicle on firm, level, non-slip pery surface and apply the parking brake.
2. Move the shift lever to
(P.
3. Turn on the hazard warning lights and set the power mode to VEHICLE OFF
(LOCK).
1Changing a Flat Tire
Follow compact spare precautions:
Periodically check the tire pressure of the compact
spare. It should be set to the specified pressure.
Specified Pressure: 60 psi (420 kPa, 4.2 kgf/cm
2)
When driving with the compact spare tire, keep the
vehicle speed under 50 mph (80 km/h). Replace with
a full-size tire as soon as possible.
The compact spare tire and wheel in your vehicle are
specifically for this model. Do not use them with
another vehicle. Do not us e another type of compact
spare tire or wheel with your vehicle.
Do not mount tire chains on a compact spare tire.
If a chain-mounted front tire goes flat, remove one of
the full-size rear tires and replace it with the compact
spare tire. Remove the flat front tire and replace it
with the full-size tire that was removed from the rear.
Mount the tire chains on the front tire.
Do not use a puncture-repairi ng agent on a flat tire,
as it can damage the tire pressure sensor.