check HONDA RIDGELINE 2017 2.G Repair Manual
[x] Cancel search | Manufacturer: HONDA, Model Year: 2017, Model line: RIDGELINE, Model: HONDA RIDGELINE 2017 2.GPages: 606, PDF Size: 13.21 MB
Page 399 of 606
398
uuBefore Driving uDriving Preparation
Driving
• Be sure items placed on the floor behind the front seats cannot roll under the
seats.
u They can interfere with the driver’s ability to operate the pedals, the operation
of the seats, or the operation of the sensors under the seats.
• Everyone in the vehicle must fasten their seat belt.
2Fastening a Seat Belt P. 36
•Make sure that the indicators in the ins trument panel come on when you start the
vehicle, and go off soon after.
u Always have a dealer check the vehicle if a problem is indicated.
2 Indicators P. 72
Page 405 of 606
404
Driving
Towing a Trailer
Towing Preparation
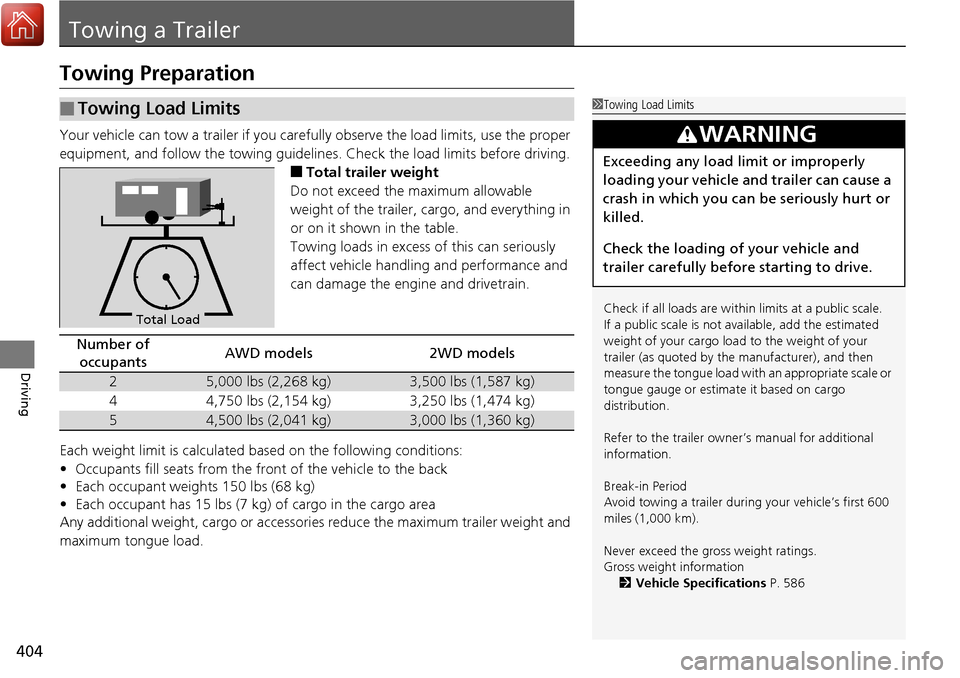
Your vehicle can tow a trailer if you carefully observe the load limits, use the proper
equipment, and follow the to wing guidelines. Check the load limits before driving.
■Total trailer weight
Do not exceed the maximum allowable
weight of the trailer, cargo, and everything in
or on it shown in the table.
Towing loads in excess of this can seriously
affect vehicle handling and performance and
can damage the engine and drivetrain.
Each weight limit is calculated based on the following conditions:
• Occupants fill seats from the front of the vehicle to the back
• Each occupant weights 150 lbs (68 kg)
• Each occupant has 15 lbs (7 kg) of cargo in the cargo area
Any additional weight, cargo or accessori es reduce the maximum trailer weight and
maximum tongue load.
■Towing Load Limits1 Towing Load Limits
Check if all loads are within limits at a public scale.
If a public scale is not available, add the estimated
weight of your cargo load to the weight of your
trailer (as quoted by the manufacturer), and then
measure the tongue load with an appropriate scale or
tongue gauge or estima te it based on cargo
distribution.
Refer to the trailer owner’s manual for additional
information.
Break-in Period
Avoid towing a trailer duri ng your vehicle’s first 600
miles (1,000 km).
Never exceed the gross weight ratings.
Gross weight information 2 Vehicle Specifications P. 586
3WARNING
Exceeding any load limit or improperly
loading your vehicle and trailer can cause a
crash in which you can be seriously hurt or
killed.
Check the loading of your vehicle and
trailer carefully before starting to drive.
Total Load
Number of
occupantsAWD models2WD models
25,000 lbs (2,268 kg)3,500 lbs (1,587 kg)
44,750 lbs (2,154 kg)3,250 lbs (1,474 kg)
54,500 lbs (2,041 kg)3,000 lbs (1,360 kg)
Page 408 of 606
Continued407
uuTowing a Trailer uTowing Preparation
Driving
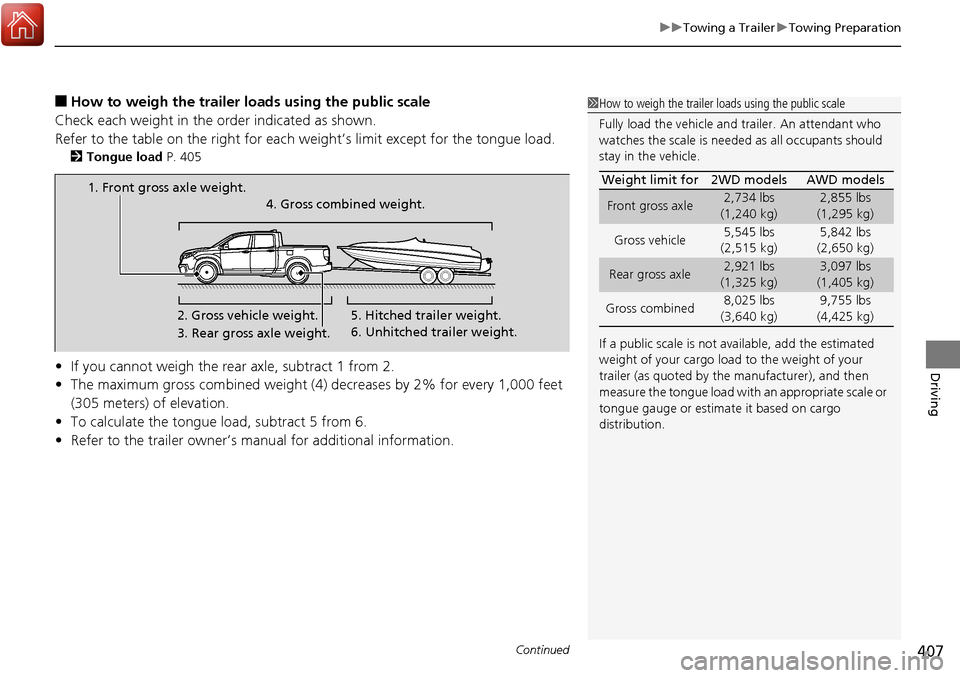
■How to weigh the trailer load s using the public scale
Check each weight in the order indicated as shown.
Refer to the table on the right for each weight’s limit except for the tongue load.
2Tongue load P. 405
•If you cannot weigh the rear axle, subtract 1 from 2.
• The maximum gross combined weight (4) decreases by 2% for every 1,000 feet
(305 meters) of elevation.
• To calculate the tongue load, subtract 5 from 6.
• Refer to the trailer owner’s manu al for additional information.
1How to weigh the trailer loads using the public scale
Fully load the vehicle and trailer. An attendant who
watches the scale is needed as all occupants should
stay in the vehicle.
If a public scale is not available, add the estimated
weight of your cargo load to the weight of your
trailer (as quoted by the manufacturer), and then
measure the tongue load with an appropriate scale or
tongue gauge or estima te it based on cargo
distribution. Weight limit for 2WD models AWD models
Front gross axle2,734 lbs
(1,240 kg)2,855 lbs
(1,295 kg)
Gross vehicle 5,545 lbs
(2,515 kg) 5,842 lbs
(2,650 kg)
Rear gross axle2,921 lbs
(1,325 kg)3,097 lbs
(1,405 kg)
Gross combined 8,025 lbs
(3,640 kg) 9,755 lbs
(4,425 kg)
1. Front gross axle weight.
2. Gross vehicle weight.4. Gross combined weight.
3. Rear gross axle weight. 5. Hitched trailer weight.
6. Unhitched trailer weight.
Page 412 of 606
Continued411
uuTowing a Trailer uTowing Preparation
Driving
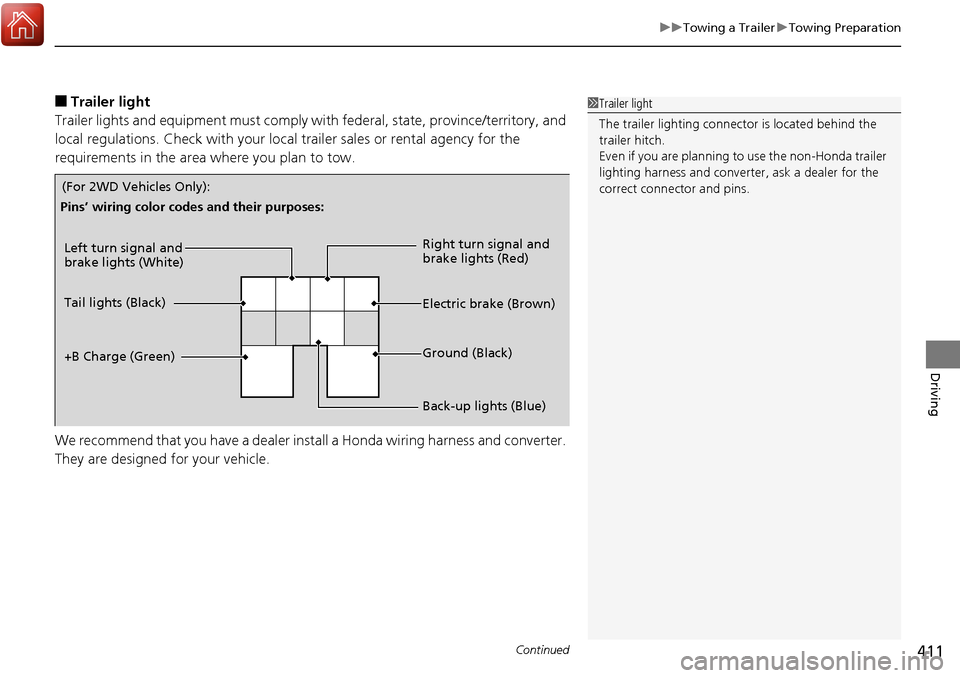
■Trailer light
Trailer lights and equipment must comply with federal, state, province/territory, and
local regulations. Check with your local trailer sales or rental agency for the
requirements in the area where you plan to tow.
We recommend that you have a dealer install a Honda wiring harness and converter.
They are designed for your vehicle.1 Trailer light
The trailer lighting connect or is located behind the
trailer hitch.
Even if you are planning to use the non-Honda trailer
lighting harness and converte r, ask a dealer for the
correct connector and pins.
Left turn signal and
brake lights (White)
Electric brake (Brown) Right turn signal and
brake lights (Red)
Back-up lights (Blue) Ground (Black)
Tail lights (Black)
+B Charge (Green)
Pins’ wiring color codes and their purposes:
(For 2WD Vehicles Only):
Page 415 of 606
414
uuTowing a Trailer uDriving Safely with a Trailer
Driving
Driving Safely with a Trailer
• Have the trailer properly serviced and keep it in good condition.
• Make sure that all the weights and load in the vehicle and trailer are within limits.
2Towing Load Limits P. 404
•Securely attach the hitch, safety chains, and other necessary parts to the trailer.
• Securely store all the items in and on the tr ailer so that they do not shift while
driving.
• Check if the lights and brakes on the trailer are working properly.
• Check the pressures of the traile r tires, including the spare.
• Drive slower than normal.
• Obey posted speed limits for vehicles with trailers.
• Use the
(D position when towing a trailer on level roads.
• Turn more slowly and with a wider turning arc than normal.
• Allow more time and distance for braking.
• Do not brake or turn suddenly.
■Things You Need To Know Before Towing a Trailer
■Towing Speeds and Gears
■Turning and Braking
1Driving Safely with a Trailer
Operating speed when towing a trailer must not
exceed 62 mph (100 km/h).
Parking
In addition to the normal precautions, place wheel
chocks at each of the trailer’s tires.
When towing a trailer, we recommend that you carry
a full-size spare wheel and tire for both your vehicle
and trailer. If you use the compact spare tire that
came with your vehicle, it could adversely affect
vehicle handling.
Remember to unhitch the tra iler before changing a
flat tire. Ask the trailer sales or rental agency where
and how to store the trailer’s spare tire.
1 Towing Speeds and Gears
When towing a fixed-sided trailer (e.g., camper), do
not exceed 55 mph (88 km/h).
At higher speeds, the trai ler may sway or affect
vehicle handling.
Page 418 of 606
417
uuOff-Highway Driving Guidelines uAvoiding Trouble
Driving
Avoiding Trouble
• Check Out Your Vehicle before you leave the pavement and make sure that all
scheduled maintenance has been completed. Pay special attention to the
condition of the tires, and check the tire pressures.
• Remember the route you choose presents limi ts (too steep or bumpy), you have
limits (driving skill and comfort), and your ve hicle has limits (traction, stability, and
power). Failing to recognize these limits will likely put you and your passengers in
a hazardous situation.
• Accelerating and Braking should be done slowly and gradually. Trying to start
or stop too fast can cause a loss of traction and you could lose control.
• Avoiding Obstacles and Debris in the road reduces the likelihood of a rollover
or damage to your suspension or other components.
• Driving on Slopes increases your risk of a rollover, particularly if you attempt to
drive across a slope that is too steep. Goin g straight up or down a slope is usually
the safest. If you can’t clearly see all cond itions or obstacles on a slope, walk it
before you drive it. If there is any doubt whether you can safely pass, don’t try it.
Find another route. If you get stuck when climbing, do not try to turn around.
Back down slowly following the same route you took up the hill.
• Crossing a Stream - Avoid driving through deep water. If you encounter water
in your route (a small stream or large pu ddle, for example), evaluate it carefully
before going ahead. Make sure it is shallow, flowing slowly, and has firm ground
underneath. If you are not sure of the de pth or the ground, turn around and find
another route. Driving through deep water can also damage your vehicle. The
water can get into the transmission and di fferential, diluting the lubricant and
causing an eventual failure. It can also wash the grease out of the wheel bearings.
• If You Get Stuck , carefully go in the direction that you think will get you
unstuck. Do not spin the tires as this will only make things worse and could
damage the transmission. If you are unable to free yourself, your vehicle will need
to be towed. Front and rear tow ho oks are provided for this purpose.
Page 419 of 606
418
Driving
When Driving
Starting the Engine
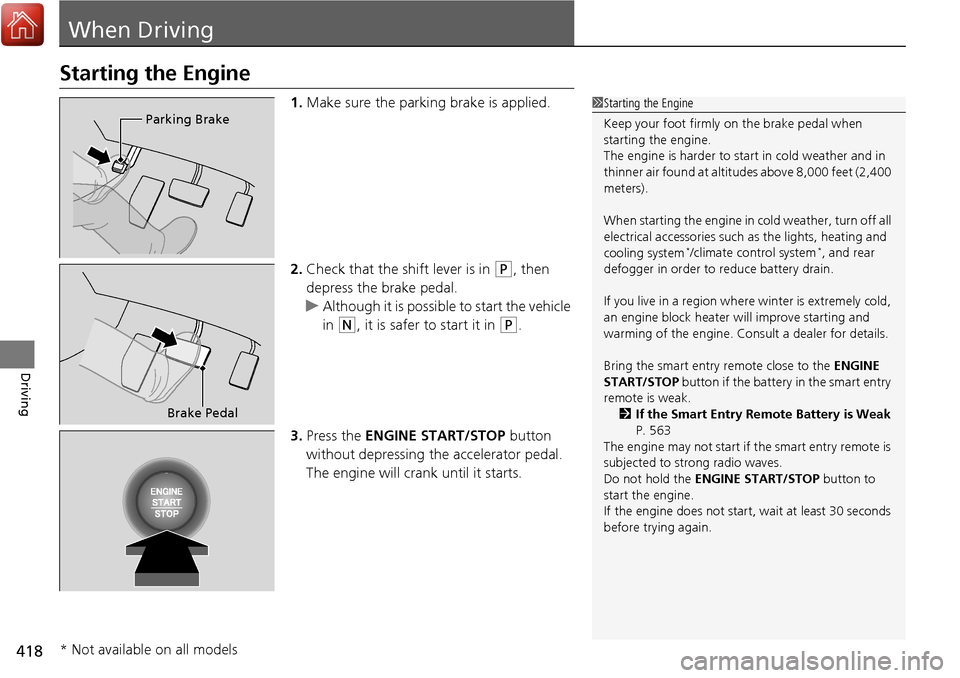
1.Make sure the parking brake is applied.
2. Check that the shift lever is in
(P, then
depress the brake pedal.
u Although it is possible to start the vehicle
in
(N, it is safer to start it in (P.
3. Press the ENGINE START/STOP button
without depressing the accelerator pedal.
The engine will crank until it starts.
1 Starting the Engine
Keep your foot firmly on the brake pedal when
starting the engine.
The engine is harder to st art in cold weather and in
thinner air found at altitudes above 8,000 feet (2,400
meters).
When starting the engine in cold weather, turn off all
electrical accessories such as the lights, heating and
cooling system
*/climate control system*, and rear
defogger in order to reduce battery drain.
If you live in a region where winter is extremely cold,
an engine block heater will improve starting and
warming of the engine. Cons ult a dealer for details.
Bring the smart entry remote close to the ENGINE
START/STOP button if the battery in the smart entry
remote is weak.
2 If the Smart Entry Remote Battery is Weak
P. 563
The engine may not start if the smart entry remote is
subjected to strong radio waves.
Do not hold the ENGINE START/STOP button to
start the engine.
If the engine does not start, wait at least 30 seconds
before trying again.
Parking Brake
Brake Pedal
* Not available on all models
Page 424 of 606
423
uuWhen Driving uStarting the Engine
Driving
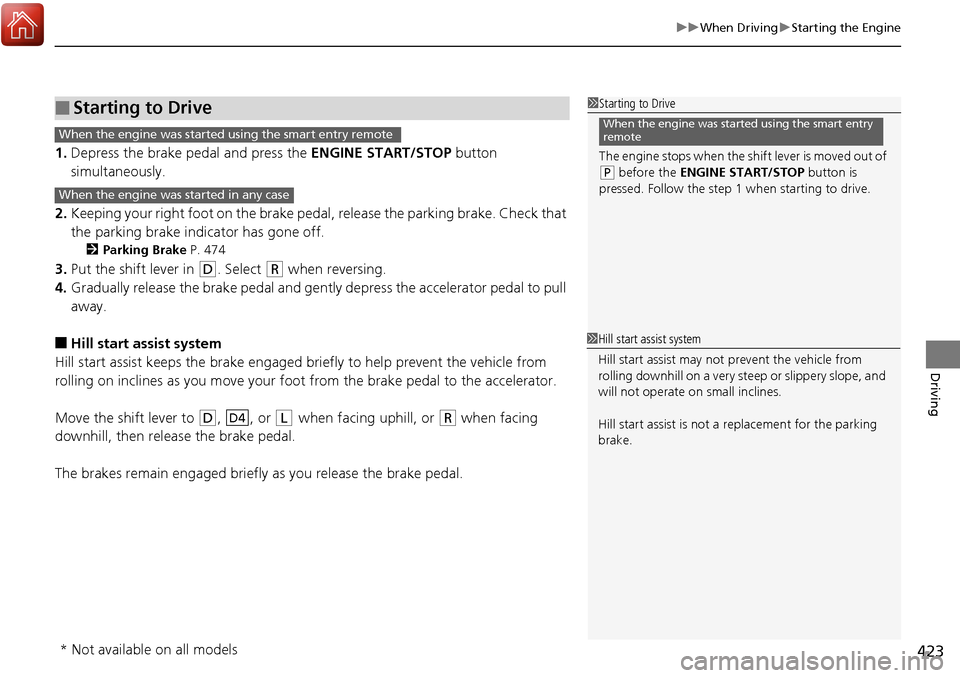
1. Depress the brake pedal and press the ENGINE START/STOP button
simultaneously.
2. Keeping your right foot on the brake pedal, release the parking brake. Check that
the parking brake indicator has gone off.
2 Parking Brake P. 474
3.Put the shift lever in (D. Select (R when reversing.
4. Gradually release the brake pedal and gently depress the accelerator pedal to pull
away.
■Hill start assist system
Hill start assist keeps the brake engaged br iefly to help prevent the vehicle from
rolling on inclines as you move your foot from the brake pedal to the accelerator.
Move the shift lever to
(D, , or (L when facing uphill, or (R when facing
downhill, then release the brake pedal.
The brakes remain engaged briefly as you release the brake pedal.
■Starting to Drive1 Starting to Drive
The engine stops when the sh ift lever is moved out of
(P before the ENGINE START/STOP button is
pressed. Follow the step 1 when starting to drive.
When the engine was started using the smart entry
remoteWhen the engine was started using the smart entry remote
When the engine was started in any case
D4
1 Hill start assist system
Hill start assist may not prevent the vehicle from
rolling downhill on a very steep or slippe ry slope, and
will not operate on small inclines.
Hill start assist is not a replacement for the parking
brake.
* Not available on all models
Page 425 of 606
424
uuWhen Driving uPrecautions While Driving
Driving
Precautions While Driving
Utility vehicles have a significantly higher ro llover rate than other types of vehicles.
To prevent rollovers or loss of control:
• Take corners at slower speeds than yo u would with a passenger vehicle.
• Avoid sharp turns and abrupt maneuvers whenever possible.
• Do not modify your vehicle in any way that you would raise the center of gravity.
• Do not carry heavy cargo on the roof.
Never carry more than 165 lbs (75 kg) of cargo on the roof rack (Honda accessory).
Avoid driving in deep water and on flooded roads. This can damage the engine,
driveline, or cause electrical component failure.
If there is a strong impact with something un der the vehicle, stop in a safe location.
Check the underside of the vehicle for damage or any fluid leaks.
■Driving Guidelines for Your Utility Vehicle
■In Rain
■Other Precautions
1 Precautions While Driving
NOTICE
Do not change the shift lever while pressing the
accelerator pedal. You could damage the
transmission.
NOTICE
If you repeatedly turn the steering wheel at an
extremely low speed, or hold the steering wheel in
the full left or right position for a while, the system
heats up. The system goes into a protective mode,
and limits its performa nce. The steering wheel
becomes harder and harder to operate. Once the
system cools down, the EPS system is restored.
Repeated operation under these conditions can
eventually damage the system.
If the power mode is set to ACCESSORY or VEHICLE
OFF (LOCK) while driving, the engine will shut down
and all steering and brake pow er assist functions will
stop, making it difficult to control the vehicle.
Do not put the shift lever in
( N, as you will lose
engine braking (and acce leration) performance.
During the first 600 miles (1,000 km) of operation,
avoid sudden acceleration or full throttle operation so
as not to damage the engine or powertrain.
Avoid hard braking for the first 200 miles (300 km).
You should also follow this when the brake pads are
replaced.
Page 428 of 606
427
uuWhen Driving uShifting
Driving
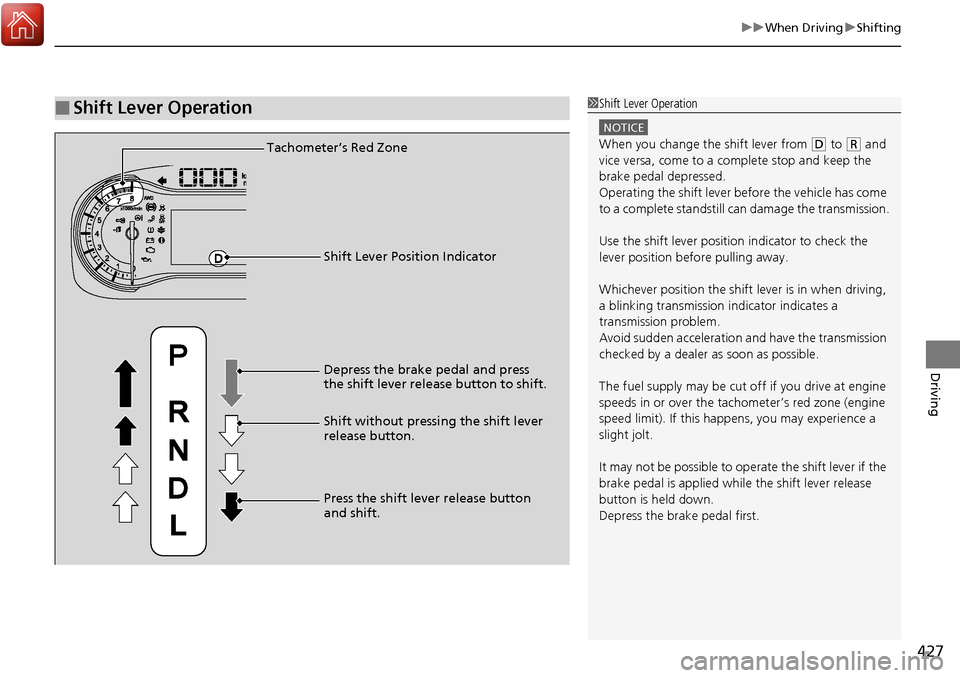
■Shift Lever Operation1Shift Lever Operation
NOTICE
When you change the shift lever from (D to ( R and
vice versa, come to a complete stop and keep the
brake pedal depressed.
Operating the shift lever be fore the vehicle has come
to a complete standstill can damage the transmission.
Use the shift lever position indicator to check the
lever position befo re pulling away.
Whichever position the shift lever is in when driving,
a blinking transmission indicator indicates a
transmission problem.
Avoid sudden acceleration and have the transmission
checked by a dealer as soon as possible.
The fuel supply may be cut of f if you drive at engine
speeds in or over the tachometer’s red zone (engine
speed limit). If this happe ns, you may experience a
slight jolt.
It may not be possible to operate the shift lever if the
brake pedal is applied while the shift lever release
button is held down.
Depress the brake pedal first.Tachometer’s Red Zone
Shift Lever Position Indicator
Depress the brake pedal and press
the shift lever release button to shift.
Shift without pressing the shift lever
release button.
Press the shift lever release button
and shift.