HONDA S2000 2001 1.G Owners Manual
Manufacturer: HONDA, Model Year: 2001, Model line: S2000, Model: HONDA S2000 2001 1.GPages: 276, PDF Size: 3.79 MB
Page 191 of 276
Tire
s
Maintenanc e
I n additio n t o prope r inflation ,
correc t whee l alignmen t help s t o
decreas e tir e wear . I f yo u fin d a tir e
i s wor n unevenly , hav e you r deale r
chec k th e whee l alignment .
Th e tire s wer e properl y balance d b y
th e factory . The y ma y nee d t o b e
rebalance d a t som e tim e befor e the y
ar e wor n out . Hav e you r deale r
chec k th e tire s i f yo u fee l a consis -
ten t vibratio n whil e driving . A tir e
shoul d alway s b e rebalance d if i t i s
remove d fro m th e whee l fo r repair .Mak
e sur e th e installe r balance s th e
wheel s whe n yo u hav e ne w tire s
installed . Thi s increase s ridin g
comfor t an d tir e life . You r car' s
origina l tire s wer e dynami c o r "spin "
balance d a t th e factory . Fo r bes t
results , hav e th e installe r perfor m a
dynami c balance .
Improper wheel weights can damage
your vehicle's aluminum wheels. Use
only genuine Honda wheel weights for
balancing.
Tir
e Rotatio n
Yo u shoul d no t rotat e you r Honda' s
tires . Th e fron t an d rea r tire s ar e
differen t sizes , s o the y canno t b e
rotate d front-to-rear . Th e original -
equipmen t tire s o n you r Hond a hav e
a unidirectiona l trea d pattern , s o
the y canno t b e rotate d side-to-side .
Tir e Wea r
Th e tire s tha t cam e o n you r ca r wer e
designe d an d constructe d to provid e
superio r gri p durin g acceleration ,
braking , an d cornering . A s a trade -
off , the y wil l wea r mor e rapidl y tha n
tire s use d o n ordinar y passenge r
cars . Becaus e o f th e car' s weigh t
distribution , an d th e fac t tha t the y
ar e th e drivin g wheels , yo u ma y
expec t th e rea r tire s t o wea r mor e
rapidl y tha n th e fron t tires .
Maintenanc e
NOTIC
E
Page 192 of 276
Tire
s
Yo u shoul d carefull y inspec t you r
car' s tire s fo r wear , damage , an d
prope r inflatio n ever y 7,50 0 mile s
(12,000km ) (se e pag e 185 ). Replacin
g Tire s an d Wheel s
Th e tire s tha t cam e wit h you r ca r
wer e selecte d t o matc h th e perform -
anc e capabilitie s o f th e ca r whil e
providin g th e bes t combinatio n o f
handling , rid e comfort , an d lon g life .
Yo u shoul d replac e the m wit h radia l
tire s o f th e sam e size , loa d range ,
spee d rating , an d maximu m col d tir e
pressur e ratin g (a s show n o n th e
tire' s sidewall) . Mixin g radia l an d
bias-pl y tire s o n you r ca r ca n reduc e
it s brakin g ability , traction , an d
steerin g accuracy .
It i s bes t t o replac e al l fou r tire s a t
th e sam e time . I f tha t i s no t possibl e
o r necessary , the n replac e th e tw o
fron t tire s o r th e tw o rea r tire s a s a
pair . Replacin g jus t on e tir e ca n
seriousl y affec t you r car' s handling .
CONTINUED
Maintenanc e
Installin
g imprope r tire s o n you r
ca r ca n affec t handlin g an d
stability . Thi s ca n caus e a cras h
i n whic h yo u ca n b e seriousl y
hur t o r killed .
Alway s us e th e siz e an d typ e o f
tire s recommende d in thi s
owner' s manual .
Page 193 of 276
Tire
s
Th e AB S work s b y comparin g th e
spee d o f th e wheels . Whe n replacin g
tires , us e th e sam e siz e originall y
supplie d wit h th e car . Tir e siz e an d
constructio n ca n affec t whee l spee d
an d ma y caus e th e syste m to wor k in -
consistently .
I f yo u eve r nee d to replac e a wheel ,
mak e sur e th e wheel' s specification s
matc h thos e o f th e origina l whee l
tha t cam e o n you r car . Replacemen t
wheel s ar e availabl e a t you r Hond a
dealer .
Wheel
s an d Tire s
Wheels :
Front :
16x6 1/ 2 J J
Rear :
16x 7 1/ 2 J J
Tires :
Front :
205/55 R 1 6 89 W
Rear :
225/50 R 1 6 92 W
Se e pag e 24 8 fo r informatio n abou t
DO T Tir e Qualit y Grading . Winte
r Drivin g
Tire s tha t ar e marke d " M + S " o n th e
sidewal l hav e a n all-weathe r trea d
design . The y shoul d b e suitabl e fo r
mos t winte r drivin g conditions . Tire s
wi t ou t thes e marking s ar e designe d
fo r optimu m tractio n in dr y
conditions . The y ma y no t provid e
adequat e performanc e i n winte r
driving .
Fo r th e bes t performanc e in snow y
o r ic y conditions , yo u shoul d instal l
sno w tire s o r tir e chains . The y ma y
b e require d b y loca l law s unde r
certai n conditions .
Maintenanc e
Page 194 of 276
Tire
s
Snow Tires
I f yo u moun t sno w tire s o n you r
Honda , mak e sur e the y ar e radia l
tire s o f th e sam e siz e an d loa d rang e
a s th e origina l tires . Moun t sno w
tire s o n al l fou r wheel s t o balanc e
you r vehicle' s handlin g in al l weathe r
conditions . Kee p i n min d th e tractio n
provide d b y sno w tire s o n dr y road s
ma y no t b e a s hig h a s you r vehicle' s
origina l equipmen t tires . Yo u shoul d
driv e cautiousl y eve n whe n th e road s
ar e clear . Chec k wit h th e tir e deale r
fo r maximu m spee d recommenda -
tions .
Tire Chains
Becaus e you r Hond a ha s limite d tir e
clearance , moun t onl y SA E Clas s "S "
cable-typ e tractio n device s o n th e
rea r tires . Us e tractio n device s onl y
whe n require d b y drivin g condition s
o r loca l laws . Mak e sur e the y ar e th e
correc t siz e fo r you r tires .
Meta l link-typ e "chains " shoul d no t
b e used . N o matte r ho w tigh t the y
see m to b e installed , the y ca n com e
int o contac t wit h th e bod y an d
suspension , causin g seriou s damage .
Whe n installin g cables , follo w th e
manufacturer' s instruction s an d
moun t the m as tightl y a s yo u can .
Driv e slowl y wit h the m installed . I f
yo u hea r the m comin g in contac t
wit h th e bod y o r chassis , sto p an d
investigate . Mak e sur e th e cable s ar e
installe d tightly , an d tha t the y ar e
no t contactin g th e brak e line s o r
suspension .
Remov e the m as soo n a s yo u begi n drivin
g o n cleare d roads .
Cables that are the wrong size or
improperly installed can damage your
car's brake lines, suspension, body, and
wheels. Stop driving if they are hitting
any part of the car.
Maintenanc e
NOTIC
E
Page 195 of 276
Light
s
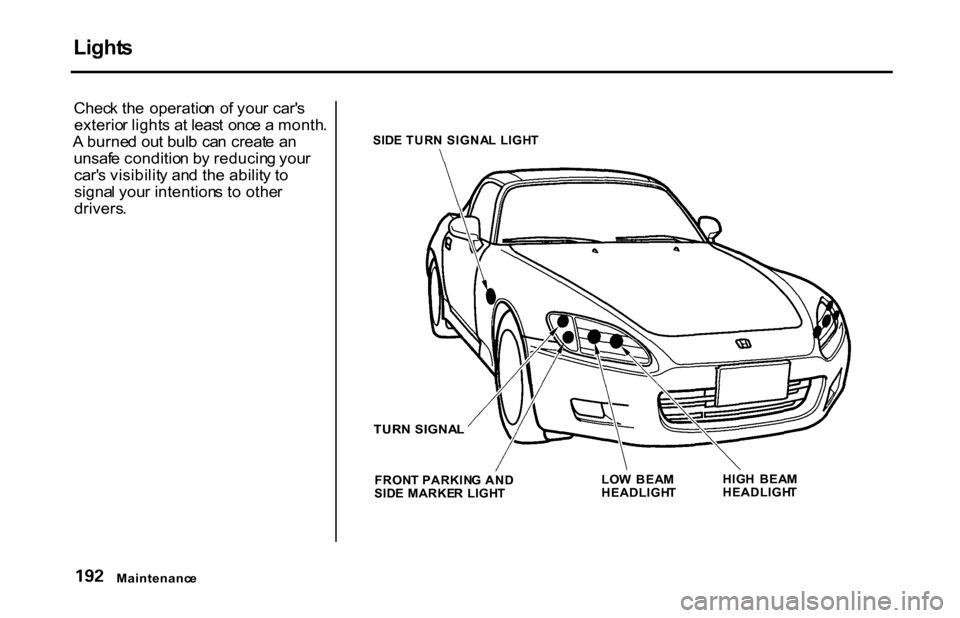
Chec k th e operatio n o f you r car' s
exterio r light s a t leas t onc e a month .
A burne d ou t bul b ca n creat e a n
unsaf e conditio n b y reducin g you r
car' s visibilit y an d th e abilit y t o
signa l you r intention s t o othe r
drivers . SID
E TUR N SIGNA L LIGH T
TUR N SIGNA L
FRON T PARKIN G AN D
SID E MARKE R LIGH T LO
W BEA M
HEADLIGH THIG
H BEA M
HEADLIGH T
Maintenanc e
Page 196 of 276
Light
s
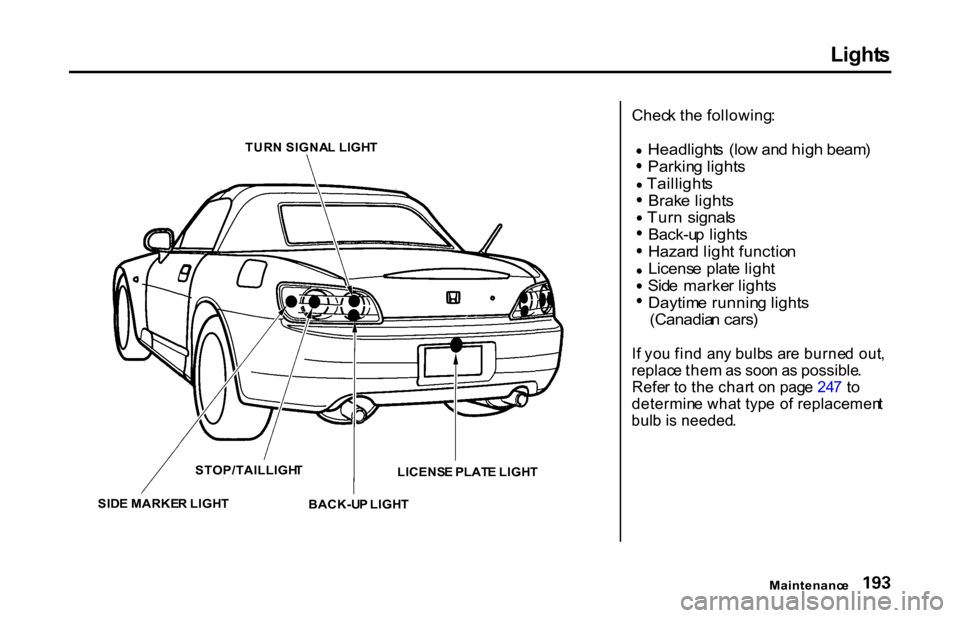
TUR N SIGNA L LIGH T
LICENS E PLAT E LIGH T
SID E MARKE R LIGH T
BACK-UP LIGH T
Chec
k th e following :
Headlight s (lo w an d hig h beam ) Parkin
g light s
Taillight s Brak
e light s Tur
n signal s Back-u
p light s Hazar
d ligh t functio n
Licens e plat e ligh t
Sid e marke r light s Daytim
e runnin g light s
(Canadia n cars )
I f yo u fin d an y bulb s ar e burne d out ,
replac e the m as soo n a s possible .
Refe r t o th e char t o n pag e 24 7 t o
determin e wha t typ e o f replacemen t
bul b is needed .
Maintenanc e
STOP/TAILLIGH
T
Page 197 of 276
Light
s
Replacin g a Headligh t Bul b
Th e lo w bea m headligh t bulb s ar e a
typ e o f hig h voltag e discharg e tube .
Hig h voltag e ca n remai n in th e
circui t eve n wit h th e ligh t switc h of f
an d th e ke y removed . Becaus e o f
this , yo u shoul d no t attemp t t o
examin e o r chang e a lo w bea m
headligh t bul b yourself . I f a lo w
bea m headligh t bul b fails , tak e th e
ca r t o you r deale r t o hav e i t replaced .Haloge
n bulb s ar e use d fo r th e hig h
bea m headligh t bulbs . Whe n
replacin g a hig h bea m headligh t bulb ,
handl e i t b y it s bas e an d protec t th e
glas s fro m contac t wit h you r ski n o r
har d objects . I f yo u touc h th e glass ,
clea n it wit h denature d alcoho l an d a
clea n cloth .
Halogen
headlight bulbs get very hot
when lit. Oil, perspiration, or a scratch
on the glass can cause the bulb to
overheat and shatter.
Maintenanc e
NOTIC
E
Page 198 of 276
Light
s
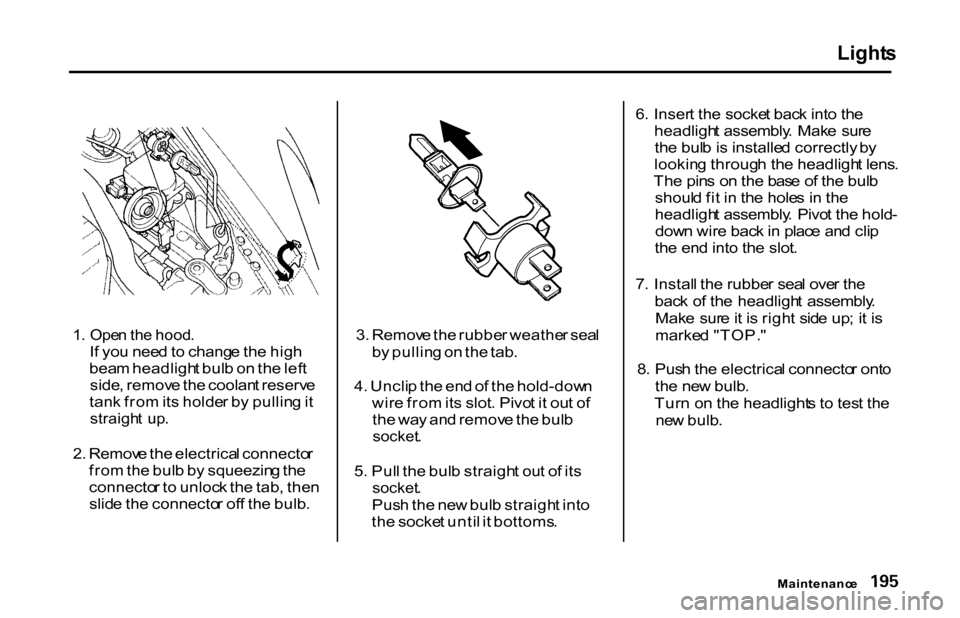
1 . Ope n th e hood .
I f yo u nee d to chang e th e hig h
bea m headligh t bul b o n th e lef t
side , remov e th e coolan t reserv e
tan k fro m its holde r b y pullin g it
straigh t up .
2 . Remov e th e electrica l connecto r
fro m th e bul b b y squeezin g th e
connecto r t o unloc k th e tab , the n
slid e th e connecto r of f th e bulb . 3
. Remov e th e rubbe r weathe r sea l
b y pullin g o n th e tab .
4 . Uncli p th e en d o f th e hold-dow n
wir e fro m its slot . Pivo t i t ou t o f
th e wa y an d remov e th e bul b
socket .
5 . Pul l th e bul b straigh t ou t o f it s
socket .
Pus h th e ne w bul b straigh t int o
th e socke t unti l i t bottoms . 6
. Inser t th e socke t bac k int o th e
headligh t assembly . Mak e sur e
th e bul b is installe d correctly by
lookin g throug h th e headligh t lens .
Th e pin s o n th e bas e o f th e bul b
shoul d fi t i n th e hole s i n th e
headligh t assembly . Pivo t th e hold -
dow n wir e bac k in plac e an d cli p
th e en d int o th e slot .
7 . Instal l th e rubbe r sea l ove r th e
bac k o f th e headligh t assembly .
Mak e sur e it i s righ t sid e up ; i t i s
marke d "TOP. "
8 . Pus h th e electrica l connecto r ont o
th e ne w bulb .
Tur n o n th e headlight s t o tes t th e
ne w bulb .
Maintenanc e
Page 199 of 276
Light
s
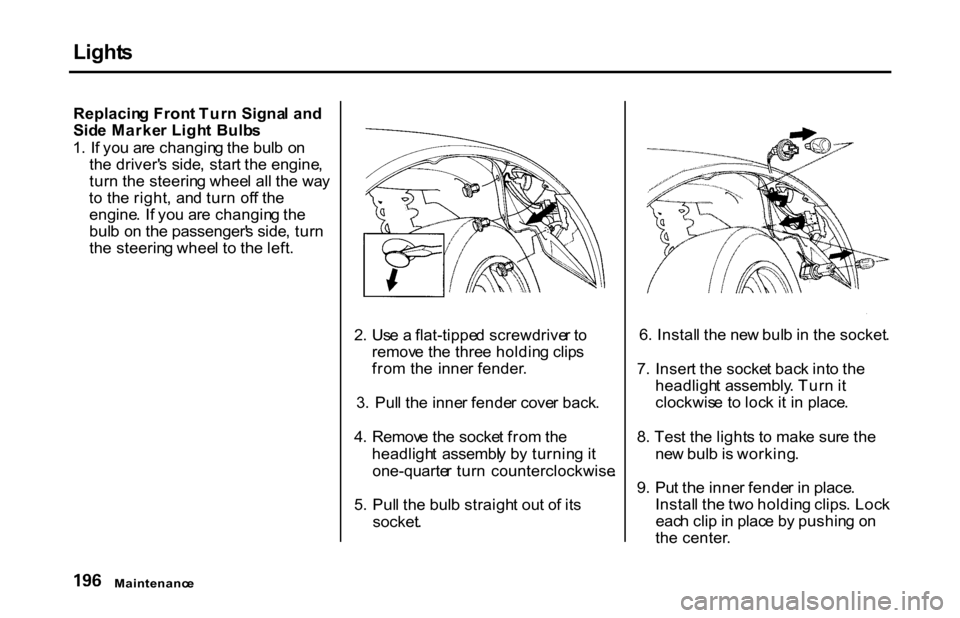
Replacin g Fron t Tur n Signa l an d
Sid e Marke r Ligh t Bulb s
1 . I f yo u ar e changin g th e bul b o n
th e driver' s side , star t th e engine ,
tur n th e steerin g whee l al l th e wa y
t o th e right , an d tur n of f th e
engine . I f yo u ar e changin g th e
bul b o n th e passenger' s side , tur n
th e steerin g whee l t o th e left .
2. Us e a flat-tippe d screwdrive r t o
remov e th e thre e holdin g clip s
fro m th e inne r fender .
3 . Pul l th e inne r fende r cove r back .
4 . Remov e th e socke t fro m th e
headligh t assembl y b y turnin g it
one-quarte r tur n counterclockwise .
5 . Pul l th e bul b straigh t ou t o f it s
socket .
6
. Instal l th e ne w bul b in th e socket .
7 . Inser t th e socke t bac k int o th e
headligh t assembly . Tur n it
clockwis e t o loc k i t i n place .
8 . Tes t th e light s t o mak e sur e th e
ne w bul b is working .
9 . Pu t th e inne r fende r i n place .
Instal l th e tw o holdin g clips . Loc k
eac h cli p in plac e b y pushin g o n
th e center .
Maintenanc e
Page 200 of 276
Light
s
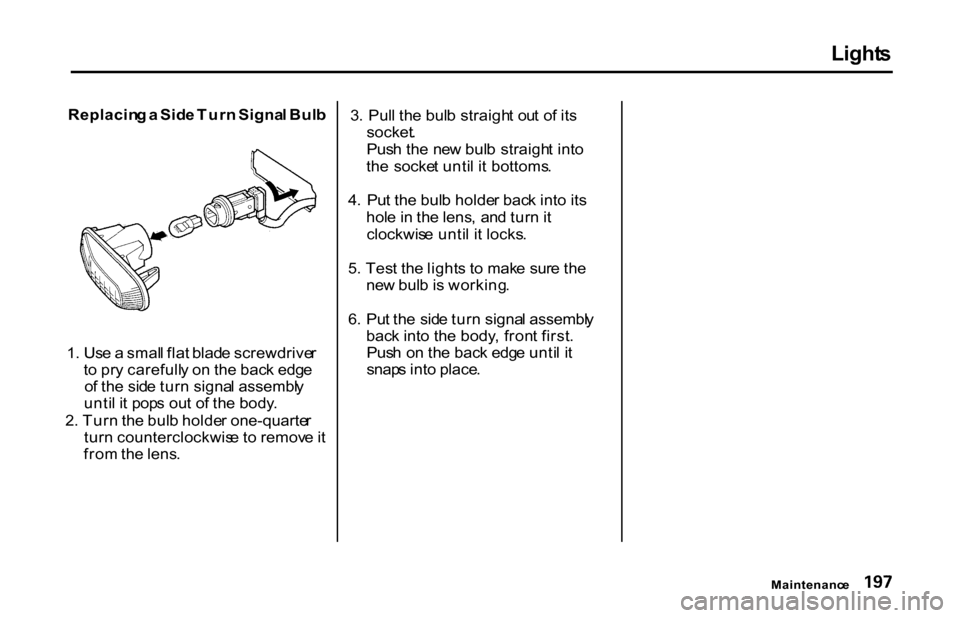
Replacin g a Sid e Tur n Signa l Bul b
1 . Us e a smal l fla t blad e screwdrive r
t o pr y carefull y o n th e bac k edg e
o f th e sid e tur n signa l assembl y
unti l i t pop s ou t o f th e body .
2 . Tur n th e bul b holde r one-quarte r
tur n counterclockwis e t o remov e it
fro m th e lens . 3
. Pul l th e bul b straigh t ou t o f it s
socket .
Pus h th e ne w bul b straigh t int o
th e socke t unti l i t bottoms .
4 . Pu t th e bul b holde r bac k int o it s
hol e in th e lens , an d tur n it
clockwis e unti l i t locks .
5 . Tes t th e light s t o mak e sur e th e
ne w bul b is working .
6 . Pu t th e sid e tur n signa l assembl y
bac k int o th e body , fron t first .
Pus h o n th e bac k edg e unti l i t
snap s int o place .
Maintenance