DIFF HUMMER H3 2008 Owner's Manual
[x] Cancel search | Manufacturer: HUMMER, Model Year: 2008, Model line: H3, Model: HUMMER H3 2008Pages: 416, PDF Size: 5.66 MB
Page 151 of 416
Daytime Running Lamps (DRL)
Daytime Running Lamps (DRL) can make it easier for
others to see the front of your vehicle during the
day. DRL can be helpful in many different driving
conditions, but they can be especially helpful in the short
periods after dawn and before sunset. Fully functional
daytime running lamps are required on all vehicles
rst sold in Canada.
The DRL system will come on when the following
conditions are met:
The ignition is on.
The exterior lamps control is in AUTO.
The transmission is not in PARK (P) if you have an
automatic transmission.
The light sensor determines it is daytime.
When the DRL are on, no other lamps are on. The
instrument panel will not be lit up either. For vehicles rst
sold in Canada, if parking lamps are manually turned
on, DRL will stay on.
When it begins to get dark, the automatic headlamp
system will switch from DRL to the headlamps.
As with any vehicle, you should turn on the regular
headlamp system when you need it.
To turn off the DRL, seeExterior Lamps on page 3-15.Vehicles rst sold in Canada cannot turn off DRL unless
certain conditions are met. SeeExterior Lamps on
page 3-15.
Automatic Headlamp System
When it is dark enough outside, the automatic headlamp
system will turn on after the transmission has been
shifted from PARK (P) to DRIVE (D). The headlamps,
taillamps, sidemarker, parking lamps, roof marker lamps,
and the instrument panel lights will turn on at normal
brightness. The radio lights will become more dim when
the headlights are off compared to when the headlights
are on.
Your vehicle has a light sensor located on the top of the
instrument panel. Be sure it is not covered, or the
system will be on whenever the ignition is on.
The system may also turn on the headlamps when
driving through a parking garage, heavy overcast
weather, or a tunnel. This is normal.
There is a delay in the transition between the daytime
and nighttime operation of the Daytime Running
Lamps (DRL) and the automatic headlamp system so
that driving under bridges or bright overhead street lights
does not affect the system. The DRL and automatic
headlamp system will only be affected when the
light sensor detects a change in lighting lasting longer
than the delay.
3-17
Page 174 of 416
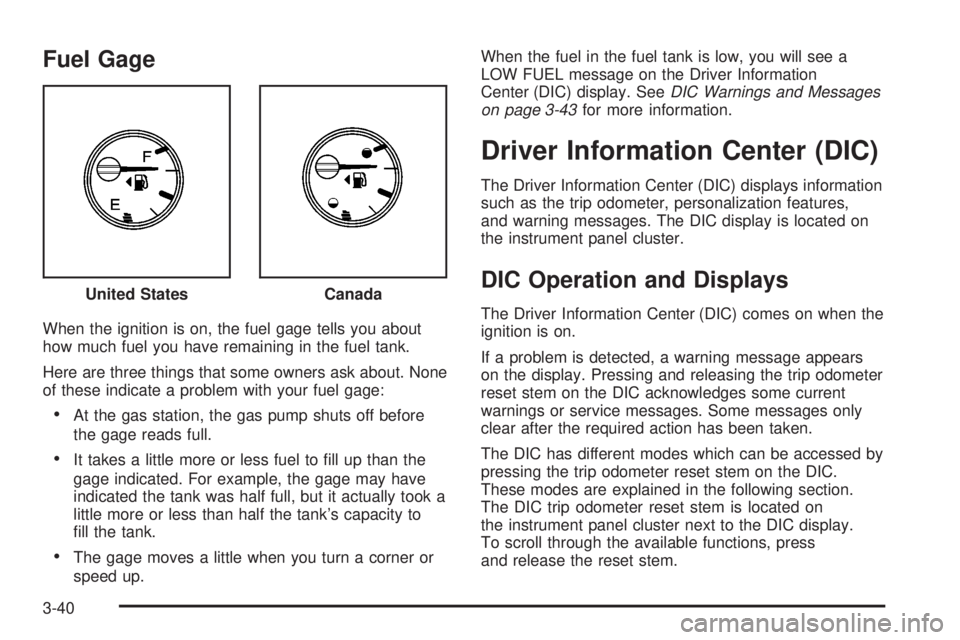
Fuel Gage
When the ignition is on, the fuel gage tells you about
how much fuel you have remaining in the fuel tank.
Here are three things that some owners ask about. None
of these indicate a problem with your fuel gage:
At the gas station, the gas pump shuts off before
the gage reads full.
It takes a little more or less fuel to ll up than the
gage indicated. For example, the gage may have
indicated the tank was half full, but it actually took a
little more or less than half the tank’s capacity to
ll the tank.
The gage moves a little when you turn a corner or
speed up.When the fuel in the fuel tank is low, you will see a
LOW FUEL message on the Driver Information
Center (DIC) display. SeeDIC Warnings and Messages
on page 3-43for more information.
Driver Information Center (DIC)
The Driver Information Center (DIC) displays information
such as the trip odometer, personalization features,
and warning messages. The DIC display is located on
the instrument panel cluster.
DIC Operation and Displays
The Driver Information Center (DIC) comes on when the
ignition is on.
If a problem is detected, a warning message appears
on the display. Pressing and releasing the trip odometer
reset stem on the DIC acknowledges some current
warnings or service messages. Some messages only
clear after the required action has been taken.
The DIC has different modes which can be accessed by
pressing the trip odometer reset stem on the DIC.
These modes are explained in the following section.
The DIC trip odometer reset stem is located on
the instrument panel cluster next to the DIC display.
To scroll through the available functions, press
and release the reset stem. United States
Canada
3-40
Page 175 of 416
Trip Information
Odometer
The odometer is automatically displayed on the DIC
when you start the vehicle. The odometer shows
the total distance the vehicle has been driven in either
miles for the United States or kilometers for Canada.
Trip Odometer
Press and release the reset stem until TRIP appears on
the DIC display. The trip odometer shows the current
distance traveled since the last reset of the trip odometer
in either miles for the United States or kilometers for
Canada.
To reset the trip odometer, press and hold the reset
stem until the display returns to zero.
Engine Oil Life System
With the engine off, turn the key to ON/RUN and
then press the reset stem until OIL LIFE RESET
appears — alternating between OIL LIFE and
RESET — on the DIC display. The CHANGE OIL
message alerts you to change the oil on a schedule
consistent with your driving conditions. Always reset the
OIL LIFE message after an oil change. To reset the
message, seeEngine Oil Life System on page 5-18.In addition to the engine oil life system monitoring the
oil life, additional maintenance is recommended in
the Maintenance Schedule in this manual. SeeEngine
Oil on page 5-15andScheduled Maintenance on
page 6-4for more information.
Language
This feature allows you to choose the language in which
the DIC display shows information.
To set your choice for this feature:
1. With the engine off, turn the key to ON/RUN, but do
not start the engine.
2. Close all doors so the DOORS message does not
display in the DIC.
3. Momentarily press and release the reset stem until
the current language is displayed: English (default),
Spanish, or French.
4. To select a different language, press and hold the
reset stem until the next language appears.
5. Repeat Step 4 until the desired language is
displayed. Once the desired language is shown on
the DIC display, the language is set.
6. To exit the language selection, momentarily press
and release the reset stem. All DIC messages will
now display in the language selected.
3-41
Page 184 of 416
Playing the Radio
P
(Power/Volume):Press to turn the system on
and off.
Turn clockwise or counterclockwise to increase or to
decrease the volume.
DISP (Display):Press to switch the display between
the radio station frequency and the time. When the
ignition is turned off, press to display the time.
For XM™ (if equipped), press the DISP button while in
XM™ mode to retrieve four different categories of
information related to the current song or channel: Artist,
Song Title, Category or PTY (program type), Channel
Number/Channel Name.
To change the default on the display, press the DISP
button until you see the desired display, then hold
this knob for two seconds. The radio produces one beep
and the selected display becomes the default.
AUTO VOL (Automatic Volume):With automatic
volume, the audio system adjusts automatically to make
up for road and wind noise as you drive.
Set the volume at the desired level. Press to select
LOW, MEDIUM, or HIGH. Each higher setting allows for
more volume compensation at faster vehicle speeds.
Then as you drive, automatic volume increases
the volume, as necessary, to overcome noise at anyspeed. The volume level should always sound the same
to you as you drive. NONE displays if the radio cannot
determine the vehicle speed. To turn automatic
volume off, press until AVOL OFF displays.
Finding a Station
BAND:Press to switch between FM1, FM2, AM, or
XM1 or XM2 (if equipped). The selection displays.
e(Tune):Turn to select radio stations.
tSEEKu:Press and release the arrows to go to
the next or to the previous station and stay there.
To scan stations, press and hold either arrow for more
than two seconds. SCN or SCAN displays and the
radio produces one beep. The radio goes to a station,
plays for a few seconds, then goes to the next
station. Press either arrow again or one of the
pushbuttons to stop scanning presets.
To scan preset stations, press and hold either arrow for
more than four seconds. PSC or PSCN displays and
the radio produces two beeps. The radio goes to
a preset station, plays for a few seconds, then goes to
the next preset station. Press either arrow again or
one of the pushbuttons to stop scanning presets.
The radio only seeks and scans stations with a strong
signal that are in the selected band.
3-50
Page 185 of 416
4(Information) (XM™ Satellite Radio Service):If the
current station has a message, the information symbol
displays. Press to see the message. The message can
display the artist, song title, call in phone numbers, etc.
If the entire message is not displayed, parts of the
message appears every three seconds. To scroll through
the message, press and release this button. A new group
of words display after every press of this button. Once the
complete message has displayed, the information symbol
disappears from the display until another new message is
received. The last message can be displayed by pressing
the
4button. You can view the last message until a new
message is received or a different station is tuned to.
When a message is not available from a station, NO
INFO displays.
1-6 (Preset Pushbuttons) (Radio with Six-Disc CD
Player):Press to play stations that are programmed on
the radio preset pushbuttons.
The radio only seeks preset stations with a strong signal
that are in the selected band.
Setting Preset Stations
Up to 30 stations (six FM1, six FM2, and six AM,
six XM1 and six XM2 (if equipped)), can be programmed
on the six numbered pushbuttons, by performing the
following steps:
1. Turn the radio on.
2. Press BAND to select FM1, FM2, AM, or
XM1 or XM2.
3. Tune in the desired station.
4. Press AUTO EQ to select the equalization.
5. Press and hold one of the six numbered
pushbuttons until a beep sounds. When that
numbered pushbutton is pressed, the station that
was set, returns and the equalization that was
selected, is stored for that pushbutton.
6. Repeat the steps for each pushbutton.
3-51
Page 195 of 416
Not Found:There are no channels available for the
selected category. The system is working properly.
XM Locked:The XM™ receiver in your vehicle may
have previously been in another vehicle. For security
purposes, XM™ receivers cannot be swapped between
vehicles. If this message is received after having
your vehicle serviced, check with your dealer/retailer.
Radio ID:If tuned to channel 0, this message will
alternate with the XM Radio 8 digit radio ID label.
This label is needed to activate the service.
Unknown:If this message is received when tuned to
channel 0, there may be a receiver fault. Consult
with your dealer/retailer.
Chk XMRcvr:If this message does not clear within a
short period of time, the receiver may have a fault.
Consult with your dealer/retailer.
Navigation/Radio System
Your vehicle may have a navigation radio system.
The navigation system has built-in features intended to
minimize driver distraction. Technology alone, no
matter how advanced, can never replace your own
judgment. See the Navigation System manual for some
tips to help you reduce distractions while driving.
Theft-Deterrent Feature
THEFTLOCK®is designed to discourage theft of your
vehicle’s radio. The feature works automatically by
learning a portion of the Vehicle Identication Number
(VIN). If the radio is moved to a different vehicle, it does
not operate and LOCKED displays.
When the radio and vehicle are turned off, the blinking
red light indicates that THEFTLOCK
®is armed.
With THEFTLOCK
®activated, the radio does not
operate if stolen.
Radio Reception
Frequency interference and static during normal radio
reception can occur if items such as cellphone chargers,
vehicle convenience accessories, and external
electronic devices are plugged into the accessory power
outlet. If there is interference or static, unplug the
item from the accessory power outlet.
3-61
Page 203 of 416
To lock the rear axle, do the following:
1. Place the transfer case in the 4LO Lock mode. This
is the only mode which will allow the rear axle to
lock. SeeFull-Time Four-Wheel Drive on page 2-27
for more information regarding the transfer case
and 4LO Lock mode.
2. Press the button with the vehicle stopped or moving
less than 2 mph (3 km/h).
You must wait for the light in the button to stop ashing
and remain illuminated before the rear axle is locked.
Notice:If you try to lock the rear axle while your
vehicle is stuck and the tires are spinning, you
could damage your vehicle’s drivetrain. The repairs
would not be covered by your warranty. Always lock
the rear axle before attempting situations and/or
navigating terrain which could possibly cause the
vehicle to become stuck.
The locking rear axle will be disengaged when the
wheel speed is greater than 20 mph (32 km/h), if the
vehicle’s battery is low and/or the transfer case is
shifted out of 4LO Lock mode.
Notice:If you lock the rear axle while driving on
pavement, you could damage your vehicle’s
drivetrain. The repairs would not be covered by
your warranty. Do not use the locking rear axle
on pavement. If you need four-wheel drive when
traveling on pavement, use only 4HI.StabiliTrak®System
Your vehicle has a vehicle stability enhancement
system called StabiliTrak®. It is an advanced computer
controlled system that assists you with directional
control of the vehicle in difficult driving conditions.
StabiliTrak
®activates when the computer senses a
discrepancy between your intended path and the
direction the vehicle is actually traveling. StabiliTrak
®
selectively applies braking pressure at any one of
the vehicle’s brakes to assist the driver with keeping
the vehicle on the intended path.
When you rst start your vehicle and begin to drive
away, the system performs several diagnostic checks to
insure there are no problems. You may hear or feel
the system working. This is normal and does not mean
there is a problem with your vehicle.
If there is a problem detected with StabiliTrak
®,a
SERVICE STAB SYS message will be displayed on the
Driver Information Center (DIC). SeeDIC Warnings
and Messages on page 3-43for more information. When
this message is displayed, the system is not operational.
Adjust your driving accordingly.
4-7
Page 214 of 416
For mounds, washouts, loose up-hill
slopes, ditches, etc.
When wheel spin occurs as the vehicle is moving, the
driver may notice a slight shaking or shuddering of
the vehicle. This should be stopped as soon as possible
to prevent damage to vehicle components. This is the
indication that a loss of traction is occurring on this
terrain. The operator should:
1. Reduce speed and apply the brakes.
2. Assess the terrain properly and adjust
vehicle speed and gear ranges accordingly:
Four-Wheel High position for higher speeds and
Four-Wheel-Low Lock for more torque and
lower speeds. Transmission FIRST (1) gear is
generally recommended.
3. Apply slight pressure to the brake when the
shaking or shuddering sensation is felt, keeping
the vehicle moving in a controlled manner.
4. Be prepared to alternate between braking and
accelerating through the adverse terrain.
Getting Familiar with Off-Road Driving
It is a good idea to practice in an area that is safe
and close to home before you go into the wilderness.
Off-road driving does require some new and different
skills. Here is what we mean.
Tune your senses to different kinds of signals. Your
eyes, for example, need to constantly sweep the terrain
for unexpected obstacles. Your ears need to listen
for unusual tire or engine sounds. With your arms,
hands, feet, and body, you will need to respond to
vibrations and vehicle bounce.
Controlling your vehicle is the key to successful off-road
driving. One of the best ways to control your vehicle
is to control your speed. Here are some things to keep
in mind. At higher speeds:
You approach things faster and you have less time
to scan the terrain for obstacles.
You have less time to react.
You have more vehicle bounce when you drive
over obstacles.
You will need more distance for braking, especially
since you are on an unpaved surface.
4-18
Page 215 of 416
{CAUTION:
When you are driving off-road, bouncing and
quick changes in direction can easily throw
you out of position. This could cause you
to lose control and crash. So, whether you
are driving on or off the road, you and your
passengers should wear safety belts.
Scanning the Terrain
Off-road driving can take you over many different kinds
of terrain. You need to be familiar with the terrain
and its many different features. Here are some things
to consider.
Surface Conditions:Off-roading can take you over
hard-packed dirt, gravel, rocks, grass, sand, mud, snow,
or ice. Each of these surfaces affects the steering,
acceleration, and braking of your vehicle in different
ways. Depending upon the kind of surface you are on,
you may experience slipping, sliding, wheel spinning,
delayed acceleration, poor traction, and longer
braking distances.Surface Obstacles:Unseen or hidden obstacles
can be hazardous. A rock, log, hole, rut, or bump can
startle you if you are not prepared for them. Often
these obstacles are hidden by grass, bushes, snow,
or even the rise and fall of the terrain itself.
Here are some things to consider:
Is the path ahead clear?
Will the surface texture change abruptly up ahead?
Does the travel take you uphill or downhill?
There is more discussion of these subjects later.
Will you have to stop suddenly or change
direction quickly?
When you drive over obstacles or rough terrain, keep
a rm grip on the steering wheel. Ruts, troughs, or other
surface features can jerk the wheel out of your hands
if you are not prepared.
When possible, it is a good practice to survey the
landscape ahead on foot prior to driving to observe
hidden obstacles.
When you drive over bumps, rocks, or other obstacles,
the wheels can leave the ground. If this happens,
even with one or two wheels, you cannot control the
vehicle as well or at all.
4-19
Page 216 of 416
Because you will be on an unpaved surface, it is
especially important to avoid sudden acceleration,
sudden turns, or sudden braking.
In a way, off-road driving requires a different kind of
alertness from driving on paved roads and highways.
There are no road signs, posted speed limits, or signal
lights. You have to use your own good judgment
about what is safe and what is not.
Drinking and driving can be very dangerous on any
road. And this is certainly true for off-road driving.
At the very time you need special alertness and
driving skills, your reexes, perceptions, and judgment
can be affected by even a small amount of alcohol.
You could have a serious — or even fatal — accident
if you drink and drive or ride with a driver who has
been drinking. SeeDrunk Driving on page 4-2.Crossing Obstacles
Approach Angle — a Key to Mobility
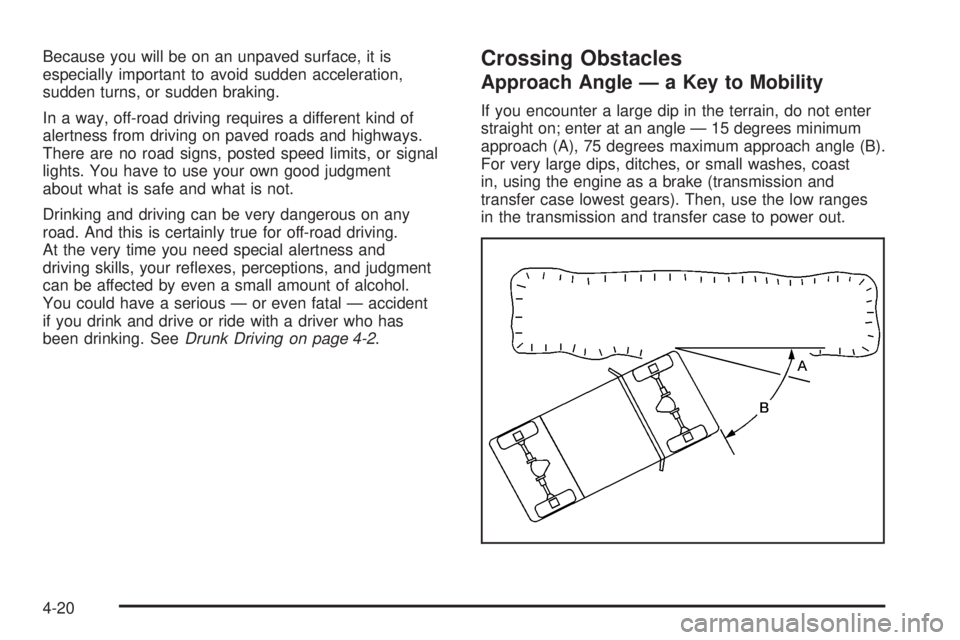
If you encounter a large dip in the terrain, do not enter
straight on; enter at an angle — 15 degrees minimum
approach (A), 75 degrees maximum approach angle (B).
For very large dips, ditches, or small washes, coast
in, using the engine as a brake (transmission and
transfer case lowest gears). Then, use the low ranges
in the transmission and transfer case to power out.
4-20