HUMMER H3 2010 Owners Manual
Manufacturer: HUMMER, Model Year: 2010, Model line: H3, Model: HUMMER H3 2010Pages: 410, PDF Size: 2.24 MB
Page 301 of 410
Vehicle Care 10-35
Bulb Replacement
For the proper type of replacement
bulbs, seeReplacement Bulbson
page 10‑37.
For any bulb changing procedure
not listed in this section, contact
your dealer.
Halogen Bulbs
{WARNING
Halogen bulbs have pressurized
gas inside and can burst if you
drop or scratch the bulb. You or
others could be injured. Be sure
to read and follow the instructions
on the bulb package.
Headlamps
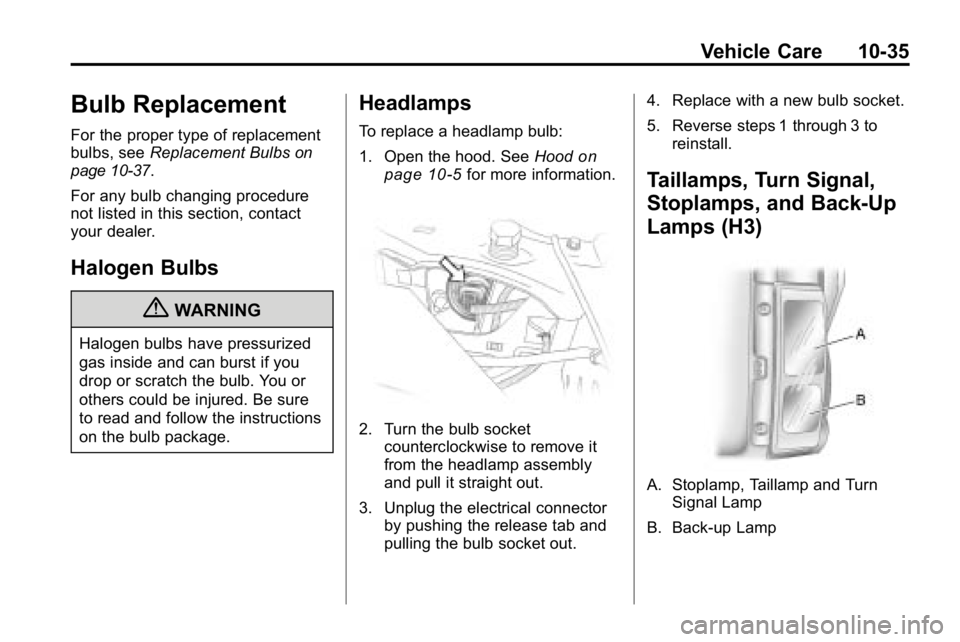
To replace a headlamp bulb:
1. Open the hood. See Hood
on
page 10‑5for more information.
2. Turn the bulb socket counterclockwise to remove it
from the headlamp assembly
and pull it straight out.
3. Unplug the electrical connector by pushing the release tab and
pulling the bulb socket out. 4. Replace with a new bulb socket.
5. Reverse steps 1 through 3 to
reinstall.
Taillamps, Turn Signal,
Stoplamps, and Back-Up
Lamps (H3)
A. Stoplamp, Taillamp and TurnSignal Lamp
B. Back-up Lamp
Page 302 of 410
10-36 Vehicle Care
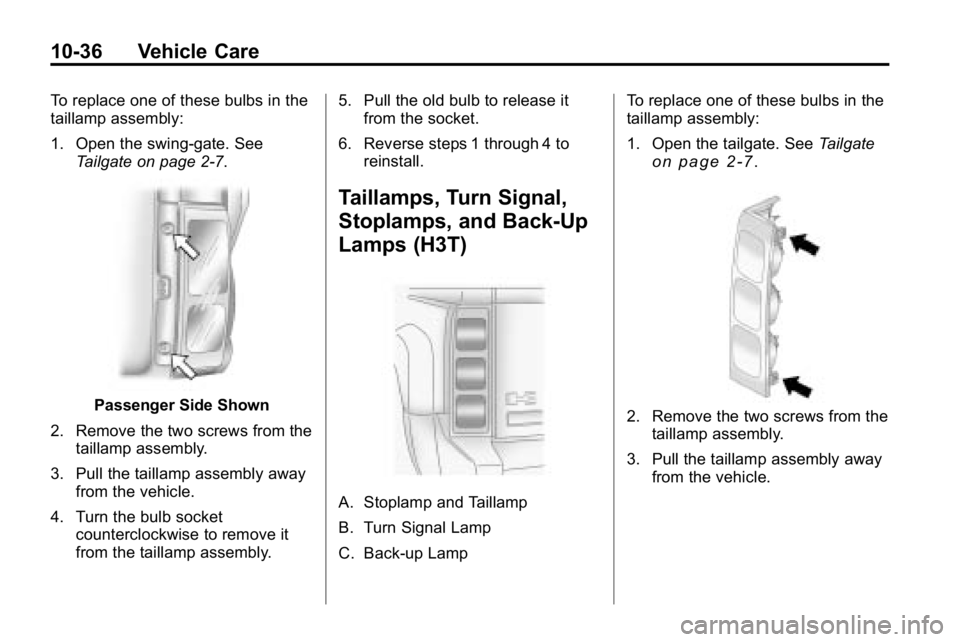
To replace one of these bulbs in the
taillamp assembly:
1. Open the swing-gate. SeeTailgate on page 2‑7.
Passenger Side Shown
2. Remove the two screws from the taillamp assembly.
3. Pull the taillamp assembly away from the vehicle.
4. Turn the bulb socket counterclockwise to remove it
from the taillamp assembly. 5. Pull the old bulb to release it
from the socket.
6. Reverse steps 1 through 4 to reinstall.
Taillamps, Turn Signal,
Stoplamps, and Back-Up
Lamps (H3T)
A. Stoplamp and Taillamp
B. Turn Signal Lamp
C. Back-up Lamp To replace one of these bulbs in the
taillamp assembly:
1. Open the tailgate. See
Tailgate
on page 2‑7.
2. Remove the two screws from the
taillamp assembly.
3. Pull the taillamp assembly away from the vehicle.
Page 303 of 410
Vehicle Care 10-37
4. Turn the bulb socketcounterclockwise to remove it
from the taillamp assembly.
5. Pull the old bulb to release it from the socket.
6. Turn the bulb socket clockwise to reinstall in the taillamp
assembly.
7. Reinstall the taillamp assembly making sure to line up the pins
with the vehicle.
8. Reinstall the two screws.License Plate Lamp
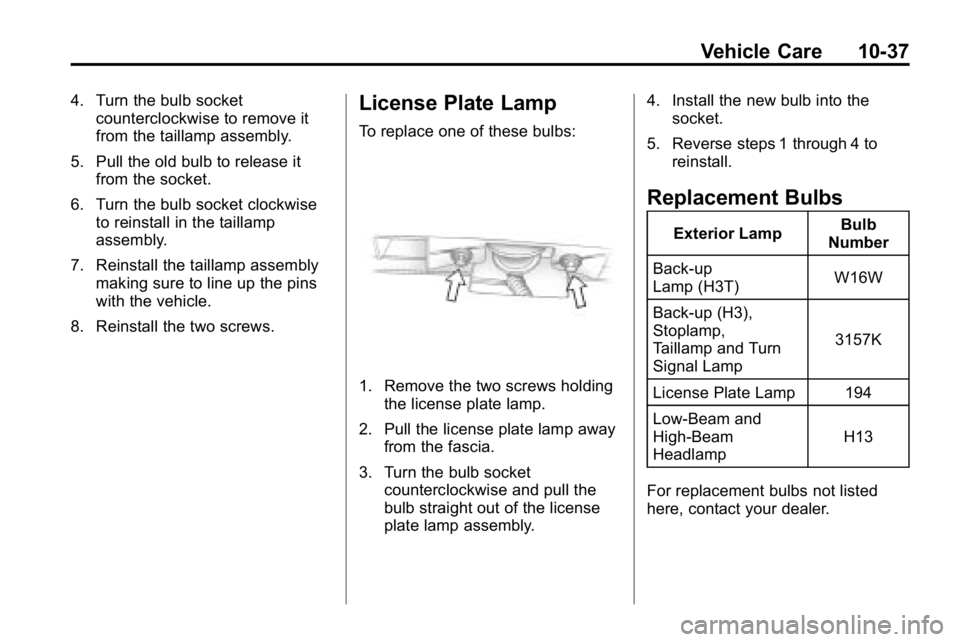
To replace one of these bulbs:
1. Remove the two screws holding the license plate lamp.
2. Pull the license plate lamp away from the fascia.
3. Turn the bulb socket counterclockwise and pull the
bulb straight out of the license
plate lamp assembly. 4. Install the new bulb into the
socket.
5. Reverse steps 1 through 4 to reinstall.
Replacement Bulbs
Exterior Lamp Bulb
Number
Back-up
Lamp (H3T) W16W
Back-up (H3),
Stoplamp,
Taillamp and Turn
Signal Lamp 3157K
License Plate Lamp 194
Low-Beam and
High-Beam
Headlamp H13
For replacement bulbs not listed
here, contact your dealer.
Page 304 of 410
10-38 Vehicle Care
Electrical System
Electrical System
Overload
The vehicle has fuses and circuit
breakers to protect against an
electrical system overload.
When the current electrical load is
too heavy, the circuit breaker opens
and closes, protecting the circuit
until the current load returns to
normal or the problem is fixed.
This greatly reduces the chance of
circuit overload and fire caused by
electrical problems.Fuses and circuit breakers protect
the following in the vehicle:
.Headlamp Wiring
.Windshield Wiper Motor
.Power Windows and other
Power Accessories
Headlamp Wiring
An electrical overload may cause
the lamps to go on and off, or in
some cases to remain off. Have
the headlamp wiring checked right
away if the lamps go on and off or
remain off.
Windshield Wipers
If the wiper motor overheats due to
heavy snow or ice, the windshield
wipers will stop until the motor cools
and will then restart.Although the circuit is protected
from electrical overload, overload
due to heavy snow or ice, may
cause wiper linkage damage.
Always clear ice and heavy snow
from the windshield before using the
windshield wipers.
If the overload is caused by an
electrical problem and not snow or
ice, be sure to get it fixed.
Power and Heated Seat Circuit
Breakers
There is a circuit breaker located
underneath the driver side front seat
that controls the power and heated
seat functions.
Page 305 of 410
Vehicle Care 10-39
Fuses and Circuit
Breakers
The wiring circuits in your vehicle
are protected from short circuits by
a combination of fuses and circuit
breakers. This greatly reduces the
chance of fires caused by electrical
problems.
Look at the silver-colored band
inside the fuse. If the band is broken
or melted, replace the fuse. Be sure
you replace a bad fuse with a new
one of the identical size and rating.
If you ever have a problem on the
road and do not have a spare fuse,
you can borrow one that has the
same amperage. Just pick some
feature of your vehicle that you can
get along without—like the radio
or cigarette lighter —and use its
fuse, if it is the correct amperage.
Replace it as soon as you can.
Engine Compartment
Fuse Block
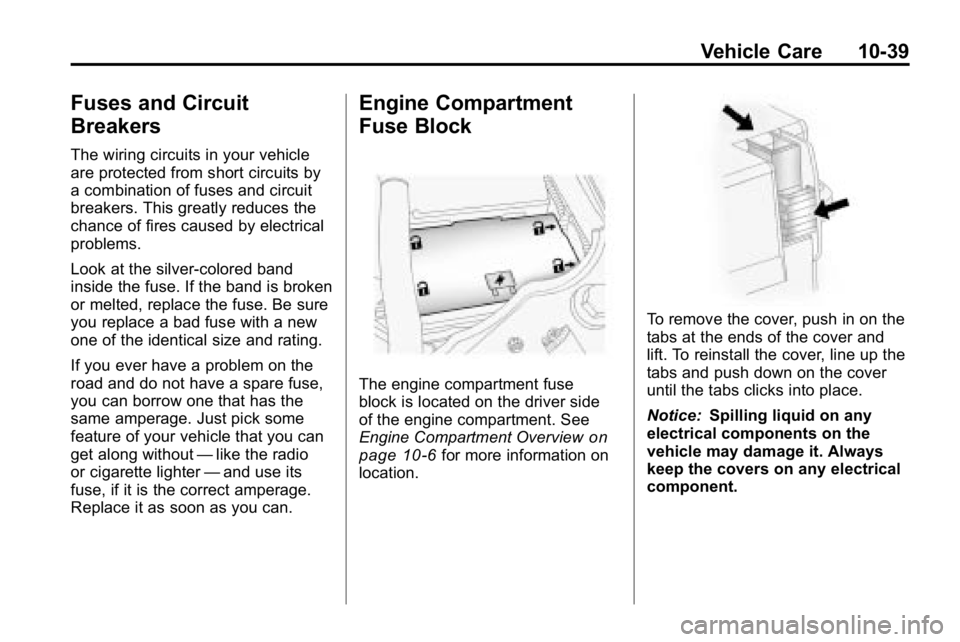
The engine compartment fuse
block is located on the driver side
of the engine compartment. See
Engine Compartment Overview
on
page 10‑6for more information on
location.
To remove the cover, push in on the
tabs at the ends of the cover and
lift. To reinstall the cover, line up the
tabs and push down on the cover
until the tabs clicks into place.
Notice: Spilling liquid on any
electrical components on the
vehicle may damage it. Always
keep the covers on any electrical
component.
Page 306 of 410
10-40 Vehicle Care
Page 307 of 410

Vehicle Care 10-41
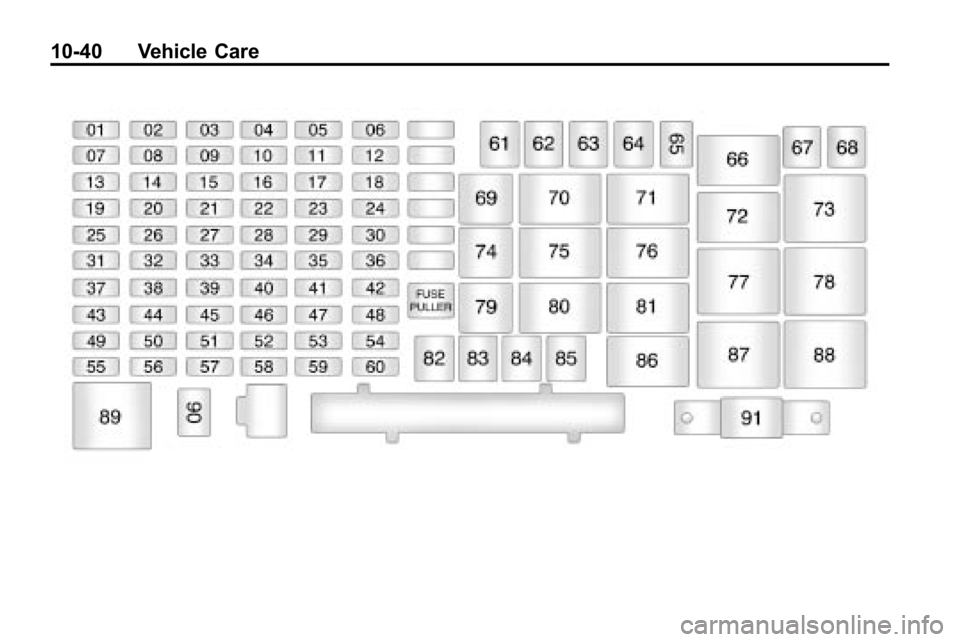
FuseUsage
1 Heated Seats
2 Grille Guard
3 Stop Lamp
(H3T Only)
4 Roof Rack Lamps
5 Battery Ignition
Switch
6 Front Wiper
7 Regulated Voltage
Control Power
8 Power Locks
9 Sunroof, Front
Washer Pump
10 Accessories (SPO) 11 Not Used
12 Transfer Case
Control Module
13 Radio
14 Body Control
Module Fuse
Usage
15 Rear Wiper Motor
(H3 Only)
16 Rear Wiper Pump
Switch (H3 Only)
17 Air Injection Reactor
(AIR) Pump Relay/
Transmission
Control Module
(TCM) (V8 Only)
18 Rear Vision Camera
19 Cluster
20 Rear Turn Lamp,
Hazard Lamp
21 Powertrain Control
Module 1
22 Mass Air Flow
Sensor, Canister
Vent Purge Solenoid
23 Injector/V8 Coil
24 Fog Lamp
25 Powertrain Control
Module B Fuse
Usage
26 Transmission
Control
Module (TCM)
27 Airbags
28 Not Used
29 Antilock Brake
System, StabiliTrak
®
30Rear Window
Defogger
31 Canister Vent
32 Regulated Voltage
Control Sensor
33 Ignition 1
34 Transmission
35 Cruise Control,
Miscellaneous
36 Horn
37 Driver Side Rear
Park Lamp
38 Amplifier
Page 308 of 410

10-42 Vehicle Care
FuseUsage
39 Daytime Running
Lamps
40 Passenger Side
Headlamp
41 Driver Side
Headlamp
42 Trailer
Back-Up Lamp
43 Front Park Lamps
44 Air Injection Reactor
(AIR) Solenoid
45 Auxiliary Power 2/
Cigarette Lighter
46 Electronic Throttle
Control
47 Oxygen Sensor
48 Air Conditioning
Clutch
49 Rear Park Lamp
50 Stop Lamp Fuse
Usage
51 Auxiliary Power 1/
Cigarette Lighter
52 StabiliTrak
®,
Antilock Brake
System
53 Power Heated Seat,
Belt Switch
54 Fuel System Control
Module (FSCM)
55 Trailer Parking
Lamps
56 Front Turn Signal,
Hazard Signal,
Courtesy Mirror
57 Power Sunroof
58 Transfer Case
Control Module
Switch
59 Climate Controls
Control Head
60 Back‐Up Lamp
61 Power Seats Fuse Usage
62 Air Injection Reactor
(AIR) Pump
63 Passenger Side
Power Window
64 Antilock Brake
System,
StabiliTrak
®2
Solenoid
67 Antilock Brake
System,
StabiliTrak
®1 Motor
68 Driver Side Power
Window
82 Climate Control Fan
83 Electronic Brake
Controller
84 Trailer B+ Fuse
85 Starter
91 Generator Megafuse
Page 309 of 410
Vehicle Care 10-43
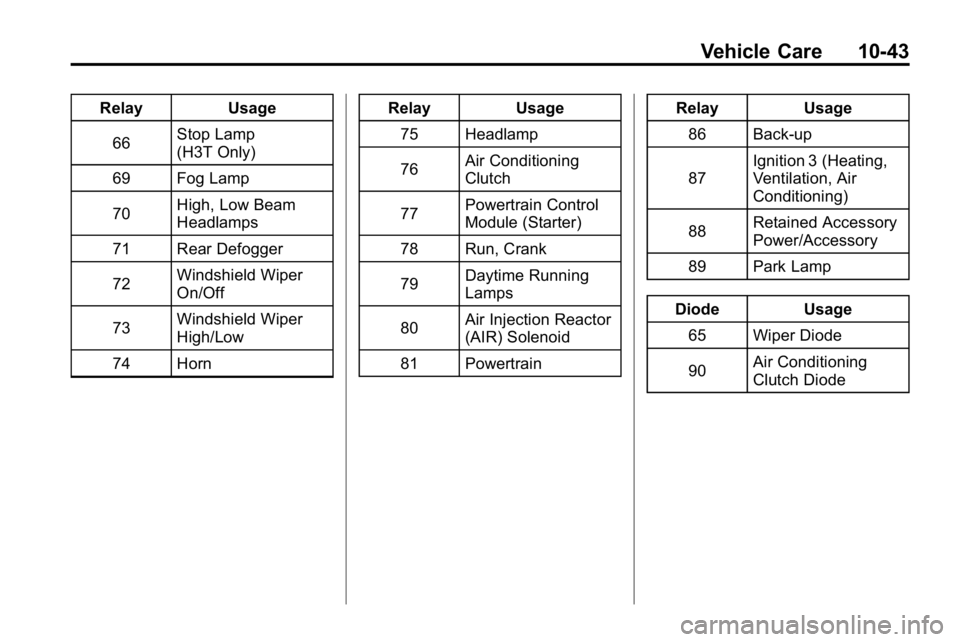
RelayUsage
66 Stop Lamp
(H3T Only)
69 Fog Lamp
70 High, Low Beam
Headlamps
71 Rear Defogger
72 Windshield Wiper
On/Off
73 Windshield Wiper
High/Low
74 Horn Relay
Usage
75 Headlamp
76 Air Conditioning
Clutch
77 Powertrain Control
Module (Starter)
78 Run, Crank
79 Daytime Running
Lamps
80 Air Injection Reactor
(AIR) Solenoid
81 Powertrain Relay
Usage
86 Back-up
87 Ignition 3 (Heating,
Ventilation, Air
Conditioning)
88 Retained Accessory
Power/Accessory
89 Park Lamp
Diode Usage
65 Wiper Diode
90 Air Conditioning
Clutch Diode
Page 310 of 410
10-44 Vehicle Care
Wheels and Tires
Tires
Your new vehicle comes with
high-quality tires made by a
leading tire manufacturer. If you
ever have questions about your
tire warranty and where to
obtain service, see your vehicle
Warranty booklet for details. For
additional information refer to
the tire manufacturer.
{WARNING
Poorly maintained and improperly
used tires are dangerous.
.Overloading your tires can
cause overheating as a result
of too much flexing. You
could have an air-out and a
serious accident. SeeVehicle
Load Limits on page 9‑27.
(Continued)
WARNING (Continued)
.Underinflated tires pose the
same danger as overloaded
tires. The resulting accident
could cause serious injury.
Check all tires frequently to
maintain the recommended
pressure. Tire pressure
should be checked when your
tires are cold. See Tire
Pressure on page 10‑51.
.Overinflated tires are more
likely to be cut, punctured
or broken by a sudden
impact —such as when you
hit a pothole. Keep tires at
the recommended pressure.
.Worn, old tires can cause
accidents. If your tread is
badly worn, or if your tires
have been damaged,
replace them.
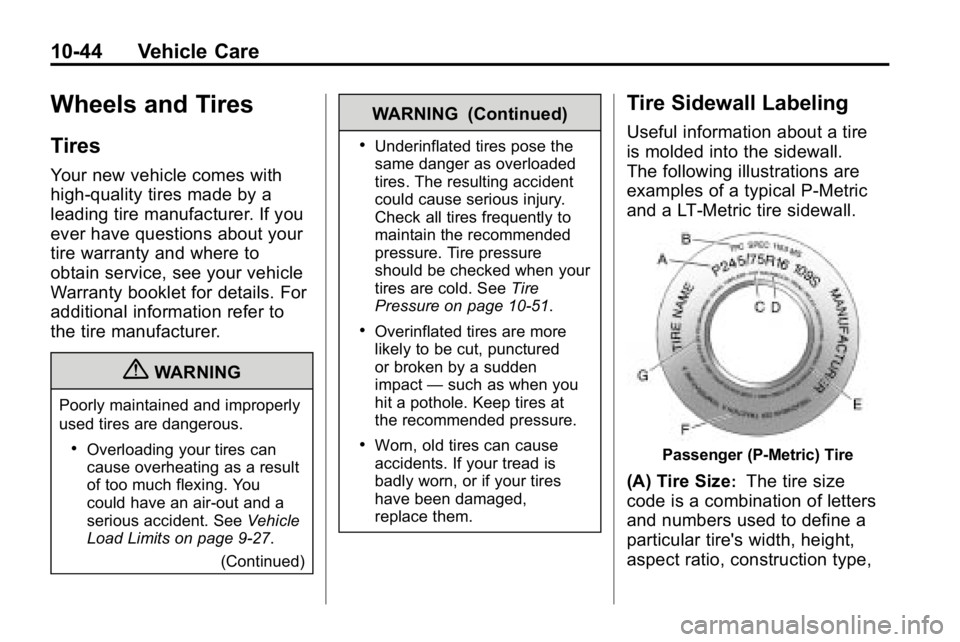
Tire Sidewall Labeling
Useful information about a tire
is molded into the sidewall.
The following illustrations are
examples of a typical P‐Metric
and a LT‐Metric tire sidewall.
Passenger (P‐Metric) Tire
(A) Tire Size:The tire size
code is a combination of letters
and numbers used to define a
particular tire's width, height,
aspect ratio, construction type,