Turning over Hyundai Accent 2007 Owner's Manual
[x] Cancel search | Manufacturer: HYUNDAI, Model Year: 2007, Model line: Accent, Model: Hyundai Accent 2007Pages: 282, PDF Size: 10.55 MB
Page 122 of 282
1FEATURES OF YOUR HYUNDAI
110
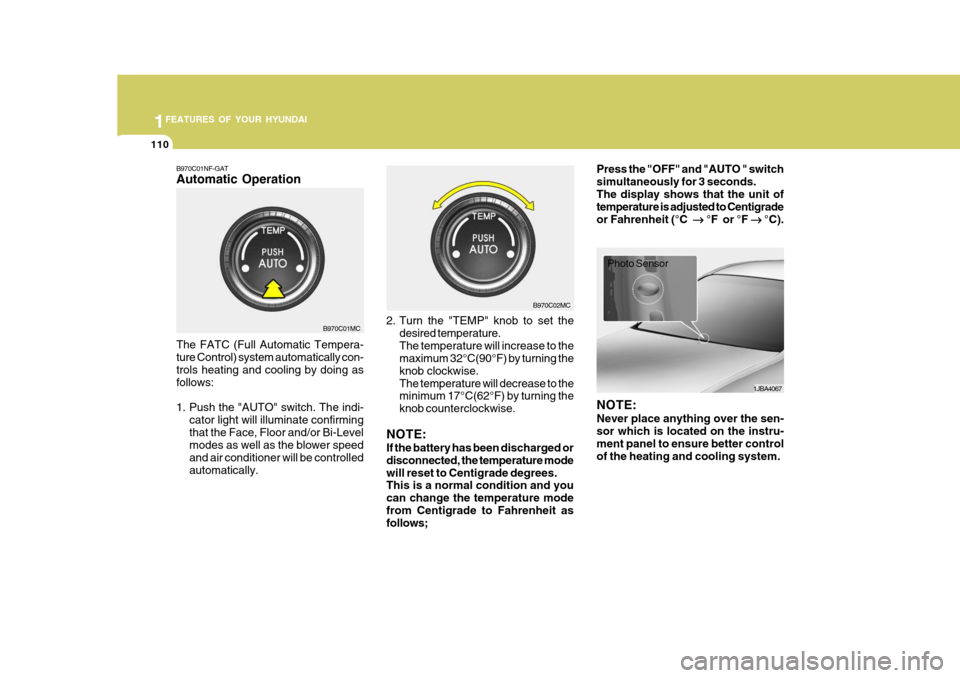
B970C01NF-GAT Automatic Operation The FATC (Full Automatic Tempera- ture Control) system automatically con- trols heating and cooling by doing as follows:
1. Push the "AUTO" switch. The indi-
cator light will illuminate confirming that the Face, Floor and/or Bi-Level modes as well as the blower speed and air conditioner will be controlledautomatically. 2. Turn the "TEMP" knob to set the
desired temperature.The temperature will increase to the maximum 32°C(90°F) by turning the knob clockwise.The temperature will decrease to the minimum 17°C(62°F) by turning the knob counterclockwise.
NOTE: If the battery has been discharged or disconnected, the temperature modewill reset to Centigrade degrees. This is a normal condition and you can change the temperature modefrom Centigrade to Fahrenheit as follows; Press the "OFF" and "AUTO " switch simultaneously for 3 seconds.The display shows that the unit of temperature is adjusted to Centigrade or Fahrenheit (°C
��
��
� °F or °F
��
��
� °C).
B970C01MC B970C02MC
1JBA4067
Photo Sensor
NOTE: Never place anything over the sen- sor which is located on the instru- ment panel to ensure better control of the heating and cooling system.
Page 163 of 282
1
FEATURES OF YOUR HYUNDAI
151
1
FEATURES OF YOUR HYUNDAI
151
1
FEATURES OF YOUR HYUNDAI
151
1
FEATURES OF YOUR HYUNDAI
151
NOTE: Look at a tape before you insert it. If the tape is loose, tighten it by turning one of the hubs with a pencil or your finger.If the label is peeling off, do not put it in the drive mechanism. Do not leave tapes sitting where theyare exposed to hot, warm, or high humidity, such as on top of the dash- board or in the player.If a tape is exposed to excessively hot or cold, let it reach a moderate temperature before putting it in theplayer.
B860A03L
ANTENNA
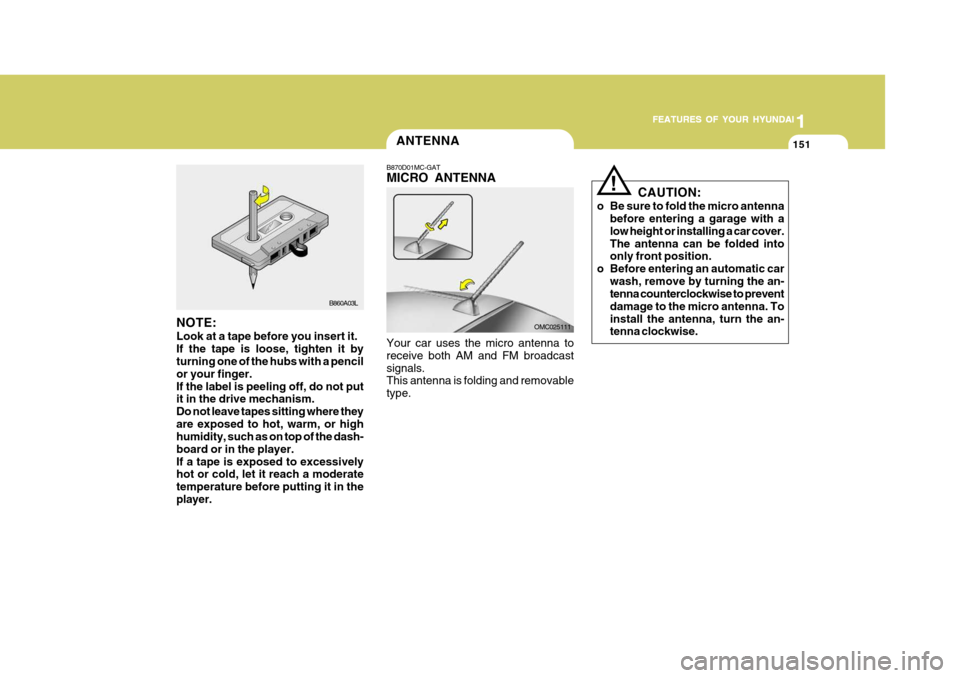
B870D01MC-GAT MICRO ANTENNA Your car uses the micro antenna to receive both AM and FM broadcastsignals. This antenna is folding and removable type. OMC025111CAUTION:
o Be sure to fold the micro antenna before entering a garage with alow height or installing a car cover.The antenna can be folded into only front position.
o Before entering an automatic car wash, remove by turning the an-tenna counterclockwise to prevent damage to the micro antenna. Toinstall the antenna, turn the an- tenna clockwise.
!
Page 171 of 282
2 DRIVING YOUR HYUNDAI
8
C070D02O-AAT Good Driving Practices
o Never take the car out of gear andcoast down a hill. This is extremely hazardous. Always leave the car in gear.
o Don't "ride" the brakes. This can cause them to overheat and mal-function. Instead, when you are driv- ing down a long hill, slow down andshift to a lower gear. When you do this, engine braking will help slow the car.
o Slow down before shifting to a lower gear. This will help avoid over-rev-ving the engine, which can causedamage.
o Slow down when you encounter cross
winds. This gives you much bettercontrol of your car.
o Be sure the car is completely stopped
before you attempt to shift into re-verse. The transaxle can be dam- aged if you do not. To shift into reverse, depress the clutch, movethe shift lever to neutral, wait three seconds, then shift to the reverse position.
o Exercise extreme caution when driv- ing on a slippery surface. Be espe-
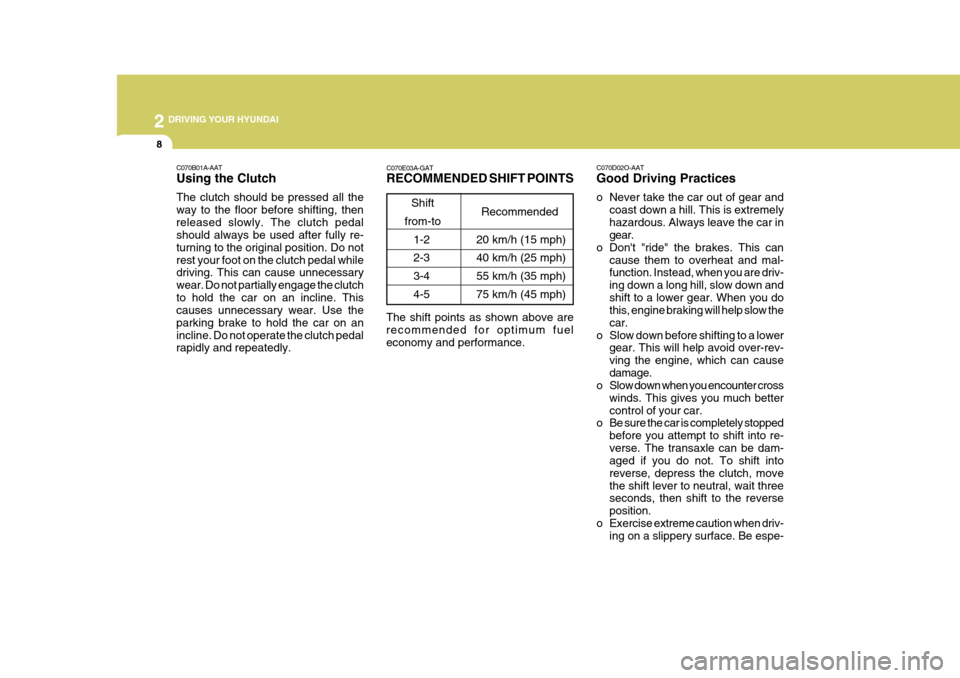
C070E03A-GAT RECOMMENDED SHIFT POINTS
Shift
from-to Recommended
The shift points as shown above are recommended for optimum fuel economy and performance. 20 km/h (15 mph) 40 km/h (25 mph)55 km/h (35 mph) 75 km/h (45 mph)
1-2 2-33-4 4-5
C070B01A-AAT Using the Clutch The clutch should be pressed all the way to the floor before shifting, thenreleased slowly. The clutch pedal should always be used after fully re- turning to the original position. Do notrest your foot on the clutch pedal while driving. This can cause unnecessary wear. Do not partially engage the clutchto hold the car on an incline. This causes unnecessary wear. Use the parking brake to hold the car on anincline. Do not operate the clutch pedal rapidly and repeatedly.
Page 173 of 282
2 DRIVING YOUR HYUNDAI
10
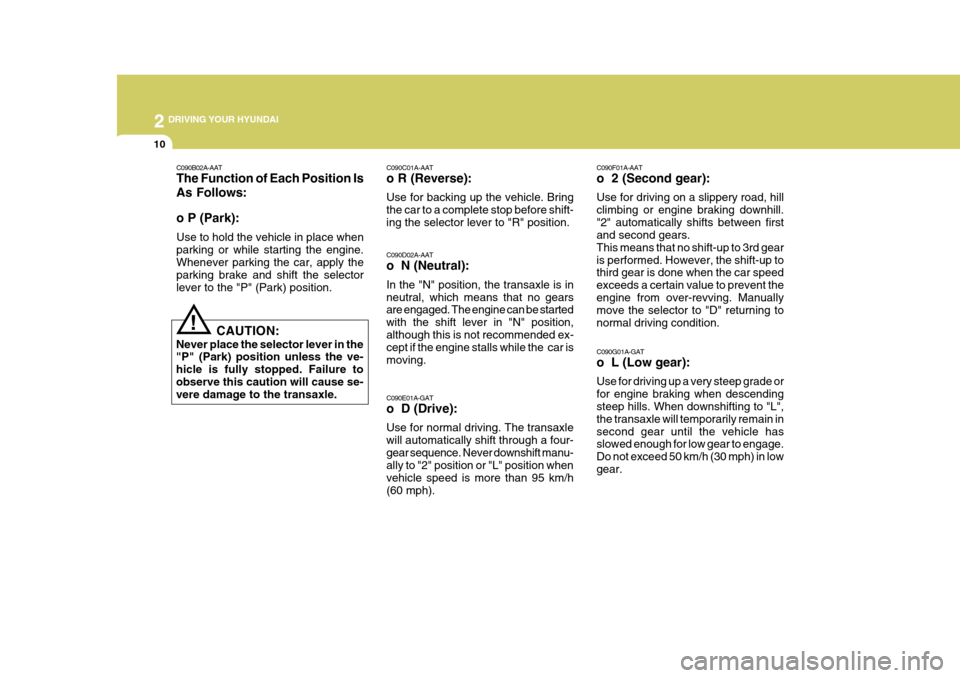
C090F01A-AAT o 2 (Second gear): Use for driving on a slippery road, hill climbing or engine braking downhill."2" automatically shifts between first and second gears. This means that no shift-up to 3rd gearis performed. However, the shift-up to third gear is done when the car speed exceeds a certain value to prevent the
engine from over-revving. Manually move the selector to "D" returning to normal driving condition.
C090E01A-GAT o D (Drive): Use for normal driving. The transaxle will automatically shift through a four-gear sequence. Never downshift manu- ally to "2" position or "L" position when vehicle speed is more than 95 km/h(60 mph).
C090C01A-AAT o R (Reverse): Use for backing up the vehicle. Bring the car to a complete stop before shift-ing the selector lever to "R" position.
C090G01A-GAT o L (Low gear): Use for driving up a very steep grade or for engine braking when descending steep hills. When downshifting to "L", the transaxle will temporarily remain insecond gear until the vehicle has slowed enough for low gear to engage. Do not exceed 50 km/h (30 mph) in lowgear.
C090D02A-AAT o N (Neutral): In the "N" position, the transaxle is in neutral, which means that no gears are engaged. The engine can be started with the shift lever in "N" position,although this is not recommended ex- cept if the engine stalls while the car is moving.
C090B02A-AAT The Function of Each Position Is As Follows: o P (Park): Use to hold the vehicle in place when parking or while starting the engine. Whenever parking the car, apply the parking brake and shift the selectorlever to the "P" (Park) position.
!
CAUTION:
Never place the selector lever in the "P" (Park) position unless the ve- hicle is fully stopped. Failure toobserve this caution will cause se- vere damage to the transaxle.
Page 199 of 282
3 WHAT TO DO IN AN EMERGENCY
10
!
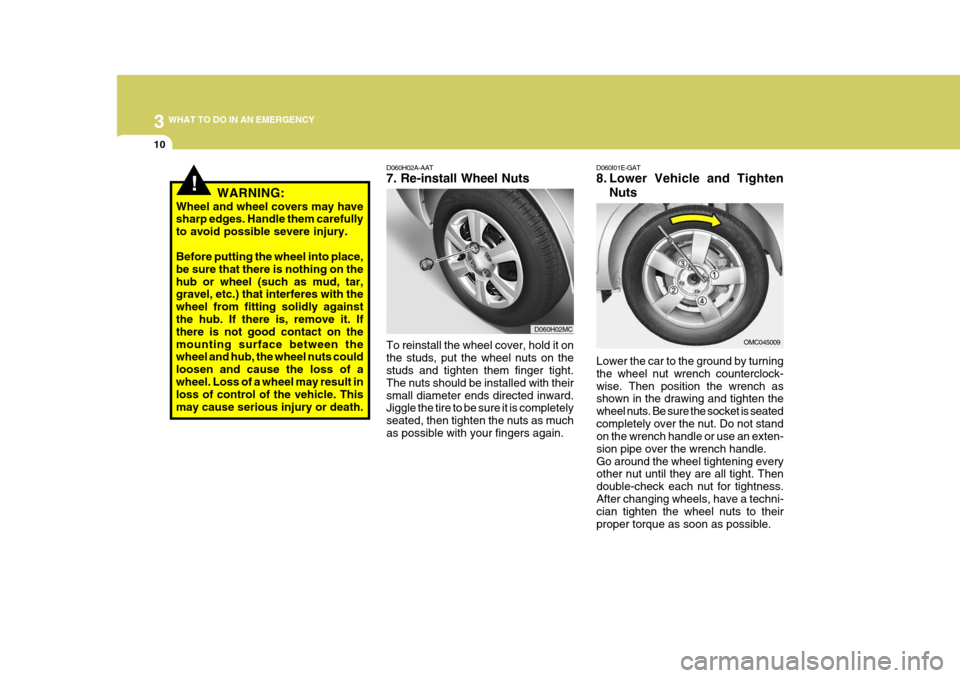
D060H02A-AAT 7. Re-install Wheel Nuts
Lower the car to the ground by turning the wheel nut wrench counterclock-wise. Then position the wrench as shown in the drawing and tighten the wheel nuts. Be sure the socket is seatedcompletely over the nut. Do not stand on the wrench handle or use an exten- sion pipe over the wrench handle.Go around the wheel tightening every other nut until they are all tight. Then double-check each nut for tightness.After changing wheels, have a techni- cian tighten the wheel nuts to their proper torque as soon as possible.
D060I01E-GAT
8. Lower Vehicle and Tighten
Nuts
To reinstall the wheel cover, hold it on the studs, put the wheel nuts on the studs and tighten them finger tight. The nuts should be installed with theirsmall diameter ends directed inward. Jiggle the tire to be sure it is completely seated, then tighten the nuts as muchas possible with your fingers again. OMC045009
WARNING:
Wheel and wheel covers may have sharp edges. Handle them carefully to avoid possible severe injury. Before putting the wheel into place, be sure that there is nothing on thehub or wheel (such as mud, tar, gravel, etc.) that interferes with the wheel from fitting solidly againstthe hub. If there is, remove it. If there is not good contact on the mounting surface between the wheel and hub, the wheel nuts could loosen and cause the loss of awheel. Loss of a wheel may result in loss of control of the vehicle. This may cause serious injury or death.
D060H02MC
Page 232 of 282
6
DO-IT-YOURSELF MAINTENANCE
9
G350A01A-GAT ENGINE OIL CONSUMPTION Function of Engine Oil Engine oil has the primary function of lubricating and cooling the inside of theengine. Engine oil consumption It is normal that an engine should consume some engine oil while nor-
mal driving. The cause of oil consump- tion in a normal engine are as follows;
o Engine oil is used to lubricate pis- tons, piston rings and cylinders. A thin film of oil is left on the cylinder wall when a piston moves down- wards in the cylinder. High negativepressure generated during engine operation sucks some of the oil into the combustion chamber.This oil with some oil of the cylinder wall is burned by the high tempera- ture combustion gases during thecombustion process.
NOTE:
o It is recommended that the engine
oil and filter should be changed by an authorized Hyundai dealer.
o Always dispose of used engine oil in an environmentally acceptablemanner. It is suggested that it beplaced in a sealed container and taken to a service station for maybe reclaimation. Do not pour the oilon the ground or put it into the household trash.
!WARNING:
Used motor oil may cause irritation or cancer of the skin if left in contact with the skin for prolonged periodsof time. Wash your hands thoroughly with soap and warm water as soon as possible after handling used oil.
!
If the oil level is close to or below the "L" mark, add oil until it reaches the "F"mark. To add oil:
1. Remove the oil filler cap by turning it counterclockwise.
2. Add oil, then check the level again.
Do not overfill.
3. Replace the cap by turning it clock- wise.
The distance between the "F" and "L" marks is equal to about 1 liter(Gasoline Engine)/1.5 liter(Diesel Engine) of oil.
WARNING:
Be very careful not to touch the radia-tor hose when adding the engine oilas it may be hot enough to burn you. CAUTION:
Slowly pour the recommended oilby using a funnel. Do not overfill soas not to damage engine.
!
Page 253 of 282
6 DO-IT-YOURSELF MAINTENANCE
30
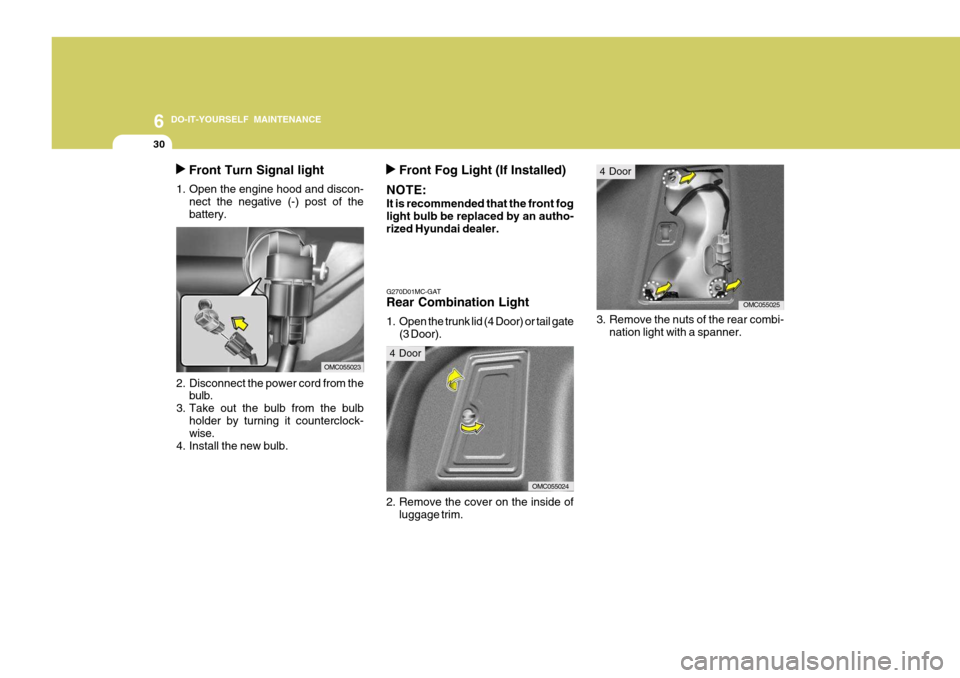
Front Turn Signal light
1. Open the engine hood and discon- nect the negative (-) post of the battery.
2. Disconnect the power cord from the bulb.
3. Take out the bulb from the bulb holder by turning it counterclock- wise.
4. Install the new bulb.
OMC055023
Front Fog Light (If Installed)
NOTE: It is recommended that the front fog light bulb be replaced by an autho- rized Hyundai dealer.
3. Remove the nuts of the rear combi- nation light with a spanner.
G270D01MC-GAT Rear Combination Light
1. Open the trunk lid (4 Door) or tail gate(3 Door).
OMC055024
OMC055025
2. Remove the cover on the inside of luggage trim.
4 Door
4 Door
Page 254 of 282
6
DO-IT-YOURSELF MAINTENANCE
31
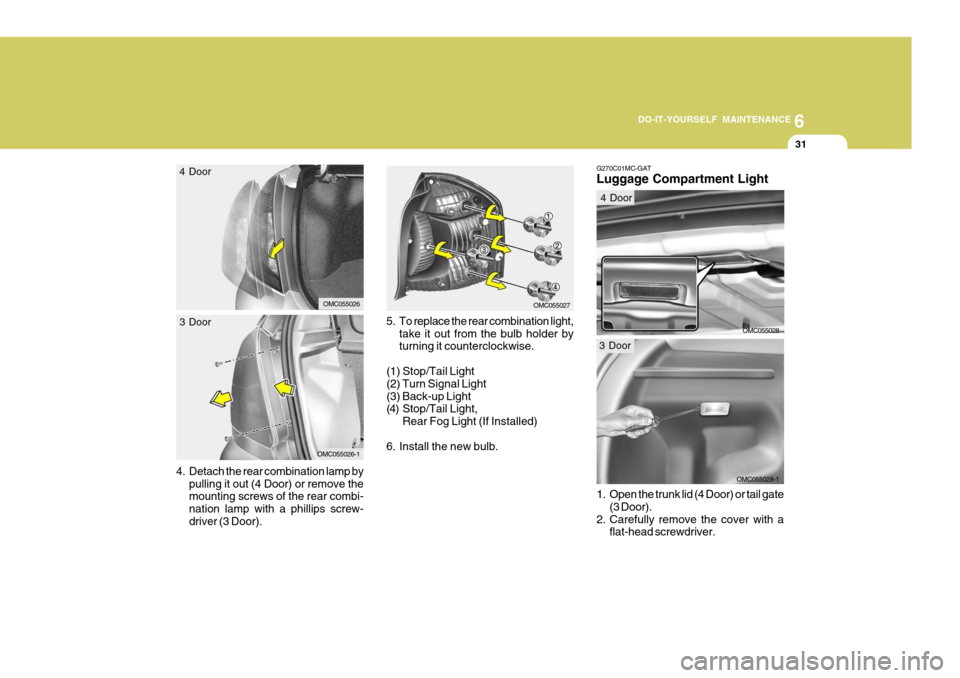
5. To replace the rear combination light, take it out from the bulb holder by turning it counterclockwise.
(1) Stop/Tail Light (2) Turn Signal Light(3) Back-up Light
(4) Stop/Tail Light, Rear Fog Light (If Installed)
6. Install the new bulb.
4.
Detach the rear combination lamp by pulling it out (4 Door) or remove the mounting screws of the rear combi- nation lamp with a phillips screw-driver (3 Door).
OMC055027OMC055026
4 Door
OMC055026-1
3 Door
OMC055028-1
G270C01MC-GAT Luggage Compartment Light
OMC055028
1. Open the trunk lid (4 Door) or tail gate (3 Door).
2. Carefully remove the cover with a flat-head screwdriver.
4 Door
3 Door