low oil pressure Hyundai Accent 2007 Owner's Manual
[x] Cancel search | Manufacturer: HYUNDAI, Model Year: 2007, Model line: Accent, Model: Hyundai Accent 2007Pages: 282, PDF Size: 10.55 MB
Page 12 of 282

YOUR VEHICLE AT A GLANCE
B255A02MC-GAT INDICATOR SYMBOLS ON THE INSTRUMENT PANEL * More detailed explanations of these items will be found begining on page 1-58.Turn Signal Indicator Lights
SRS (Airbag) Service Reminder Indicator (If Installed) O/D OFF Indicator Light (Automatic transaxle only) High Beam Indicator Light
Low Oil Pressure Warning Light
ABS Service Reminder Indicator (If Installed)
Door Ajar Warning Light
Parking Brake/Low Brake Fluid Level Warning Light
Charging System Warning Light Fuel Filter Warning Light (Diesel only)
Low Fuel Level Warning Light Diesel Pre-heat Indicator Light (Diesel only)
Malfunction Indicator Light (If Installed)
Immobilizer Warning Light (If Installed)
Passenger's Front Airbag OFF Indicator Light (If Installed)
Trunk Lid/Tail Gate Open Warning Light
Engine Coolant Temperature Indicator Light (If Installed) Seat Belt Warning Light
Electronic Power Steering (EPS) System Warning Light (If Installed)
Electronic Stability Program Indicator Lights (If Installed)
120
km/hOverspeed Warning Light (If Installed)
Page 67 of 282
1
FEATURES OF YOUR HYUNDAI
55
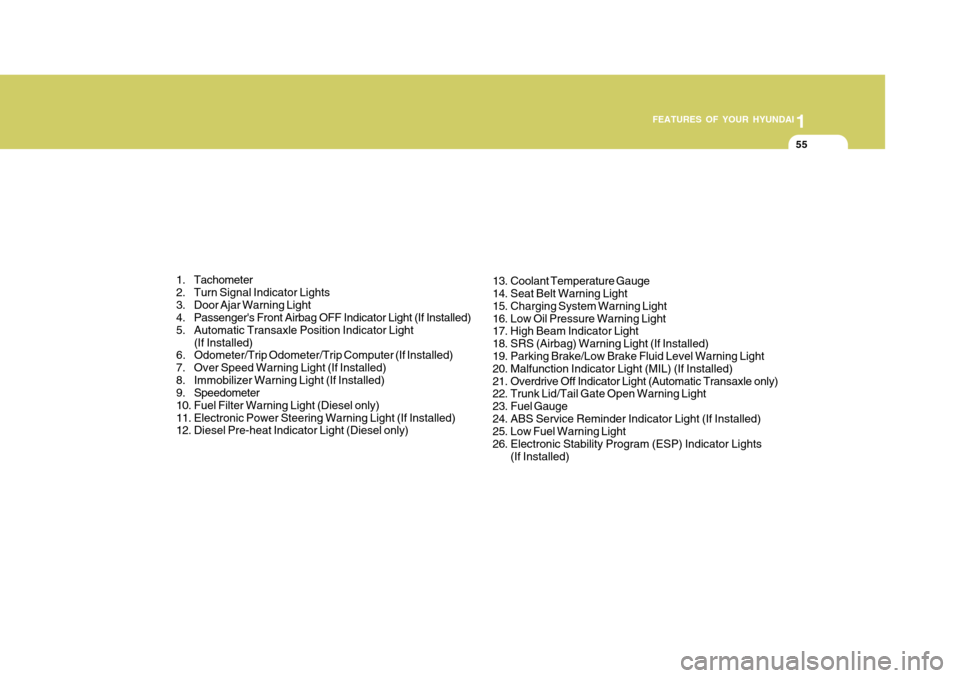
1. Tachometer
2. Turn Signal Indicator Lights
3. Door Ajar Warning Light
4. Passenger's Front Airbag OFF Indicator Light (If Installed)
5. Automatic Transaxle Position Indicator Light (If Installed)
6. Odometer/Trip Odometer/Trip Computer (If Installed)
7. Over Speed Warning Light (If Installed)
8. Immobilizer Warning Light (If Installed)
9. Speedometer
10. Fuel Filter Warning Light (Diesel only)
11. Electronic Power Steering Warning Light (If Installed)
12. Diesel Pre-heat Indicator Light (Diesel only) 13. Coolant Temperature Gauge
14. Seat Belt Warning Light
15. Charging System Warning Light
16. Low Oil Pressure Warning Light
17. High Beam Indicator Light
18. SRS (Airbag) Warning Light (If Installed)
19. Parking Brake/Low Brake Fluid Level Warning Light
20. Malfunction Indicator Light (MIL) (If Installed)
21. Overdrive Off Indicator Light (Automatic Transaxle only)
22. Trunk Lid/Tail Gate Open Warning Light
23. Fuel Gauge
24. ABS Service Reminder Indicator Light (If Installed)
25. Low Fuel Warning Light
26. Electronic Stability Program (ESP) Indicator Lights
(If Installed)
Page 69 of 282
1
FEATURES OF YOUR HYUNDAI
57
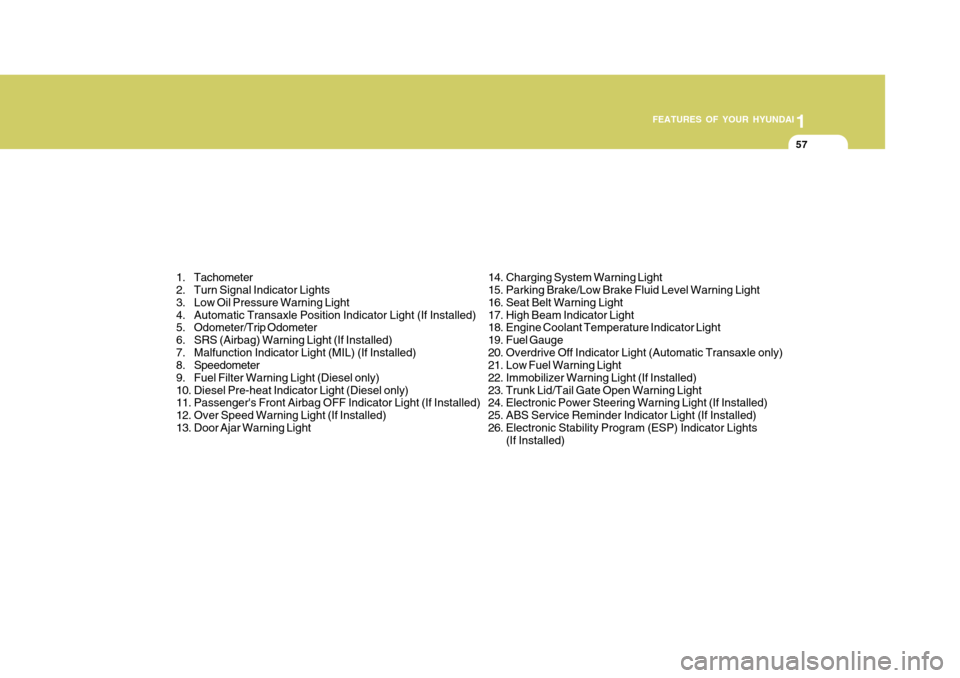
1. Tachometer
2. Turn Signal Indicator Lights
3. Low Oil Pressure Warning Light
4. Automatic Transaxle Position Indicator Light (If Installed)
5. Odometer/Trip Odometer
6. SRS (Airbag) Warning Light (If Installed)
7. Malfunction Indicator Light (MIL) (If Installed)
8. Speedometer
9. Fuel Filter Warning Light (Diesel only)
10. Diesel Pre-heat Indicator Light (Diesel only)
11. Passenger's Front Airbag OFF Indicator Light (If Installed)
12. Over Speed Warning Light (If Installed)
13. Door Ajar Warning Light 14. Charging System Warning Light
15. Parking Brake/Low Brake Fluid Level Warning Light
16. Seat Belt Warning Light
17. High Beam Indicator Light
18. Engine Coolant Temperature Indicator Light
19. Fuel Gauge
20. Overdrive Off Indicator Light (Automatic Transaxle only)
21. Low Fuel Warning Light
22. Immobilizer Warning Light (If Installed)
23. Trunk Lid/Tail Gate Open Warning Light
24. Electronic Power Steering Warning Light (If Installed)
25. ABS Service Reminder Indicator Light (If Installed)
26. Electronic Stability Program (ESP) Indicator Lights
(If Installed)
Page 72 of 282
1FEATURES OF YOUR HYUNDAI
60
!
B260H03A-AAT
Parking Brake/Low Brake Fluid Level Warning LightB260G01A-AATLow Oil Pressure Warning Light
!CAUTION:
If the oil pressure warning light stays on while the engine is running, seri- ous engine damage may result. Theoil pressure warning light comes on whenever there is insufficient oil pres- sure. In normal operation, it shouldcome on when the ignition switch is turned on, then go out when the en- gine is started. If the oil pressurewarning light stays on while the en- gine is running, there may be a seri- ous malfunction.If this happens, stop the car as soon as it is safe to do so, turn off the
engine and check the oil level. If the oil level is low, fill the engine oil to the proper level and start the engine again. If the light stays on with theengine running, turn the engine off immediately. In any instance where the oil light stays on when the engineis running, the engine should be checked by an authorized Hyundai dealer before the car is driven again. WARNING:
If you suspect brake trouble, have your brakes checked by a Hyundai dealer as soon as possible. Drivingyour car with a problem in either the brake electrical system or brake hy- draulic system is dangerous, andcould result in a serious injury or death.
Warning Light Operation The parking brake/brake fluid level warn- ing light should come on when theparking brake is applied and the ignition switch is turned to "ON" or "START". After the engine is started, the lightshould go out when the parking brake is released. If the parking brake is not applied, thewarning light should come on when the ignition switch is turned to "ON" or "START", then go out when the enginestarts. If the light comes on at any other time,you should slow the vehicle and bring itto a complete stop in a safe location off the roadway. The brake fluid level warn- ing light indicates that the brake fluidlevel in the brake master cylinder is low and hydraulic brake fluid conforming to DOT 3 or DOT 4 specifications shouldbe added. After adding fluid, if no other trouble is found, the car should be immediately and carefully driven to aHyundai dealer for inspection. If further trouble is experienced, the vehicle should not be driven at all but taken toa dealer by a professional towing ser- vice or some other safe method. Your Hyundai is equipped with dual-diagonal braking systems. This means you still have braking on two wheels even if one of the dual systems shouldfail. With only one of the dual systems working, more than normal pedal travel and greater pedal pressure are requiredto stop the car. Also, the car will not stop in as short a distance with only half of the brake system working. If thebrakes fail while you are driving, shift to a lower gear for additional engine brak- ing and stop the car as soon as it is safeto do so.
Page 185 of 282
2 DRIVING YOUR HYUNDAI
22HIGHER SPEED MOTORING
C160K01A-AAT Carry Emergency Equipment Depending on the severity of the weather where you drive your car, you should carry appropriate emergencyequipment. Some of the items you may want to carry include tire chains, tow straps or chains, flashlight, emer-gency flares, sand, a shovel, jumper cables, a window scraper, gloves, ground cloth, coveralls, a blanket, etc.
C160J01A-AAT Don't Let Ice and Snow Accumu- late Underneath Under some conditions, snow and ice can build up under the fenders andinterfere with the steering. When driv- ing in severe winter conditions where this may happen, you should periodi-cally check underneath the car to be sure the movement of the front wheels and the steering components is notobstructed.
C170A01A-AAT Pre-Trip Inspections 1. Tires: Adjust the tire inflation pressures to specification. Low tire inflation pres-sures will result in overheating and possible failure of the tires. Avoid using worn or damaged tireswhich may result in reduced traction or tire failure. NOTE: Never exceed the maximum tire in- flation pressure shown on the tires.
2. Fuel, engine coolant and
engine oil:
High speed travel consumes more fuel than urban motoring. Do not forget tocheck both engine coolant and engine oil. 3. Drive belt: A loose or damaged drive belt may result in overheating of the engine.USE OF LIGHTS
C180A01A-AAT Check your lights regularly for correct operation and always keep them clean. When driving during the day in condi- tions of poor visibility, it is helpful todrive with headlights on low beam. This enables you to be seen as well as to see.
Page 228 of 282
6
DO-IT-YOURSELF MAINTENANCE
5
G020A01A-AAT Engine Compartment The following should be checked regu- larly:
o Engine oil level and condition
o Transaxle fluid level and condition
o Brake fluid level
o Clutch fluid level
o Engine coolant level
o Windshield washer fluid level
o Accessory drive belt condition
o Engine coolant hose condition
o Fluid leaks (on or below compo-
nents)
o Power steering fluid level
o Battery condition
o Air cleaner filter condition G020C01A-AAT Vehicle Interior The following should be checked each time when the vehicle is driven:
o Lights operation
o Windshield wiper operation
o Horn operation
o Defroster, heater system operation
(and air conditioning, if installed)
o Steering operation and condition
o Mirror condition and operation
o Turn signal operation
o Accelerator pedal operation
o Brake operation, including parking
brake
o Manual transaxle operation, includ- ing clutch operation
o Automatic transaxle operation, in- cluding "Park" mechanism opera-tion
o Seat control condition and opera- tion
o Seat belt condition and operation
o Sun visor operation If you notice anything that does not operate correctly or appears to befunctioning incorrectly, inspect it care- fully and seek assistance from your Hyundai dealer if service is needed.
G020B01A-AAT Vehicle Exterior The following should be checked monthly:
o Overall appearance and condition
o Wheel condition and wheel nut torque
o Exhaust system condition
o Light condition and operation
o Windshield glass condition
o Wiper blade condition
o Paint condition and body corrosion
o Fluid leaks
o Door and hood lock condition
o Tire pressure and condition
(including spare tire)
GENERAL CHECKS
Page 232 of 282
6
DO-IT-YOURSELF MAINTENANCE
9
G350A01A-GAT ENGINE OIL CONSUMPTION Function of Engine Oil Engine oil has the primary function of lubricating and cooling the inside of theengine. Engine oil consumption It is normal that an engine should consume some engine oil while nor-
mal driving. The cause of oil consump- tion in a normal engine are as follows;
o Engine oil is used to lubricate pis- tons, piston rings and cylinders. A thin film of oil is left on the cylinder wall when a piston moves down- wards in the cylinder. High negativepressure generated during engine operation sucks some of the oil into the combustion chamber.This oil with some oil of the cylinder wall is burned by the high tempera- ture combustion gases during thecombustion process.
NOTE:
o It is recommended that the engine
oil and filter should be changed by an authorized Hyundai dealer.
o Always dispose of used engine oil in an environmentally acceptablemanner. It is suggested that it beplaced in a sealed container and taken to a service station for maybe reclaimation. Do not pour the oilon the ground or put it into the household trash.
!WARNING:
Used motor oil may cause irritation or cancer of the skin if left in contact with the skin for prolonged periodsof time. Wash your hands thoroughly with soap and warm water as soon as possible after handling used oil.
!
If the oil level is close to or below the "L" mark, add oil until it reaches the "F"mark. To add oil:
1. Remove the oil filler cap by turning it counterclockwise.
2. Add oil, then check the level again.
Do not overfill.
3. Replace the cap by turning it clock- wise.
The distance between the "F" and "L" marks is equal to about 1 liter(Gasoline Engine)/1.5 liter(Diesel Engine) of oil.
WARNING:
Be very careful not to touch the radia-tor hose when adding the engine oilas it may be hot enough to burn you. CAUTION:
Slowly pour the recommended oilby using a funnel. Do not overfill soas not to damage engine.
!
Page 249 of 282
6 DO-IT-YOURSELF MAINTENANCE
26HEADLIGHT AIMING ADJUSTMENT
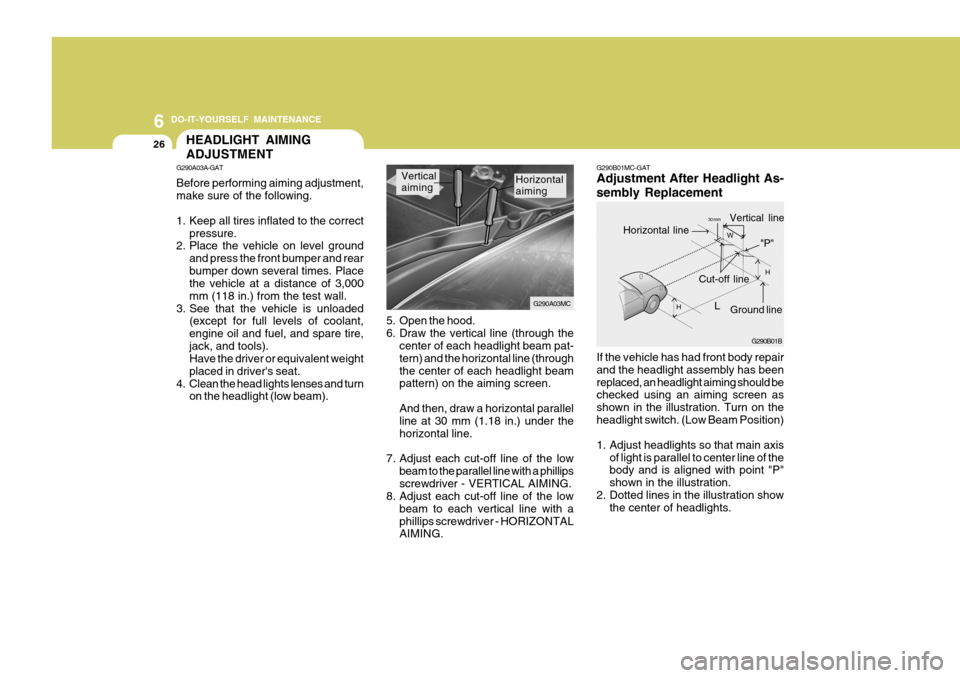
5. Open the hood.
6. Draw the vertical line (through the
center of each headlight beam pat-tern) and the horizontal line (throughthe center of each headlight beam pattern) on the aiming screen. And then, draw a horizontal parallel line at 30 mm (1.18 in.) under the horizontal line.
7. Adjust each cut-off line of the low beam to the parallel line with a phillipsscrewdriver - VERTICAL AIMING.
8. Adjust each cut-off line of the low
beam to each vertical line with aphillips screwdriver - HORIZONTAL AIMING. Horizontal aiming
Vertical aiming
If the vehicle has had front body repair and the headlight assembly has beenreplaced, an headlight aiming should be checked using an aiming screen as shown in the illustration. Turn on theheadlight switch. (Low Beam Position)
1. Adjust headlights so that main axisof light is parallel to center line of the body and is aligned with point "P" shown in the illustration.
2. Dotted lines in the illustration show the center of headlights.
G290B01MC-GAT Adjustment After Headlight As- sembly Replacement
G290A03A-GAT Before performing aiming adjustment, make sure of the following.
1. Keep all tires inflated to the correct
pressure.
2. Place the vehicle on level ground
and press the front bumper and rear bumper down several times. Place the vehicle at a distance of 3,000 mm (118 in.) from the test wall.
3. See that the vehicle is unloaded (except for full levels of coolant,engine oil and fuel, and spare tire,jack, and tools). Have the driver or equivalent weight placed in driver's seat.
4. Clean the head lights lenses and turn on the headlight (low beam). G290B01B
LW
H
H Cut-off line
Ground line
"P"
Horizontal line
Vertical line30 mm
G290A03MC