Hyundai Accent 2011 Owner's Guide
Manufacturer: HYUNDAI, Model Year: 2011, Model line: Accent, Model: Hyundai Accent 2011Pages: 282, PDF Size: 14.82 MB
Page 21 of 282
1FEATURES OF YOUR HYUNDAI10
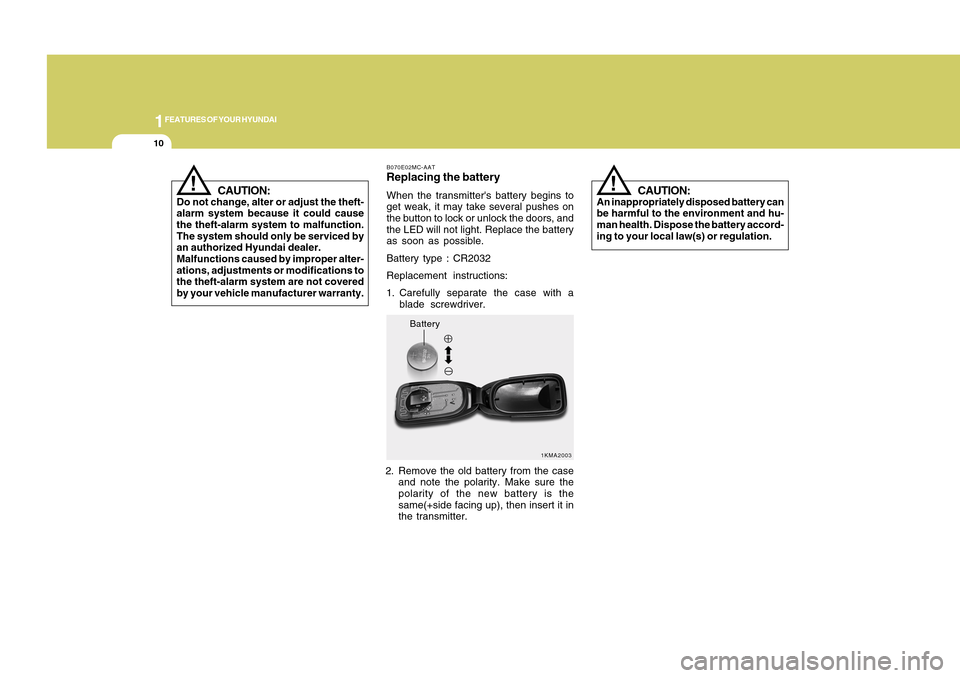
Battery
1KMA2003 B070E02MC-AAT
Replacing the batteryWhen the transmitter's battery begins to
get weak, it may take several pushes on
the button to lock or unlock the doors, and
the LED will not light. Replace the battery
as soon as possible.
Battery type : CR2032
Replacement instructions:
1. Carefully separate the case with a
blade screwdriver.
2. Remove the old battery from the case
and note the polarity. Make sure the
polarity of the new battery is the
same(+side facing up), then insert it in
the transmitter.
CAUTION:
An inappropriately disposed battery can
be harmful to the environment and hu-
man health. Dispose the battery accord-
ing to your local law(s) or regulation.
!
CAUTION:
Do not change, alter or adjust the theft-
alarm system because it could cause
the theft-alarm system to malfunction.
The system should only be serviced by
an authorized Hyundai dealer.
Malfunctions caused by improper alter-
ations, adjustments or modifications to
the theft-alarm system are not covered
by your vehicle manufacturer warranty.
!
Page 22 of 282
1
FEATURES OF YOUR HYUNDAI
111
FEATURES OF YOUR HYUNDAI
11
WINDOW GLASS!
3FDA2015 B050A01MC-AAT
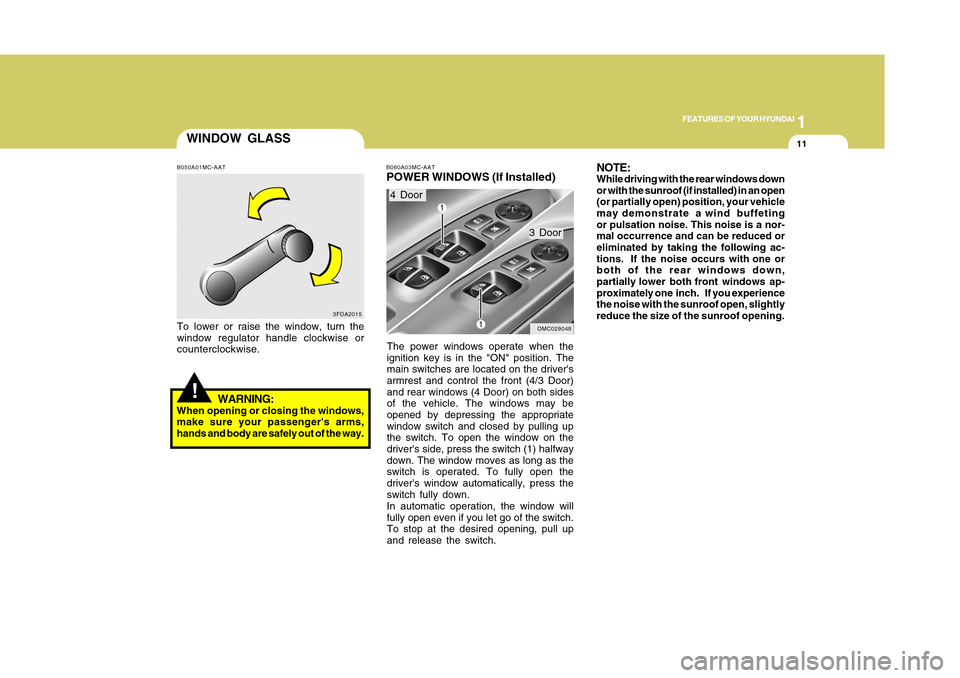
To lower or raise the window, turn the
window regulator handle clockwise or
counterclockwise.
WARNING:
When opening or closing the windows,
make sure your passenger's arms,
hands and body are safely out of the way.
B060A03MC-AATPOWER WINDOWS (If Installed)The power windows operate when the
ignition key is in the "ON" position. The
main switches are located on the driver's
armrest and control the front (4/3 Door)
and rear windows (4 Door) on both sides
of the vehicle. The windows may be
opened by depressing the appropriate
window switch and closed by pulling up
the switch. To open the window on the
driver's side, press the switch (1) halfway
down. The window moves as long as the
switch is operated. To fully open the
driver's window automatically, press the
switch fully down.
In automatic operation, the window will
fully open even if you let go of the switch.
To stop at the desired opening, pull up
and release the switch.4 Door
3 Door
OMC029048
NOTE:While driving with the rear windows down
or with the sunroof (if installed) in an open
(or partially open) position, your vehicle
may demonstrate a wind buffeting
or pulsation noise. This noise is a nor-
mal occurrence and can be reduced or
eliminated by taking the following ac-
tions. If the noise occurs with one or
both of the rear windows down,
partially lower both front windows ap-
proximately one inch. If you experience
the noise with the sunroof open, slightly
reduce the size of the sunroof opening.
Page 23 of 282
1FEATURES OF YOUR HYUNDAI12
OMC025015
CLOSE
OPEN
OMC029049
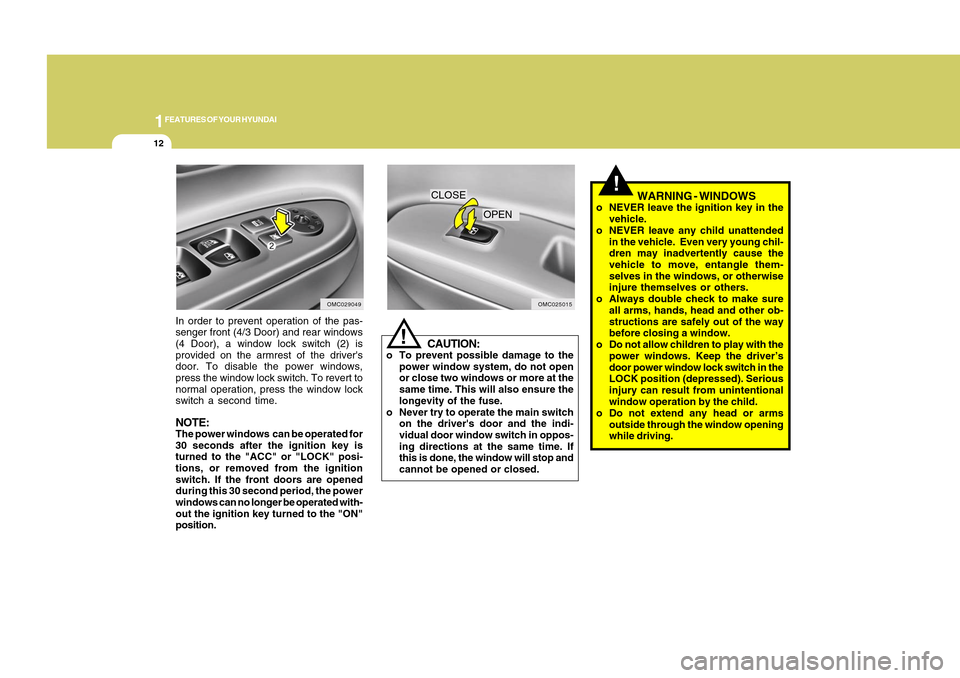
In order to prevent operation of the pas-
senger front (4/3 Door) and rear windows
(4 Door), a window lock switch (2) is
provided on the armrest of the driver's
door. To disable the power windows,
press the window lock switch. To revert to
normal operation, press the window lock
switch a second time.NOTE:The power windows can be operated for
30 seconds after the ignition key is
turned to the "ACC" or "LOCK" posi-
tions, or removed from the ignition
switch. If the front doors are opened
during this 30 second period, the power
windows can no longer be operated with-
out the ignition key turned to the "ON"
position.
!
CAUTION:
o To prevent possible damage to the
power window system, do not open
or close two windows or more at the
same time. This will also ensure the
longevity of the fuse.
o Never try to operate the main switch
on the driver's door and the indi-
vidual door window switch in oppos-
ing directions at the same time. If
this is done, the window will stop and
cannot be opened or closed.
WARNING - WINDOWS
o NEVER leave the ignition key in the
vehicle.
o NEVER leave any child unattended
in the vehicle. Even very young chil-
dren may inadvertently cause the
vehicle to move, entangle them-
selves in the windows, or otherwise
injure themselves or others.
o Always double check to make sure
all arms, hands, head and other ob-
structions are safely out of the way
before closing a window.
o Do not allow children to play with the
power windows. Keep the driver’s
door power window lock switch in the
LOCK position (depressed). Serious
injury can result from unintentional
window operation by the child.
o Do not extend any head or arms
outside through the window opening
while driving.
!
Page 24 of 282
1
FEATURES OF YOUR HYUNDAI
131
FEATURES OF YOUR HYUNDAI
13
SEATS
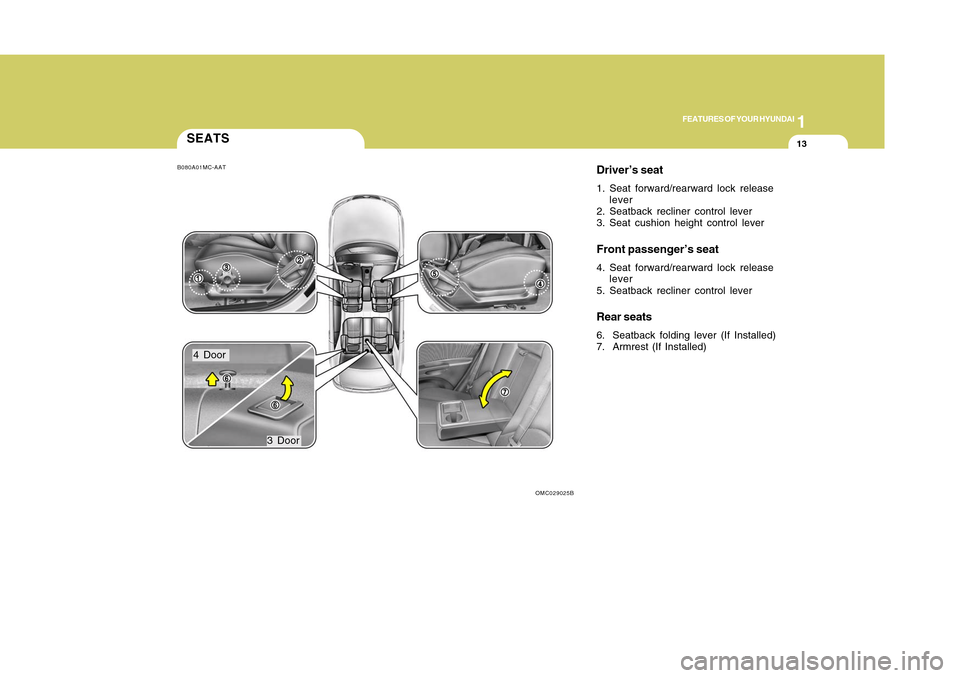
Driver’s seat1. Seat forward/rearward lock release
lever
2. Seatback recliner control lever
3. Seat cushion height control leverFront passenger’s seat4. Seat forward/rearward lock release
lever
5. Seatback recliner control leverRear seats6. Seatback folding lever (If Installed)
7. Armrest (If Installed)
B080A01MC-AAT
OMC029025B
4 Door
3 Door
Page 25 of 282
1FEATURES OF YOUR HYUNDAI14
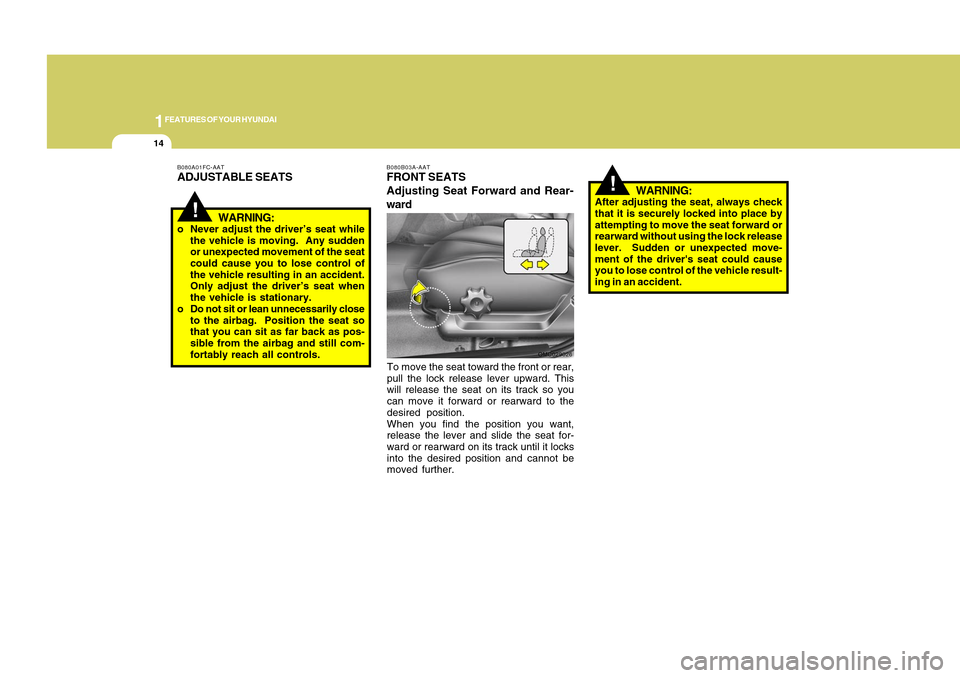
To move the seat toward the front or rear,
pull the lock release lever upward. This
will release the seat on its track so you
can move it forward or rearward to the
desired position.
When you find the position you want,
release the lever and slide the seat for-
ward or rearward on its track until it locks
into the desired position and cannot be
moved further.
!
WARNING:
After adjusting the seat, always check
that it is securely locked into place by
attempting to move the seat forward or
rearward without using the lock release
lever. Sudden or unexpected move-
ment of the driver's seat could cause
you to lose control of the vehicle result-
ing in an accident.
B080B03A-AATFRONT SEATS
Adjusting Seat Forward and Rear-
ward
!
WARNING:
o Never adjust the driver’s seat while
the vehicle is moving. Any sudden
or unexpected movement of the seat
could cause you to lose control of
the vehicle resulting in an accident.
Only adjust the driver’s seat when
the vehicle is stationary.
o Do not sit or lean unnecessarily close
to the airbag. Position the seat so
that you can sit as far back as pos-
sible from the airbag and still com-
fortably reach all controls.B080A01FC-AATADJUSTABLE SEATS
OMC029026
Page 26 of 282
1
FEATURES OF YOUR HYUNDAI
151
FEATURES OF YOUR HYUNDAI
15
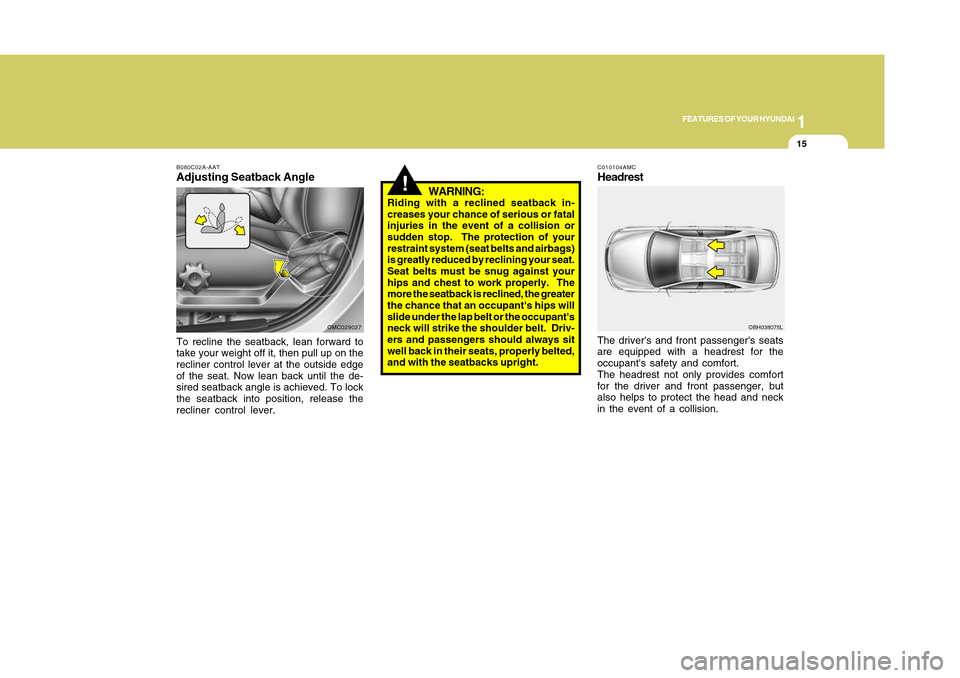
B080C02A-AATAdjusting Seatback AngleTo recline the seatback, lean forward to
take your weight off it, then pull up on the
recliner control lever at the outside edge
of the seat. Now lean back until the de-
sired seatback angle is achieved. To lock
the seatback into position, release the
recliner control lever.
!
WARNING:
Riding with a reclined seatback in-
creases your chance of serious or fatal
injuries in the event of a collision or
sudden stop. The protection of your
restraint system (seat belts and airbags)
is greatly reduced by reclining your seat.
Seat belts must be snug against your
hips and chest to work properly. The
more the seatback is reclined, the greater
the chance that an occupant's hips will
slide under the lap belt or the occupant's
neck will strike the shoulder belt. Driv-
ers and passengers should always sit
well back in their seats, properly belted,
and with the seatbacks upright.
OMC029027
C010104AMCHeadrestThe driver's and front passenger's seats
are equipped with a headrest for the
occupant's safety and comfort.
The headrest not only provides comfort
for the driver and front passenger, but
also helps to protect the head and neck
in the event of a collision.
OBH038075L
Page 27 of 282
1FEATURES OF YOUR HYUNDAI16
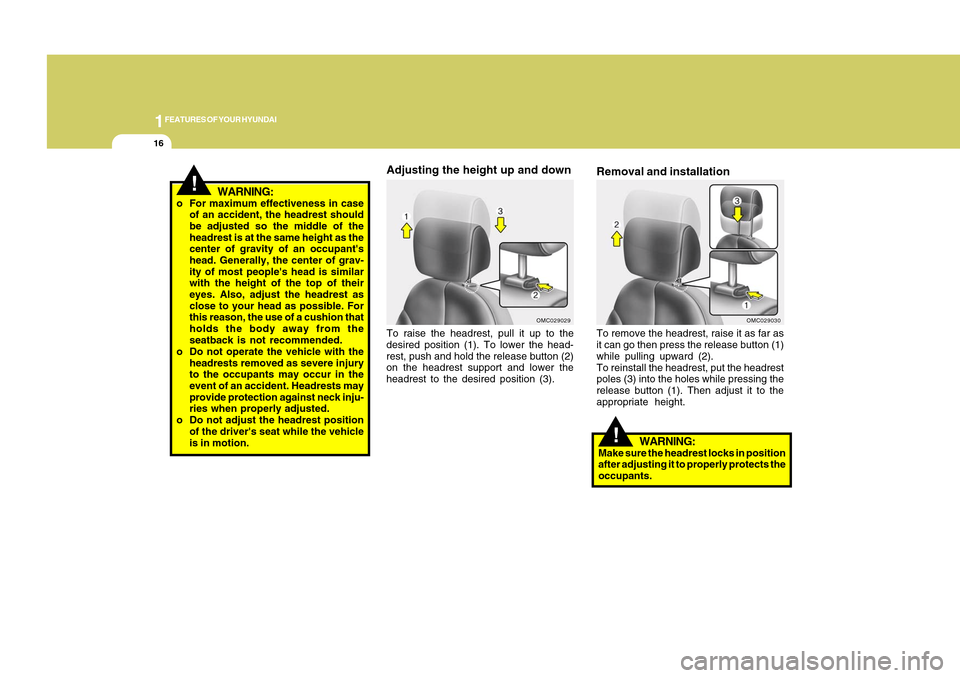
Adjusting the height up and downTo raise the headrest, pull it up to the
desired position (1). To lower the head-
rest, push and hold the release button (2)
on the headrest support and lower the
headrest to the desired position (3).
Removal and installationTo remove the headrest, raise it as far as
it can go then press the release button (1)
while pulling upward (2).
To reinstall the headrest, put the headrest
poles (3) into the holes while pressing the
release button (1). Then adjust it to the
appropriate height.
OMC029029
OMC029030
!
WARNING:
Make sure the headrest locks in position
after adjusting it to properly protects the
occupants.
!
WARNING:
o For maximum effectiveness in case
of an accident, the headrest should
be adjusted so the middle of the
headrest is at the same height as the
center of gravity of an occupant's
head. Generally, the center of grav-
ity of most people's head is similar
with the height of the top of their
eyes. Also, adjust the headrest as
close to your head as possible. For
this reason, the use of a cushion that
holds the body away from the
seatback is not recommended.
o Do not operate the vehicle with the
headrests removed as severe injury
to the occupants may occur in the
event of an accident. Headrests may
provide protection against neck inju-
ries when properly adjusted.
o Do not adjust the headrest position
of the driver's seat while the vehicle
is in motion.
Page 28 of 282
1
FEATURES OF YOUR HYUNDAI
171
FEATURES OF YOUR HYUNDAI
17
B080G01A-GATAdjusting Armrest Angle
(Driver's side only)The armrest will be raised or lowered
manually.
To raise the armrest, pull it up.
To lower it, press the armrest down.
OMC025031
B080F01MC-AATSeat Cushion Height Adjustment
(Driver's Seat only)To raise or lower the front part of the seat
cushion, turn the knob forward or rear-
ward.
OMC029028
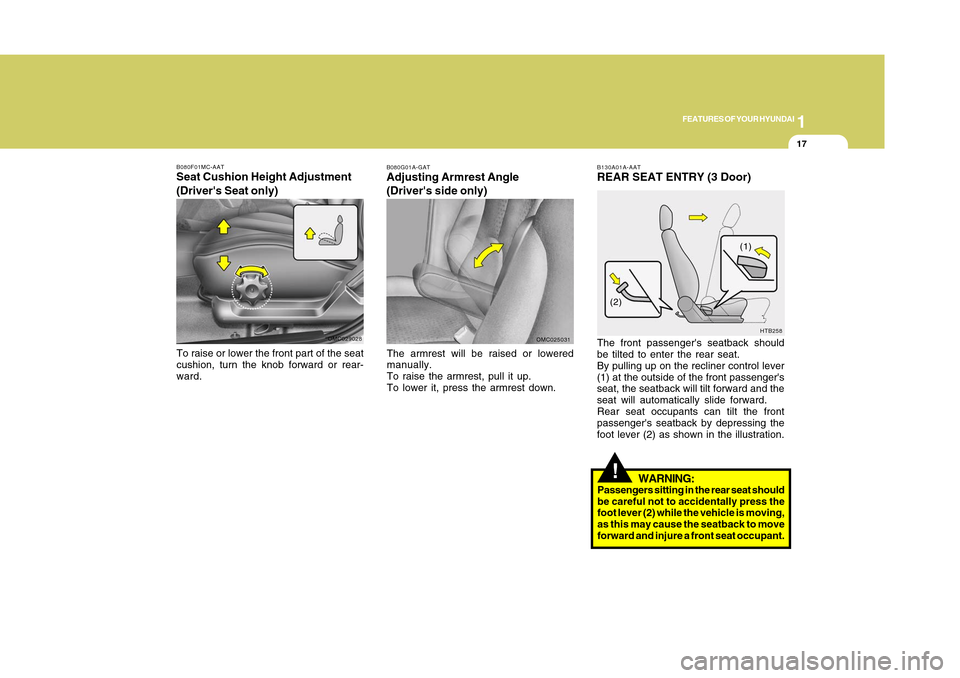
B130A01A-AATREAR SEAT ENTRY (3 Door)The front passenger's seatback should
be tilted to enter the rear seat.
By pulling up on the recliner control lever
(1) at the outside of the front passenger's
seat, the seatback will tilt forward and the
seat will automatically slide forward.
Rear seat occupants can tilt the front
passenger's seatback by depressing the
foot lever (2) as shown in the illustration.
HTB258
(1)
(2)
!
WARNING:
Passengers sitting in the rear seat should
be careful not to accidentally press the
foot lever (2) while the vehicle is moving,
as this may cause the seatback to move
forward and injure a front seat occupant.
Page 29 of 282
1FEATURES OF YOUR HYUNDAI18
B085A01MC-GATREAR SEAT
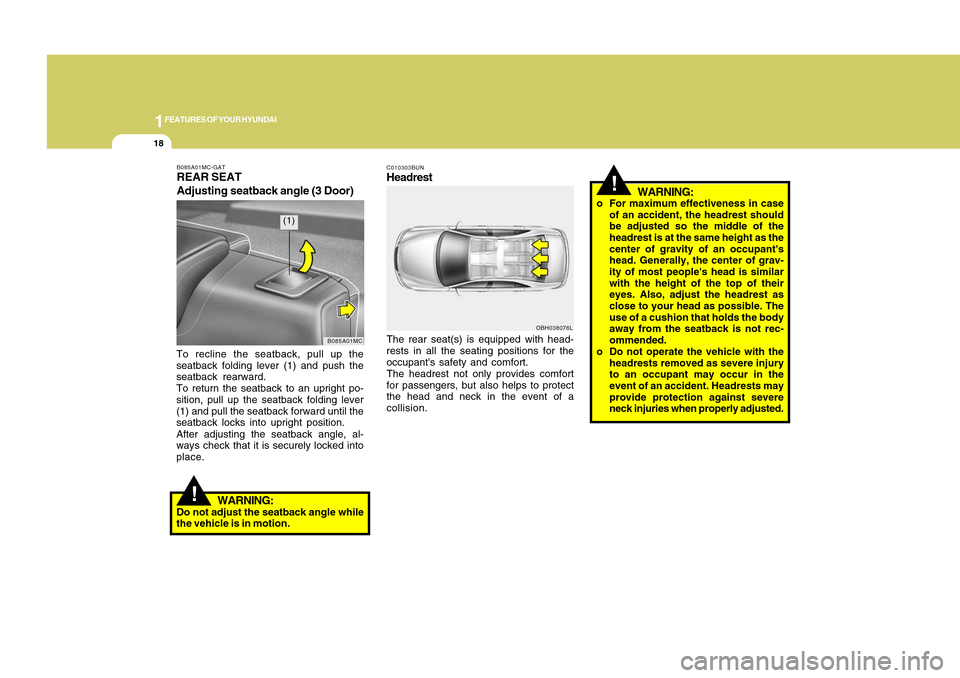
Adjusting seatback angle (3 Door)To recline the seatback, pull up the
seatback folding lever (1) and push the
seatback rearward.
To return the seatback to an upright po-
sition, pull up the seatback folding lever
(1) and pull the seatback forward until the
seatback locks into upright position.
After adjusting the seatback angle, al-
ways check that it is securely locked into
place.
B085A01MC
(1)
!
WARNING:
Do not adjust the seatback angle while
the vehicle is in motion.
C010303BUNHeadrest
OBH038076L
The rear seat(s) is equipped with head-
rests in all the seating positions for the
occupant's safety and comfort.
The headrest not only provides comfort
for passengers, but also helps to protect
the head and neck in the event of a
collision.
!
WARNING:
o For maximum effectiveness in case
of an accident, the headrest should
be adjusted so the middle of the
headrest is at the same height as the
center of gravity of an occupant's
head. Generally, the center of grav-
ity of most people's head is similar
with the height of the top of their
eyes. Also, adjust the headrest as
close to your head as possible. The
use of a cushion that holds the body
away from the seatback is not rec-
ommended.
o Do not operate the vehicle with the
headrests removed as severe injury
to an occupant may occur in the
event of an accident. Headrests may
provide protection against severe
neck injuries when properly adjusted.
Page 30 of 282
1
FEATURES OF YOUR HYUNDAI
191
FEATURES OF YOUR HYUNDAI
19
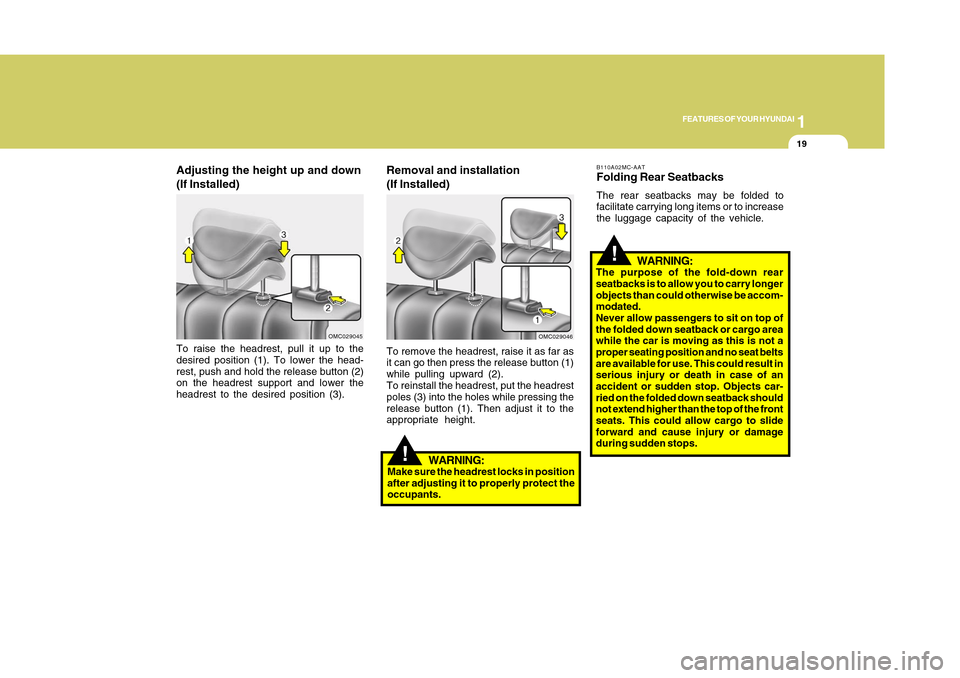
Adjusting the height up and down
(If Installed)To raise the headrest, pull it up to the
desired position (1). To lower the head-
rest, push and hold the release button (2)
on the headrest support and lower the
headrest to the desired position (3).
Removal and installation
(If Installed)To remove the headrest, raise it as far as
it can go then press the release button (1)
while pulling upward (2).
To reinstall the headrest, put the headrest
poles (3) into the holes while pressing the
release button (1). Then adjust it to the
appropriate height.
OMC029045
OMC029046
!
WARNING:
Make sure the headrest locks in position
after adjusting it to properly protect the
occupants.
!
B110A02MC-AATFolding Rear SeatbacksThe rear seatbacks may be folded to
facilitate carrying long items or to increase
the luggage capacity of the vehicle.
WARNING:
The purpose of the fold-down rear
seatbacks is to allow you to carry longer
objects than could otherwise be accom-
modated.
Never allow passengers to sit on top of
the folded down seatback or cargo area
while the car is moving as this is not a
proper seating position and no seat belts
are available for use. This could result in
serious injury or death in case of an
accident or sudden stop. Objects car-
ried on the folded down seatback should
not extend higher than the top of the front
seats. This could allow cargo to slide
forward and cause injury or damage
during sudden stops.