ABS Hyundai Accent 2011 Owner's Manual
[x] Cancel search | Manufacturer: HYUNDAI, Model Year: 2011, Model line: Accent, Model: Hyundai Accent 2011Pages: 282, PDF Size: 14.82 MB
Page 10 of 282
YOUR VEHICLE AT A GLANCE
F10
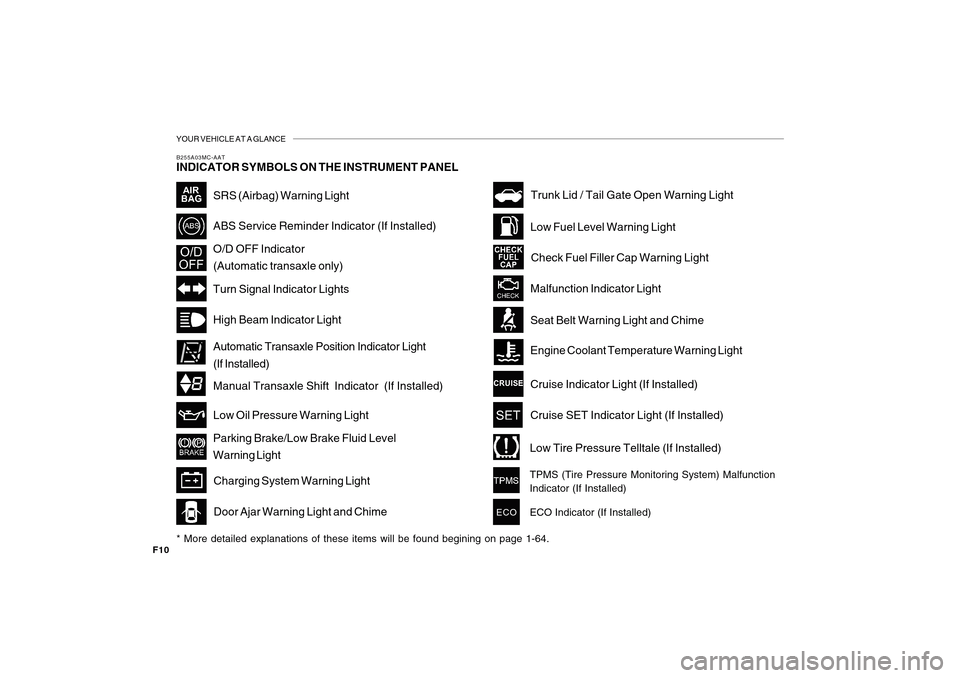
B255A03MC-AATINDICATOR SYMBOLS ON THE INSTRUMENT PANEL* More detailed explanations of these items will be found begining on page 1-64.
SRS (Airbag) Warning LightHigh Beam Indicator LightLow Oil Pressure Warning LightParking Brake/Low Brake Fluid Level
Warning LightCharging System Warning Light
Door Ajar Warning Light and Chime
Trunk Lid / Tail Gate Open Warning LightLow Fuel Level Warning Light
Check Fuel Filler Cap Warning LightMalfunction Indicator LightSeat Belt Warning Light and ChimeEngine Coolant Temperature Warning LightCruise Indicator Light (If Installed)Cruise SET Indicator Light (If Installed)Low Tire Pressure Telltale (If Installed)TPMS (Tire Pressure Monitoring System) Malfunction
Indicator (If Installed)
ECO
ECO Indicator (If Installed)
ABS Service Reminder Indicator (If Installed)O/D OFF Indicator
(Automatic transaxle only)Turn Signal Indicator Lights
Manual Transaxle Shift Indicator (If Installed) Automatic Transaxle Position Indicator Light
(If Installed)
Page 41 of 282
1FEATURES OF YOUR HYUNDAI30
!
WARNING:
o Never let anyone ride in the rear
center seat without fastening all
metal tabs and buckles as described
in this section. This seat belt is
designed to function as a typical 3-
point restraint (lap/shoulder belt).
Using only the shoulder portion or
lap portion of the belt can result in
serious or fatal injuries in the event
of a collision or sudden stop.
o Never unlock the metal tab (A) and
the buckle (B) with the following ex-
ceptions.
(1) In case of folding rear seatbacks
down.
(2) If transporting an object on the
rear seat may cause damage to
the rear seat center belt.
B220D04MC
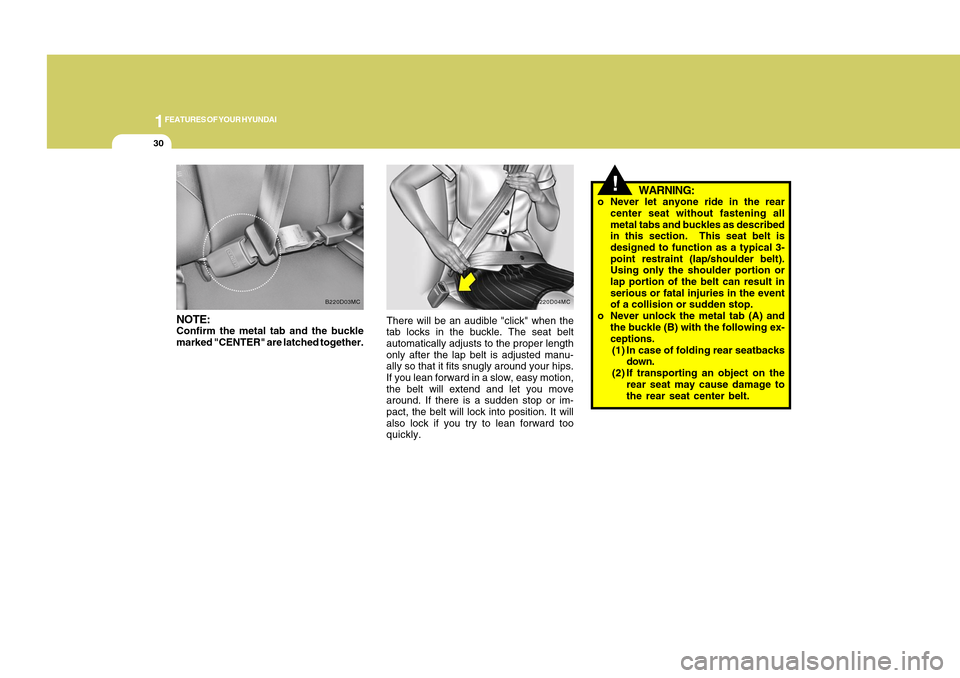
There will be an audible "click" when the
tab locks in the buckle. The seat belt
automatically adjusts to the proper length
only after the lap belt is adjusted manu-
ally so that it fits snugly around your hips.
If you lean forward in a slow, easy motion,
the belt will extend and let you move
around. If there is a sudden stop or im-
pact, the belt will lock into position. It will
also lock if you try to lean forward too
quickly.
NOTE:Confirm the metal tab and the buckle
marked "CENTER" are latched together.
B220D03MC
Page 47 of 282
1FEATURES OF YOUR HYUNDAI36
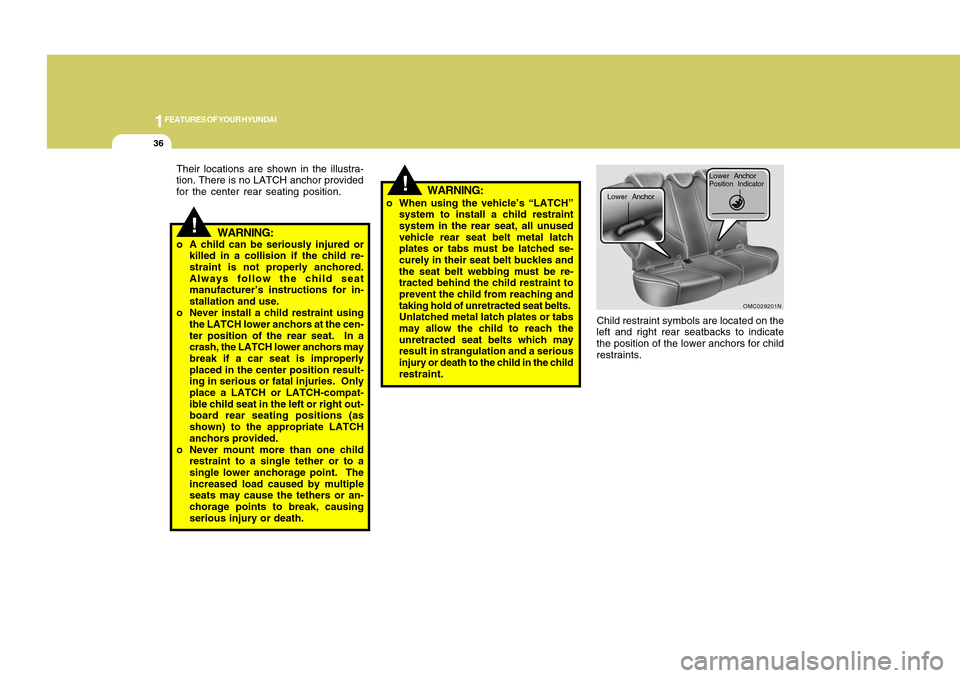
Child restraint symbols are located on the
left and right rear seatbacks to indicate
the position of the lower anchors for child
restraints.
OMC029201N
Lower Anchor
Lower AnchorPosition Indicator
!
o When using the vehicle’s “LATCH”
system to install a child restraint
system in the rear seat, all unused
vehicle rear seat belt metal latch
plates or tabs must be latched se-
curely in their seat belt buckles and
the seat belt webbing must be re-
tracted behind the child restraint to
prevent the child from reaching and
taking hold of unretracted seat belts.
Unlatched metal latch plates or tabs
may allow the child to reach the
unretracted seat belts which may
result in strangulation and a serious
injury or death to the child in the child
restraint.
WARNING:
WARNING:
o A child can be seriously injured or
killed in a collision if the child re-
straint is not properly anchored.
Always follow the child seat
manufacturer’s instructions for in-
stallation and use.
o Never install a child restraint using
the LATCH lower anchors at the cen-
ter position of the rear seat. In a
crash, the LATCH lower anchors may
break if a car seat is improperly
placed in the center position result-
ing in serious or fatal injuries. Only
place a LATCH or LATCH-compat-
ible child seat in the left or right out-
board rear seating positions (as
shown) to the appropriate LATCH
anchors provided.
o Never mount more than one child
restraint to a single tether or to a
single lower anchorage point. The
increased load caused by multiple
seats may cause the tethers or an-
chorage points to break, causing
serious injury or death.
!
Their locations are shown in the illustra-
tion. There is no LATCH anchor provided
for the center rear seating position.
Page 72 of 282
1
FEATURES OF YOUR HYUNDAI
611
FEATURES OF YOUR HYUNDAI
61
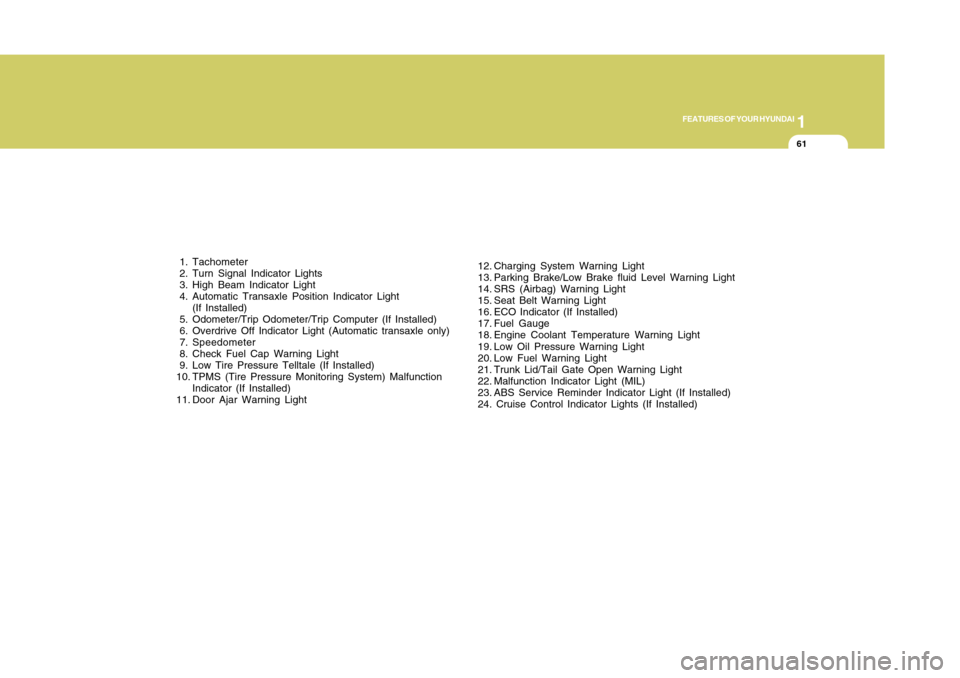
1. Tachometer
2. Turn Signal Indicator Lights
3. High Beam Indicator Light
4. Automatic Transaxle Position Indicator Light
(If Installed)
5. Odometer/Trip Odometer/Trip Computer (If Installed)
6. Overdrive Off Indicator Light (Automatic transaxle only)
7. Speedometer
8. Check Fuel Cap Warning Light
9. Low Tire Pressure Telltale (If Installed)
10. TPMS (Tire Pressure Monitoring System) Malfunction
Indicator (If Installed)
11. Door Ajar Warning Light12. Charging System Warning Light
13. Parking Brake/Low Brake fluid Level Warning Light
14. SRS (Airbag) Warning Light
15. Seat Belt Warning Light
16. ECO Indicator (If Installed)
17. Fuel Gauge
18. Engine Coolant Temperature Warning Light
19. Low Oil Pressure Warning Light
20. Low Fuel Warning Light
21. Trunk Lid/Tail Gate Open Warning Light
22. Malfunction Indicator Light (MIL)
23. ABS Service Reminder Indicator Light (If Installed)
24. Cruise Control Indicator Lights (If Installed)
Page 74 of 282
1
FEATURES OF YOUR HYUNDAI
631
FEATURES OF YOUR HYUNDAI
63
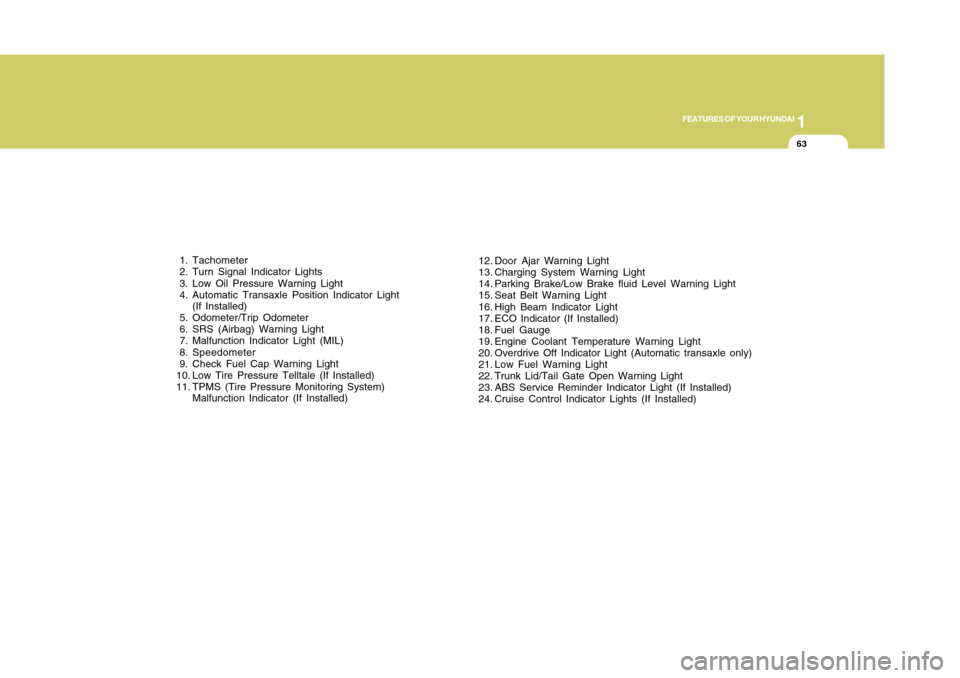
12. Door Ajar Warning Light
13. Charging System Warning Light
14. Parking Brake/Low Brake fluid Level Warning Light
15. Seat Belt Warning Light
16. High Beam Indicator Light
17. ECO Indicator (If Installed)
18. Fuel Gauge
19. Engine Coolant Temperature Warning Light
20. Overdrive Off Indicator Light (Automatic transaxle only)
21. Low Fuel Warning Light
22. Trunk Lid/Tail Gate Open Warning Light
23. ABS Service Reminder Indicator Light (If Installed)
24. Cruise Control Indicator Lights (If Installed) 1. Tachometer
2. Turn Signal Indicator Lights
3. Low Oil Pressure Warning Light
4. Automatic Transaxle Position Indicator Light
(If Installed)
5. Odometer/Trip Odometer
6. SRS (Airbag) Warning Light
7. Malfunction Indicator Light (MIL)
8. Speedometer
9. Check Fuel Cap Warning Light
10. Low Tire Pressure Telltale (If Installed)
11. TPMS (Tire Pressure Monitoring System)
Malfunction Indicator (If Installed)
Page 75 of 282
1FEATURES OF YOUR HYUNDAI64
WARNING AND INDICATOR
LIGHTS
!
B260P02Y-GAT
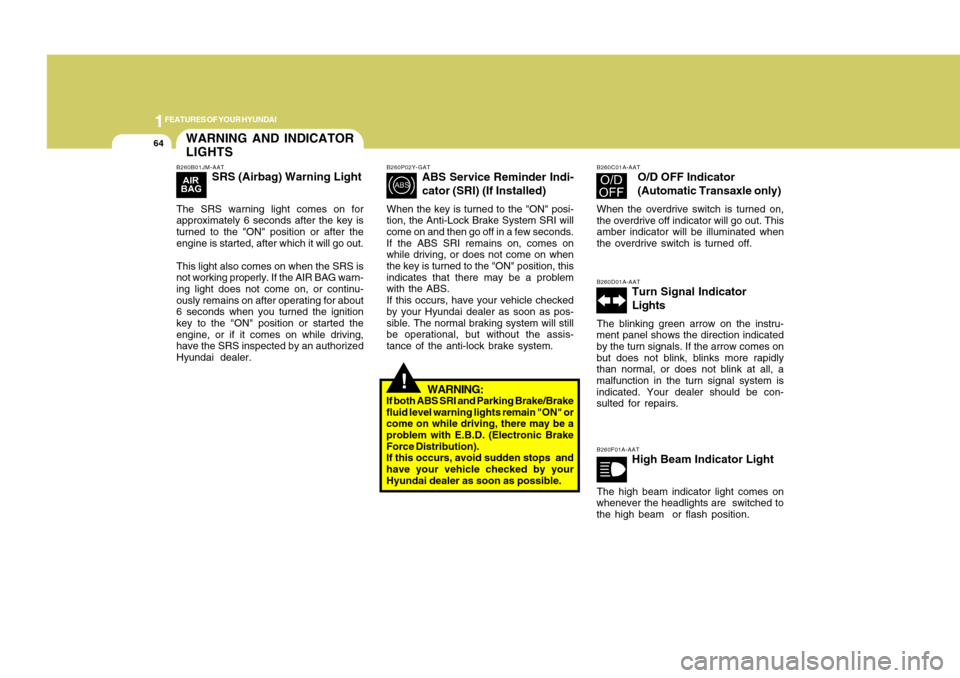
ABS Service Reminder Indi-
cator (SRI) (If Installed)
When the key is turned to the "ON" posi-
tion, the Anti-Lock Brake System SRI will
come on and then go off in a few seconds.
If the ABS SRI remains on, comes on
while driving, or does not come on when
the key is turned to the "ON" position, this
indicates that there may be a problem
with the ABS.
If this occurs, have your vehicle checked
by your Hyundai dealer as soon as pos-
sible. The normal braking system will still
be operational, but without the assis-
tance of the anti-lock brake system.
WARNING:
If both ABS SRI and Parking Brake/Brake
fluid level warning lights remain "ON" or
come on while driving, there may be a
problem with E.B.D. (Electronic Brake
Force Distribution).
If this occurs, avoid sudden stops and
have your vehicle checked by your
Hyundai dealer as soon as possible.
B260C01A-AAT
O/D OFF Indicator
(Automatic Transaxle only)
When the overdrive switch is turned on,
the overdrive off indicator will go out. This
amber indicator will be illuminated when
the overdrive switch is turned off.B260D01A-AAT
Turn Signal Indicator
Lights
The blinking green arrow on the instru-
ment panel shows the direction indicated
by the turn signals. If the arrow comes on
but does not blink, blinks more rapidly
than normal, or does not blink at all, a
malfunction in the turn signal system is
indicated. Your dealer should be con-
sulted for repairs.B260F01A-AAT
High Beam Indicator Light
The high beam indicator light comes on
whenever the headlights are switched to
the high beam or flash position.
B260B01JM-AAT
SRS (Airbag) Warning Light
The SRS warning light comes on for
approximately 6 seconds after the key is
turned to the "ON" position or after the
engine is started, after which it will go out.
This light also comes on when the SRS is
not working properly. If the AIR BAG warn-
ing light does not come on, or continu-
ously remains on after operating for about
6 seconds when you turned the ignition
key to the "ON" position or started the
engine, or if it comes on while driving,
have the SRS inspected by an authorized
Hyundai dealer.
Page 169 of 282
13
DRIVING YOUR HYUNDAI
2
!
o If your vehicle becomes stuck in
snow, mud, sand, etc., then you may
attempt to rock the vehicle free by
moving it forward and backward. Do
not attempt this procedure if people
or objects are anywhere near the
vehicle. During the rocking opera-
tion the vehicle may suddenly move
forward or backward as it becomes
unstuck, causing injury to nearby
people or damage to objects.
WARNING:
!
WARNING:
ABS will not prevent accidents due to
improper or dangerous driving maneu-
vers. Even though vehicle control is
improved during emergency braking,
always maintain a safe distance be-
tween you and objects ahead. Vehicle
speeds should always be reduced dur-
ing extreme road conditions.
The braking distance for cars equipped
with an anti-lock braking system may
be longer than for those without it in the
following road conditions.
During these conditions the veicle
should be driven at reduced speeds.
o Rough, gravel or snow-covered
roads.
o With tire chains installed.
o On roads where the road surface is
pitted or has different surface height.
These roads should be driven at re-
duced speeds. The safety features of
an ABS equipped vehicle should not be
tested by high speed driving or corner-
ing. This could endanger the safety of
yourself or others.
ANTI-LOCK BRAKE SYS-
TEMC120A01MC-AAT(If Installed)The Anti-Lock Brake System (ABS) is
designed to prevent wheel lock-up dur-
ing sudden braking or on hazardous road
surfaces. The ABS control module moni-
tors the wheel speed and controls the
pressure applied to each brake. Thus, in
emergency situations or on slick roads,
ABS will increase vehicle control during
braking.NOTE:o A click sound may be heard in the
engine compartment when the ve-
hicle begins to move after the engine
is started. These conditions are nor-
mal and indicate that the anti-lock
brake system is functioning prop-
erly.
o During ABS operation, a slight pulsa-
tion may be felt in the brake pedal
when the brakes are applied. Also, a
noise may be heard in the engine
compartment while braking. These
conditions are normal and indicate
that the anti-lock brake system is
functioning properly.
Page 205 of 282
44
CORROSION PREVENTION AND APPEARANCE CARE4
Use a clean sponge or cloth, rinse it
frequently and don't damage the finish by
rubbing too hard. For stubborn spots,
dampen them frequently and remove
them a little at a time.
To clean whitewall tires, use a stiff brush
or soap-impregnated steel-wool scour-
ing pad.
To clean plastic wheel covers, use a
clean sponge or soft cloth and water.
To clean cast aluminum alloy wheels,
use a mild soap or neutral detergent. Do
not use abrasive cleaners. Protect the
bare-metal surfaces by cleaning, polish-
ing and waxing. Because aluminum is
subject to corrosion, be sure to give alu-
minum alloy wheels special attention in
winter. If you drive on salted roads, clean
the wheels thoroughly afterwards.
After washing, be sure to rinse thoroughly.
If soapy water dries on the finish, streak-
ing will result.
When the weather is warm and the hu-
midity low, you may find it necessary to
rinse each section immediately after wash-
ing to avoid streaking.After rinsing, dry the car using a damp
chamois or soft, absorbent cloth. The rea-
son for drying the car is to remove water
from the car so it will dry without water
spots. Don't rub, this can damage the
finish.
If you find any nicks or scratches in the
paint, use touch-up paint to cover them to
prevent corrosion. To protect the
paintwork of the car against corrosion,
you must clean your Hyundai (at least
once a month). Give special attention to
the removal of salt, mud and other sub-
stances on the underside of the
splashboards of the car. Make sure that
the outlets and the underside of the doors
are open. Paint damage can be caused
by small accumulation of tar, industrial
precipitation, tree resin, insects and bird
droppings, when not removed immedi-
ately.
If water alone is not strong enough to
remove the accumulated dirt, use a mild
car washing solution. Be sure to rinse the
surface after washing to remove the solu-
tion. Never allow the solution to dry on the
painted surfaces.
WASHING AND WAXINGE030A02A-AATWashing Your HyundaiNever wash your car when the surface is
hot from being in the sun. Always wash
your car in the shade.
Wash your car frequently. Dirt is abrasive
and can scratch the paint if it is not re-
moved. Air pollution or acid rain may
damage the paint and trim through chemi-
cal action if pollutants are allowed to
remain in contact with the surface. If you
live near the ocean or in an area where
road salts or dust control chemicals are
used, you should pay particular attention
to the underside of the car. Start by rins-
ing the car to remove dust and loose dirt.
In winter, or if you have driven through
mud or muddy water, be sure to thor-
oughly clean the underside as well. Use
a hard direct stream of water to remove
accumulations of mud or corrosive mate-
rials. Use a good quality car-washing
solution and follow the manufacturer's
directions on the package. These are
available at your Hyundai dealer or auto
parts outlet. Don't use strong household
detergents, gasoline, strong solvents or
abrasive cleaning powders as these may
damage the finish.
Page 246 of 282
6
DO-IT-YOURSELF MAINTENANCE
28
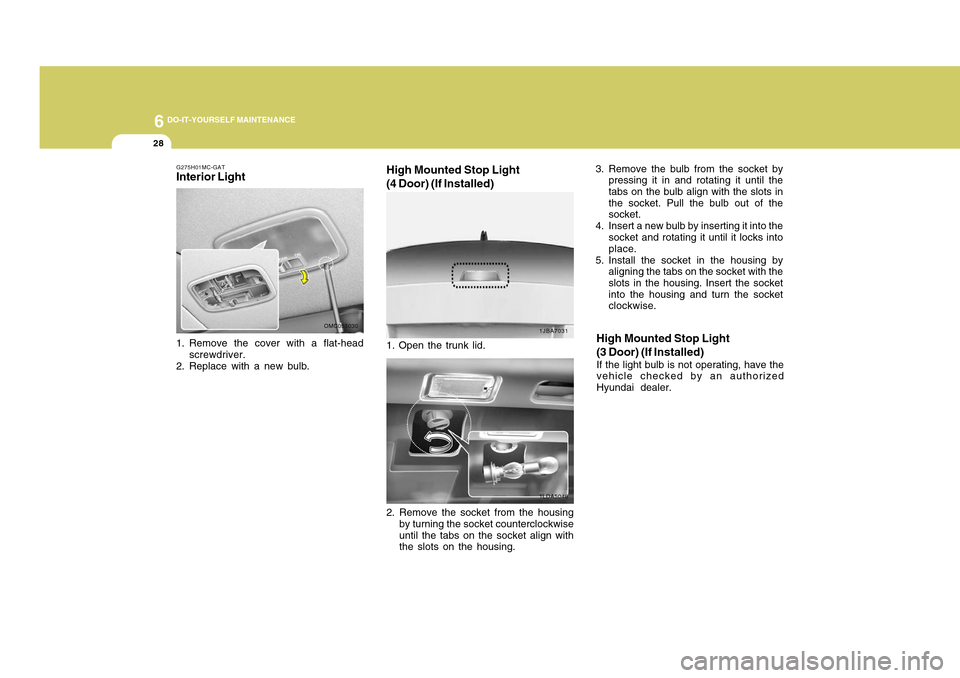
G275H01MC-GATInterior Light1. Remove the cover with a flat-head
screwdriver.
2. Replace with a new bulb.
OMC055030
1JBA70311LDA5046
High Mounted Stop Light
(4 Door) (If Installed)
3. Remove the bulb from the socket by
pressing it in and rotating it until the
tabs on the bulb align with the slots in
the socket. Pull the bulb out of the
socket.
4. Insert a new bulb by inserting it into the
socket and rotating it until it locks into
place.
5. Install the socket in the housing by
aligning the tabs on the socket with the
slots in the housing. Insert the socket
into the housing and turn the socket
clockwise.High Mounted Stop Light
(3 Door) (If Installed)If the light bulb is not operating, have the
vehicle checked by an authorized
Hyundai dealer. 1. Open the trunk lid.
2. Remove the socket from the housing
by turning the socket counterclockwise
until the tabs on the socket align with
the slots on the housing.
Page 248 of 282
6
DO-IT-YOURSELF MAINTENANCE
30
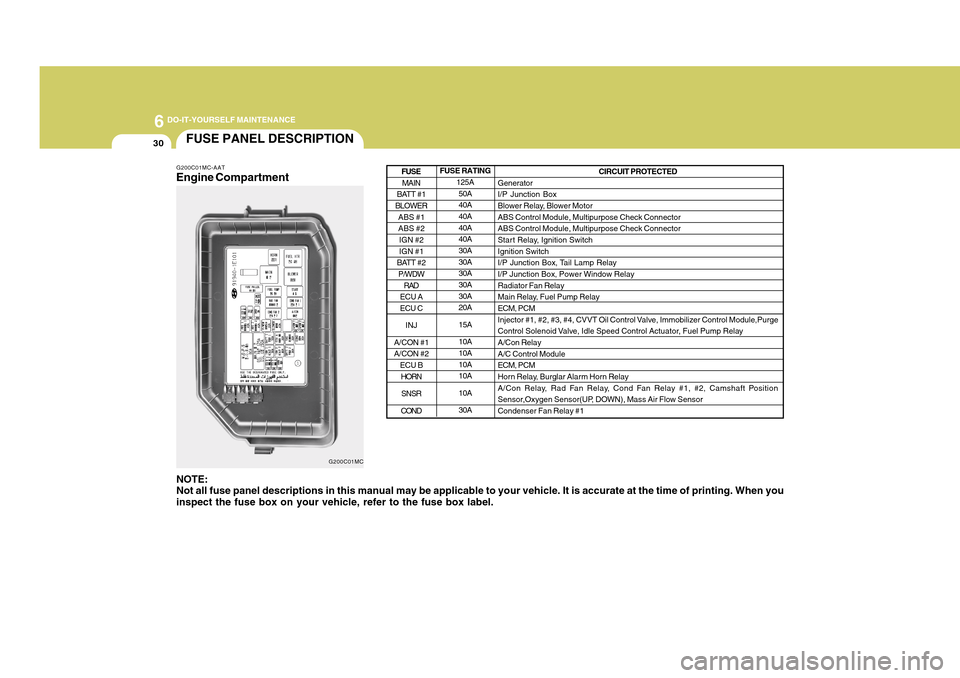
FUSE PANEL DESCRIPTION
FUSE RATING
125A
50A
40A
40A
40A
40A
30A
30A
30A
30A
30A
20A
15A
10A
10A
10A
10A
10A
30A
G200C01MC-AATEngine CompartmentNOTE:
Not all fuse panel descriptions in this manual may be applicable to your vehicle. It is accurate at the time of printing. When you
inspect the fuse box on your vehicle, refer to the fuse box label.
CIRCUIT PROTECTED
Generator
I/P Junction Box
Blower Relay, Blower Motor
ABS Control Module, Multipurpose Check Connector
ABS Control Module, Multipurpose Check Connector
Star t Relay, Ignition Switch
Ignition Switch
I/P Junction Box, Tail Lamp Relay
I/P Junction Box, Power Window Relay
Radiator Fan Relay
Main Relay, Fuel Pump Relay
ECM, PCM
Injector #1, #2, #3, #4, CVVT Oil Control Valve, Immobilizer Control Module,Purge
Control Solenoid Valve, Idle Speed Control Actuator, Fuel Pump Relay
A/Con Relay
A/C Control Module
ECM, PCM
Horn Relay, Burglar Alarm Horn Relay
A/Con Relay, Rad Fan Relay, Cond Fan Relay #1, #2, Camshaft Position
Sensor,Oxygen Sensor(UP, DOWN), Mass Air Flow Sensor
Condenser Fan Relay #1
MAIN
BATT #1
BLOWER
ABS #1
ABS #2
IGN #2
IGN #1
BATT #2
P/WDW
RAD
ECU A
ECU C
INJ
A/CON #1
A/CON #2
ECU B
HORN
SNSR
CONDFUSE
G200C01MC