brakes Hyundai Atos 2002 User Guide
[x] Cancel search | Manufacturer: HYUNDAI, Model Year: 2002, Model line: Atos, Model: Hyundai Atos 2002Pages: 249, PDF Size: 3.11 MB
Page 76 of 249
DRIVING YOUR HYUNDAI
DRIVING YOUR HYUNDAI DRIVING YOUR HYUNDAI
DRIVING YOUR HYUNDAI
DRIVING YOUR HYUNDAI
2- 13
4. To maintain engine braking efficiency andelectrical charging performance, do not use fifth gear (manual transaxle) or overdrive(automatic transaxle).
5. Always secure items in the trailer to prevent load shift while driving.
6. Check the condition and air pressure of all tires on the trailer and your car. Low tirepressure can seriously affect the handling.Also check the spare tire.
7. The vehicle/trailer combination is more af- fected by crosswind and buffeting. When being passed by a large vehicle, keep a constant speed and steer straight ahead.If there is too much wind buffeting slowdown to get out of the other vehicle's airturbulence.
8. When parking your car and trailer, especial- ly on a hill, be sure to follow all the normalprecautions. Turn your front wheel into thecurb, set the parking brake firmly, and putthe transaxle in 1st or Reverse (manual) orPark (automatic). In addition, place wheelchocks at each of the trailer's tires.
9. If the trailer has electric brakes, start your vehicle and trailer moving, and then applythe trailer brake controller by hand to besure the brakes are working. This lets youcheck your electrical connection at the sametime.
10. During your trip, check occasionally to be sure that the load is secure, and that thelights and any trailer brakes are still working.
WARNING:
WARNING: WARNING:
WARNING:
WARNING:
oo
oo
o The tongue load should never exceed;
The tongue load should never exceed; The tongue load should never exceed;
The tongue load should never exceed;
The tongue load should never exceed;
Auto: 25kg
Auto: 25kg Auto: 25kg
Auto: 25kg
Auto: 25kg
Manual : 28kg
Manual : 28kg Manual : 28kg
Manual : 28kg
Manual : 28kg
oo
oo
o Maximun permissible mass of the cou-
Maximun permissible mass of the cou- Maximun permissible mass of the cou-
Maximun permissible mass of the cou-
Maximun permissible mass of the cou-
pling device (ATOS VAN only) : 20kg
pling device (ATOS VAN only) : 20kg pling device (ATOS VAN only) : 20kg
pling device (ATOS VAN only) : 20kg
pling device (ATOS VAN only) : 20kg
oo
oo
o Improperly loading your car and trailer
Improperly loading your car and trailer Improperly loading your car and trailer
Improperly loading your car and trailer
Improperly loading your car and trailer
can seriously affect its steering and brak-
can seriously affect its steering and brak- can seriously affect its steering and brak-
can seriously affect its steering and brak-
can seriously affect its steering and brak-
ing performance causing a crash which
ing performance causing a crash which ing performance causing a crash which
ing performance causing a crash which
ing performance causing a crash which
could cause serious injury or death.
could cause serious injury or death. could cause serious injury or death.
could cause serious injury or death.
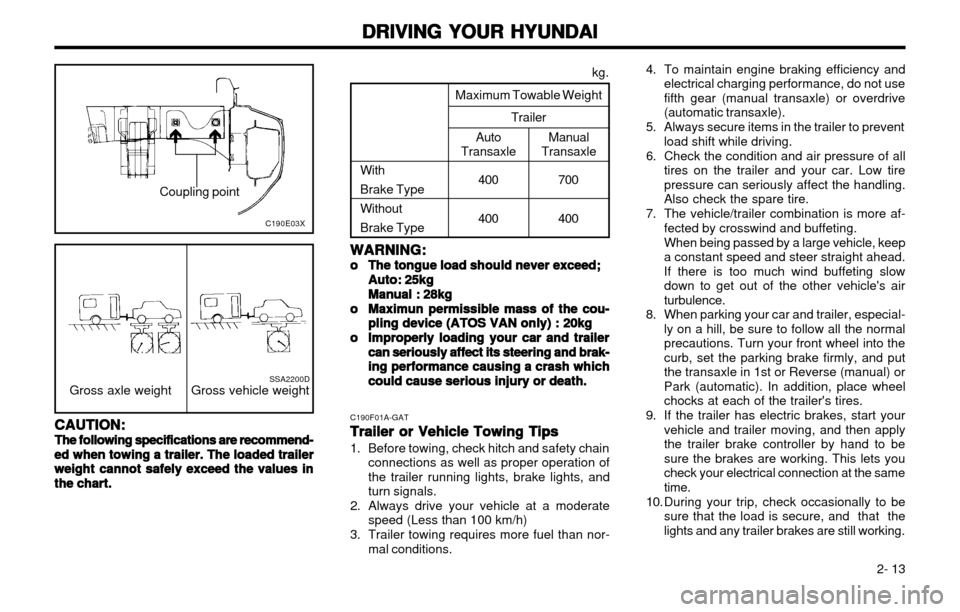
could cause serious injury or death. kg.
Maximum Towable Weight Trailer
Manual
TransaxleAuto
Transaxle
With Brake TypeWithoutBrake Type 400 400
C190F01A-GAT
Trailer or Vehicle Towing Tips
Trailer or Vehicle Towing Tips Trailer or Vehicle Towing Tips
Trailer or Vehicle Towing Tips
Trailer or Vehicle Towing Tips
1. Before towing, check hitch and safety chain
connections as well as proper operation of the trailer running lights, brake lights, andturn signals.
2. Always drive your vehicle at a moderate speed (Less than 100 km/h)
3. Trailer towing requires more fuel than nor- mal conditions.
Gross axle weight Gross vehicle weightSSA2200D
CAUTION:
CAUTION: CAUTION:
CAUTION:
CAUTION:
The following specifications are recommend-
The following specifications are recommend- The following specifications are recommend-
The following specifications are recommend-
The following specifications are recommend- ed when towing a
ed when towing a ed when towing a
ed when towing a
ed when towing a trailer. The loaded trailer
trailer. The loaded trailer trailer. The loaded trailer
trailer. The loaded trailer
trailer. The loaded trailer
weight cannot safely exceed the values in
weight cannot safely exceed the values in weight cannot safely exceed the values in
weight cannot safely exceed the values in
weight cannot safely exceed the values in
the the
the the
the chart.
chart. chart.
chart.
chart. Coupling point
C190E03X
700 400
Page 77 of 249
DRIVING YOUR HYUNDAI
DRIVING YOUR HYUNDAI DRIVING YOUR HYUNDAI
DRIVING YOUR HYUNDAI
DRIVING YOUR HYUNDAI
2- 14
11. Avoid jerky starts, sudden acceleration or
sudden stops.
12. Avoid sharp turns and rapid lane changes.
13. Avoid holding the brake pedal down too long or too frequently. This could cause the brakes to overheat, resulting in reduced brakingefficiency.
14. When going down a hill, shift into a lower gear and use the engine braking effect. When ascending a long grade, downshift the transaxle to a lower gear and reduce speedto reduce chances of engine overloadingand/or overheating.
15. If you have to stop while going uphill, do not hold the vehicle in place by pressing on theaccelerator. This can cause the automatictransaxle to overheat. Use the parking brakeor footbrake.
NOTE:
NOTE: NOTE:
NOTE:
NOTE:
When towing check transaxle fluid more
When towing check transaxle fluid more When towing check transaxle fluid more
When towing check transaxle fluid more
When towing check transaxle fluid more frequently.
frequently. frequently.
frequently.
frequently.
CAUTION:
CAUTION: CAUTION:
CAUTION:
CAUTION:
If overheating should occur when towing,
If overheating should occur when towing, If overheating should occur when towing,
If overheating should occur when towing,
If overheating should occur when towing,(temperature gauge reads near red zone),
(temperature gauge reads near red zone), (temperature gauge reads near red zone),
(temperature gauge reads near red zone),
(temperature gauge reads near red zone),
taking the following action may reduce or
taking the following action may reduce or taking the following action may reduce or
taking the following action may reduce or
taking the following action may reduce or
eliminate the problem.
eliminate the problem. eliminate the problem.
eliminate the problem.
eliminate the problem. 1. Turn off the air conditioner.
2. Reduce highway speed.
3. Select a lower gear when going uphill.
4. While in stop and go traffic, place the gear
selector in park or neutral and idle the en- gine at a higher speed.
Page 80 of 249
WHAT TO DO IN AN EMERGENCY
WHAT TO DO IN AN EMERGENCY WHAT TO DO IN AN EMERGENCY
WHAT TO DO IN AN EMERGENCY
WHAT TO DO IN AN EMERGENCY
3-3
WARNING:
WARNING: WARNING:
WARNING:
WARNING:
While the engine is running, keep hands,
While the engine is running, keep hands, While the engine is running, keep hands,
While the engine is running, keep hands,
While the engine is running, keep hands, long hair
long hair long hair
long hair
long hair
and clothing away from moving
and clothing away from moving and clothing away from moving
and clothing away from moving
and clothing away from moving
parts such as the fan and drive belts to
parts such as the fan and drive belts to parts such as the fan and drive belts to
parts such as the fan and drive belts to
parts such as the fan and drive belts to
prevent
prevent prevent
prevent
prevent
injury.
injury. injury.
injury.
injury.
5. If the water pump drive belt is broken or engine coolant is leaking out, stop the en- gine immediately and call the nearestHyundai dealer for assistance.
WARNING:
WARNING: WARNING:
WARNING:
WARNING:
Do not remove the radiator cap when the
Do not remove the radiator cap when the Do not remove the radiator cap when the
Do not remove the radiator cap when the
Do not remove the radiator cap when the engine is hot. This may allow
engine is hot. This may allow engine is hot. This may allow
engine is hot. This may allow
engine is hot. This may allow coolant to be
coolant to be coolant to be
coolant to be
coolant to be
blown out of the opening and cause serious
blown out of the opening and cause serious blown out of the opening and cause serious
blown out of the opening and cause serious
blown out of the opening and cause serious
burns.
burns. burns.
burns.
burns.
6. If you cannot find the cause of the overheat-
ing, wait until the engine temperature has returned to normal. Then, if engine coolanthas been lost, carefully remove the radiator
cap and add engine coolant to bring the fluidlevel in the reservoir up to the halfway mark.
7. Proceed with caution, keeping alert for fur- ther signs of overheating. If overheating hap-pens again, call a Hyundai dealer for assis-tance.
CAUTION:
CAUTION: CAUTION:
CAUTION:
CAUTION:
Serious loss of engine coolant indicates
Serious loss of engine coolant indicates Serious loss of engine coolant indicates
Serious loss of engine coolant indicates
Serious loss of engine coolant indicates there is a leak in
there is a leak in there is a leak in
there is a leak in
there is a leak in the cooling system and this
the cooling system and this the cooling system and this
the cooling system and this
the cooling system and this
should be checked as soon as possible by a
should be checked as soon as possible by a should be checked as soon as possible by a
should be checked as soon as possible by a
should be checked as soon as possible by a
Hyundai
Hyundai Hyundai
Hyundai
Hyundai dealer.
dealer. dealer.
dealer.
dealer. D040A01A-GAT
SPARE TIRE
SPARE TIRE SPARE TIRE
SPARE TIRE
SPARE TIRE
The following instructions for the FULL SIZE
spare tire should be observed:
Check inflation pressure as soon as practical
after installing the spare tire, and adjust to the specified pressure. The tire pressure should beperiodically checked and maintained at thespecified pressure while the tire is stored.
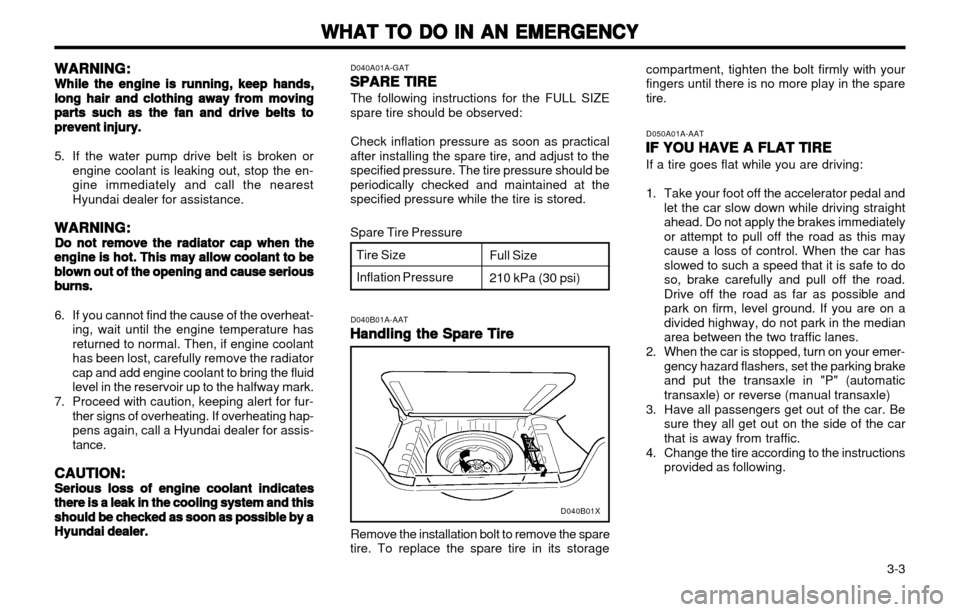
Tire Size Inflation Pressure Full Size 210 kPa (30 psi)
Spare Tire Pressure
D040B01A-AAT
Handling the Spare Tire
Handling the Spare Tire Handling the Spare Tire
Handling the Spare Tire
Handling the Spare Tire
Remove the installation bolt to remove the spare
tire. To replace the spare tire in its storage D050A01A-AAT
IF YOU HAVE A FLAT TIRE
IF YOU HAVE A FLAT TIRE IF YOU HAVE A FLAT TIRE
IF YOU HAVE A FLAT TIRE
IF YOU HAVE A FLAT TIRE If a tire goes flat while you are driving:
1. Take your foot off the accelerator pedal and
let the car slow down while driving straight ahead. Do not apply the brakes immediatelyor attempt to pull off the road as this may
cause a loss of control. When the car hasslowed to such a speed that it is safe to doso, brake carefully and pull off the road.Drive off the road as far as possible and
park on firm, level ground. If you are on adivided highway, do not park in the medianarea between the two traffic lanes.
2. When the car is stopped, turn on your emer- gency hazard flashers, set the parking brakeand put the transaxle in "P" (automatic
transaxle) or reverse (manual transaxle)
3. Have all passengers get out of the car. Be sure they all get out on the side of the carthat is away from traffic.
4. Change the tire according to the instructions provided as following.
compartment, tighten the bolt firmly with yourfingers until there is no more play in the sparetire.
D040B01X
Page 85 of 249
WHAT TO DO IN AN EMERGENCY
WHAT TO DO IN AN EMERGENCY WHAT TO DO IN AN EMERGENCY
WHAT TO DO IN AN EMERGENCY
WHAT TO DO IN AN EMERGENCY
3-8 D080C02A-GAT
Towing a Car With Automatic Transaxle
Towing a Car With Automatic Transaxle Towing a Car With Automatic Transaxle
Towing a Car With Automatic Transaxle
Towing a Car With Automatic Transaxle
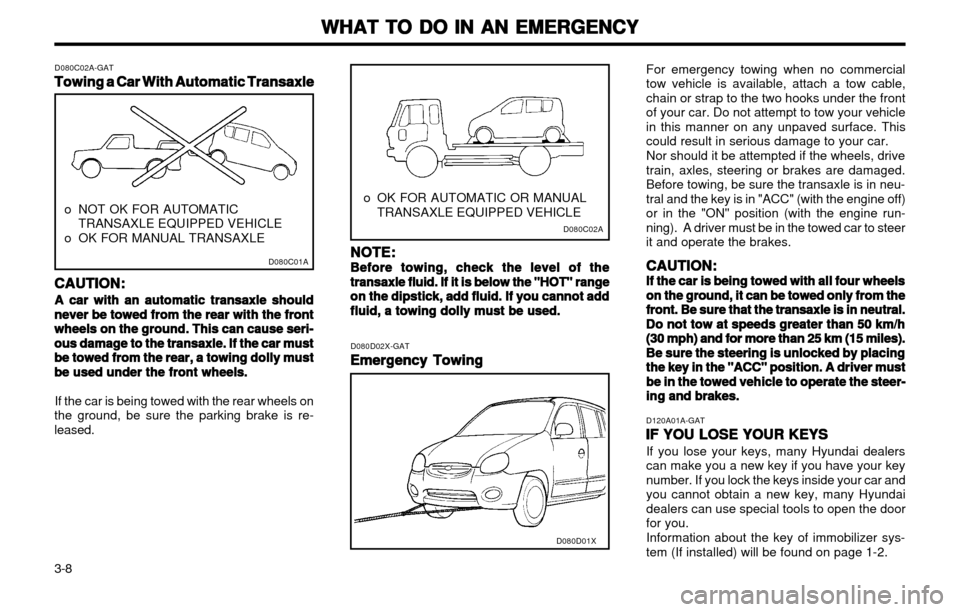
o NOT OK FOR AUTOMATIC TRANSAXLE EQUIPPED VEHICLE
o OK FOR MANUAL TRANSAXLE
CAUTION:
CAUTION: CAUTION:
CAUTION:
CAUTION:
A car with an automatic transaxle should
A car with an automatic transaxle should A car with an automatic transaxle should
A car with an automatic transaxle should
A car with an automatic transaxle should never be towed from the rear with the front
never be towed from the rear with the front never be towed from the rear with the front
never be towed from the rear with the front
never be towed from the rear with the front
wheels on the ground. This can cause seri-
wheels on the ground. This can cause seri- wheels on the ground. This can cause seri-
wheels on the ground. This can cause seri-
wheels on the ground. This can cause seri-
ous damage to the transaxle. If the car must
ous damage to the transaxle. If the car must ous damage to the transaxle. If the car must
ous damage to the transaxle. If the car must
ous damage to the transaxle. If the car must
be towed from the rear, a towing dolly must
be towed from the rear, a towing dolly must be towed from the rear, a towing dolly must
be towed from the rear, a towing dolly must
be towed from the rear, a towing dolly must
be used under the front wheels.
be used under the front wheels. be used under the front wheels.
be used under the front wheels.
be used under the front wheels.
If the car is being towed with the rear wheels on
the ground, be sure the parking brake is re- leased. D080D02X-GAT
Emergency Towing
Emergency Towing Emergency Towing
Emergency Towing
Emergency Towing For emergency towing when no commercialtow vehicle is available, attach a tow cable,chain or strap to the two hooks under the frontof your car. Do not attempt to tow your vehiclein this manner on any unpaved surface. Thiscould result in serious damage to your car. Nor should it be attempted if the wheels, drive train, axles, steering or brakes are damaged.Before towing, be sure the transaxle is in neu-tral and the key is in "ACC" (with the engine off)or in the "ON" position (with the engine run-ning). A driver must be in the towed car to steerit and operate the brakes.
CAUTION:
CAUTION: CAUTION:
CAUTION:
CAUTION:
If the car is being towed with all four wheels
If the car is being towed with all four wheels If the car is being towed with all four wheels
If the car is being towed with all four wheels
If the car is being towed with all four wheels
on the ground, it can be towed only from the
on the ground, it can be towed only from the on the ground, it can be towed only from the
on the ground, it can be towed only from the
on the ground, it can be towed only from the
front. Be sure that the transaxle is in neutral.
front. Be sure that the transaxle is in neutral. front. Be sure that the transaxle is in neutral.
front. Be sure that the transaxle is in neutral.
front. Be sure that the transaxle is in neutral.
Do not tow at speeds greater than 50 km/h
Do not tow at speeds greater than 50 km/h Do not tow at speeds greater than 50 km/h
Do not tow at speeds greater than 50 km/h
Do not tow at speeds greater than 50 km/h
(30 mph) and for more than 25 km (15 miles).
(30 mph) and for more than 25 km (15 miles). (30 mph) and for more than 25 km (15 miles).
(30 mph) and for more than 25 km (15 miles).
(30 mph) and for more than 25 km (15 miles).
Be sure the steering is unlocked by placing
Be sure the steering is unlocked by placing Be sure the steering is unlocked by placing
Be sure the steering is unlocked by placing
Be sure the steering is unlocked by placing
the key in the "ACC" position. A driver must
the key in the "ACC" position. A driver must the key in the "ACC" position. A driver must
the key in the "ACC" position. A driver must
the key in the "ACC" position. A driver must
be in the towed vehicle to operate the steer-
be in the towed vehicle to operate the steer- be in the towed vehicle to operate the steer-
be in the towed vehicle to operate the steer-
be in the towed vehicle to operate the steer-
ing and brakes.
ing and brakes. ing and brakes.
ing and brakes.
ing and brakes.
o OK FOR AUTOMATIC OR MANUAL
TRANSAXLE EQUIPPED VEHICLE
D080C01A
D080C02A
D080D01X
D120A01A-GAT
IF YOU LOSE YOUR KEYS
IF YOU LOSE YOUR KEYS IF YOU LOSE YOUR KEYS
IF YOU LOSE YOUR KEYS
IF YOU LOSE YOUR KEYS
If you lose your keys, many Hyundai dealers can make you a new key if you have your keynumber. If you lock the keys inside your car andyou cannot obtain a new key, many Hyundaidealers can use special tools to open the doorfor you. Information about the key of immobilizer sys- tem (If installed) will be found on page 1-2.
NOTE:
NOTE: NOTE:
NOTE:
NOTE:
Before towing, check the level of the
Before towing, check the level of the Before towing, check the level of the
Before towing, check the level of the
Before towing, check the level of the
transaxle fluid. If it is below the "HOT" range
transaxle fluid. If it is below the "HOT" range transaxle fluid. If it is below the "HOT" range
transaxle fluid. If it is below the "HOT" range
transaxle fluid. If it is below the "HOT" range
on the dipstick, add fluid. If you cannot add
on the dipstick, add fluid. If you cannot add on the dipstick, add fluid. If you cannot add
on the dipstick, add fluid. If you cannot add
on the dipstick, add fluid. If you cannot add
fluid, a towing dolly must be used.
fluid, a towing dolly must be used. fluid, a towing dolly must be used.
fluid, a towing dolly must be used.
fluid, a towing dolly must be used.
Page 107 of 249
DO-IT-YOURSELF MAINTENANCE
DO-IT-YOURSELF MAINTENANCE DO-IT-YOURSELF MAINTENANCE
DO-IT-YOURSELF MAINTENANCE
DO-IT-YOURSELF MAINTENANCE
6-11
WARNING:
WARNING: WARNING:
WARNING:
WARNING:
The cooling fan is controlled by engine cool-
The cooling fan is controlled by engine cool- The cooling fan is controlled by engine cool-
The cooling fan is controlled by engine cool-
The cooling fan is controlled by engine cool- ant temperature and may sometimes oper-
ant temperature and may sometimes oper- ant temperature and may sometimes oper-
ant temperature and may sometimes oper-
ant temperature and may sometimes oper-
ate even when the engine is not running.
ate even when the engine is not running. ate even when the engine is not running.
ate even when the engine is not running.
ate even when the engine is not running.
Use extreme caution when working near the
Use extreme caution when working near the Use extreme caution when working near the
Use extreme caution when working near the
Use extreme caution when working near the
blades of the cooling fan, so that you are not
blades of the cooling fan, so that you are not blades of the cooling fan, so that you are not
blades of the cooling fan, so that you are not
blades of the cooling fan, so that you are not
injured by a rotating fan blade. As the en-
injured by a rotating fan blade. As the en- injured by a rotating fan blade. As the en-
injured by a rotating fan blade. As the en-
injured by a rotating fan blade. As the en-
gine coolant temperature decreases, the fan
gine coolant temperature decreases, the fan gine coolant temperature decreases, the fan
gine coolant temperature decreases, the fan
gine coolant temperature decreases, the fan
will automatically shut off. This is a normal
will automatically shut off. This is a normal will automatically shut off. This is a normal
will automatically shut off. This is a normal
will automatically shut off. This is a normal
condition.
condition. condition.
condition.
condition.
G120C02A-AATRecommended Brake Fluid
Recommended Brake Fluid Recommended Brake Fluid
Recommended Brake Fluid
Recommended Brake Fluid
Use only hydraulic brake fluid conforming to
DOT 3 or DOT 4 specifications in your braking G120A01A-AAT
CHECKING THE BRAKES
CHECKING THE BRAKES CHECKING THE BRAKES
CHECKING THE BRAKES
CHECKING THE BRAKES
CAUTION:
CAUTION: CAUTION:
CAUTION:
CAUTION:
Because brakes are essential to the safe
Because brakes are essential to the safe Because brakes are essential to the safe
Because brakes are essential to the safe
Because brakes are essential to the safeoperation of the car, it is suggested that
operation of the car, it is suggested that operation of the car, it is suggested that
operation of the car, it is suggested that
operation of the car, it is suggested that
they be checked and inspected by your
they be checked and inspected by your they be checked and inspected by your
they be checked and inspected by your
they be checked and inspected by your
Hyundai dealer. The brakes should be
Hyundai dealer. The brakes should be Hyundai dealer. The brakes should be
Hyundai dealer. The brakes should be
Hyundai dealer. The brakes should be
checked and inspected for wear at those
checked and inspected for wear at those checked and inspected for wear at those
checked and inspected for wear at those
checked and inspected for wear at those
intervals specified in the vehicle mainte-
intervals specified in the vehicle mainte- intervals specified in the vehicle mainte-
intervals specified in the vehicle mainte-
intervals specified in the vehicle mainte-
nance schedule in Section 5.
nance schedule in Section 5. nance schedule in Section 5.
nance schedule in Section 5.
nance schedule in Section 5.
G120B01A-AATChecking the Brake Fluid Level
Checking the Brake Fluid Level Checking the Brake Fluid Level
Checking the Brake Fluid Level
Checking the Brake Fluid Level
WARNING:
WARNING: WARNING:
WARNING:
WARNING:
Use caution when handling brake fluid. It
Use caution when handling brake fluid. It Use caution when handling brake fluid. It
Use caution when handling brake fluid. It
Use caution when handling brake fluid. Itcan damage your vision if it gets into your
can damage your vision if it gets into your can damage your vision if it gets into your
can damage your vision if it gets into your
can damage your vision if it gets into your
eyes. It will also damage your vehicle's paint
eyes. It will also damage your vehicle's paint eyes. It will also damage your vehicle's paint
eyes. It will also damage your vehicle's paint
eyes. It will also damage your vehicle's paint
if spilled on it and not removed immediately.
if spilled on it and not removed immediately. if spilled on it and not removed immediately.
if spilled on it and not removed immediately.
if spilled on it and not removed immediately.
G110D02A-GAT
To Check the Automatic Transaxle Fluid
To Check the Automatic Transaxle Fluid To Check the Automatic Transaxle Fluid
To Check the Automatic Transaxle Fluid
To Check the Automatic Transaxle Fluid
Level
Level Level
Level
Level
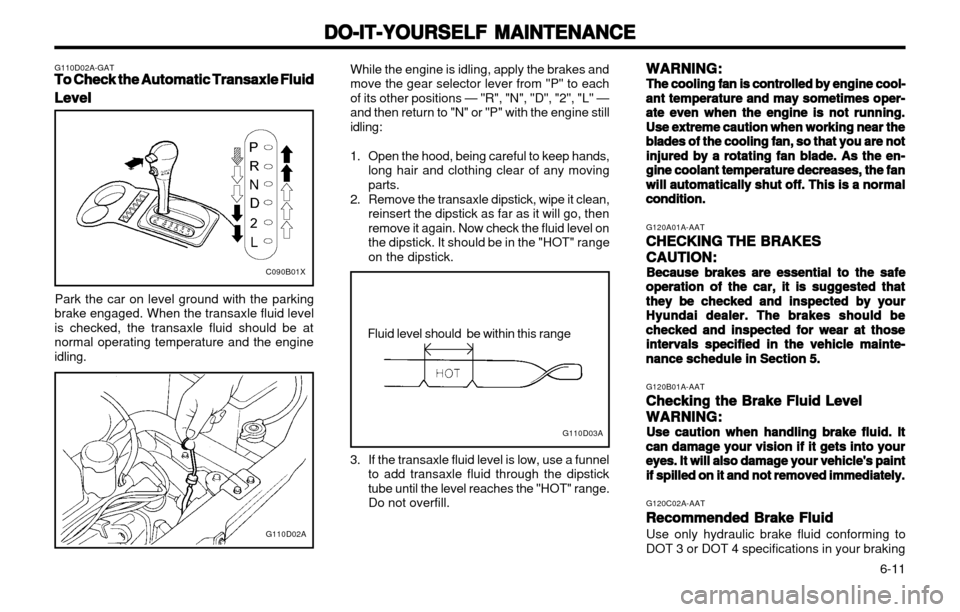
Park the car on level ground with the parking
brake engaged. When the transaxle fluid level is checked, the transaxle fluid should be atnormal operating temperature and the engineidling. While the engine is idling, apply the brakes andmove the gear selector lever from "P" to eachof its other positions — "R", "N", "D", "2", "L" —and then return to "N" or "P" with the engine stillidling:
1. Open the hood, being careful to keep hands,
long hair and clothing clear of any moving parts.
2. Remove the transaxle dipstick, wipe it clean, reinsert the dipstick as far as it will go, thenremove it again. Now check the fluid level onthe dipstick. It should be in the "HOT" rangeon the dipstick.
Fluid level should be within this range
3. If the transaxle fluid level is low, use a funnel to add transaxle fluid through the dipsticktube until the level reaches the "HOT" range.Do not overfill.
C090B01X
G110D02A
G110D03A
Page 125 of 249
INDEX
INDEX INDEX
INDEX
INDEX
10-1
Catalytic Converter .................................................................... 7-1 ~ 7-2
Child-Protector Rear Door Lock ......................................................... 1-5
Cigarette Lighter ................................................................................
1-26
Clock ................................................................................................ 1-26
Clutch Pedal freeplay ........................................................................ 6-13
Combination Light Daytime running lights ................................................................. 1-23
Headlight flasher .......................................................................... 1-24
Headlight switch ........................................................................... 1-23
High-beam switch ........................................................................ 1-24
Lane change signal ...................................................................... 1-23
Turn signal operation ................................................................... 1-23
Compact Disk Player Operation (H922M) ........................................ 1-49
Cooling Fans ..................................................................................... 6-16
Corrosion Protection Cleaning the interior ....................................................................... 4-3
Protecting your Hyundai from corrosion ........................................ 4-1
Washing and waxing ...................................................................... 4-2
DD
DD
D
Defroster ........................................................................................... 1-38
Door Central door locking system .......................................................... 1-7
Door locks ...................................................................................... 1-4
Locking, unlocking front doors with a key ..................................... 1-4
Drive Belts ............................................................................... 6-12, 6-14 Driving Economical driving ......................................................................... 2-9
Smooth cornering ........................................................................... 2-9
Winter driving ................................................................................. 2-9
ZK000A1-G
10. INDEX
10. INDEX 10. INDEX
10. INDEX
10. INDEX
AA
AA
A
Air bag .................................................................................... 1-13 ~ 1-17
Air Cleaner Filter ................................................................................. 6-9Air Conditioning
Care ............................................................................................. 6-12
Operation ..................................................................................... 1-38
Antenna ............................................................................................. 1-54
Ashtray .............................................................................................. 1-27
Audio Fault Code .............................................................................. 1-51
BB
BB
B
Battery ...................................................................................... 2-10, 6-16
Bi-Level Heating ................................................................................ 1-36
Brake Anti-lock system ............................................................................ 2-8
Checking the brakes .................................................................... 6-11
Fluid .................................................................................. 6-11 ~ 6-12
Pedal clearance ........................................................................... 6-14
Pedal freeplay .............................................................................. 6-13
Practices ............................................................................... 2-7 ~ 2-8
Breaking-In your New Hyundai ........................................................... 1-1
CC
CC
C
Care of Cassette Tapes ................................................................... 1-52
Cassette Tape Player Operation (H900A) ............................. 1-44 ~ 1-46
1010
1010
10
Page 155 of 249
FEATURES OF YOUR HYUNDAI
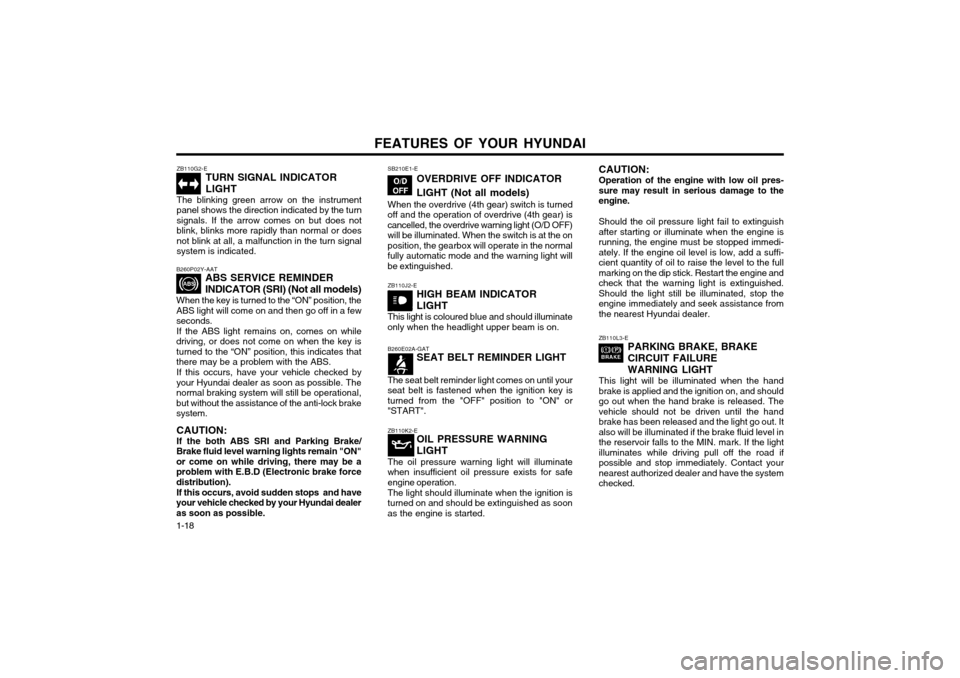
1-18 ZB110G2-E
TURN SIGNAL INDICATOR LIGHT
The blinking green arrow on the instrument panel shows the direction indicated by the turnsignals. If the arrow comes on but does notblink, blinks more rapidly than normal or doesnot blink at all, a malfunction in the turn signalsystem is indicated.
B260P02Y-AAT ABS SERVICE REMINDER INDICATOR (SRI) (Not all models)
When the key is turned to the “ON” position, the ABS light will come on and then go off in a fewseconds. If the ABS light remains on, comes on while
driving, or does not come on when the key isturned to the “ON” position, this indicates thatthere may be a problem with the ABS.
If this occurs, have your vehicle checked by
your Hyundai dealer as soon as possible. Thenormal braking system will still be operational,but without the assistance of the anti-lock brakesystem.
CAUTION: If the both ABS SRI and Parking Brake/
Brake fluid level warning lights remain "ON" or come on while driving, there may be aproblem with E.B.D (Electronic brake forcedistribution).
If this occurs, avoid sudden stops and have
your vehicle checked by your Hyundai dealeras soon as possible. SB210E1-E
OVERDRIVE OFF INDICATOR LIGHT (Not all models)
When the overdrive (4th gear) switch is turned off and the operation of overdrive (4th gear) iscancelled, the overdrive warning light (O/D OFF)will be illuminated. When the switch is at the onposition, the gearbox will operate in the normalfully automatic mode and the warning light willbe extinguished.
ZB110J2-E HIGH BEAM INDICATOR LIGHT
This light is coloured blue and should illuminate only when the headlight upper beam is on.
B260E02A-GAT SEAT BELT REMINDER LIGHT
The seat belt reminder light comes on until your seat belt is fastened when the ignition key isturned from the "OFF" position to "ON" or"START".
ZB110K2-E OIL PRESSURE WARNING LIGHT
The oil pressure warning light will illuminate when insufficient oil pressure exists for safeengine operation. The light should illuminate when the ignition is turned on and should be extinguished as soonas the engine is started.
ZB110L3-E PARKING BRAKE, BRAKE CIRCUIT FAILURE WARNING LIGHT
This light will be illuminated when the hand brake is applied and the ignition on, and shouldgo out when the hand brake is released. Thevehicle should not be driven until the handbrake has been released and the light go out. Italso will be illuminated if the brake fluid level inthe reservoir falls to the MIN. mark. If the lightilluminates while driving pull off the road ifpossible and stop immediately. Contact yournearest authorized dealer and have the systemchecked.
CAUTION: Operation of the engine with low oil pres- sure may result in serious damage to theengine. Should the oil pressure light fail to extinguish after starting or illuminate when the engine isrunning, the engine must be stopped immedi-ately. If the engine oil level is low, add a suffi-cient quantity of oil to raise the level to the fullmarking on the dip stick. Restart the engine andcheck that the warning light is extinguished.Should the light still be illuminated, stop theengine immediately and seek assistance fromthe nearest Hyundai dealer.
Page 156 of 249
FEATURES OF YOUR HYUNDAI 1-19
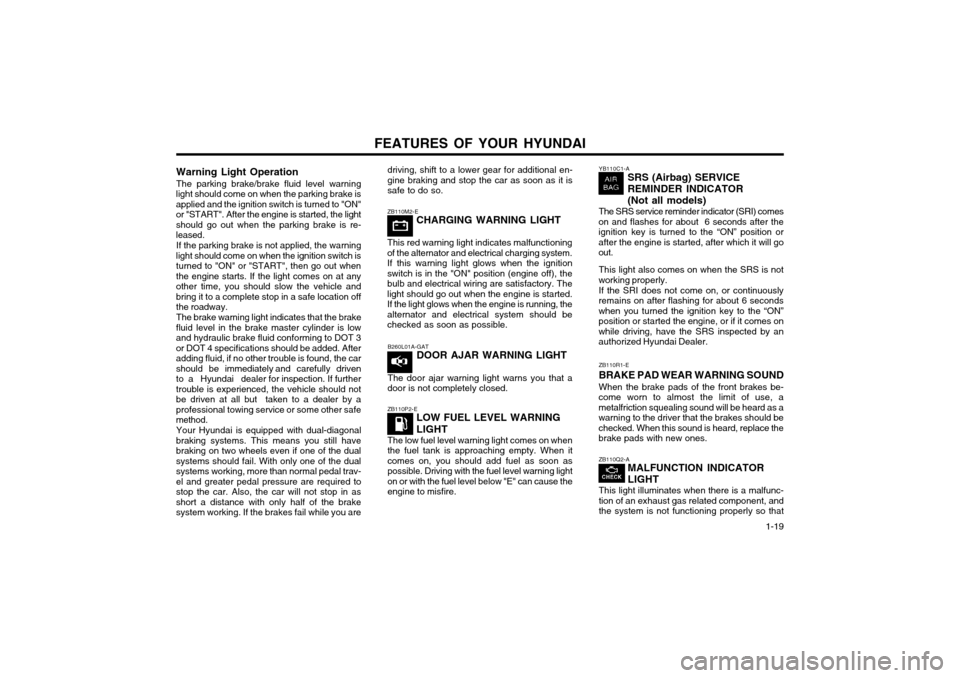
YB110C1-A
SRS (Airbag) SERVICE REMINDER INDICATOR(Not all models)
The SRS service reminder indicator (SRI) comes
on and flashes for about 6 seconds after the ignition key is turned to the “ON” position orafter the engine is started, after which it will goout.
This light also comes on when the SRS is not
working properly.
If the SRI does not come on, or continuously
remains on after flashing for about 6 secondswhen you turned the ignition key to the “ON”position or started the engine, or if it comes onwhile driving, have the SRS inspected by anauthorized Hyundai Dealer.
ZB110P2-E LOW FUEL LEVEL WARNING LIGHT
The low fuel level warning light comes on when the fuel tank is approaching empty. When itcomes on, you should add fuel as soon aspossible. Driving with the fuel level warning lighton or with the fuel level below "E" can cause theengine to misfire.
ZB110R1-E BRAKE PAD WEAR WARNING SOUNDWhen the brake pads of the front brakes be-
come worn to almost the limit of use, a metalfriction squealing sound will be heard as awarning to the driver that the brakes should bechecked. When this sound is heard, replace thebrake pads with new ones.
ZB110Q2-A MALFUNCTION INDICATOR LIGHT
This light illuminates when there is a malfunc- tion of an exhaust gas related component, andthe system is not functioning properly so that
B260L01A-GAT DOOR AJAR WARNING LIGHT
The door ajar warning light warns you that a
door is not completely closed.
ZB110M2-E CHARGING WARNING LIGHT
This red warning light indicates malfunctioning of the alternator and electrical charging system.If this warning light glows when the ignitionswitch is in the "ON" position (engine off), thebulb and electrical wiring are satisfactory. Thelight should go out when the engine is started.If the light glows when the engine is running, thealternator and electrical system should bechecked as soon as possible.
Warning Light Operation The parking brake/brake fluid level warning
light should come on when the parking brake is applied and the ignition switch is turned to "ON"or "START". After the engine is started, the lightshould go out when the parking brake is re-leased.
If the parking brake is not applied, the warning
light should come on when the ignition switch isturned to "ON" or "START", then go out whenthe engine starts. If the light comes on at anyother time, you should slow the vehicle andbring it to a complete stop in a safe location offthe roadway.
The brake warning light indicates that the brake
fluid level in the brake master cylinder is lowand hydraulic brake fluid conforming to DOT 3or DOT 4 specifications should be added. Afteradding fluid, if no other trouble is found, the carshould be immediately and carefully drivento a Hyundai dealer for inspection. If furthertrouble is experienced, the vehicle should notbe driven at all but taken to a dealer by aprofessional towing service or some other safemethod.
Your Hyundai is equipped with dual-diagonal
braking systems. This means you still havebraking on two wheels even if one of the dualsystems should fail. With only one of the dualsystems working, more than normal pedal trav-el and greater pedal pressure are required tostop the car. Also, the car will not stop in asshort a distance with only half of the brakesystem working. If the brakes fail while you are driving, shift to a lower gear for additional en-gine braking and stop the car as soon as it issafe to do so.
Page 164 of 249
FEATURES OF YOUR HYUNDAI 1-27
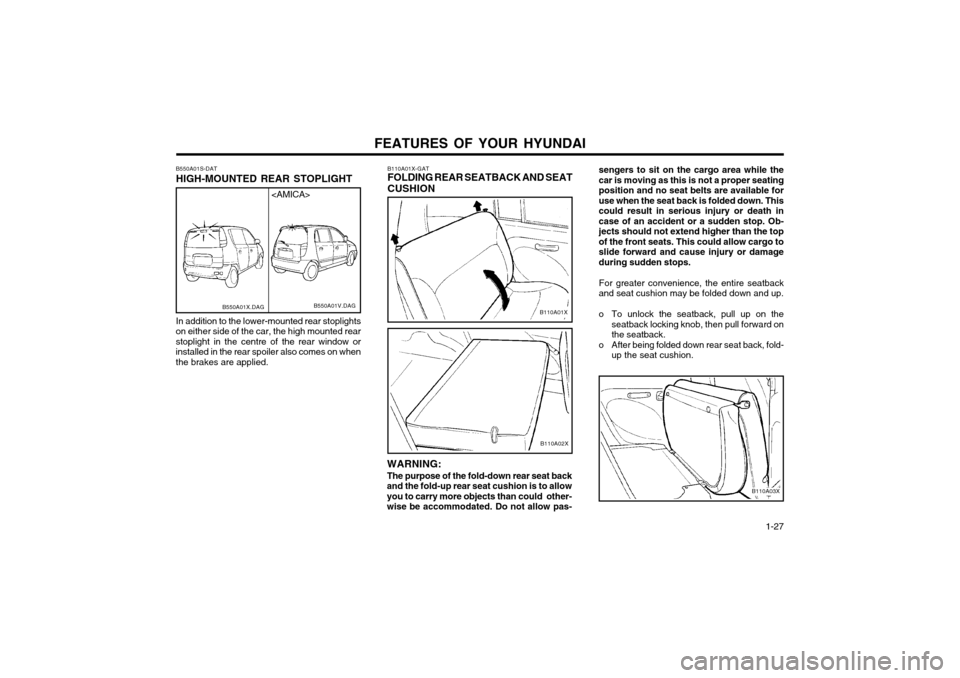
sengers to sit on the cargo area while the car is moving as this is not a proper seatingposition and no seat belts are available foruse when the seat back is folded down. Thiscould result in serious injury or death incase of an accident or a sudden stop. Ob-jects should not extend higher than the topof the front seats. This could allow cargo toslide forward and cause injury or damageduring sudden stops.
For greater convenience, the entire seatback
and seat cushion may be folded down and up.
o To unlock the seatback, pull up on the seatback locking knob, then pull forward on the seatback.
o After being folded down rear seat back, fold- up the seat cushion.
B110A03X
B110A01X-GAT FOLDING REAR SEATBACK AND SEAT CUSHION
B110A01X
WARNING: The purpose of the fold-down rear seat back
and the fold-up rear seat cushion is to allow you to carry more objects than could other-
wise be accommodated. Do not allow pas-
B110A02X
B550A01S-DAT HIGH-MOUNTED REAR STOPLIGHT In addition to the lower-mounted rear stoplights
on either side of the car, the high mounted rear stoplight in the centre of the rear window orinstalled in the rear spoiler also comes on whenthe brakes are applied.
B550A01V.DAG
B550A01X.DAG
Page 195 of 249
DRIVING YOUR HYUNDAI
2- 6 C090I01E-EAT
CAUTION:
o Shift into "R" and "P" only when the vehicle has completely stopped.
o Do not accelerate the engine in the re- verse or any of the forward positions
with the brakes applied.
o Always apply the footbrake when shift- ing from "P" or "N", to "R", "D", "2" or "L".
o Do not use the "P" (Park) position in place of the parking brake. Always setthe park-ing brake, shift the transaxleinto "P" (Park) and turn off the ignitionwhen you leave the vehicle, even mo-mentarily. Never leave the vehicle unat-tended whilst the engine is running.
C090H01E-EAT
NOTE:
o The brake pedal should be depressed when shifting from NEUTRAL to a for- ward or reverse gear.
o The brake pedal fully depressed in order to move the shift lever from the "P"(Park) position to any of the other posi-tions.
o It is always possible to shift from "R", "N", "D", "2", "L" position.
C090P01X-DAG
SC130A1-E
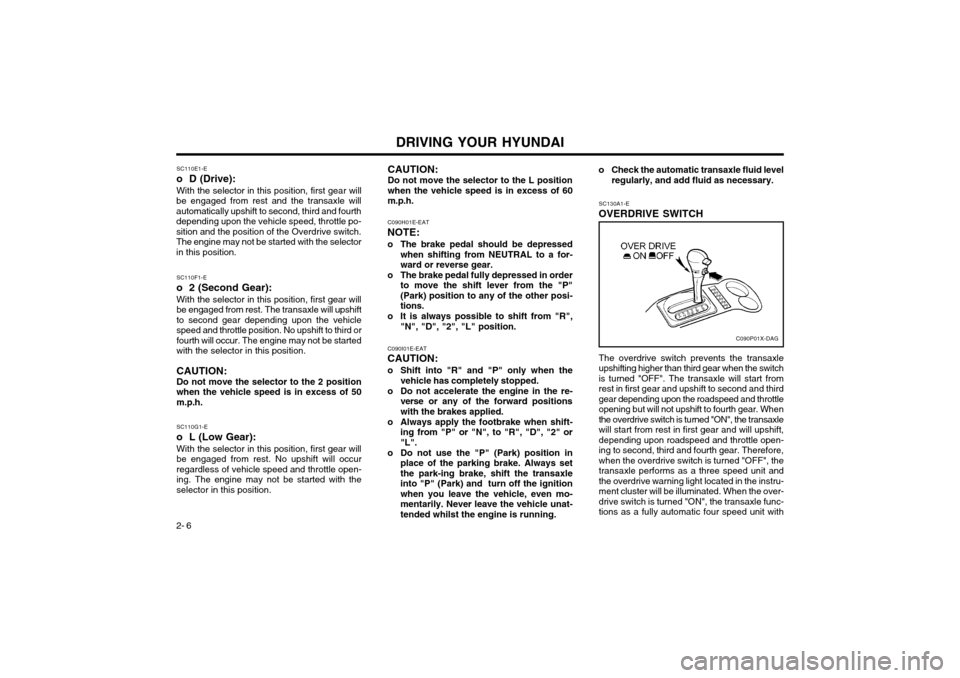
OVERDRIVE SWITCH
SC110E1-E
o D (Drive):
With the selector in this position, first gear will
be engaged from rest and the transaxle will automatically upshift to second, third and fourthdepending upon the vehicle speed, throttle po-sition and the position of the Overdrive switch.The engine may not be started with the selectorin this position.
SC110G1-E
o L (Low Gear): With the selector in this position, first gear willbe engaged from rest. No upshift will occurregardless of vehicle speed and throttle open-ing. The engine may not be started with theselector in this position.
SC110F1-E
o 2 (Second Gear): With the selector in this position, first gear willbe engaged from rest. The transaxle will upshiftto second gear depending upon the vehiclespeed and throttle position. No upshift to third orfourth will occur. The engine may not be startedwith the selector in this position. CAUTION: Do not move the selector to the 2 positionwhen the vehicle speed is in excess of 50m.p.h. CAUTION: Do not move the selector to the L position when the vehicle speed is in excess of 60m.p.h.
o Check the automatic transaxle fluid level
regularly, and add fluid as necessary.
The overdrive switch prevents the transaxleupshifting higher than third gear when the switchis turned "OFF". The transaxle will start fromrest in first gear and upshift to second and thirdgear depending upon the roadspeed and throttleopening but will not upshift to fourth gear. Whenthe overdrive switch is turned "ON", the transaxlewill start from rest in first gear and will upshift,depending upon roadspeed and throttle open-ing to second, third and fourth gear. Therefore,when the overdrive switch is turned "OFF", thetransaxle performs as a three speed unit andthe overdrive warning light located in the instru-ment cluster will be illuminated. When the over-drive switch is turned "ON", the transaxle func-tions as a fully automatic four speed unit with