headlights Hyundai Atos 2002 Owner's Manual
[x] Cancel search | Manufacturer: HYUNDAI, Model Year: 2002, Model line: Atos, Model: Hyundai Atos 2002Pages: 249, PDF Size: 3.11 MB
Page 29 of 249
FEATURES OF YOUR HYUNDAI
FEATURES OF YOUR HYUNDAI FEATURES OF YOUR HYUNDAI
FEATURES OF YOUR HYUNDAI
FEATURES OF YOUR HYUNDAI
1- 20
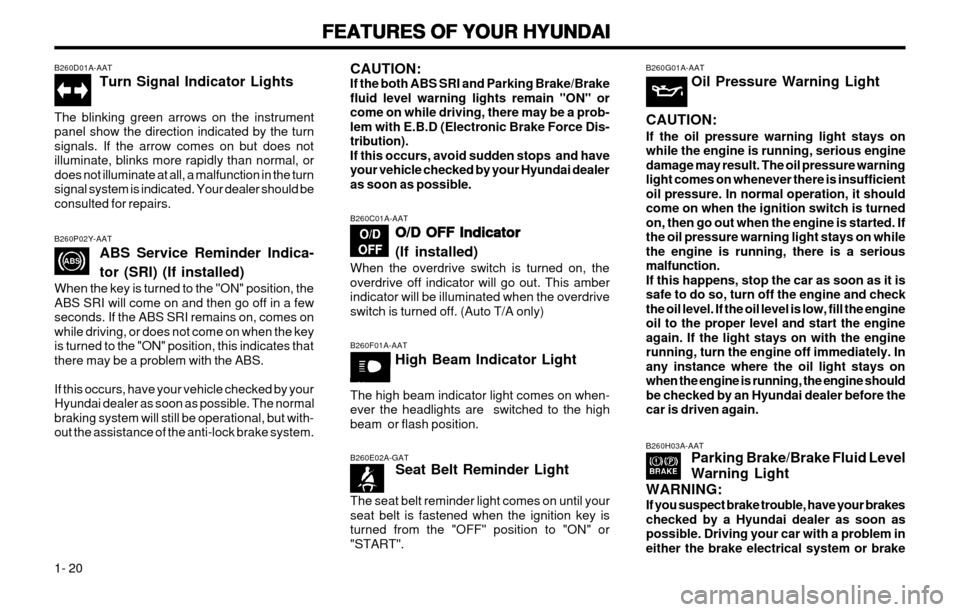
B260P02Y-AAT ABS Service Reminder Indica- tor (SRI) (If installed)
When the key is turned to the "ON" position, the ABS SRI will come on and then go off in a fewseconds. If the ABS SRI remains on, comes onwhile driving, or does not come on when the keyis turned to the "ON" position, this indicates thatthere may be a problem with the ABS. If this occurs, have your vehicle checked by your Hyundai dealer as soon as possible. The normalbraking system will still be operational, but with-out the assistance of the anti-lock brake system.
B260D01A-AAT
Turn Signal Indicator Lights
The blinking green arrows on the instrumentpanel show the direction indicated by the turnsignals. If the arrow comes on but does notilluminate, blinks more rapidly than normal, ordoes not illuminate at all, a malfunction in the turnsignal system is indicated. Your dealer should beconsulted for repairs. B260G01A-AAT
Oil Pressure Warning Light
CAUTION: If the oil pressure warning light stays on while the engine is running, serious enginedamage may result. The oil pressure warninglight comes on whenever there is insufficientoil pressure. In normal operation, it shouldcome on when the ignition switch is turnedon, then go out when the engine is started. Ifthe oil pressure warning light stays on whilethe engine is running, there is a seriousmalfunction.If this happens, stop the car as soon as it issafe to do so, turn off the engine and checkthe oil level. If the oil level is low, fill the engineoil to the proper level and start the engineagain. If the light stays on with the enginerunning, turn the engine off immediately. Inany instance where the oil light stays onwhen the engine is running, the engine shouldbe checked by an Hyundai dealer before thecar is driven again.
B260E02A-GAT Seat Belt Reminder Light
The seat belt reminder light comes on until your seat belt is fastened when the ignition key isturned from the "OFF" position to "ON" or"START".B260H03A-AAT Parking Brake/Brake Fluid Level Warning Light
WARNING: If you suspect brake trouble, have your brakes checked by a Hyundai dealer as soon aspossible. Driving your car with a problem ineither the brake electrical system or brake
B260F01A-AAT High Beam Indicator Light
The high beam indicator light comes on when- ever the headlights are switched to the highbeam or flash position.
B260C01A-AAT O/D OFF Indicator
O/D OFF Indicator O/D OFF Indicator
O/D OFF Indicator
O/D OFF Indicator (If installed)
When the overdrive switch is turned on, the overdrive off indicator will go out. This amberindicator will be illuminated when the overdriveswitch is turned off. (Auto T/A only)
CAUTION: If the both ABS SRI and Parking Brake/Brakefluid level warning lights remain "ON" orcome on while driving, there may be a prob-lem with E.B.D (Electronic Brake Force Dis-tribution).If this occurs, avoid sudden stops and haveyour vehicle checked by your Hyundai dealeras soon as possible.
Page 32 of 249
FEATURES OF YOUR HYUNDAI
FEATURES OF YOUR HYUNDAI FEATURES OF YOUR HYUNDAI
FEATURES OF YOUR HYUNDAI
FEATURES OF YOUR HYUNDAI
1- 23
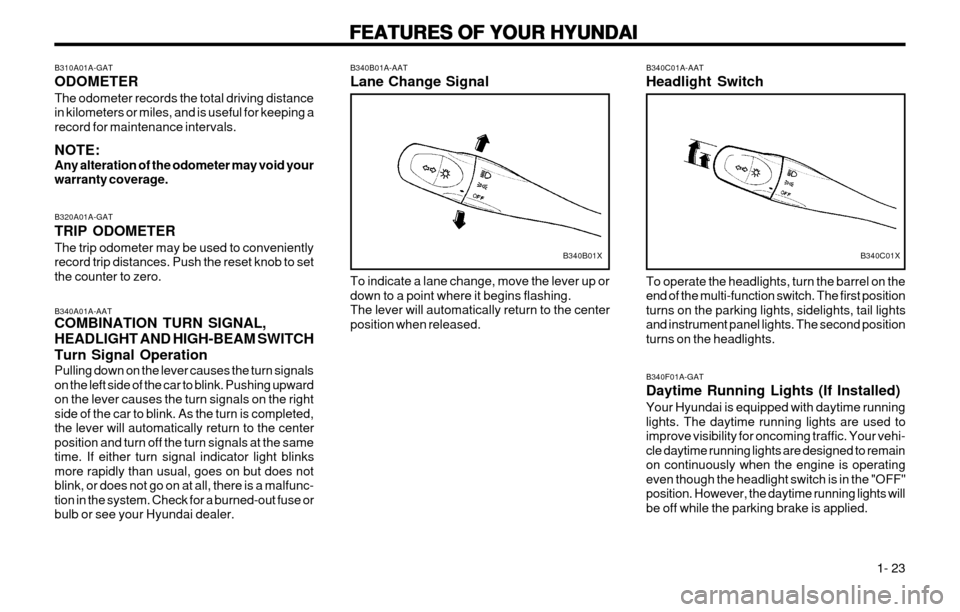
B340B01A-AAT Lane Change Signal To indicate a lane change, move the lever up or down to a point where it begins flashing.The lever will automatically return to the centerposition when released.
B340A01A-AAT COMBINATION TURN SIGNAL, HEADLIGHT AND HIGH-BEAM SWITCH Turn Signal Operation Pulling down on the lever causes the turn signals on the left side of the car to blink. Pushing upwardon the lever causes the turn signals on the rightside of the car to blink. As the turn is completed,the lever will automatically return to the centerposition and turn off the turn signals at the sametime. If either turn signal indicator light blinksmore rapidly than usual, goes on but does notblink, or does not go on at all, there is a malfunc-tion in the system. Check for a burned-out fuse orbulb or see your Hyundai dealer.
B340B01X
B310A01A-GAT ODOMETERThe odometer records the total driving distance in kilometers or miles, and is useful for keeping arecord for maintenance intervals. NOTE: Any alteration of the odometer may void yourwarranty coverage. B320A01A-GAT TRIP ODOMETER The trip odometer may be used to conveniently record trip distances. Push the reset knob to setthe counter to zero. B340C01A-AAT Headlight Switch To operate the headlights, turn the barrel on the end of the multi-function switch. The first positionturns on the parking lights, sidelights, tail lightsand instrument panel lights. The second positionturns on the headlights.
B340C01X
B340F01A-GAT Daytime Running Lights (If Installed) Your Hyundai is equipped with daytime running lights. The daytime running lights are used toimprove visibility for oncoming traffic. Your vehi-cle daytime running lights are designed to remainon continuously when the engine is operatingeven though the headlight switch is in the "OFF"position. However, the daytime running lights willbe off while the parking brake is applied.
Page 33 of 249
FEATURES OF YOUR HYUNDAI
FEATURES OF YOUR HYUNDAI FEATURES OF YOUR HYUNDAI
FEATURES OF YOUR HYUNDAI
FEATURES OF YOUR HYUNDAI
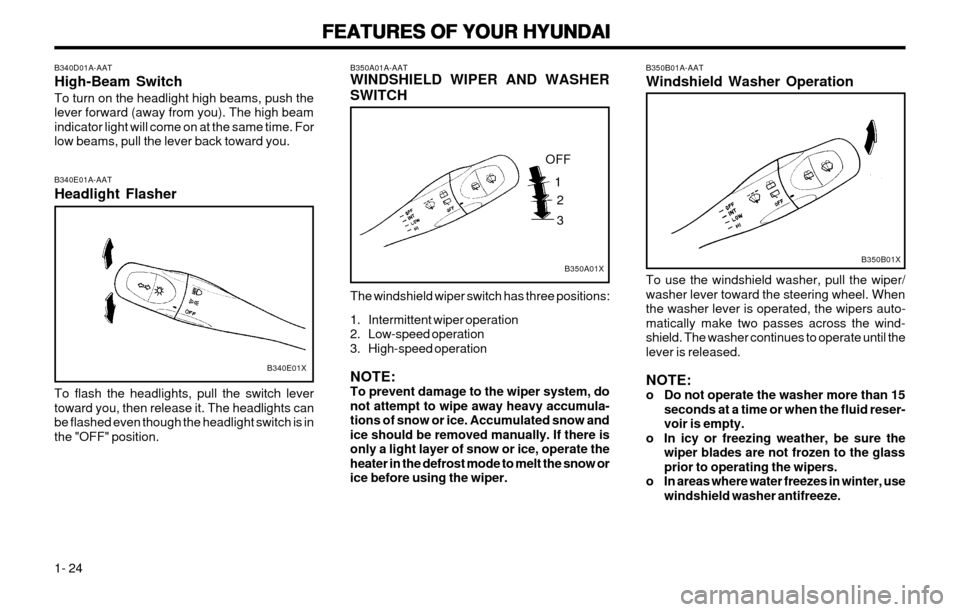
1- 24 B350B01A-AAT Windshield Washer Operation
B350B01X
To use the windshield washer, pull the wiper/ washer lever toward the steering wheel. Whenthe washer lever is operated, the wipers auto-
matically make two passes across the wind-
shield. The washer continues to operate until thelever is released. NOTE:
o Do not operate the washer more than 15
seconds at a time or when the fluid reser-voir is empty.
o In icy or freezing weather, be sure the wiper blades are not frozen to the glassprior to operating the wipers.
o In areas where water freezes in winter, use windshield washer antifreeze.
B340E01A-AAT Headlight Flasher To flash the headlights, pull the switch lever toward you, then release it. The headlights canbe flashed even though the headlight switch is inthe "OFF" position.
B340E01X
B350A01A-AAT WINDSHIELD WIPER AND WASHER SWITCH
B350A01X
OFF12 3
The windshield wiper switch has three positions:
1. Intermittent wiper operation
2. Low-speed operation
3. High-speed operation NOTE: To prevent damage to the wiper system, donot attempt to wipe away heavy accumula-tions of snow or ice. Accumulated snow andice should be removed manually. If there isonly a light layer of snow or ice, operate theheater in the defrost mode to melt the snow orice before using the wiper.
B340D01A-AAT High-Beam SwitchTo turn on the headlight high beams, push the lever forward (away from you). The high beamindicator light will come on at the same time. Forlow beams, pull the lever back toward you.
Page 34 of 249
FEATURES OF YOUR HYUNDAI
FEATURES OF YOUR HYUNDAI FEATURES OF YOUR HYUNDAI
FEATURES OF YOUR HYUNDAI
FEATURES OF YOUR HYUNDAI
1- 25
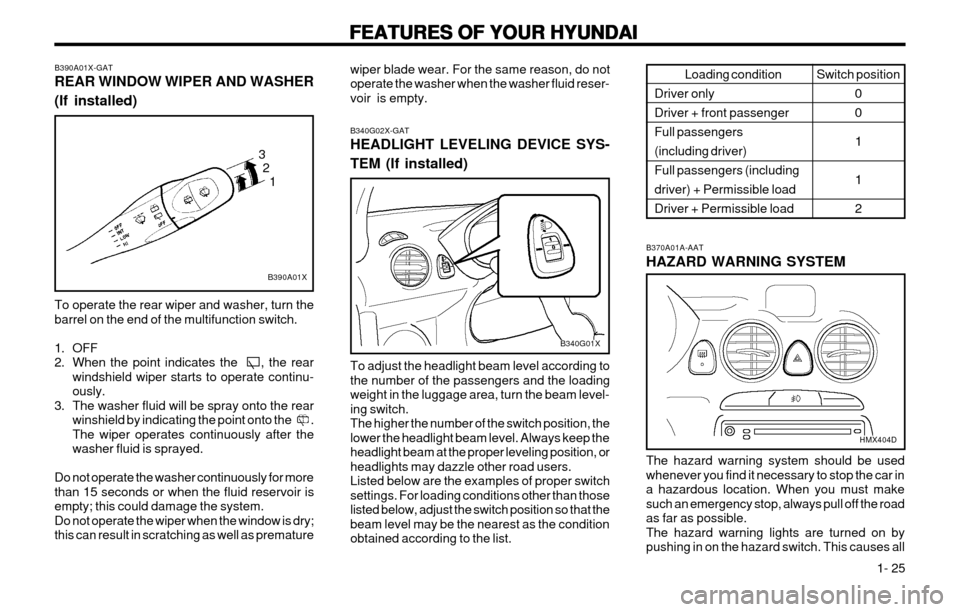
wiper blade wear. For the same reason, do not operate the washer when the washer fluid reser-voir is empty. B340G02X-GAT HEADLIGHT LEVELING DEVICE SYS- TEM (If installed) To adjust the headlight beam level according to the number of the passengers and the loadingweight in the luggage area, turn the beam level-ing switch.The higher the number of the switch position, thelower the headlight beam level. Always keep the
headlight beam at the proper leveling position, orheadlights may dazzle other road users.Listed below are the examples of proper switchsettings. For loading conditions other than those
listed below, adjust the switch position so that thebeam level may be the nearest as the conditionobtained according to the list.
B390A01X-GAT REAR WINDOW WIPER AND WASHER (If installed)
B390A01X
3
2 1
To operate the rear wiper and washer, turn the barrel on the end of the multifunction switch.
1. OFF
2. When the point indicates the , the rear windshield wiper starts to operate continu-ously.
3. The washer fluid will be spray onto the rear winshield by indicating the point onto the .The wiper operates continuously after thewasher fluid is sprayed.
Do not operate the washer continuously for morethan 15 seconds or when the fluid reservoir isempty; this could damage the system.Do not operate the wiper when the window is dry;
this can result in scratching as well as premature
B370A01A-AAT HAZARD WARNING SYSTEM The hazard warning system should be used whenever you find it necessary to stop the car ina hazardous location. When you must makesuch an emergency stop, always pull off the roadas far as possible.The hazard warning lights are turned on bypushing in on the hazard switch. This causes all Loading condition
Driver only Driver + front passengerFull passengers(including driver)Full passengers (includingdriver) + Permissible loadDriver + Permissible load Switch position
00 1 1 2
B340G01X
HMX404D
Page 37 of 249
FEATURES OF YOUR HYUNDAI
FEATURES OF YOUR HYUNDAI FEATURES OF YOUR HYUNDAI
FEATURES OF YOUR HYUNDAI
FEATURES OF YOUR HYUNDAI
1- 28
B550A01FB550A01V
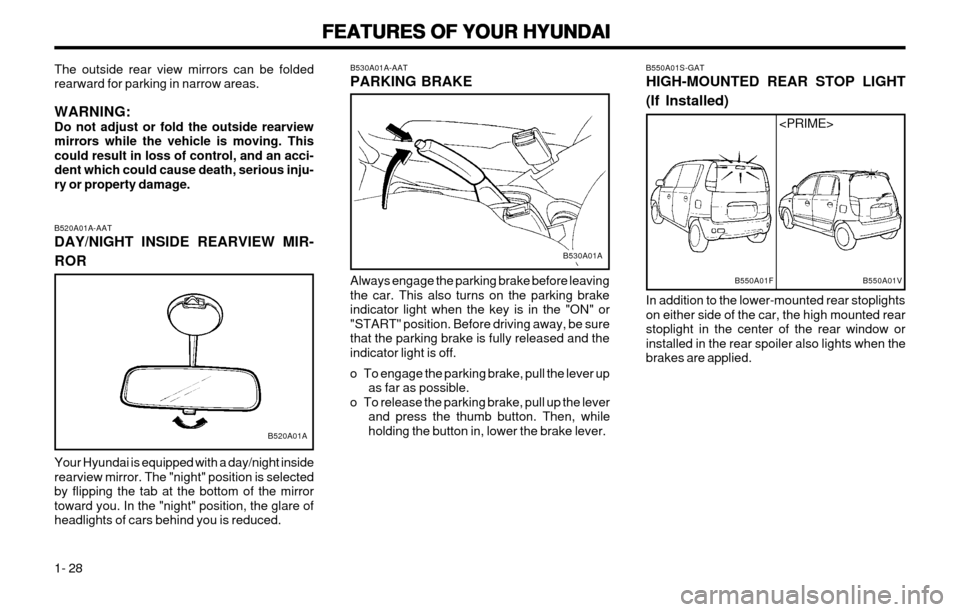
B550A01S-GAT HIGH-MOUNTED REAR STOP LIGHT (If Installed) In addition to the lower-mounted rear stoplights on either side of the car, the high mounted rearstoplight in the center of the rear window orinstalled in the rear spoiler also lights when thebrakes are applied.
Always engage the parking brake before leavingthe car. This also turns on the parking brakeindicator light when the key is in the "ON" or"START" position. Before driving away, be surethat the parking brake is fully released and theindicator light is off.
o To engage the parking brake, pull the lever up
as far as possible.
o To release the parking brake, pull up the lever and press the thumb button. Then, while holding the button in, lower the brake lever.
B530A01A-AAT PARKING BRAKE
B530A01A
B520A01A-AAT DAY/NIGHT INSIDE REARVIEW MIR- ROR Your Hyundai is equipped with a day/night inside rearview mirror. The "night" position is selectedby flipping the tab at the bottom of the mirrortoward you. In the "night" position, the glare ofheadlights of cars behind you is reduced.
The outside rear view mirrors can be foldedrearward for parking in narrow areas. WARNING: Do not adjust or fold the outside rearviewmirrors while the vehicle is moving. Thiscould result in loss of control, and an acci-dent which could cause death, serious inju-ry or property damage.
B520A01A
Page 40 of 249
FEATURES OF YOUR HYUNDAI
FEATURES OF YOUR HYUNDAI FEATURES OF YOUR HYUNDAI
FEATURES OF YOUR HYUNDAI
FEATURES OF YOUR HYUNDAI
1- 31
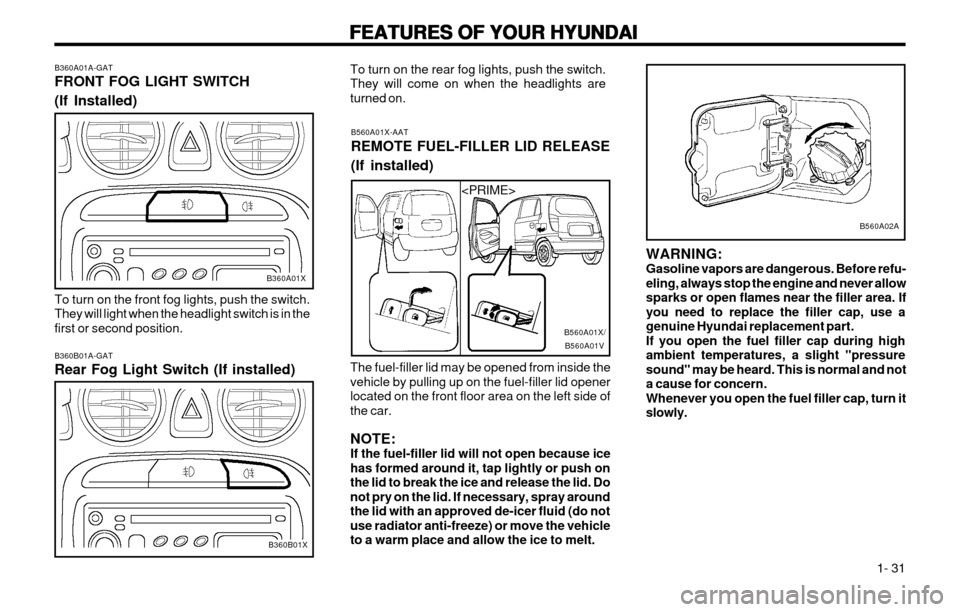
B560A01X-AAT REMOTE FUEL-FILLER LID RELEASE (If installed)
The fuel-filler lid may be opened from inside the vehicle by pulling up on the fuel-filler lid openerlocated on the front floor area on the left side ofthe car. NOTE: If the fuel-filler lid will not open because icehas formed around it, tap lightly or push onthe lid to break the ice and release the lid. Donot pry on the lid. If necessary, spray around
the lid with an approved de-icer fluid (do notuse radiator anti-freeze) or move the vehicleto a warm place and allow the ice to melt.
To turn on the rear fog lights, push the switch.They will come on when the headlights areturned on.
B560A01V
B560A01X/
B360A01A-GAT FRONT FOG LIGHT SWITCH (If Installed) To turn on the front fog lights, push the switch. They will light when the headlight switch is in thefirst or second position. B360B01A-GAT Rear Fog Light Switch (If installed)
B360A01X
B360B01X WARNING: Gasoline vapors are dangerous. Before refu-
eling, always stop the engine and never allowsparks or open flames near the filler area. Ifyou need to replace the filler cap, use agenuine Hyundai replacement part.If you open the fuel filler cap during highambient temperatures, a slight "pressuresound" may be heard. This is normal and nota cause for concern.Whenever you open the fuel filler cap, turn itslowly.
B560A02A
Page 74 of 249
DRIVING YOUR HYUNDAI
DRIVING YOUR HYUNDAI DRIVING YOUR HYUNDAI
DRIVING YOUR HYUNDAI
DRIVING YOUR HYUNDAI
2- 11
C190A01A-GAT
TRAILER OR VEHICLE TOWING
TRAILER OR VEHICLE TOWING TRAILER OR VEHICLE TOWING
TRAILER OR VEHICLE TOWING
TRAILER OR VEHICLE TOWING
If you are considering towing with your car, you
should first check with your Province Depart- ment of Motor Vehicles to determine their legal
requirements. Since laws vary from province to province the
requirements for towing trailers, cars, or other types of vehicles or apparatus may differ. Askyour Hyundai dealer for further details beforetowing.
CAUTION:
CAUTION: CAUTION:
CAUTION:
CAUTION:
Do not do any towing with your car during
Do not do any towing with your car during Do not do any towing with your car during
Do not do any towing with your car during
Do not do any towing with your car during its first 2,000 km (1,200 miles) in order to
its first 2,000 km (1,200 miles) in order to its first 2,000 km (1,200 miles) in order to
its first 2,000 km (1,200 miles) in order to
its first 2,000 km (1,200 miles) in order to
allow the engine to properly break in. Fail-
allow the engine to properly break in. Fail- allow the engine to properly break in. Fail-
allow the engine to properly break in. Fail-
allow the engine to properly break in. Fail-
ure to heed this caution may result in seri-
ure to heed this caution may result in seri- ure to heed this caution may result in seri-
ure to heed this caution may result in seri-
ure to heed this caution may result in seri-
ous engine or transaxle damage.
ous engine or transaxle damage. ous engine or transaxle damage.
ous engine or transaxle damage.
ous engine or transaxle damage.
C190B01S-AATTrailer Hitches
Trailer Hitches Trailer Hitches
Trailer Hitches
Trailer Hitches
Select the proper hitch and ball combination,
making sure that it's location is compatible with that of the trailer or vehicle being towed.
Use a quality non-equalizing hitch which distrib-
utes the tongue load uniformly throughout thechassis.
The hitch should be bolted securely to the car
and installed by a qualified technician. DO NOTUSE A HITCH DESIGNED FOR TEMPORARYINSTALLATION AND NEVER USE ONE THATATTACHES ONLY TO THE BUMPER.
C170A01A-AAT
HIGHER SPEED MOTORING
HIGHER SPEED MOTORING HIGHER SPEED MOTORING
HIGHER SPEED MOTORING
HIGHER SPEED MOTORING
Pre-Trip Inspections
Pre-Trip Inspections Pre-Trip Inspections
Pre-Trip Inspections
Pre-Trip Inspections 1. Tires:
Adjust the tire inflation pressures to specifica-
tion driving. Low tire inflation pressures will result in overheating and possible failure of thetires.
Avoid using worn or damaged tires which may
result in reduced traction or tire failure.
NOTE:
NOTE: NOTE:
NOTE:
NOTE:
Never exceed the maximum tire inflation
Never exceed the maximum tire inflation Never exceed the maximum tire inflation
Never exceed the maximum tire inflation
Never exceed the maximum tire inflation pressure shown on the tires.
pressure shown on the tires. pressure shown on the tires.
pressure shown on the tires.
pressure shown on the tires.
2. Fuel, engine coolant and engine oil:High speed travel consumes 1.5 times more
fuel than urban motoring. Do not forget to check both engine coolant and engine oil. 3. Drive belt:
A loose or damaged drive belt may result in
overheating of the engine.
C180A01A-AATUSE OF LIGHTS
USE OF LIGHTS USE OF LIGHTS
USE OF LIGHTS
USE OF LIGHTS
Check your lights regularly for correct operation
and always keep them clean. When driving during the day in conditions of poor visibility, itis helpful to drive with headlights on low beam.This enables you to be seen as well as to see.
rarily while you put the gear selector lever in"P" (automatic transaxle) or in first or reversegear (manual transaxle) and block the rearwheels so the car cannot roll. Then release theparking brake.
C160J01A-AATDon't Let Ice and Snow Accumulate
Don't Let Ice and Snow Accumulate Don't Let Ice and Snow Accumulate
Don't Let Ice and Snow Accumulate
Don't Let Ice and Snow Accumulate
Underneath
Underneath Underneath
Underneath
Underneath
Under some conditions, snow and ice can build
up under the fenders and interfere with thesteering. When driving in severe winter condi-tions where this may happen, you should peri-odically check underneath the car to be surethe movement of the front wheels and thesteering components are not obstructed.
C160K01A-AATCarry Emergency Equipment
Carry Emergency Equipment Carry Emergency Equipment
Carry Emergency Equipment
Carry Emergency Equipment
Depending on the severity of the weather where
you drive your car, you should carry appropri-ate emergency equipment. Some of the itemsyou may want to carry include tire chains, towstraps or chains, flashlight, emergency flares,sand, a shovel, jumper cables, a windowscraper, gloves, ground cloth, coveralls, a blan-ket, etc.
Page 114 of 249
DO-IT-YOURSELF MAINTENANCE
DO-IT-YOURSELF MAINTENANCE DO-IT-YOURSELF MAINTENANCE
DO-IT-YOURSELF MAINTENANCE
DO-IT-YOURSELF MAINTENANCE
6-18 SPECIFICATIONS:
SPECIFICATIONS: SPECIFICATIONS:
SPECIFICATIONS:
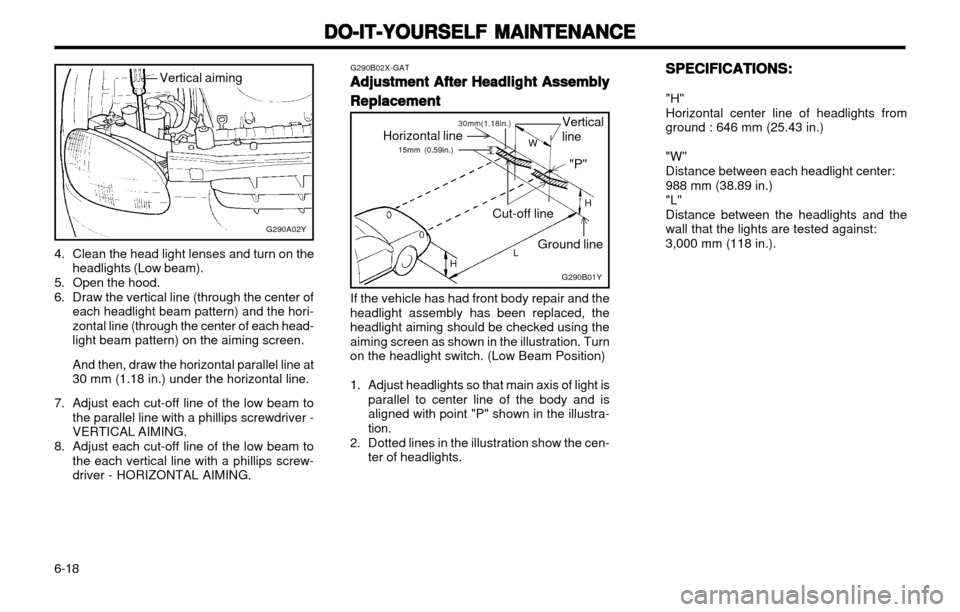
SPECIFICATIONS: "H" Horizontal center line of headlights from ground : 646 mm (25.43 in.) "W" Distance between each headlight center:988 mm (38.89 in.)"L"Distance between the headlights and the wall that the lights are tested against:3,000 mm (118 in.).
4. Clean the head light lenses and turn on the
headlights (Low beam).
5. Open the hood.
6. Draw the vertical line (through the center of each headlight beam pattern) and the hori- zontal line (through the center of each head-light beam pattern) on the aiming screen. And then, draw the horizontal parallel line at 30 mm (1.18 in.) under the horizontal line.
7. Adjust each cut-off line of the low beam to the parallel line with a phillips screwdriver -VERTICAL AIMING.
8. Adjust each cut-off line of the low beam to the each vertical line with a phillips screw-driver - HORIZONTAL AIMING.
G290A02Y
Vertical aiming G290B02X-GAT
Adjustment After Headlight Assembly
Adjustment After Headlight Assembly Adjustment After Headlight Assembly
Adjustment After Headlight Assembly
Adjustment After Headlight Assembly
Replacement
Replacement Replacement
Replacement
Replacement
G290B01Y
Vertical line
Cut-off line Ground line
Horizontal line
LW
H
H "P"
15mm (0.59in.)30mm(1.18in.)
If the vehicle has had front body repair and the
headlight assembly has been replaced, the headlight aiming should be checked using the
aiming screen as shown in the illustration. Turnon the headlight switch. (Low Beam Position)
1. Adjust headlights so that main axis of light is parallel to center line of the body and is aligned with point "P" shown in the illustra-tion.
2. Dotted lines in the illustration show the cen- ter of headlights.
Page 158 of 249
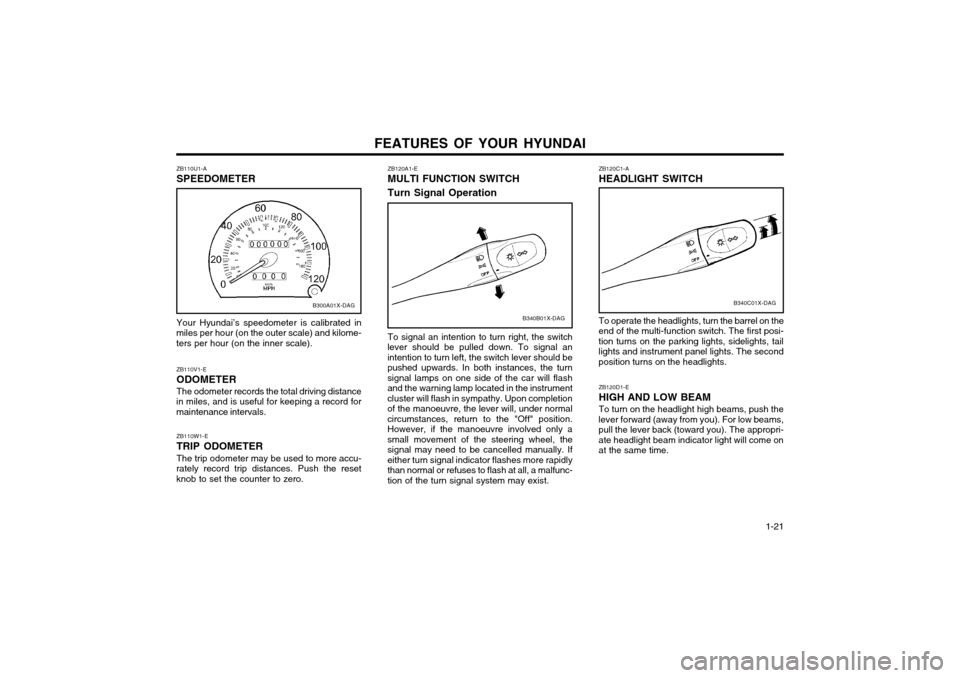
FEATURES OF YOUR HYUNDAI 1-21
B340B01X-DAG
ZB120A1-E MULTI FUNCTION SWITCH Turn Signal Operation
To signal an intention to turn right, the switch
lever should be pulled down. To signal an intention to turn left, the switch lever should bepushed upwards. In both instances, the turnsignal lamps on one side of the car will flashand the warning lamp located in the instrumentcluster will flash in sympathy. Upon completionof the manoeuvre, the lever will, under normalcircumstances, return to the "Off" position.However, if the manoeuvre involved only asmall movement of the steering wheel, thesignal may need to be cancelled manually. Ifeither turn signal indicator flashes more rapidlythan normal or refuses to flash at all, a malfunc-tion of the turn signal system may exist.
ZB110U1-A SPEEDOMETER Your Hyundai’s speedometer is calibrated in
miles per hour (on the outer scale) and kilome- ters per hour (on the inner scale).
B300A01X-DAG
ZB110W1-E TRIP ODOMETER The trip odometer may be used to more accu-
rately record trip distances. Push the reset knob to set the counter to zero. ZB110V1-E ODOMETERThe odometer records the total driving distance
in miles, and is useful for keeping a record for maintenance intervals.
ZB120C1-A HEADLIGHT SWITCH
B340C01X-DAG
ZB120D1-E HIGH AND LOW BEAMTo turn on the headlight high beams, push the
lever forward (away from you). For low beams, pull the lever back (toward you). The appropri-ate headlight beam indicator light will come onat the same time.
To operate the headlights, turn the barrel on the
end of the multi-function switch. The first posi- tion turns on the parking lights, sidelights, taillights and instrument panel lights. The secondposition turns on the headlights.
Page 159 of 249
FEATURES OF YOUR HYUNDAI
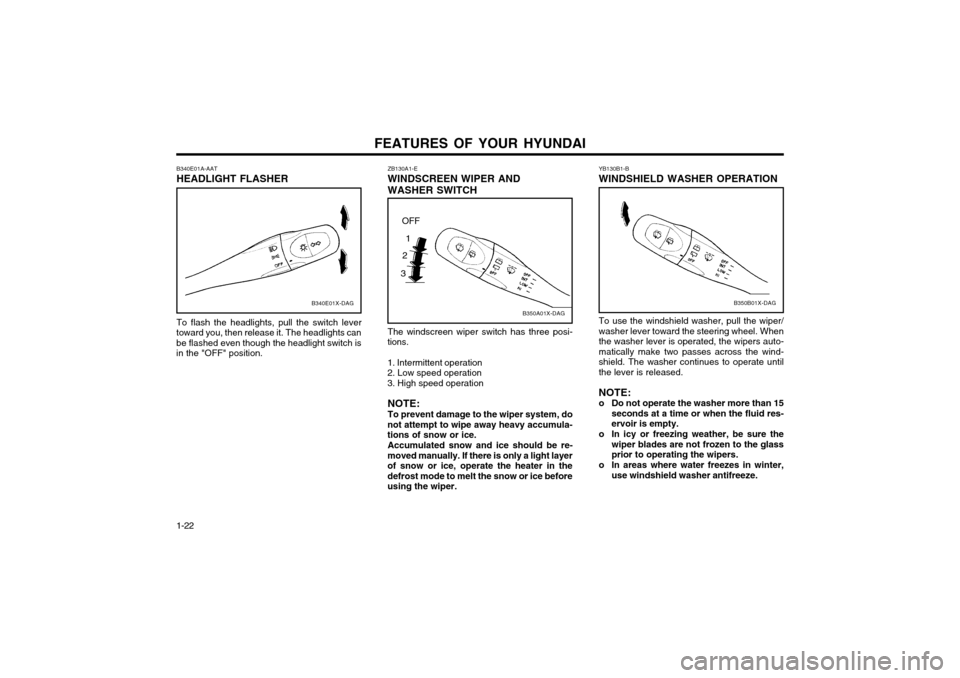
1-22 YB130B1-B WINDSHIELD WASHER OPERATION
B350B01X-DAG
To use the windshield washer, pull the wiper/ washer lever toward the steering wheel. Whenthe washer lever is operated, the wipers auto-matically make two passes across the wind-shield. The washer continues to operate untilthe lever is released. NOTE:
o Do not operate the washer more than 15 seconds at a time or when the fluid res-ervoir is empty.
o In icy or freezing weather, be sure the wiper blades are not frozen to the glassprior to operating the wipers.
o In areas where water freezes in winter, use windshield washer antifreeze.
ZB130A1-E WINDSCREEN WIPER ANDWASHER SWITCH
B350A01X-DAG
The windscreen wiper switch has three posi-
tions. 1. Intermittent operation 2. Low speed operation 3. High speed operation
NOTE:To prevent damage to the wiper system, do
not attempt to wipe away heavy accumula- tions of snow or ice.
Accumulated snow and ice should be re-
moved manually. If there is only a light layerof snow or ice, operate the heater in thedefrost mode to melt the snow or ice beforeusing the wiper.
OFF
1
2
3
B340E01A-AAT HEADLIGHT FLASHER
B340E01X-DAG
To flash the headlights, pull the switch lever
toward you, then release it. The headlights can be flashed even though the headlight switch isin the "OFF" position.