cooling Hyundai Atos 2002 Owner's Guide
[x] Cancel search | Manufacturer: HYUNDAI, Model Year: 2002, Model line: Atos, Model: Hyundai Atos 2002Pages: 249, PDF Size: 3.11 MB
Page 204 of 249
3-3
WHAT TO DO IN AN EMERGENCY
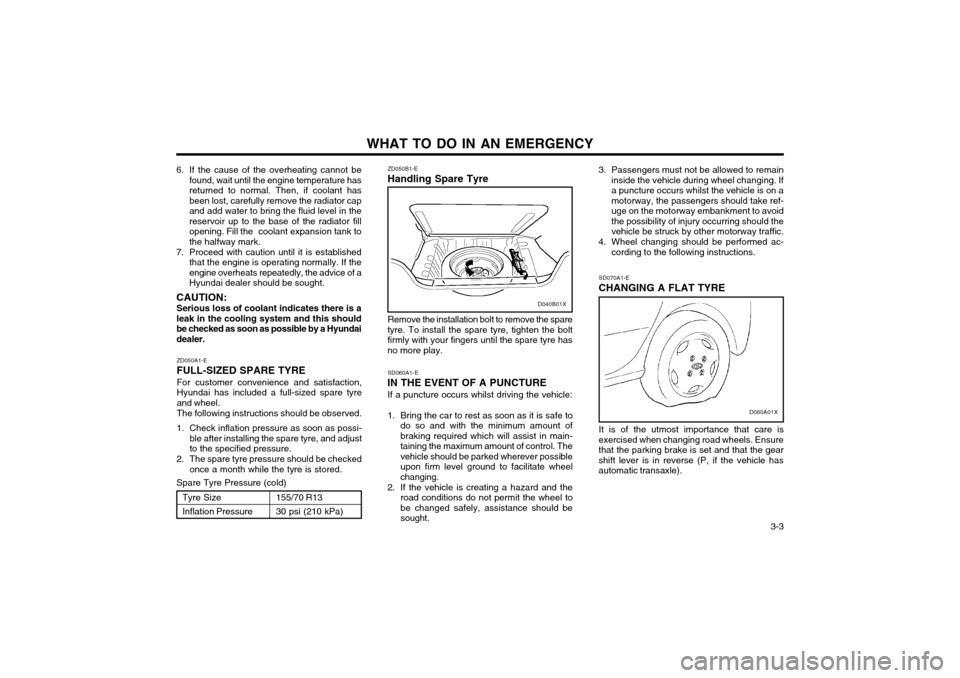
ZD050B1-E
Handling Spare Tyre
6. If the cause of the overheating cannot be
found, wait until the engine temperature has returned to normal. Then, if coolant hasbeen lost, carefully remove the radiator capand add water to bring the fluid level in thereservoir up to the base of the radiator fill
opening. Fill the coolant expansion tank tothe halfway mark.
7. Proceed with caution until it is established that the engine is operating normally. If theengine overheats repeatedly, the advice of aHyundai dealer should be sought.
CAUTION: Serious loss of coolant indicates there is aleak in the cooling system and this shouldbe checked as soon as possible by a Hyundaidealer. 3. Passengers must not be allowed to remain
inside the vehicle during wheel changing. Ifa puncture occurs whilst the vehicle is on amotorway, the passengers should take ref-uge on the motorway embankment to avoidthe possibility of injury occurring should thevehicle be struck by other motorway traffic.
4. Wheel changing should be performed ac- cording to the following instructions.
ZD050A1-E
FULL-SIZED SPARE TYRE For customer convenience and satisfaction,Hyundai has included a full-sized spare tyreand wheel. The following instructions should be observed.
1. Check inflation pressure as soon as possi- ble after installing the spare tyre, and adjust to the specified pressure.
2. The spare tyre pressure should be checked once a month while the tyre is stored.
Spare Tyre Pressure (cold)
D040B01X
Remove the installation bolt to remove the spare
tyre. To install the spare tyre, tighten the bolt firmly with your fingers until the spare tyre hasno more play.
SD060A1-E
IN THE EVENT OF A PUNCTURE
If a puncture occurs whilst driving the vehicle:
1. Bring the car to rest as soon as it is safe to do so and with the minimum amount ofbraking required which will assist in main-taining the maximum amount of control. Thevehicle should be parked wherever possibleupon firm level ground to facilitate wheelchanging.
2. If the vehicle is creating a hazard and the road conditions do not permit the wheel tobe changed safely, assistance should besought. SD070A1-E
CHANGING A FLAT TYRE
D060A01X
It is of the utmost importance that care is
exercised when changing road wheels. Ensure that the parking brake is set and that the gearshift lever is in reverse (P, if the vehicle hasautomatic transaxle).
Tyre Size Inflation Pressure 155/70 R1330 psi (210 kPa)
Page 214 of 249
VEHICLE MAINTENANCE REQUIREMENTS 5-3
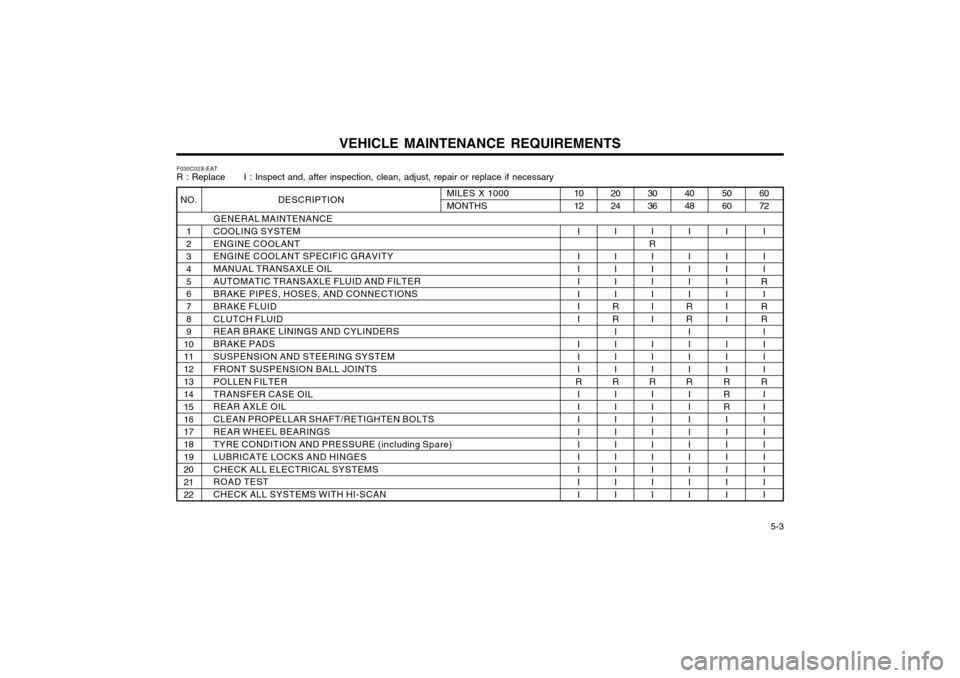
F030C02X-EAT R : Replace I : Inspect and, after inspection, clean, adjust, repair or replace if necessary
DESCRIPTION
GENERAL MAINTENANCE COOLING SYSTEMENGINE COOLANT ENGINE COOLANT SPECIFIC GRAVITY MANUAL TRANSAXLE OILAUTOMATIC TRANSAXLE FLUID AND FILTER BRAKE PIPES, HOSES, AND CONNECTIONS BRAKE FLUIDCLUTCH FLUID REAR BRAKE LININGS AND CYLINDERS BRAKE PADSSUSPENSION AND STEERING SYSTEM FRONT SUSPENSION BALL JOINTS POLLEN FILTERTRANSFER CASE OIL REAR AXLE OIL CLEAN PROPELLAR SHAFT/RETIGHTEN BOLTSREAR WHEEL BEARINGS TYRE CONDITION AND PRESSURE (incl uding Spare)
LUBRICATE LOCKS AND HINGES CHECK ALL ELECTRICAL SYSTEMS ROAD TEST CHECK ALL SYSTEMS WITH HI-SCAN
60 72
I I I
R I
R R
I I II
R
II I II I II I
50 60
I I I II I I I II
RRR III I II I
40 48
I I I II
RR
I I II
R
II I II I II I
30 36
I
R I I II I I I II
R
II I II I II I
20 24
I I I II
RR
I I II
R
II I II I II I
10 12
I I I II I I I II
R
II I II I II I
MILES X 1000 MONTHSNO.
1 2 3 45 6 78 9
1011 1213 14 1516 17 1819 20 2122
Page 217 of 249
VEHICLE MAINTENANCE REQUIREMENTS
5-6 F070B01A-GAT
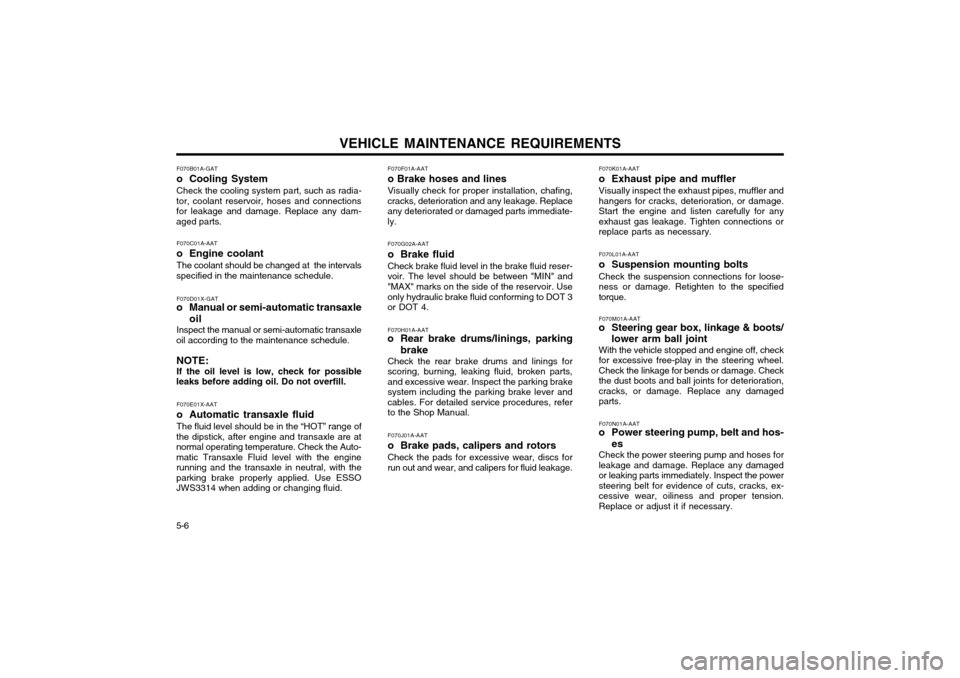
o Cooling SystemCheck the cooling system part, such as radia-
tor, coolant reservoir, hoses and connections for leakage and damage. Replace any dam-aged parts.
F070C01A-AAT
o Engine coolant The coolant should be changed at the intervals
specified in the maintenance schedule.
F070D01X-GAT
o Manual or semi-automatic transaxle
oil
Inspect the manual or semi-automatic transaxle
oil according to the maintenance schedule.
NOTE: If the oil level is low, check for possible
leaks before adding oil. Do not overfill.
F070E01X-AAT
o Automatic transaxle fluidThe fluid level should be in the “HOT” range of
the dipstick, after engine and transaxle are at
normal operating temperature. Check the Auto-matic Transaxle Fluid level with the engine
running and the transaxle in neutral, with theparking brake properly applied. Use ESSOJWS3314 when adding or changing fluid. F070F01A-AAT o Brake hoses and linesVisually check for proper installation, chafing, cracks, deterioration and any leakage. Replaceany deteriorated or damaged parts immediate-ly. F070G02A-AAT
o Brake fluid Check brake fluid level in the brake fluid reser- voir. The level should be between "MIN" and"MAX" marks on the side of the reservoir. Use only hydraulic brake fluid conforming to DOT 3 or DOT 4. F070H01A-AAT
o Rear brake drums/linings, parking
brake
Check the rear brake drums and linings for
scoring, burning, leaking fluid, broken parts,and excessive wear. Inspect the parking brake
system including the parking brake lever andcables. For detailed service procedures, referto the Shop Manual. F070J01A-AAT
o Brake pads, calipers and rotorsCheck the pads for excessive wear, discs for run out and wear, and calipers for fluid leakage. F070K01A-AAT
o Exhaust pipe and mufflerVisually inspect the exhaust pipes, muffler and hangers for cracks, deterioration, or damage.Start the engine and listen carefully for any
exhaust gas leakage. Tighten connections orreplace parts as necessary. F070L01A-AAT
o Suspension mounting bolts Check the suspension connections for loose- ness or damage. Retighten to the specifiedtorque. F070M01A-AAT
o Steering gear box, linkage & boots/
lower arm ball joint
With the vehicle stopped and engine off, check for excessive free-play in the steering wheel.Check the linkage for bends or damage. Check
the dust boots and ball joints for deterioration,cracks, or damage. Replace any damagedparts. F070N01A-AAT
o Power steering pump, belt and hos-
es
Check the power steering pump and hoses for leakage and damage. Replace any damagedor leaking parts immediately. Inspect the powersteering belt for evidence of cuts, cracks, ex-cessive wear, oiliness and proper tension.Replace or adjust it if necessary.
Page 221 of 249
DO-IT-YOURSELF MAINTENANCE 6-3
AS60050A
FL
ZG030C1-A
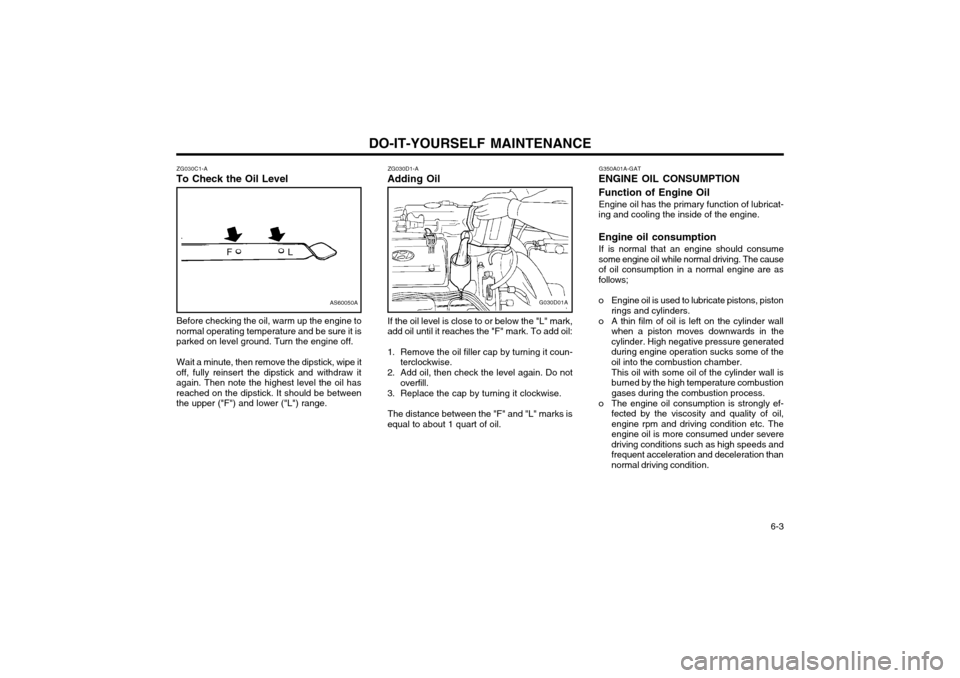
To Check the Oil Level
Before checking the oil, warm up the engine to
normal operating temperature and be sure it is parked on level ground. Turn the engine off.
Wait a minute, then remove the dipstick, wipe it
off, fully reinsert the dipstick and withdraw itagain. Then note the highest level the oil hasreached on the dipstick. It should be betweenthe upper ("F") and lower ("L") range. ZG030D1-A
Adding Oil
G030D01A
If the oil level is close to or below the "L" mark,
add oil until it reaches the "F" mark. To add oil:
1. Remove the oil filler cap by turning it coun- terclockwise.
2. Add oil, then check the level again. Do not overfill.
3. Replace the cap by turning it clockwise.
The distance between the "F" and "L" marks is
equal to about 1 quart of oil. G350A01A-GAT
ENGINE OIL CONSUMPTION Function of Engine Oil
Engine oil has the primary function of lubricat-
ing and cooling the inside of the engine. Engine oil consumption
If is normal that an engine should consume
some engine oil while normal driving. The cause of oil consumption in a normal engine are asfollows;
o Engine oil is used to lubricate pistons, piston rings and cylinders.
o A thin film of oil is left on the cylinder wall when a piston moves downwards in the cylinder. High negative pressure generatedduring engine operation sucks some of theoil into the combustion chamber. This oil with some oil of the cylinder wall is burned by the high temperature combustiongases during the combustion process.
o The engine oil consumption is strongly ef- fected by the viscosity and quality of oil,engine rpm and driving condition etc. The
engine oil is more consumed under severedriving conditions such as high speeds and
frequent acceleration and deceleration thannormal driving condition.
Page 224 of 249
DO-IT-YOURSELF MAINTENANCE
6-6 ZG050B1-A
Recommended Coolant
G050B01A
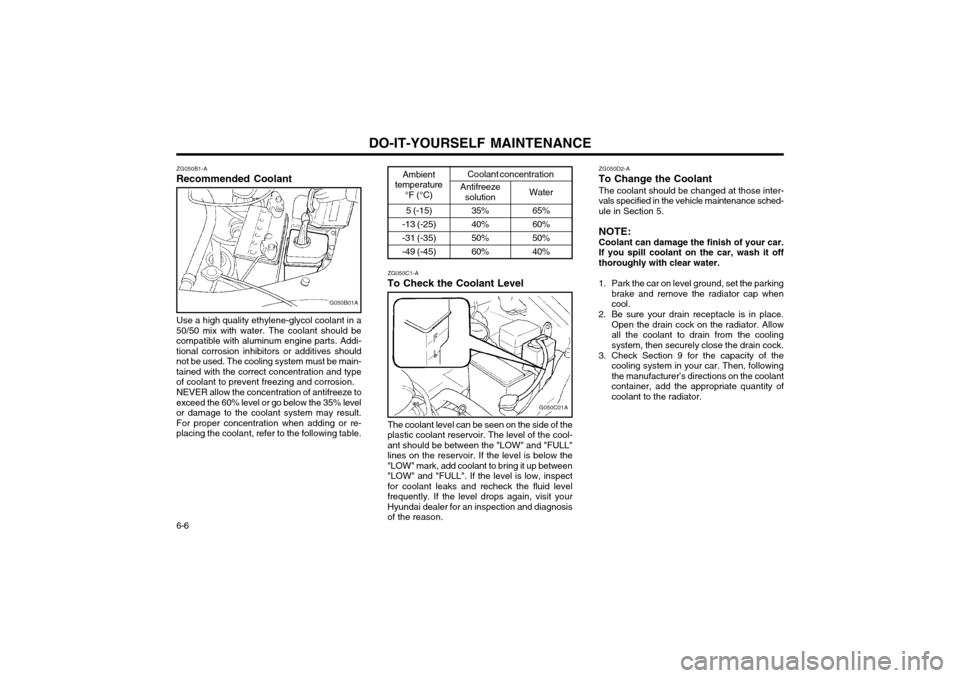
Use a high quality ethylene-glycol coolant in a
50/50 mix with water. The coolant should be compatible with aluminum engine parts. Addi-tional corrosion inhibitors or additives shouldnot be used. The cooling system must be main-tained with the correct concentration and typeof coolant to prevent freezing and corrosion.
NEVER allow the concentration of antifreeze to
exceed the 60% level or go below the 35% levelor damage to the coolant system may result.For proper concentration when adding or re-placing the coolant, refer to the following table.
Coolant concentration
ZG050C1-A
To Check the Coolant Level
G050C01A
The coolant level can be seen on the side of the
plastic coolant reservoir. The level of the cool- ant should be between the "LOW" and "FULL"lines on the reservoir. If the level is below the"LOW" mark, add coolant to bring it up between"LOW" and "FULL". If the level is low, inspectfor coolant leaks and recheck the fluid levelfrequently. If the level drops again, visit yourHyundai dealer for an inspection and diagnosisof the reason. ZG050D2-A
To Change the Coolant
The coolant should be changed at those inter-vals specified in the vehicle maintenance sched-ule in Section 5. NOTE: Coolant can damage the finish of your car. If you spill coolant on the car, wash it offthoroughly with clear water.
1. Park the car on level ground, set the parking brake and remove the radiator cap whencool.
2. Be sure your drain receptacle is in place. Open the drain cock on the radiator. Allowall the coolant to drain from the coolingsystem, then securely close the drain cock.
3. Check Section 9 for the capacity of the cooling system in your car. Then, followingthe manufacturer’s directions on the coolantcontainer, add the appropriate quantity ofcoolant to the radiator.
Water
Antifreeze
solution
35% 40%50%60%
Ambient
temperature °F (°C)
5 (-15)
-13 (-25)-31 (-35)-49 (-45) 65%60%50%40%
Page 225 of 249
DO-IT-YOURSELF MAINTENANCE 6-7
G050D02XG050B01A
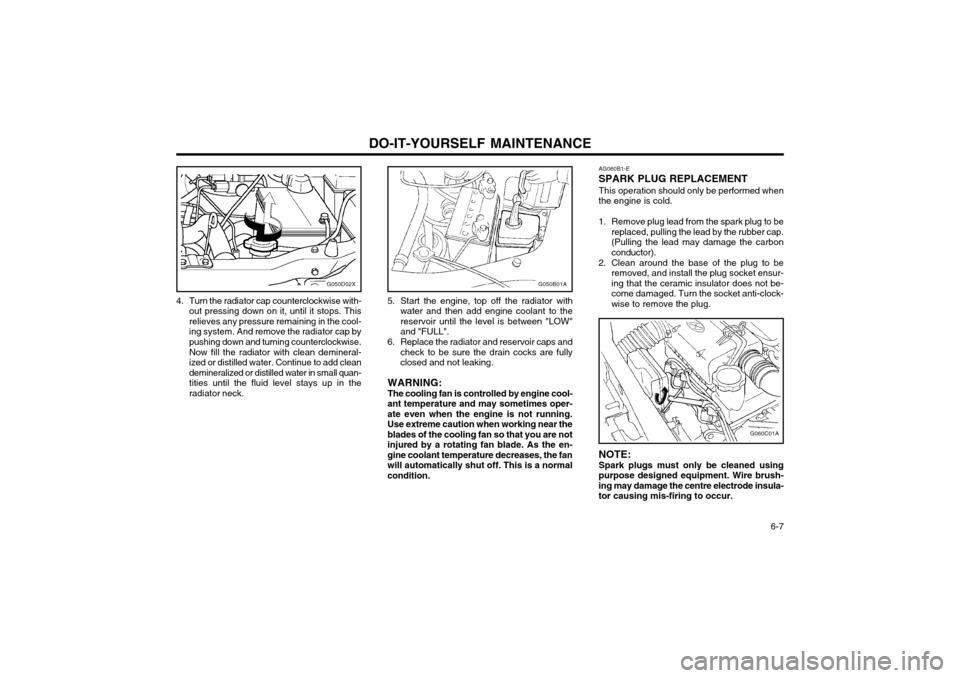
4. Turn the radiator cap counterclockwise with- out pressing down on it, until it stops. This relieves any pressure remaining in the cool-ing system. And remove the radiator cap bypushing down and turning counterclockwise. Now fill the radiator with clean demineral- ized or distilled water. Continue to add cleandemineralized or distilled water in small quan-tities until the fluid level stays up in theradiator neck. 5. Start the engine, top off the radiator with
water and then add engine coolant to thereservoir until the level is between "LOW"and "FULL".
6. Replace the radiator and reservoir caps and check to be sure the drain cocks are fullyclosed and not leaking.
WARNING: The cooling fan is controlled by engine cool-
ant temperature and may sometimes oper- ate even when the engine is not running.Use extreme caution when working near theblades of the cooling fan so that you are notinjured by a rotating fan blade. As the en-gine coolant temperature decreases, the fanwill automatically shut off. This is a normalcondition. AG060B1-E
SPARK PLUG REPLACEMENT
This operation should only be performed when
the engine is cold.
1. Remove plug lead from the spark plug to be replaced, pulling the lead by the rubber cap. (Pulling the lead may damage the carbonconductor).
2. Clean around the base of the plug to be removed, and install the plug socket ensur-ing that the ceramic insulator does not be-come damaged. Turn the socket anti-clock-wise to remove the plug.
G060C01A
NOTE: Spark plugs must only be cleaned using
purpose designed equipment. Wire brush-ing may damage the centre electrode insula-tor causing mis-firing to occur.
Page 229 of 249
DO-IT-YOURSELF MAINTENANCE 6-11
While the engine is idling, apply the brakes and move the gear selector lever from "P" to each
of its other positions — "R", "N", "D", "2", "L" —and then return to "N". With the engine stillidling:
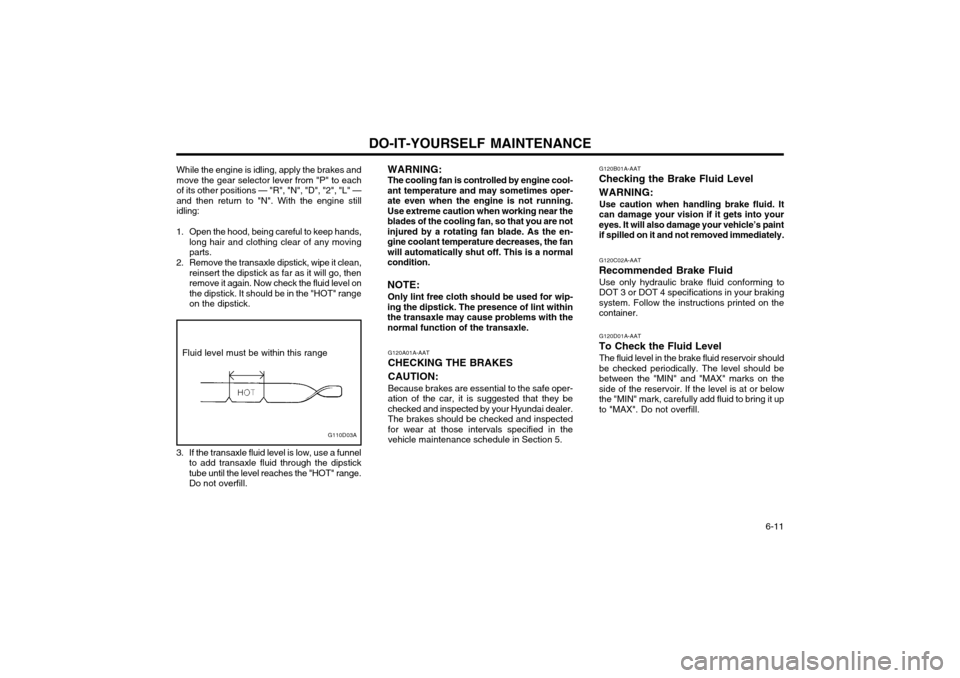
1. Open the hood, being careful to keep hands, long hair and clothing clear of any movingparts.
2. Remove the transaxle dipstick, wipe it clean, reinsert the dipstick as far as it will go, thenremove it again. Now check the fluid level on
the dipstick. It should be in the "HOT" rangeon the dipstick.
Fluid level must be within this range
3. If the transaxle fluid level is low, use a funnel to add transaxle fluid through the dipsticktube until the level reaches the "HOT" range.
Do not overfill.
G110D03A
G120A01A-AAT CHECKING THE BRAKES CAUTION: Because brakes are essential to the safe oper- ation of the car, it is suggested that they bechecked and inspected by your Hyundai dealer.The brakes should be checked and inspectedfor wear at those intervals specified in thevehicle maintenance schedule in Section 5. G120B01A-AAT
Checking the Brake Fluid Level WARNING:
Use caution when handling brake fluid. It
can damage your vision if it gets into your eyes. It will also damage your vehicle’s paint
if spilled on it and not removed immediately.
G120C02A-AAT
Recommended Brake Fluid Use only hydraulic brake fluid conforming to
DOT 3 or DOT 4 specifications in your brakingsystem. Follow the instructions printed on thecontainer.
G120D01A-AAT
To Check the Fluid Level The fluid level in the brake fluid reservoir should
be checked periodically. The level should bebetween the "MIN" and "MAX" marks on theside of the reservoir. If the level is at or below
the "MIN" mark, carefully add fluid to bring it upto "MAX". Do not overfill.
WARNING: The cooling fan is controlled by engine cool-
ant temperature and may sometimes oper- ate even when the engine is not running.
Use extreme caution when working near theblades of the cooling fan, so that you are notinjured by a rotating fan blade. As the en-
gine coolant temperature decreases, the fanwill automatically shut off. This is a normalcondition. NOTE:
Only lint free cloth should be used for wip-
ing the dipstick. The presence of lint within the transaxle may cause problems with thenormal function of the transaxle.
Page 230 of 249
DO-IT-YOURSELF MAINTENANCE
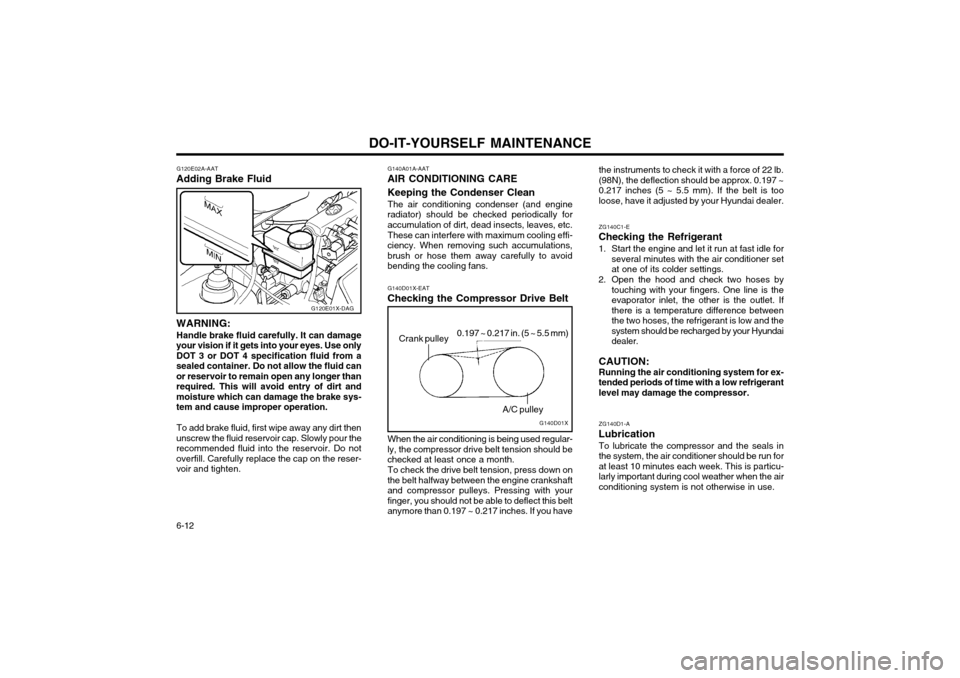
6-12 the instruments to check it with a force of 22 lb. (98N), the deflection should be approx. 0.197 ~0.217 inches (5 ~ 5.5 mm). If the belt is tooloose, have it adjusted by your Hyundai dealer. ZG140C1-E
Checking the Refrigerant
1. Start the engine and let it run at fast idle for several minutes with the air conditioner set at one of its colder settings.
2. Open the hood and check two hoses by touching with your fingers. One line is theevaporator inlet, the other is the outlet. Ifthere is a temperature difference betweenthe two hoses, the refrigerant is low and thesystem should be recharged by your Hyundaidealer.
CAUTION:Running the air conditioning system for ex-tended periods of time with a low refrigerantlevel may damage the compressor. ZG140D1-A
Lubrication To lubricate the compressor and the seals in the system, the air conditioner should be run forat least 10 minutes each week. This is particu-larly important during cool weather when the airconditioning system is not otherwise in use.
G140A01A-AAT
AIR CONDITIONING CARE Keeping the Condenser Clean
The air conditioning condenser (and engine
radiator) should be checked periodically for accumulation of dirt, dead insects, leaves, etc.
These can interfere with maximum cooling effi-
ciency. When removing such accumulations,brush or hose them away carefully to avoidbending the cooling fans.
G140D01X-EAT
Checking the Compressor Drive Belt
G140D01X
A/C pulley
0.197 ~ 0.217 in. (5 ~ 5.5 mm)
Crank pulley
When the air conditioning is being used regular-
ly, the compressor drive belt tension should be checked at least once a month.
To check the drive belt tension, press down on
the belt halfway between the engine crankshaftand compressor pulleys. Pressing with yourfinger, you should not be able to deflect this beltanymore than 0.197 ~ 0.217 inches. If you have
G120E01X-DAG
G120E02A-AAT
Adding Brake Fluid WARNING:
Handle brake fluid carefully. It can damage
your vision if it gets into your eyes. Use only DOT 3 or DOT 4 specification fluid from a
sealed container. Do not allow the fluid canor reservoir to remain open any longer than
required. This will avoid entry of dirt andmoisture which can damage the brake sys-tem and cause improper operation.
To add brake fluid, first wipe away any dirt then
unscrew the fluid reservoir cap. Slowly pour therecommended fluid into the reservoir. Do notoverfill. Carefully replace the cap on the reser-voir and tighten.
Page 233 of 249
DO-IT-YOURSELF MAINTENANCE 6-15
DG200B2-E
INDIVIDUAL CIRCUIT FUSES
XV60320E
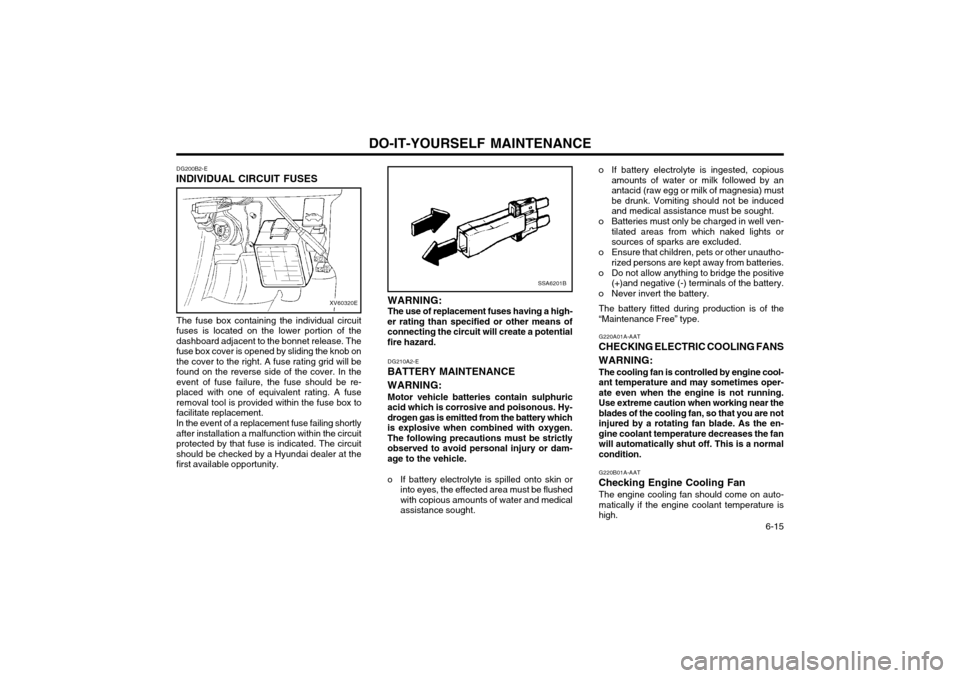
The fuse box containing the individual circuit fuses is located on the lower portion of thedashboard adjacent to the bonnet release. Thefuse box cover is opened by sliding the knob onthe cover to the right. A fuse rating grid will befound on the reverse side of the cover. In theevent of fuse failure, the fuse should be re-placed with one of equivalent rating. A fuseremoval tool is provided within the fuse box tofacilitate replacement. In the event of a replacement fuse failing shortly after installation a malfunction within the circuitprotected by that fuse is indicated. The circuitshould be checked by a Hyundai dealer at thefirst available opportunity.
SSA6201B
WARNING: The use of replacement fuses having a high-
er rating than specified or other means of connecting the circuit will create a potentialfire hazard.
DG210A2-E
BATTERY MAINTENANCE WARNING:
Motor vehicle batteries contain sulphuric
acid which is corrosive and poisonous. Hy- drogen gas is emitted from the battery whichis explosive when combined with oxygen.The following precautions must be strictlyobserved to avoid personal injury or dam-age to the vehicle.
o If battery electrolyte is spilled onto skin or into eyes, the effected area must be flushed with copious amounts of water and medicalassistance sought. o If battery electrolyte is ingested, copious
amounts of water or milk followed by anantacid (raw egg or milk of magnesia) mustbe drunk. Vomiting should not be inducedand medical assistance must be sought.
o Batteries must only be charged in well ven- tilated areas from which naked lights orsources of sparks are excluded.
o Ensure that children, pets or other unautho- rized persons are kept away from batteries.
o Do not allow anything to bridge the positive (+)and negative (-) terminals of the battery.
o Never invert the battery.
The battery fitted during production is of the“Maintenance Free” type. G220A01A-AAT
CHECKING ELECTRIC COOLING FANS WARNING:
The cooling fan is controlled by engine cool- ant temperature and may sometimes oper-ate even when the engine is not running.
Use extreme caution when working near theblades of the cooling fan, so that you are notinjured by a rotating fan blade. As the en-
gine coolant temperature decreases the fanwill automatically shut off. This is a normalcondition. G220B01A-AAT
Checking Engine Cooling Fan The engine cooling fan should come on auto- matically if the engine coolant temperature ishigh.
Page 234 of 249
DO-IT-YOURSELF MAINTENANCE
6-16 G270A01X-GAT
HEADLIGHT BULB
G270A01X
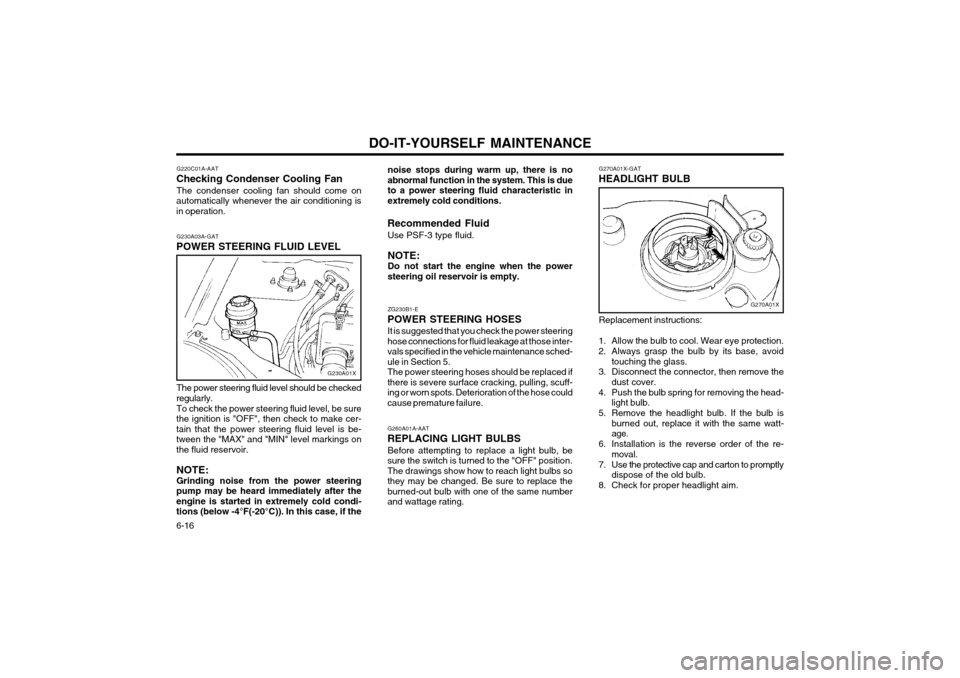
Replacement instructions:
1. Allow the bulb to cool. Wear eye protection.
2. Always grasp the bulb by its base, avoid touching the glass.
3. Disconnect the connector, then remove the dust cover.
4. Push the bulb spring for removing the head- light bulb.
5. Remove the headlight bulb. If the bulb is burned out, replace it with the same watt- age.
6. Installation is the reverse order of the re- moval.
7. Use the protective cap and carton to promptly dispose of the old bulb.
8. Check for proper headlight aim.
noise stops during warm up, there is no
abnormal function in the system. This is dueto a power steering fluid characteristic inextremely cold conditions.
Recommended Fluid Use PSF-3 type fluid. NOTE: Do not start the engine when the power
steering oil reservoir is empty. ZG230B1-E
POWER STEERING HOSES It is suggested that you check the power steering hose connections for fluid leakage at those inter-vals specified in the vehicle maintenance sched-ule in Section 5.The power steering hoses should be replaced ifthere is severe surface cracking, pulling, scuff-ing or worn spots. Deterioration of the hose couldcause premature failure.
G260A01A-AAT
REPLACING LIGHT BULBS Before attempting to replace a light bulb, be
sure the switch is turned to the "OFF" position.
The drawings show how to reach light bulbs sothey may be changed. Be sure to replace the
burned-out bulb with one of the same numberand wattage rating.
G220C01A-AAT
Checking Condenser Cooling Fan
The condenser cooling fan should come on
automatically whenever the air conditioning is in operation.
G230A03A-GAT
POWER STEERING FLUID LEVEL
G230A01X
The power steering fluid level should be checked
regularly.
To check the power steering fluid level, be sure
the ignition is "OFF", then check to make cer- tain that the power steering fluid level is be-
tween the "MAX" and "MIN" level markings onthe fluid reservoir.
NOTE: Grinding noise from the power steering
pump may be heard immediately after the engine is started in extremely cold condi-tions (below -4°F(-20°C)). In this case, if the