boot Hyundai Atos 2002 Owner's Manual
[x] Cancel search | Manufacturer: HYUNDAI, Model Year: 2002, Model line: Atos, Model: Hyundai Atos 2002Pages: 249, PDF Size: 3.11 MB
Page 88 of 249
CORROSION PREVENTION AND APPEARANCE CARE
CORROSION PREVENTION AND APPEARANCE CARE CORROSION PREVENTION AND APPEARANCE CARE
CORROSION PREVENTION AND APPEARANCE CARE
CORROSION PREVENTION AND APPEARANCE CARE
4-3
(at least once a month). Give special attention
to the removal of salt, mud and other substanc-
es on the underside of the splashboards of the car. Make sure that the outlets and the under-side of the doors are open. Paint damage canbe caused by small accumulation of tar, indus-trial precipitation, tree resin, insects and birddroppings, when not removed immediately.
If water alone is not strong enough to remove
the accumulated dirt, use a mild car washingsolution. Be sure to rinse the surface afterwashing to remove the solution. Never allowthe solution to dry on the painted surfaces. E030C01A-AAT
Polishing and Waxing
Polishing and Waxing Polishing and Waxing
Polishing and Waxing
Polishing and Waxing Always wash and dry the car before polishing or waxing or using a combination cleaner andwax. Use a good quality commercial productand follow the manufacturer's directions on thecontainer. Polish and wax the bright trim piecesas well as the paint.
E030B01A-AAT Spot Cleaning
Spot Cleaning Spot Cleaning
Spot Cleaning
Spot Cleaning
Don't use gasoline, strong solvents or corrosive
cleaning agents. These can damage the finishof the car. To remove road tar, use turpentineon a clean, soft cloth or commercially availablebug and tar remover. Be gentle.
To remove dead insects or tree sap, use warm
water and mild soap or car-washing solution.Soak the spot and rub gently. If the paint haslost its luster, use a commercial car-cleaningpolish. E030D01A-AAT
When to Wax Again
When to Wax Again When to Wax Again
When to Wax Again
When to Wax Again
You should polish and wax the car again when
water no longer beads on a clean surface butspreads out over a larger area.
E030E01A-AATMaintaining Bumpers
Maintaining Bumpers Maintaining Bumpers
Maintaining Bumpers
Maintaining Bumpers
Special precautions must be observed to pre-
serve the appearance of the bumpers on yourHyundai. They are:
o Be careful not to spill battery electrolyte or hydraulic brake fluid on the bumpers. If you do, wash it off immediately with clean water.
o Be gentle when cleaning the bumper sur- faces. They are made of soft plastic and thesurface can be damaged if mistreated. Donot use abrasive cleaners. Use warm waterand mild soap or car-washing solution. o Do not expose the bumpers to high tem-
peratures. For example, if you have yourcar repainted, do not leave the bumpers onthe car if the car is going to be placed in ahigh temperature paint booth.
E040A01A-AAT CLEANING THE INTERIOR
CLEANING THE INTERIOR CLEANING THE INTERIOR
CLEANING THE INTERIOR
CLEANING THE INTERIOR
To Clean the Vinyl Upholstery
To Clean the Vinyl Upholstery To Clean the Vinyl Upholstery
To Clean the Vinyl Upholstery
To Clean the Vinyl Upholstery
To clean the vinyl upholstery, first remove loose
dirt and dust with a vacuum cleaner. Then applya solution of mild soap or detergent and waterusing a clean sponge or soft cloth. Allow this tostay on the surface to loosen the dirt, then wipewith a clean damp sponge or cloth. If all the dirtstains are not removed, repeat this procedureuntil the upholstery is clean. Do not use gaso-line, solvent, paint thinner or other strong clean-ers.
E040B01A-AATTo Clean the Leather Upholstery
To Clean the Leather Upholstery To Clean the Leather Upholstery
To Clean the Leather Upholstery
To Clean the Leather Upholstery
(If Installed)
(If Installed) (If Installed)
(If Installed)
(If Installed)
In the normal course of use, leather upholstered
surfaces will, like any material, pick-up dust anddirt. This dust and dirt must be cleaned off or itmay work into the surface of the leather, caus-ing damage.
Fine leather needs care, and should be cleaned
when necessary. Washing leather thoroughlywith soap and water will keep your leather
lustrous, beautiful and ensure you have manyyears of wear.
Page 92 of 249
VEHICLE MAINTENANCE REQUIREMENTS
VEHICLE MAINTENANCE REQUIREMENTS VEHICLE MAINTENANCE REQUIREMENTS
VEHICLE MAINTENANCE REQUIREMENTS
VEHICLE MAINTENANCE REQUIREMENTS
5-3
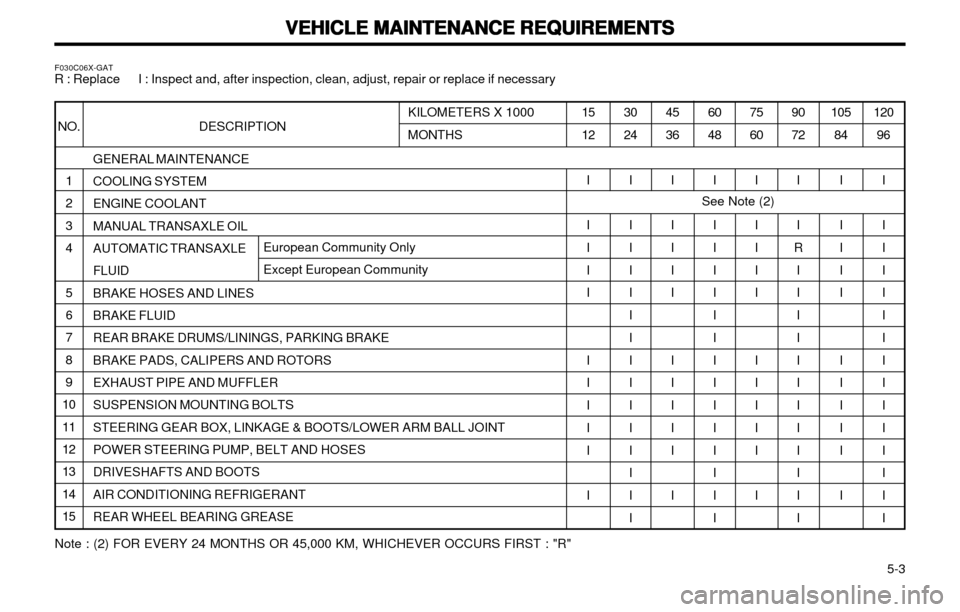
GENERAL MAINTENANCE COOLING SYSTEM ENGINE COOLANTMANUAL TRANSAXLE OIL AUTOMATIC TRANSAXLE FLUIDBRAKE HOSES AND LINES BRAKE FLUID REAR BRAKE DRUMS/LININGS, PARKING BRAKEBRAKE PADS, CALIPERS AND ROTORS EXHAUST PIPE AND MUFFLER SUSPENSION MOUNTING BOLTSSTEERING GEAR BOX, LINKAGE & BOOTS/LOWER ARM BALL JOINT POWER STEERING PUMP, BELT AND HOSES DRIVESHAFTS AND BOOTSAIR CONDITIONING REFRIGERANT REAR WHEEL BEARING GREASE
F030C06X-GAT
R : Replace I : Inspect and, after inspection, clean, adjust, repair or replace if necessary
120
96
I I I I I I I I I I I I I I I
105
84
I I I I I I I I I I I
90 72
I I
R
I I I I I I I I I I I I
75 60
I I I I I I I I I I I
60 48
I I I I I I I I I I I I I I I
45 36
I I I I I I I I I I I
30 24
I I I I I I I I I I I I I I I
15 12
I I I I I I I I I I I
KILOMETERS X 1000 MONTHS
NO. DESCRIPTION
1 2 34 5 6 7 89
101112 13 1415
See Note (2)
Note : (2) FOR EVERY 24 MONTHS OR 45,000 KM, WHICHEVER OCCURS FIRST : "R"
European Community Only Except European Community
Page 93 of 249
VEHICLE MAINTENANCE REQUIREMENTS
VEHICLE MAINTENANCE REQUIREMENTS VEHICLE MAINTENANCE REQUIREMENTS
VEHICLE MAINTENANCE REQUIREMENTS
VEHICLE MAINTENANCE REQUIREMENTS
5- 4 ENGINE OIL AND FILTER AIR CLEANER FILTER SPARK PLUGSTIMING BELT BRAKE PADS, CALIPERS AND ROTORS REAR BRAKE DRUMS/LININGS,PARKING BRAKE STEERING GEAR BOX, LINKAGE & BOOTS/LOWER ARM BALL JOINTDRIVESHAFTS AND BOOTS MANUAL TRANSAXLE OIL AUTOMATIC TRANSAXLEFLUID
European community OnlyExcept European community
MAINTENANCE UNDER SEVERE USAGE CONDITIONS
MAINTENANCE UNDER SEVERE USAGE CONDITIONS MAINTENANCE UNDER SEVERE USAGE CONDITIONS
MAINTENANCE UNDER SEVERE USAGE CONDITIONS
MAINTENANCE UNDER SEVERE USAGE CONDITIONS
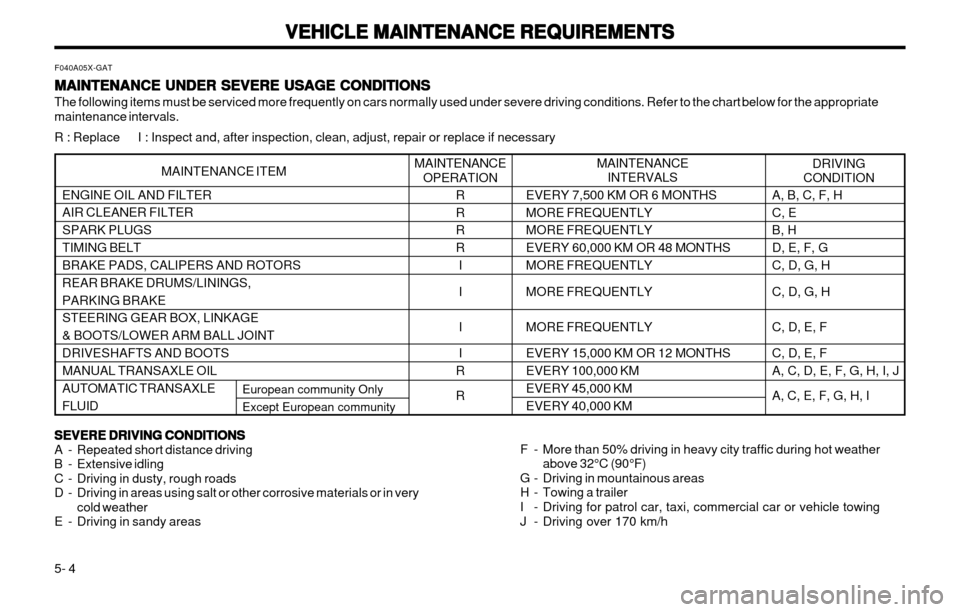
The following items must be serviced more frequently on cars normally used under severe driving conditions. Refer to the chart below for the appropriate maintenance intervals. R : Replace I : Inspect and, after inspection, clean, adjust, repair or replace if necessaryF040A05X-GAT
DRIVING
CONDITION
MAINTENANCE
INTERVALSMAINTENANCEOPERATION
R R R R
I I I I
R R EVERY 7,500 KM OR 6 MONTHS MORE FREQUENTLY MORE FREQUENTLY EVERY 60,000 KM OR 48 MONTHSMORE FREQUENTLY MORE FREQUENTLY MORE FREQUENTLY EVERY 15,000 KM OR 12 MONTHS EVERY 100,000 KM EVERY 45,000 KM EVERY 40,000 KM
MAINTENANCE ITEM
A, B, C, F, HC, E B, H D, E, F, GC, D, G, H C, D, G, H C, D, E, F C, D, E, F A, C, D, E, F, G, H, I, J A, C, E, F, G, H, I
SEVERE DRIVING CONDITIONS
SEVERE DRIVING CONDITIONS SEVERE DRIVING CONDITIONS
SEVERE DRIVING CONDITIONS
SEVERE DRIVING CONDITIONS
A - Repeated short distance driving
B - Extensive idling
C - Driving in dusty, rough roads
D - Driving in areas using salt or other corrosive materials or in very
cold weather
E - Driving in sandy areas F - More than 50% driving in heavy city traffic during hot weather
above 32°C (90°F)
G - Driving in mountainous areas
H - Towing a trailer
I - Driving for patrol car, taxi, commercial car or vehicle towing
J - Driving over 170 km/h
Page 95 of 249
VEHICLE MAINTENANCE REQUIREMENTS
VEHICLE MAINTENANCE REQUIREMENTS VEHICLE MAINTENANCE REQUIREMENTS
VEHICLE MAINTENANCE REQUIREMENTS
VEHICLE MAINTENANCE REQUIREMENTS
5- 6 F070B01A-GAT
oo
oo
o Cooling System
Cooling System Cooling System
Cooling System
Cooling System
Check the cooling system part, such as radia-
tor, coolant reservoir, hoses and connections for leakage and damage. Replace any dam-aged parts.
F070C01A-AAToo
oo
o
Engine coolant
Engine coolant Engine coolant
Engine coolant
Engine coolant
The coolant should be changed at the
intervals specified in the maintenance sched-ule.
F070D02X-GAToo
oo
o Manual transaxle oil
Manual transaxle oil Manual transaxle oil
Manual transaxle oil
Manual transaxle oil
Inspect the manual transaxle oil according to
the maintenance schedule.
NOTE:
NOTE: NOTE:
NOTE:
NOTE:
If the oil level is low, check for possible
If the oil level is low, check for possible If the oil level is low, check for possible
If the oil level is low, check for possible
If the oil level is low, check for possible leaks before adding oil. Do not overfill.
leaks before adding oil. Do not overfill. leaks before adding oil. Do not overfill.
leaks before adding oil. Do not overfill.
leaks before adding oil. Do not overfill.
F070E01X-GAToo
oo
o
Automatic transaxle fluid
Automatic transaxle fluid Automatic transaxle fluid
Automatic transaxle fluid
Automatic transaxle fluid
The fluid level should be in the "HOT" range of
the dipstick, after the engine and transaxle are at normal operating temperature. Check theAutomatic Transaxle Fluid level with the engine
running and the transaxle in neutral, with theparking brake properly applied. Use ESSO JWS-3314 when adding or changing fluid. F070F01A-AAT
oo
oo
o Brake hoses and lines
Brake hoses and lines Brake hoses and lines
Brake hoses and lines
Brake hoses and lines
Visually check for proper installation, chafing,
cracks, deterioration and any leakage. Replaceany deteriorated or damaged parts immediate-ly. F070G01A-AAT
oo
oo
o Brake fluid
Brake fluid Brake fluid
Brake fluid
Brake fluid
Check brake fluid level in the brake fluid reser- voir. The level should be between "MIN" and"MAX" marks on the side of the reservoir. Use only hydraulic brake fluid conforming to DOT 3 or DOT 4. F070H01A-AAT oo
oo
o
Rear brake drums/linings, parking
Rear brake drums/linings, parking Rear brake drums/linings, parking
Rear brake drums/linings, parking
Rear brake drums/linings, parking
brake
brake brake
brake
brake
Check the rear brake drums and linings for
scoring, burning, leaking fluid, broken parts,and excessive wear. Inspect the parking brake
system including the parking brake lever andcables. For detailed service procedures, referto the Shop Manual. F070J01A-AAT
oo
oo
o
Brake pads, calipers and rotors
Brake pads, calipers and rotors Brake pads, calipers and rotors
Brake pads, calipers and rotors
Brake pads, calipers and rotors
Check the pads for excessive wear, discs for
run out and wear, and calipers for fluid leakage. F070L01A-AAT
oo
oo
o Suspension mounting bolts
Suspension mounting bolts Suspension mounting bolts
Suspension mounting bolts
Suspension mounting bolts
Check the suspension connections for loose-ness or damage. Retighten to the specifiedtorque.
F070K01A-AAT
oo
oo
o Exhaust pipe and muffler
Exhaust pipe and muffler Exhaust pipe and muffler
Exhaust pipe and muffler
Exhaust pipe and muffler
Visually inspect the exhaust pipes, muffler andhangers for cracks, deterioration, or damage.Start the engine and listen carefully for any
exhaust gas leakage. Tighten connections orreplace parts as necessary. F070M01A-AAT oo
oo
o
Steering gear box, linkage & boots/
Steering gear box, linkage & boots/ Steering gear box, linkage & boots/
Steering gear box, linkage & boots/
Steering gear box, linkage & boots/
lower
lower lower
lower
lower arm ball joint
arm ball joint arm ball joint
arm ball joint
arm ball joint
With the vehicle stopped and engine off, check for excessive free-play in the steering wheel.Check the linkage for bends or damage. Check
the dust boots and ball joints for deterioration,
cracks, or damage. Replace any damaged parts. F070N01A-AAT oo
oo
o Power steering pump, belt and
Power steering pump, belt and Power steering pump, belt and
Power steering pump, belt and
Power steering pump, belt and
hoses
hoses hoses
hoses
hoses
Check the power steering pump and hoses for leakage and damage. Replace any damaged orleaking parts immediately. Inspect the powersteering belt for evidence of cuts, cracks, ex-
cessive wear, oiliness and proper tension. Re-place or adjust it if necessary.
Page 96 of 249
VEHICLE MAINTENANCE REQUIREMENTS
VEHICLE MAINTENANCE REQUIREMENTS VEHICLE MAINTENANCE REQUIREMENTS
VEHICLE MAINTENANCE REQUIREMENTS
VEHICLE MAINTENANCE REQUIREMENTS
5-7
F070P01A-AAT
oo
oo
o Driveshafts and boots
Driveshafts and boots Driveshafts and boots
Driveshafts and boots
Driveshafts and boots
Check the drive shafts, boots and clamps for
cracks, deterioration, or damage. Replace any damaged parts and, if necessary, repack thegrease.
F070Q01A-AAToo
oo
o Air conditioning refrigerant
Air conditioning refrigerant Air conditioning refrigerant
Air conditioning refrigerant
Air conditioning refrigerant
Check the air conditioning lines and connec-
tions for leakage and damage. Check air condi-tioning performance according to the relevantshop manual if necessary.
F070R02X-GAToo
oo
o Rear wheel bearing grease
Rear wheel bearing grease Rear wheel bearing grease
Rear wheel bearing grease
Rear wheel bearing grease
Check rear wheel bearing grease whenever the
brake drums are removed to inspect the rearbrake system.
Page 205 of 249
WHAT TO DO IN AN EMERGENCY
3-4 SD070B1-E
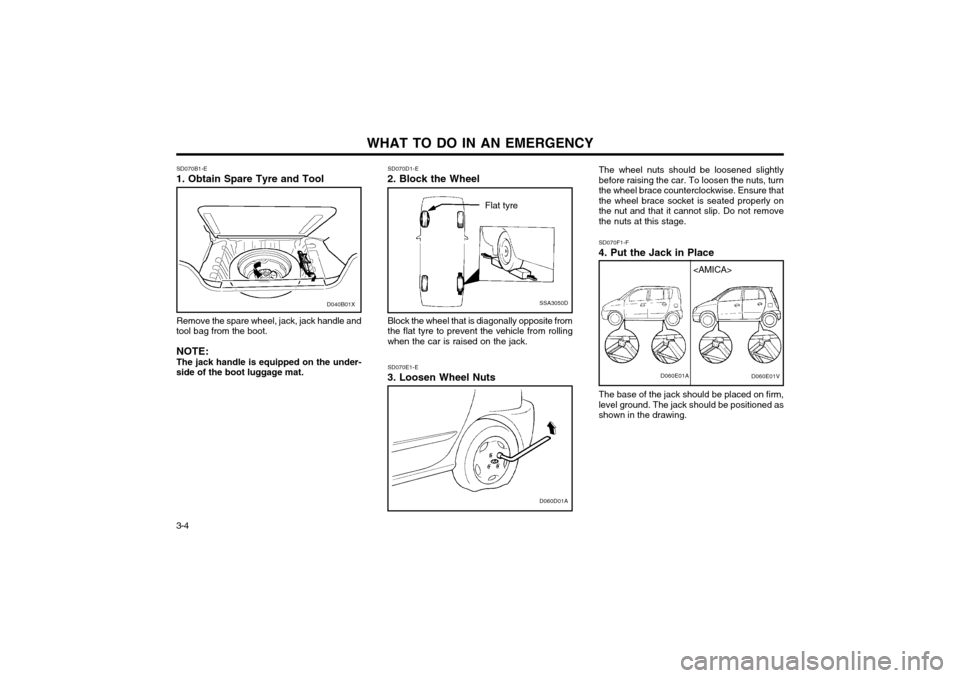
1. Obtain Spare Tyre and Tool
Remove the spare wheel, jack, jack handle and
tool bag from the boot.
NOTE: The jack handle is equipped on the under-
side of the boot luggage mat.
SSA3050D
Flat tyre
SD070D1-E
2. Block the Wheel
Block the wheel that is diagonally opposite from the flat tyre to prevent the vehicle from rollingwhen the car is raised on the jack.
D060D01A
SD070E1-E
3. Loosen Wheel Nuts The wheel nuts should be loosened slightly before raising the car. To loosen the nuts, turnthe wheel brace counterclockwise. Ensure thatthe wheel brace socket is seated properly onthe nut and that it cannot slip. Do not removethe nuts at this stage. SD070F1-F
4. Put the Jack in Place
The base of the jack should be placed on firm, level ground. The jack should be positioned asshown in the drawing.D060E01A
D040B01X
Page 207 of 249
WHAT TO DO IN AN EMERGENCY
3-6 SD070I1-E
7. Re-install Wheel Nuts
D060H01A
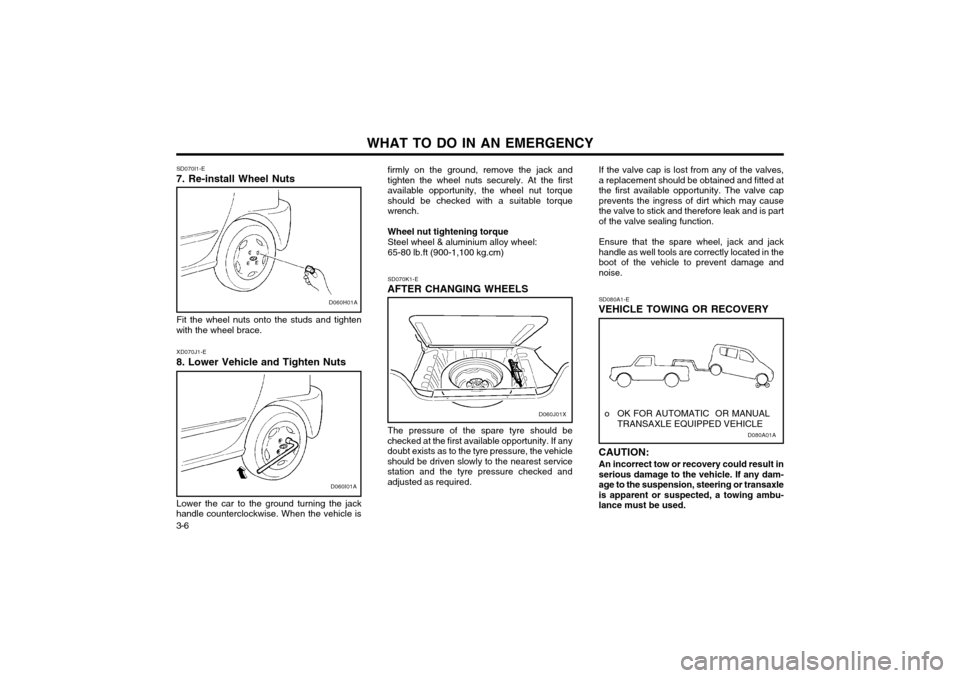
Fit the wheel nuts onto the studs and tighten
with the wheel brace.
D060I01A
XD070J1-E
8. Lower Vehicle and Tighten Nuts
Lower the car to the ground turning the jack
handle counterclockwise. When the vehicle is firmly on the ground, remove the jack and tighten the wheel nuts securely. At the firstavailable opportunity, the wheel nut torqueshould be checked with a suitable torquewrench. Wheel nut tightening torque Steel wheel & aluminium alloy wheel:65-80 lb.ft (900-1,100 kg.cm) SD070K1-E
AFTER CHANGING WHEELS
The pressure of the spare tyre should be
checked at the first available opportunity. If any doubt exists as to the tyre pressure, the vehicleshould be driven slowly to the nearest servicestation and the tyre pressure checked andadjusted as required. If the valve cap is lost from any of the valves,a replacement should be obtained and fitted atthe first available opportunity. The valve capprevents the ingress of dirt which may causethe valve to stick and therefore leak and is partof the valve sealing function. Ensure that the spare wheel, jack and jack handle as well tools are correctly located in theboot of the vehicle to prevent damage andnoise.
D080A01A
o OK FOR AUTOMATIC OR MANUAL
TRANSAXLE EQUIPPED VEHICLE
SD080A1-E
VEHICLE TOWING OR RECOVERY CAUTION:
An incorrect tow or recovery could result in serious damage to the vehicle. If any dam-age to the suspension, steering or transaxleis apparent or suspected, a towing ambu-lance must be used.D060J01X
Page 215 of 249
VEHICLE MAINTENANCE REQUIREMENTS
5-4 F040A02X-EAT
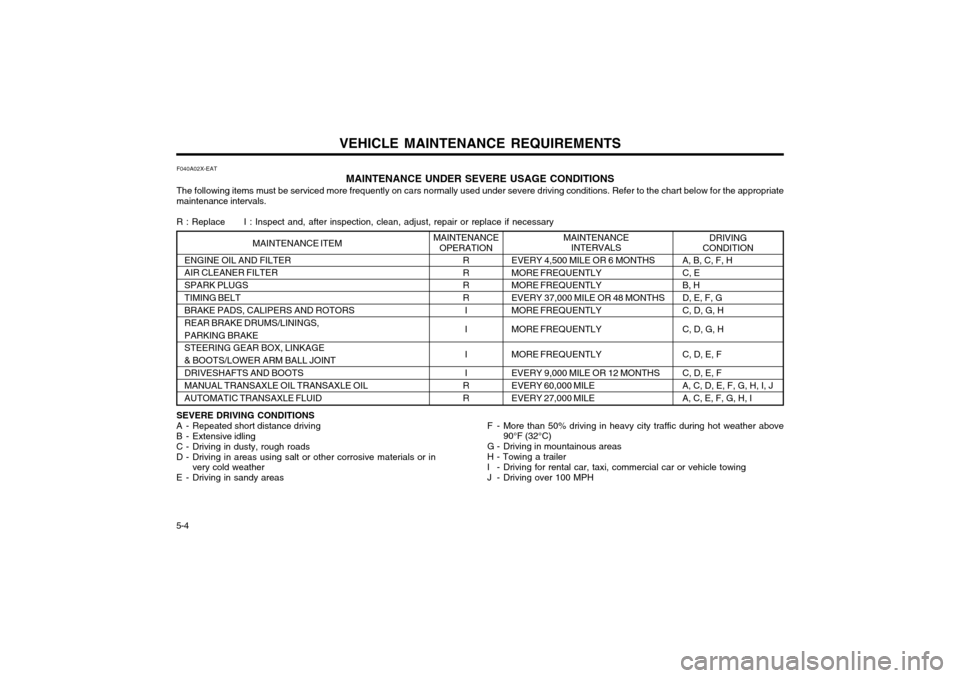
MAINTENANCE UNDER SEVERE USAGE CONDITIONS
The following items must be serviced more frequently on cars normally used under severe driving conditions. Refer to the chart below for the appropriate maintenance intervals. R : Replace I : Inspect and, after inspection, clean, adjust, repair or replace if necessary SEVERE DRIVING CONDITIONS
A - Repeated short distance driving
B - Extensive idling
C - Driving in dusty, rough roads
D - Driving in areas using salt or other corrosive materials or in very cold weather
E - Driving in sandy areas F - More than 50% driving in heavy city traffic during hot weather above
90°F (32°C)
G - Driving in mountainous areasH - Towing a trailer
I - Driving for rental car, taxi, commercial car or vehicle towing
J - Driving over 100 MPH
ENGINE OIL AND FILTER AIR CLEANER FILTER SPARK PLUGSTIMING BELT BRAKE PADS, CALIPERS AND ROTORS REAR BRAKE DRUMS/LININGS,PARKING BRAKE STEERING GEAR BOX, LINKAGE & BOOTS/LOWER ARM BALL JOINTDRIVESHAFTS AND BOOTS MANUAL TRANSAXLE OIL TRANSAXLE OIL AUTOMATIC TRANSAXLE FLUID
DRIVING
CONDITION
MAINTENANCE
INTERVALSMAINTENANCEOPERATION
R R R R
I I I I
R R EVERY 4,500 MILE OR 6 MONTHS MORE FREQUENTLY MORE FREQUENTLY EVERY 37,000 MILE OR 48 MONTHSMORE FREQUENTLY MORE FREQUENTLY MORE FREQUENTLY EVERY 9,000 MILE OR 12 MONTHS EVERY 60,000 MILE EVERY 27,000 MILE
MAINTENANCE ITEM
A, B, C, F, H C, E B, H D, E, F, GC, D, G, H C, D, G, H C, D, E, F C, D, E, F A, C, D, E, F, G, H, I, J A, C, E, F, G, H, I
Page 217 of 249
VEHICLE MAINTENANCE REQUIREMENTS
5-6 F070B01A-GAT
o Cooling SystemCheck the cooling system part, such as radia-
tor, coolant reservoir, hoses and connections for leakage and damage. Replace any dam-aged parts.
F070C01A-AAT
o Engine coolant The coolant should be changed at the intervals
specified in the maintenance schedule.
F070D01X-GAT
o Manual or semi-automatic transaxle
oil
Inspect the manual or semi-automatic transaxle
oil according to the maintenance schedule.
NOTE: If the oil level is low, check for possible
leaks before adding oil. Do not overfill.
F070E01X-AAT
o Automatic transaxle fluidThe fluid level should be in the “HOT” range of
the dipstick, after engine and transaxle are at
normal operating temperature. Check the Auto-matic Transaxle Fluid level with the engine
running and the transaxle in neutral, with theparking brake properly applied. Use ESSOJWS3314 when adding or changing fluid. F070F01A-AAT o Brake hoses and linesVisually check for proper installation, chafing, cracks, deterioration and any leakage. Replaceany deteriorated or damaged parts immediate-ly. F070G02A-AAT
o Brake fluid Check brake fluid level in the brake fluid reser- voir. The level should be between "MIN" and"MAX" marks on the side of the reservoir. Use only hydraulic brake fluid conforming to DOT 3 or DOT 4. F070H01A-AAT
o Rear brake drums/linings, parking
brake
Check the rear brake drums and linings for
scoring, burning, leaking fluid, broken parts,and excessive wear. Inspect the parking brake
system including the parking brake lever andcables. For detailed service procedures, referto the Shop Manual. F070J01A-AAT
o Brake pads, calipers and rotorsCheck the pads for excessive wear, discs for run out and wear, and calipers for fluid leakage. F070K01A-AAT
o Exhaust pipe and mufflerVisually inspect the exhaust pipes, muffler and hangers for cracks, deterioration, or damage.Start the engine and listen carefully for any
exhaust gas leakage. Tighten connections orreplace parts as necessary. F070L01A-AAT
o Suspension mounting bolts Check the suspension connections for loose- ness or damage. Retighten to the specifiedtorque. F070M01A-AAT
o Steering gear box, linkage & boots/
lower arm ball joint
With the vehicle stopped and engine off, check for excessive free-play in the steering wheel.Check the linkage for bends or damage. Check
the dust boots and ball joints for deterioration,cracks, or damage. Replace any damagedparts. F070N01A-AAT
o Power steering pump, belt and hos-
es
Check the power steering pump and hoses for leakage and damage. Replace any damagedor leaking parts immediately. Inspect the powersteering belt for evidence of cuts, cracks, ex-cessive wear, oiliness and proper tension.Replace or adjust it if necessary.
Page 218 of 249
VEHICLE MAINTENANCE REQUIREMENTS 5-7
F070P01A-AAT
o Driveshafts and bootsCheck the drive shafts, boots and clamps for
cracks, deterioration, or damage. Replace any damaged parts and, if necessary, repack thegrease.
F070Q01A-AAT
o Air conditioning refrigerantCheck the air conditioning lines and connec-
tions for leakage and damage. Check air con- ditioning performance according to the relevantshop manual if necessary.
F070R02X-GAT
o Rear wheel bearing greaseCheck rear wheel bearing grease whenever
the brake drums are removed to inspect the rear brake system.