change time Hyundai Atos 2002 Owner's Manual
[x] Cancel search | Manufacturer: HYUNDAI, Model Year: 2002, Model line: Atos, Model: Hyundai Atos 2002Pages: 249, PDF Size: 3.11 MB
Page 3 of 249
OWNER'S MANUAL
OWNER'S MANUAL OWNER'S MANUAL
OWNER'S MANUAL
OWNER'S MANUAL
A030A01X-GATOperation
Operation Operation
Operation
Operation
Maintenance
Maintenance Maintenance
Maintenance
Maintenance
Specifications
Specifications Specifications
Specifications
Specifications
All information in this Owner's Manual is current at the time of publication. However, Hyundai reserves the right to make changes
at any time so that our policy of continual product improvement may be carried out.
This manual applies to all current Hyundai models and includes descriptions and explanations of optional as well as standard
equipment. As a result, you may find material in this manual that does not apply to your specific vehicle.
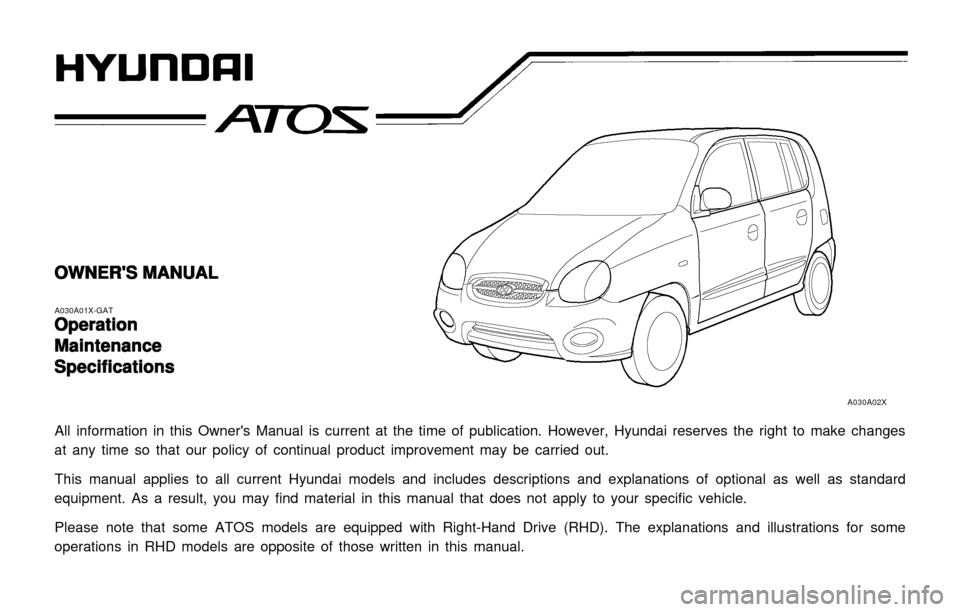
Please note that some ATOS models are equipped with Right-Hand Drive (RHD). The explanations and illustrations for some
operations in RHD models are opposite of those written in this manual.
A030A02X
Page 32 of 249
FEATURES OF YOUR HYUNDAI
FEATURES OF YOUR HYUNDAI FEATURES OF YOUR HYUNDAI
FEATURES OF YOUR HYUNDAI
FEATURES OF YOUR HYUNDAI
1- 23
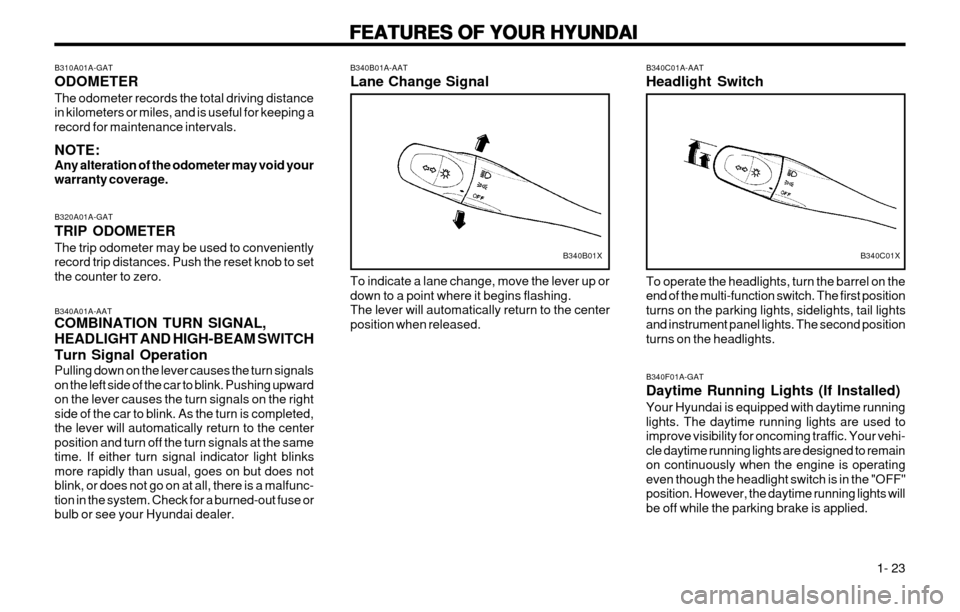
B340B01A-AAT Lane Change Signal To indicate a lane change, move the lever up or down to a point where it begins flashing.The lever will automatically return to the centerposition when released.
B340A01A-AAT COMBINATION TURN SIGNAL, HEADLIGHT AND HIGH-BEAM SWITCH Turn Signal Operation Pulling down on the lever causes the turn signals on the left side of the car to blink. Pushing upwardon the lever causes the turn signals on the rightside of the car to blink. As the turn is completed,the lever will automatically return to the centerposition and turn off the turn signals at the sametime. If either turn signal indicator light blinksmore rapidly than usual, goes on but does notblink, or does not go on at all, there is a malfunc-tion in the system. Check for a burned-out fuse orbulb or see your Hyundai dealer.
B340B01X
B310A01A-GAT ODOMETERThe odometer records the total driving distance in kilometers or miles, and is useful for keeping arecord for maintenance intervals. NOTE: Any alteration of the odometer may void yourwarranty coverage. B320A01A-GAT TRIP ODOMETER The trip odometer may be used to conveniently record trip distances. Push the reset knob to setthe counter to zero. B340C01A-AAT Headlight Switch To operate the headlights, turn the barrel on the end of the multi-function switch. The first positionturns on the parking lights, sidelights, tail lightsand instrument panel lights. The second positionturns on the headlights.
B340C01X
B340F01A-GAT Daytime Running Lights (If Installed) Your Hyundai is equipped with daytime running lights. The daytime running lights are used toimprove visibility for oncoming traffic. Your vehi-cle daytime running lights are designed to remainon continuously when the engine is operatingeven though the headlight switch is in the "OFF"position. However, the daytime running lights willbe off while the parking brake is applied.
Page 35 of 249
FEATURES OF YOUR HYUNDAI
FEATURES OF YOUR HYUNDAI FEATURES OF YOUR HYUNDAI
FEATURES OF YOUR HYUNDAI
FEATURES OF YOUR HYUNDAI
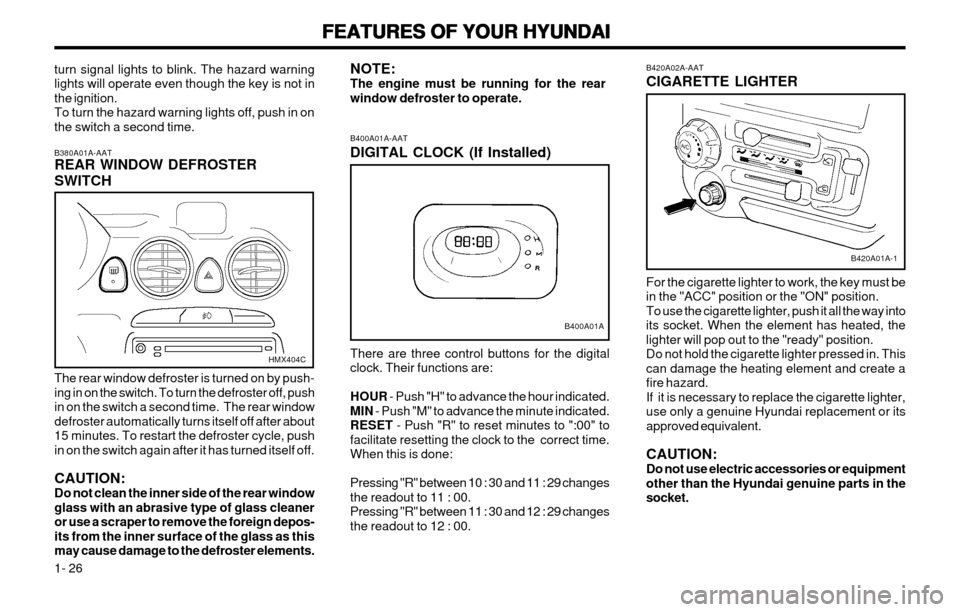
1- 26 B420A02A-AAT CIGARETTE LIGHTER For the cigarette lighter to work, the key must be in the "ACC" position or the "ON" position.To use the cigarette lighter, push it all the way intoits socket. When the element has heated, thelighter will pop out to the "ready" position.Do not hold the cigarette lighter pressed in. Thiscan damage the heating element and create afire hazard.If it is necessary to replace the cigarette lighter,use only a genuine Hyundai replacement or itsapproved equivalent. CAUTION: Do not use electric accessories or equipmentother than the Hyundai genuine parts in thesocket.
B420A01A-1
B400A01A-AAT DIGITAL CLOCK (If Installed) There are three control buttons for the digital clock. Their functions are: HOUR
- Push "H" to advance the hour indicated.
MIN - Push "M" to advance the minute indicated.
RESET - Push "R" to reset minutes to ":00" to
facilitate resetting the clock to the correct time. When this is done: Pressing "R" between 10 : 30 and 11 : 29 changes the readout to 11 : 00.Pressing "R" between 11 : 30 and 12 : 29 changesthe readout to 12 : 00.
NOTE:The engine must be running for the rearwindow defroster to operate.
B400A01A
turn signal lights to blink. The hazard warning lights will operate even though the key is not inthe ignition.To turn the hazard warning lights off, push in onthe switch a second time. B380A01A-AAT REAR WINDOW DEFROSTER SWITCH The rear window defroster is turned on by push- ing in on the switch. To turn the defroster off, pushin on the switch a second time. The rear windowdefroster automatically turns itself off after about15 minutes. To restart the defroster cycle, pushin on the switch again after it has turned itself off. CAUTION: Do not clean the inner side of the rear windowglass with an abrasive type of glass cleaneror use a scraper to remove the foreign depos-its from the inner surface of the glass as thismay cause damage to the defroster elements.
HMX404C
Page 64 of 249
DRIVING YOUR HYUNDAI
DRIVING YOUR HYUNDAI DRIVING YOUR HYUNDAI
DRIVING YOUR HYUNDAI
DRIVING YOUR HYUNDAI
2- 1
2. DRIVING YOUR HYUNDAI
C010A01A-AAT
WARNING: ENGINE EXHAUST CAN BE DANGEROUS!
WARNING: ENGINE EXHAUST CAN BE DANGEROUS! WARNING: ENGINE EXHAUST CAN BE DANGEROUS!
WARNING: ENGINE EXHAUST CAN BE DANGEROUS!
WARNING: ENGINE EXHAUST CAN BE DANGEROUS!
Engine exhaust fumes can be extremely dangerous. If, at any time, you smell exhaust fumes inside the vehicle, open the windows immediately. o Do not inhale exhaust fumes.
o Do not inhale exhaust fumes. o Do not inhale exhaust fumes.
o Do not inhale exhaust fumes.
o Do not inhale exhaust fumes. Exhaust fumes contain carbon monoxide, a colorless, odorless gas that can cause unconsciousness and death by asphyxiation.
o Be sure the exhaust system does not leak.
o Be sure the exhaust system does not leak. o Be sure the exhaust system does not leak.
o Be sure the exhaust system does not leak.
o Be sure the exhaust system does not leak. The exhaust system should be checked whenever the vehicle is raised to change the oil or for any other purpose. If you hear a change in the sound of the exhaust or if you drive over something that strikes the underneath side of the car, have theexhaust system checked as soon as possible by your Hyundai dealer.
o Do not run the engine in an enclosed area.
o Do not run the engine in an enclosed area. o Do not run the engine in an enclosed area.
o Do not run the engine in an enclosed area.
o Do not run the engine in an enclosed area. Letting the engine idle in your garage, even with the garage door open, is a hazardous practice. Never run the engine in your garage any longer than it takes to start the engine and back the car out.
o Avoid idling the engine for prolonged periods with people inside the car.
o Avoid idling the engine for prolonged periods with people inside the car. o Avoid idling the engine for prolonged periods with people inside the car.
o Avoid idling the engine for prolonged periods with people inside the car.
o Avoid idling the engine for prolonged periods with people inside the car. If it is necessary to idle the engine for a prolonged period with people inside the car, be sure to do so only in an open area with the air intake set at "Fresh" and the fan operating at one of the higher speeds so fresh air is drawn into the interior.If you must drive with the tail gate open because you are carrying objects that make this necessary: 1. Close all windows. 2. Open side vents.3. Set the air intake control at "Fresh", the air flow control at "Floor" or "Face" and the fan at one of the higher speeds.
To assure proper operation of the ventilation system, be sure the ventilation air intakes located just in front of the windshield are kept clear of snow, ice, leaves or other obstructions.
22
22
2
Page 70 of 249

DRIVING YOUR HYUNDAI
DRIVING YOUR HYUNDAI DRIVING YOUR HYUNDAI
DRIVING YOUR HYUNDAI
DRIVING YOUR HYUNDAI
2- 7
C130A01A-AAT
GOOD BRAKING PRACTICES
GOOD BRAKING PRACTICES GOOD BRAKING PRACTICES
GOOD BRAKING PRACTICES
GOOD BRAKING PRACTICES
WARNING:
WARNING: WARNING:
WARNING:
WARNING:
Do not allow passengers to sit on the cargo
Do not allow passengers to sit on the cargo Do not allow passengers to sit on the cargo
Do not allow passengers to sit on the cargo
Do not allow passengers to sit on the cargo
area while the
area while the area while the
area while the
area while the car is moving as this is not a
car is moving as this is not a car is moving as this is not a
car is moving as this is not a
car is moving as this is not a
proper seating position and no seat belts
proper seating position and no seat belts proper seating position and no seat belts
proper seating position and no seat belts
proper seating position and no seat belts
are are
are are
are available for use when the seat back is
available for use when the seat back is available for use when the seat back is
available for use when the seat back is
available for use when the seat back is
folded down. This could result in
folded down. This could result in folded down. This could result in
folded down. This could result in
folded down. This could result in serious
serious serious
serious
serious
injury or death in case of an accident or a
injury or death in case of an accident or a injury or death in case of an accident or a
injury or death in case of an accident or a
injury or death in case of an accident or a
sudden stop. Objects should
sudden stop. Objects should sudden stop. Objects should
sudden stop. Objects should
sudden stop. Objects should not extend
not extend not extend
not extend
not extend
higher than the top of the front seats. This
higher than the top of the front seats. This higher than the top of the front seats. This
higher than the top of the front seats. This
higher than the top of the front seats. This
could allow cargo
could allow cargo could allow cargo
could allow cargo
could allow cargo
to slide forward and cause
to slide forward and cause to slide forward and cause
to slide forward and cause
to slide forward and cause
injury or damage during sudden stops.
injury or damage during sudden stops. injury or damage during sudden stops.
injury or damage during sudden stops.
injury or damage during sudden stops.
o After being parked, check to be sure the parking brake is not engaged and that the parking brake indicator light is out beforedriving away.
o Driving through water may get the brakes wet. They can also get wet when the car iswashed. Wet brakes can be dangerous!
Your car will not stop as quickly if the brakesare wet and it may also pull to one side. Todry the brakes, apply the brakes lightly untilthe braking action returns to normal, takingcare to keep the car under control at alltimes. If the braking action does not return tonormal, stop as soon as it is safe to do soand call your Hyundai dealer for assistance.
o Don't coast down hills with the car out of gear. This is extremely hazardous. Keep thecar in gear at all times, use the brakes toslow down, then shift to a lower gear so thatengine braking will help you maintain a safespeed.
o Exercise extreme caution when driving on a
slippery surface. Be especially careful whenbraking, accelerating or shifting gears. On aslippery surface, an abrupt change in ve-hicle speed can cause the drive wheels tolose traction and the vehicle to go out ofcontrol.
o Turn the overdrive switch on for good fuel economy and smooth driving. If engine brak-ing is needed in the "D" range or if repeatedupshifting and downshifting between 3rd and4th gear is needed when climbing a gentleslope, it is recommended that the overdriveswitch be turned off. Turn the overdriveswitch back on immediately afterward.
CAUTION:
CAUTION: CAUTION:
CAUTION:
CAUTION:
oo
oo
o The risk of rollover is greatly increased if
The risk of rollover is greatly increased if The risk of rollover is greatly increased if
The risk of rollover is greatly increased if
The risk of rollover is greatly increased if
you lose control of your vehicle at high-
you lose control of your vehicle at high- you lose control of your vehicle at high-
you lose control of your vehicle at high-
you lose control of your vehicle at high-
way speeds.
way speeds. way speeds.
way speeds.
way speeds.
oo
oo
o Loss of control often occurs if two or
Loss of control often occurs if two or Loss of control often occurs if two or
Loss of control often occurs if two or
Loss of control often occurs if two or
more wheels drop off the roadway and
more wheels drop off the roadway and more wheels drop off the roadway and
more wheels drop off the roadway and
more wheels drop off the roadway and
the driver oversteers to reenter the road-
the driver oversteers to reenter the road- the driver oversteers to reenter the road-
the driver oversteers to reenter the road-
the driver oversteers to reenter the road-
way.
way. way.
way.
way.
oo
oo
o In the event your vehicle leaves the road-
In the event your vehicle leaves the road- In the event your vehicle leaves the road-
In the event your vehicle leaves the road-
In the event your vehicle leaves the road-
way, do not steer sharply. Instead, slow
way, do not steer sharply. Instead, slow way, do not steer sharply. Instead, slow
way, do not steer sharply. Instead, slow
way, do not steer sharply. Instead, slow
down before pulling back into the travel
down before pulling back into the travel down before pulling back into the travel
down before pulling back into the travel
down before pulling back into the travel
lanes.
lanes. lanes.
lanes.
lanes.
oo
oo
o In a collision crash, on unbelted person
In a collision crash, on unbelted person In a collision crash, on unbelted person
In a collision crash, on unbelted person
In a collision crash, on unbelted person
is significantly more likely to die than a
is significantly more likely to die than a is significantly more likely to die than a
is significantly more likely to die than a
is significantly more likely to die than a
person wearing a seatbelt.
person wearing a seatbelt. person wearing a seatbelt.
person wearing a seatbelt.
person wearing a seatbelt.
C090N02A-AAT
Good Driving Practices
Good Driving Practices Good Driving Practices
Good Driving Practices
Good Driving Practices
o Never move the gear selector lever from "P"
or "N" to any other position with the acceler- ator pedal depressed.
o Never move the gear selector lever into "P" when the vehicle is in motion.
o Be sure the car is completely stopped be- fore you attempt to shift into "R".
o Never take the car out of gear and coast down a hill. This may be extremely hazard-ous. Always leave the car in gear whenmoving.
o Do not "ride" the brakes. This can cause them to overheat and malfunction. Instead,when you are driving down a long hill, slowdown and shift to a lower gear. When you dothis, engine braking will help slow the car.
o Slow down before shifting to a lower gear. Otherwise, the lower gear may not be en-gaged.
o Always use the parking brake. Do not de- pend on placing the transaxle in "P" to keepthe car from moving.
drive switch is turned off, the transaxle will notupshift to the overdrive gear. For normal driv-ing, the selector lever should be left in the "D"position and the overdrive switch turned on.
If you need to accelerate rapidly, press the
accelerator pedal all the way to the floor. Thetransaxle will automatically shift to a lower gear,depending on the vehicle speed and load.
Page 103 of 249
DO-IT-YOURSELF MAINTENANCE
DO-IT-YOURSELF MAINTENANCE DO-IT-YOURSELF MAINTENANCE
DO-IT-YOURSELF MAINTENANCE
DO-IT-YOURSELF MAINTENANCE
6-7
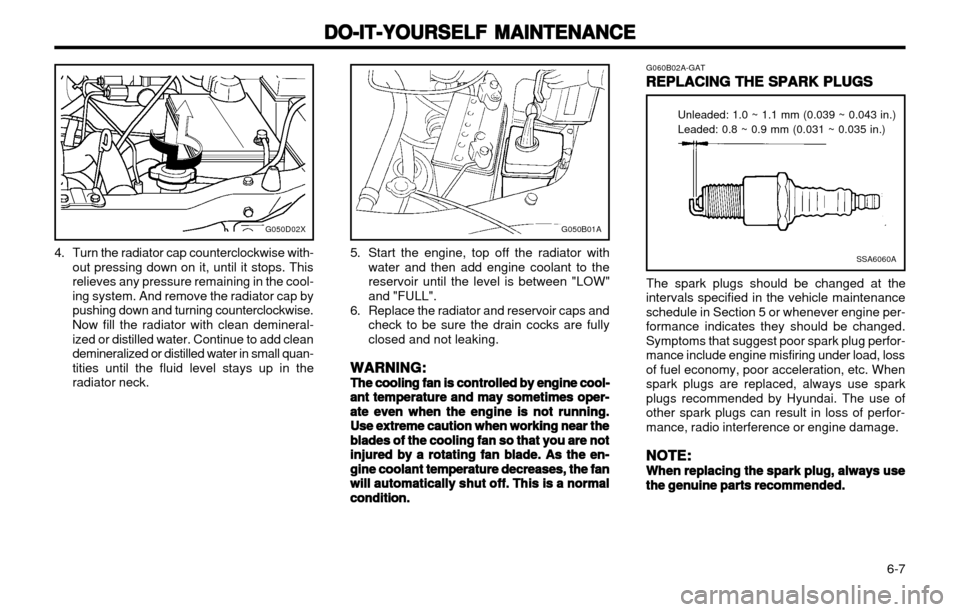
4. Turn the radiator cap counterclockwise with-out pressing down on it, until it stops. This relieves any pressure remaining in the cool-ing system. And remove the radiator cap bypushing down and turning counterclockwise. Now fill the radiator with clean demineral- ized or distilled water. Continue to add cleandemineralized or distilled water in small quan-tities until the fluid level stays up in theradiator neck.SSA6060A
Unleaded: 1.0 ~ 1.1 mm (0.039 ~ 0.043 in.) Leaded: 0.8 ~ 0.9 mm (0.031 ~ 0.035 in.)
G060B02A-GAT
REPLACING THE SPARK PLUGS
REPLACING THE SPARK PLUGS REPLACING THE SPARK PLUGS
REPLACING THE SPARK PLUGS
REPLACING THE SPARK PLUGS
The spark plugs should be changed at the
intervals specified in the vehicle maintenance schedule in Section 5 or whenever engine per-formance indicates they should be changed.Symptoms that suggest poor spark plug perfor-mance include engine misfiring under load, lossof fuel economy, poor acceleration, etc. Whenspark plugs are replaced, always use sparkplugs recommended by Hyundai. The use ofother spark plugs can result in loss of perfor-mance, radio interference or engine damage.
NOTE:
NOTE: NOTE:
NOTE:
NOTE:
When replacing the spark plug, always use
When replacing the spark plug, always use When replacing the spark plug, always use
When replacing the spark plug, always use
When replacing the spark plug, always use the genuine parts recommended.
the genuine parts recommended. the genuine parts recommended.
the genuine parts recommended.
the genuine parts recommended.
G050D02X
5. Start the engine, top off the radiator with
water and then add engine coolant to the reservoir until the level is between "LOW"and "FULL".
6. Replace the radiator and reservoir caps and check to be sure the drain cocks are fullyclosed and not leaking.
WARNING:
WARNING: WARNING:
WARNING:
WARNING:
The cooling fan is controlled by engine cool-
The cooling fan is controlled by engine cool- The cooling fan is controlled by engine cool-
The cooling fan is controlled by engine cool-
The cooling fan is controlled by engine cool- ant temperature and may sometimes oper-
ant temperature and may sometimes oper- ant temperature and may sometimes oper-
ant temperature and may sometimes oper-
ant temperature and may sometimes oper-
ate even when the engine is not running.
ate even when the engine is not running. ate even when the engine is not running.
ate even when the engine is not running.
ate even when the engine is not running.
Use extreme caution when working near the
Use extreme caution when working near the Use extreme caution when working near the
Use extreme caution when working near the
Use extreme caution when working near the
blades of the cooling fan so that you are not
blades of the cooling fan so that you are not blades of the cooling fan so that you are not
blades of the cooling fan so that you are not
blades of the cooling fan so that you are not
injured by a rotating fan blade. As the en-
injured by a rotating fan blade. As the en- injured by a rotating fan blade. As the en-
injured by a rotating fan blade. As the en-
injured by a rotating fan blade. As the en-
gine coolant temperature decreases, the fan
gine coolant temperature decreases, the fan gine coolant temperature decreases, the fan
gine coolant temperature decreases, the fan
gine coolant temperature decreases, the fan
will automatically shut off. This is a normal
will automatically shut off. This is a normal will automatically shut off. This is a normal
will automatically shut off. This is a normal
will automatically shut off. This is a normal
condition.
condition. condition.
condition.
condition.
G050B01A
Page 104 of 249
DO-IT-YOURSELF MAINTENANCE
DO-IT-YOURSELF MAINTENANCE DO-IT-YOURSELF MAINTENANCE
DO-IT-YOURSELF MAINTENANCE
DO-IT-YOURSELF MAINTENANCE
6-8 NOTE:
NOTE: NOTE:
NOTE:
NOTE:
Spark plugs should be tightened firmly. Over-
Spark plugs should be tightened firmly. Over- Spark plugs should be tightened firmly. Over-
Spark plugs should be tightened firmly. Over-
Spark plugs should be tightened firmly. Over-
tightening can damage
tightening can damage tightening can damage
tightening can damage
tightening can damage the threads in the
the threads in the the threads in the
the threads in the
the threads in the
aluminum cylinder head. Also, leaving them
aluminum cylinder head. Also, leaving them aluminum cylinder head. Also, leaving them
aluminum cylinder head. Also, leaving them
aluminum cylinder head. Also, leaving them
too loose can
too loose can too loose can
too loose can
too loose can cause the spark plug to get
cause the spark plug to get cause the spark plug to get
cause the spark plug to get
cause the spark plug to get
very hot and possibly result in damage to
very hot and possibly result in damage to very hot and possibly result in damage to
very hot and possibly result in damage to
very hot and possibly result in damage to
the the
the the
the engine.
engine. engine.
engine.
engine.
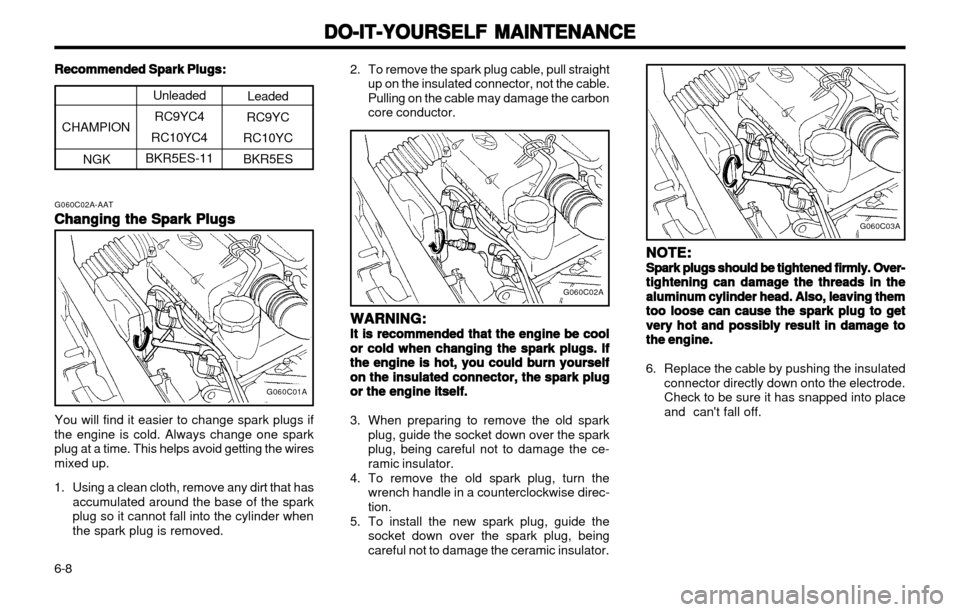
6. Replace the cable by pushing the insulated connector directly down onto the electrode. Check to be sure it has snapped into placeand can't fall off.
G060C03A
G060C02A-AAT
Changing the Spark Plugs
Changing the Spark Plugs Changing the Spark Plugs
Changing the Spark Plugs
Changing the Spark Plugs
Unleaded
RC9YC4
RC10YC4
BKR5ES-11
NGK Leaded
RC9YC
RC10YC BKR5ES
CHAMPION
G060C01A
You will find it easier to change spark plugs if
the engine is cold. Always change one spark
plug at a time. This helps avoid getting the wiresmixed up.
1. Using a clean cloth, remove any dirt that has accumulated around the base of the spark plug so it cannot fall into the cylinder whenthe spark plug is removed. WARNING:
WARNING: WARNING:
WARNING:
WARNING:
It is recommended that the engine be cool
It is recommended that the engine be cool It is recommended that the engine be cool
It is recommended that the engine be cool
It is recommended that the engine be cool or cold when changing
or cold when changing or cold when changing
or cold when changing
or cold when changing the spark plugs. If
the spark plugs. If the spark plugs. If
the spark plugs. If
the spark plugs. If
the engine is hot, you could burn yourself
the engine is hot, you could burn yourself the engine is hot, you could burn yourself
the engine is hot, you could burn yourself
the engine is hot, you could burn yourself
on the insulated
on the insulated on the insulated
on the insulated
on the insulated connector, the spark plug
connector, the spark plug connector, the spark plug
connector, the spark plug
connector, the spark plug
or the engine itself.
or the engine itself. or the engine itself.
or the engine itself.
or the engine itself.
3. When preparing to remove the old spark
plug, guide the socket down over the spark plug, being careful not to damage the ce-ramic insulator.
4. To remove the old spark plug, turn the wrench handle in a counterclockwise direc-tion.
5. To install the new spark plug, guide the socket down over the spark plug, beingcareful not to damage the ceramic insulator.
G060C02A
Recommended Spark Plugs:
Recommended Spark Plugs: Recommended Spark Plugs:
Recommended Spark Plugs:
Recommended Spark Plugs: 2. To remove the spark plug cable, pull straight
up on the insulated connector, not the cable. Pulling on the cable may damage the carboncore conductor.
Page 105 of 249
DO-IT-YOURSELF MAINTENANCE
DO-IT-YOURSELF MAINTENANCE DO-IT-YOURSELF MAINTENANCE
DO-IT-YOURSELF MAINTENANCE
DO-IT-YOURSELF MAINTENANCE
6-9
G090A01X-GAT
FILLING THE WASHER RESERVOIR
FILLING THE WASHER RESERVOIR FILLING THE WASHER RESERVOIR
FILLING THE WASHER RESERVOIR
FILLING THE WASHER RESERVOIR
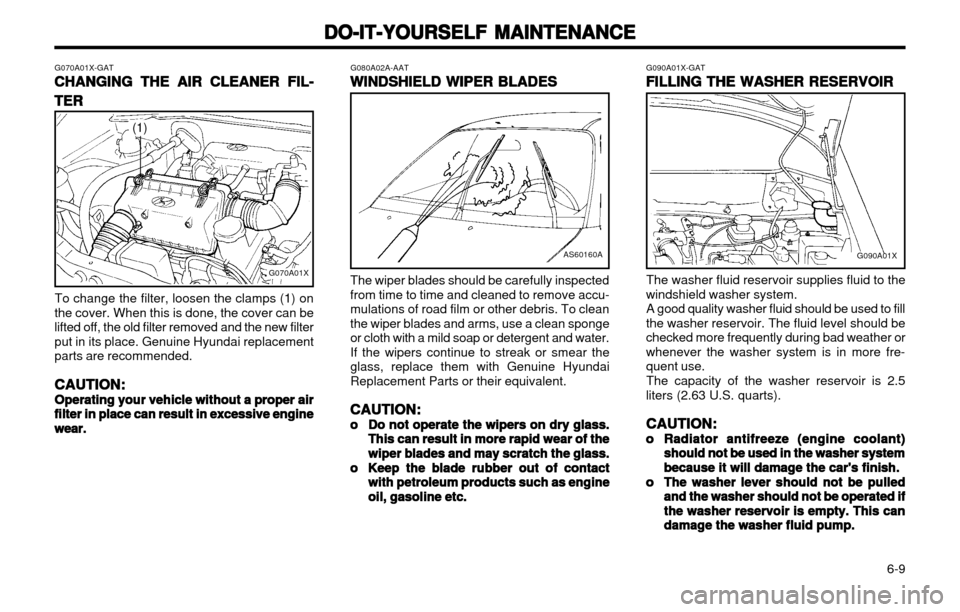
The washer fluid reservoir supplies fluid to the
windshield washer system. A good quality washer fluid should be used to fill
the washer reservoir. The fluid level should be checked more frequently during bad weather orwhenever the washer system is in more fre-quent use.
The capacity of the washer reservoir is 2.5
liters (2.63 U.S. quarts).
CAUTION:
CAUTION: CAUTION:
CAUTION:
CAUTION:
oo
oo
o Radiator antifreeze (engine coolant)
Radiator antifreeze (engine coolant) Radiator antifreeze (engine coolant)
Radiator antifreeze (engine coolant)
Radiator antifreeze (engine coolant)
should not be used in the washer system
should not be used in the washer system should not be used in the washer system
should not be used in the washer system
should not be used in the washer system
because it will damage the car's finish.
because it will damage the car's finish. because it will damage the car's finish.
because it will damage the car's finish.
because it will damage the car's finish.
oo
oo
o The washer lever should not be pulled
The washer lever should not be pulled The washer lever should not be pulled
The washer lever should not be pulled
The washer lever should not be pulled
and the washer should not be operated if
and the washer should not be operated if and the washer should not be operated if
and the washer should not be operated if
and the washer should not be operated if
the washer reservoir is empty. This can
the washer reservoir is empty. This can the washer reservoir is empty. This can
the washer reservoir is empty. This can
the washer reservoir is empty. This can
damage the washer fluid pump.
damage the washer fluid pump. damage the washer fluid pump.
damage the washer fluid pump.
damage the washer fluid pump.
G070A01X-GAT
CHANGING THE AIR CLEANER FIL-
CHANGING THE AIR CLEANER FIL- CHANGING THE AIR CLEANER FIL-
CHANGING THE AIR CLEANER FIL-
CHANGING THE AIR CLEANER FIL-
TER
TER TER
TER
TER G080A02A-AAT
WINDSHIELD WIPER BLADES
WINDSHIELD WIPER BLADES WINDSHIELD WIPER BLADES
WINDSHIELD WIPER BLADES
WINDSHIELD WIPER BLADES The wiper blades should be carefully inspected from time to time and cleaned to remove accu-mulations of road film or other debris. To cleanthe wiper blades and arms, use a clean spongeor cloth with a mild soap or detergent and water.If the wipers continue to streak or smear theglass, replace them with Genuine HyundaiReplacement Parts or their equivalent.
CAUTION:
CAUTION: CAUTION:
CAUTION:
CAUTION:
oo
oo
o Do not operate the wipers on dry glass.
Do not operate the wipers on dry glass. Do not operate the wipers on dry glass.
Do not operate the wipers on dry glass.
Do not operate the wipers on dry glass.
This can result in more rapid wear of the
This can result in more rapid wear of the This can result in more rapid wear of the
This can result in more rapid wear of the
This can result in more rapid wear of the
wiper blades and may scratch the glass.
wiper blades and may scratch the glass. wiper blades and may scratch the glass.
wiper blades and may scratch the glass.
wiper blades and may scratch the glass.
oo
oo
o Keep the blade rubber out of contact
Keep the blade rubber out of contact Keep the blade rubber out of contact
Keep the blade rubber out of contact
Keep the blade rubber out of contact
with petroleum products such as engine
with petroleum products such as engine with petroleum products such as engine
with petroleum products such as engine
with petroleum products such as engine
oil, gasoline etc.
oil, gasoline etc. oil, gasoline etc.
oil, gasoline etc.
oil, gasoline etc.
To change the filter, loosen the clamps (1) on
the cover. When this is done, the cover can be
lifted off, the old filter removed and the new filterput in its place. Genuine Hyundai replacement
parts are recommended.
CAUTION:
CAUTION: CAUTION:
CAUTION:
CAUTION:
Operating your vehicle without a proper air
Operating your vehicle without a proper air Operating your vehicle without a proper air
Operating your vehicle without a proper air
Operating your vehicle without a proper air filter in place
filter in place filter in place
filter in place
filter in place can result in excessive engine
can result in excessive engine can result in excessive engine
can result in excessive engine
can result in excessive engine
wear.
wear. wear.
wear.
wear.
G070A01X
(1)
AS60160AG090A01X
Page 109 of 249
DO-IT-YOURSELF MAINTENANCE
DO-IT-YOURSELF MAINTENANCE DO-IT-YOURSELF MAINTENANCE
DO-IT-YOURSELF MAINTENANCE
DO-IT-YOURSELF MAINTENANCE
6-13
G170A01A-GAT
CHECKING BRAKE PEDAL
CHECKING BRAKE PEDAL CHECKING BRAKE PEDAL
CHECKING BRAKE PEDAL
CHECKING BRAKE PEDAL
FREEPLAY
FREEPLAY FREEPLAY
FREEPLAY
FREEPLAY
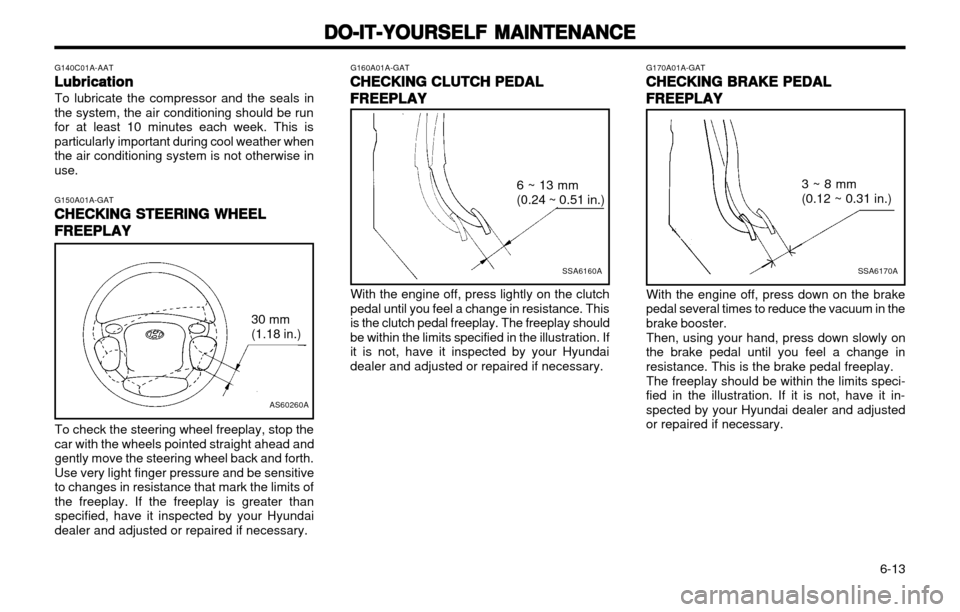
To check the steering wheel freeplay, stop the car with the wheels pointed straight ahead andgently move the steering wheel back and forth.Use very light finger pressure and be sensitiveto changes in resistance that mark the limits ofthe freeplay. If the freeplay is greater thanspecified, have it inspected by your Hyundaidealer and adjusted or repaired if necessary. G160A01A-GAT
CHECKING CLUTCH PEDAL
CHECKING CLUTCH PEDAL CHECKING CLUTCH PEDAL
CHECKING CLUTCH PEDAL
CHECKING CLUTCH PEDAL
FREEPLAY
FREEPLAY FREEPLAY
FREEPLAY
FREEPLAY
SSA6160A
6 ~ 13 mm (0.24 ~ 0.51 in.)
With the engine off, press lightly on the clutch
pedal until you feel a change in resistance. This is the clutch pedal freeplay. The freeplay shouldbe within the limits specified in the illustration. Ifit is not, have it inspected by your Hyundaidealer and adjusted or repaired if necessary.
SSA6170A
3 ~ 8 mm (0.12 ~ 0.31 in.)
With the engine off, press down on the brake
pedal several times to reduce the vacuum in the brake booster.
Then, using your hand, press down slowly on
the brake pedal until you feel a change inresistance. This is the brake pedal freeplay.
The freeplay should be within the limits speci-
fied in the illustration. If it is not, have it in-spected by your Hyundai dealer and adjustedor repaired if necessary.
G140C01A-AAT
Lubrication
Lubrication Lubrication
Lubrication
Lubrication
To lubricate the compressor and the seals in
the system, the air conditioning should be run for at least 10 minutes each week. This isparticularly important during cool weather whenthe air conditioning system is not otherwise inuse.
G150A01A-GATCHECKING STEERING WHEEL
CHECKING STEERING WHEEL CHECKING STEERING WHEEL
CHECKING STEERING WHEEL
CHECKING STEERING WHEEL
FREEPLAY
FREEPLAY FREEPLAY
FREEPLAY
FREEPLAY
AS60260A
30 mm (1.18 in.)
Page 113 of 249
DO-IT-YOURSELF MAINTENANCE
DO-IT-YOURSELF MAINTENANCE DO-IT-YOURSELF MAINTENANCE
DO-IT-YOURSELF MAINTENANCE
DO-IT-YOURSELF MAINTENANCE
6-17
G270A02X-GAT
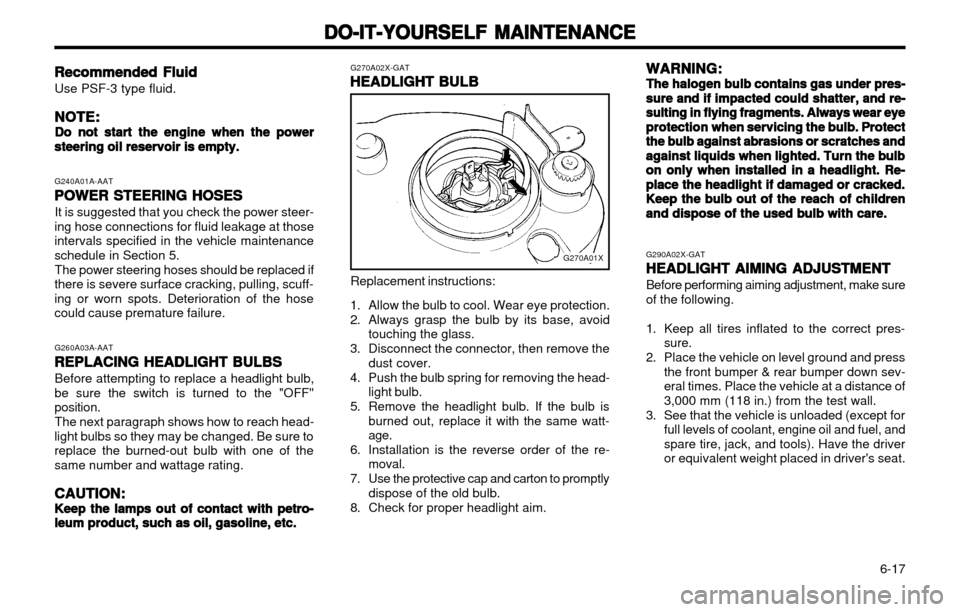
HEADLIGHT BULB
HEADLIGHT BULB HEADLIGHT BULB
HEADLIGHT BULB
HEADLIGHT BULB
Replacement instructions:
1. Allow the bulb to cool. Wear eye protection.
2. Always grasp the bulb by its base, avoid touching the glass.
3. Disconnect the connector, then remove the dust cover.
4. Push the bulb spring for removing the head- light bulb.
5. Remove the headlight bulb. If the bulb is burned out, replace it with the same watt- age.
6. Installation is the reverse order of the re- moval.
7. Use the protective cap and carton to promptly dispose of the old bulb.
8. Check for proper headlight aim. WARNING:
WARNING: WARNING:
WARNING:
WARNING:
The halogen bulb contains gas under pres-
The halogen bulb contains gas under pres- The halogen bulb contains gas under pres-
The halogen bulb contains gas under pres-
The halogen bulb contains gas under pres- sure and if impacted
sure and if impacted sure and if impacted
sure and if impacted
sure and if impacted
could shatter, and re-
could shatter, and re- could shatter, and re-
could shatter, and re-
could shatter, and re-
sulting in flying fragments. Always wear eye
sulting in flying fragments. Always wear eye sulting in flying fragments. Always wear eye
sulting in flying fragments. Always wear eye
sulting in flying fragments. Always wear eye
protection
protection protection
protection
protection
when servicing the bulb. Protect
when servicing the bulb. Protect when servicing the bulb. Protect
when servicing the bulb. Protect
when servicing the bulb. Protect
the bulb against abrasions or scratches and
the bulb against abrasions or scratches and the bulb against abrasions or scratches and
the bulb against abrasions or scratches and
the bulb against abrasions or scratches and
against liquids when lighted. Turn the bulb
against liquids when lighted. Turn the bulb against liquids when lighted. Turn the bulb
against liquids when lighted. Turn the bulb
against liquids when lighted. Turn the bulb
on only when installed in a headlight. Re-
on only when installed in a headlight. Re- on only when installed in a headlight. Re-
on only when installed in a headlight. Re-
on only when installed in a headlight. Re-
place the headlight if damaged or cracked.
place the headlight if damaged or cracked. place the headlight if damaged or cracked.
place the headlight if damaged or cracked.
place the headlight if damaged or cracked.
Keep the bulb out of the reach
Keep the bulb out of the reach Keep the bulb out of the reach
Keep the bulb out of the reach
Keep the bulb out of the reach
of children
of children of children
of children
of children
and dispose of the used bulb with care.
and dispose of the used bulb with care. and dispose of the used bulb with care.
and dispose of the used bulb with care.
and dispose of the used bulb with care. G290A02X-GAT
HEADLIGHT AIMING ADJUSTMENT
HEADLIGHT AIMING ADJUSTMENT HEADLIGHT AIMING ADJUSTMENT
HEADLIGHT AIMING ADJUSTMENT
HEADLIGHT AIMING ADJUSTMENT Before performing aiming adjustment, make sure of the following.
1. Keep all tires inflated to the correct pres-
sure.
2. Place the vehicle on level ground and press the front bumper & rear bumper down sev- eral times. Place the vehicle at a distance of3,000 mm (118 in.) from the test wall.
3. See that the vehicle is unloaded (except for full levels of coolant, engine oil and fuel, andspare tire, jack, and tools). Have the driveror equivalent weight placed in driver's seat.
Recommended Fluid
Recommended Fluid Recommended Fluid
Recommended Fluid
Recommended Fluid
Use PSF-3 type fluid.
NOTE:
NOTE: NOTE:
NOTE:
NOTE:
Do not start the engine when the power
Do not start the engine when the power Do not start the engine when the power
Do not start the engine when the power
Do not start the engine when the power steering oil reservoir is empty.
steering oil reservoir is empty. steering oil reservoir is empty.
steering oil reservoir is empty.
steering oil reservoir is empty.
G240A01A-AATPOWER STEERING HOSES
POWER STEERING HOSES POWER STEERING HOSES
POWER STEERING HOSES
POWER STEERING HOSES
It is suggested that you check the power steer-
ing hose connections for fluid leakage at those intervals specified in the vehicle maintenanceschedule in Section 5.
The power steering hoses should be replaced if
there is severe surface cracking, pulling, scuff-ing or worn spots. Deterioration of the hosecould cause premature failure.
G260A03A-AATREPLACING HEADLIGHT BULBS
REPLACING HEADLIGHT BULBS REPLACING HEADLIGHT BULBS
REPLACING HEADLIGHT BULBS
REPLACING HEADLIGHT BULBS
Before attempting to replace a headlight bulb,
be sure the switch is turned to the "OFF"position.
The next paragraph shows how to reach head-
light bulbs so they may be changed. Be sure toreplace the burned-out bulb with one of thesame number and wattage rating.
CAUTION:
CAUTION: CAUTION:
CAUTION:
CAUTION:
Keep the lamps out of contact with petro-
Keep the lamps out of contact with petro- Keep the lamps out of contact with petro-
Keep the lamps out of contact with petro-
Keep the lamps out of contact with petro- leum product, such as oil, gasoline, etc.
leum product, such as oil, gasoline, etc. leum product, such as oil, gasoline, etc.
leum product, such as oil, gasoline, etc.
leum product, such as oil, gasoline, etc.
G270A01X