headrest Hyundai Azera 2016 Owner's Manual
[x] Cancel search | Manufacturer: HYUNDAI, Model Year: 2016, Model line: Azera, Model: Hyundai Azera 2016Pages: 521, PDF Size: 16.54 MB
Page 22 of 521
Safety features of your vehicle
23
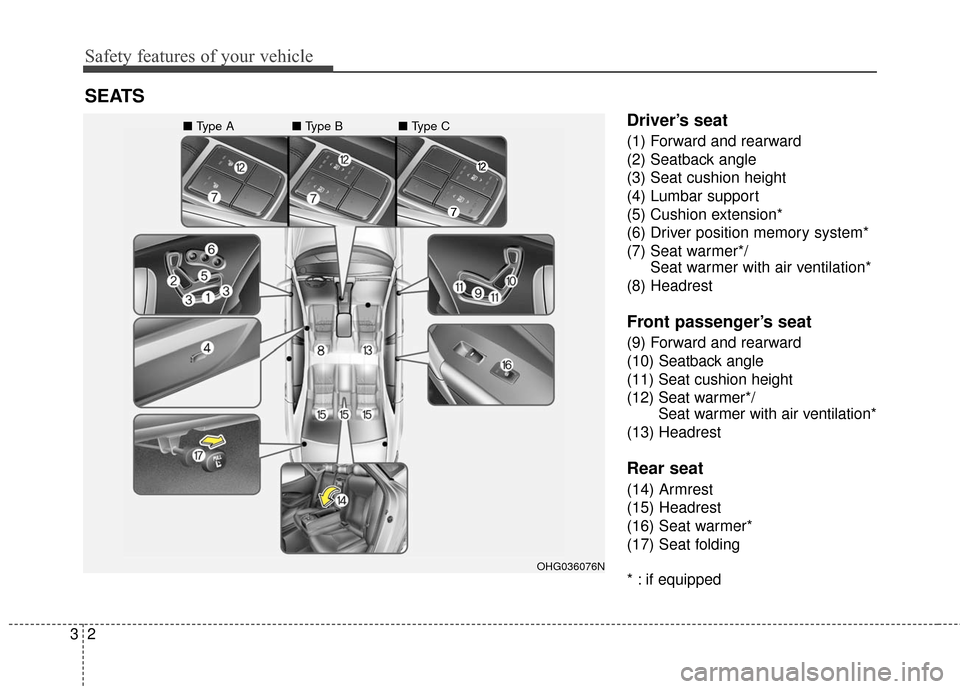
Driver’s seat
(1) Forward and rearward
(2) Seatback angle
(3) Seat cushion height
(4) Lumbar support
(5) Cushion extension*
(6) Driver position memory system*
(7) Seat warmer*/Seat warmer with air ventilation*
(8) Headrest
Front passenger’s seat
(9) Forward and rearward
(10) Seatback angle
(11) Seat cushion height
(12) Seat warmer*/ Seat warmer with air ventilation*
(13) Headrest
Rear seat
(14) Armrest
(15) Headrest
(16) Seat warmer*
(17) Seat folding
* : if equipped
SEATS
OHG036076N
■ Type A ■ Type B ■ Type C
Page 26 of 521
Safety features of your vehicle
63
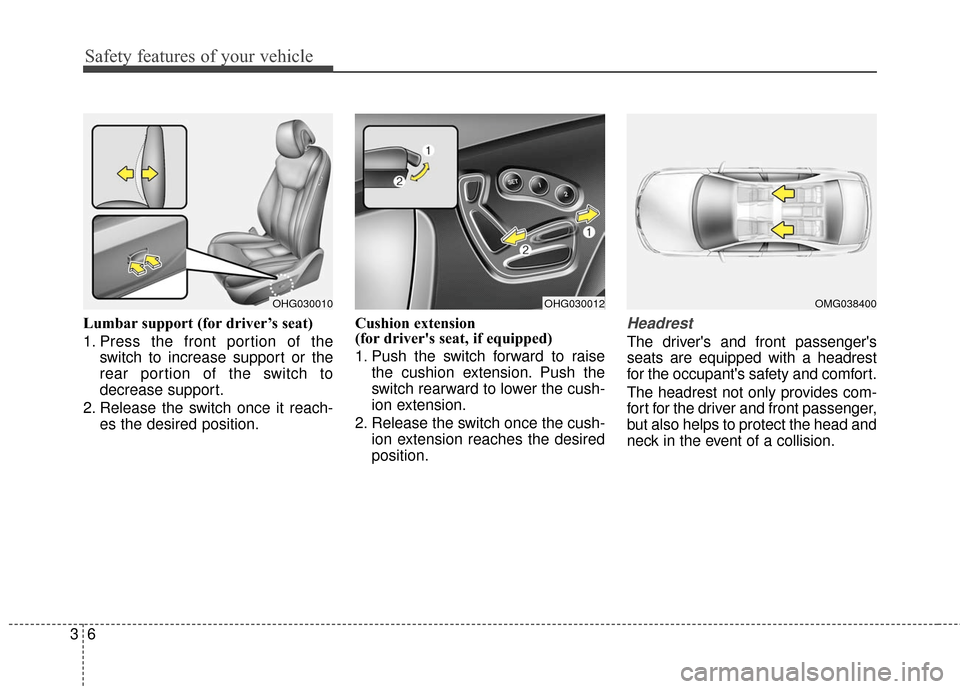
Lumbar support (for driver’s seat)
1. Press the front portion of theswitch to increase support or the
rear portion of the switch to
decrease support.
2. Release the switch once it reach- es the desired position. Cushion extension
(for driver's seat, if equipped)
1. Push the switch forward to raise
the cushion extension. Push the
switch rearward to lower the cush-
ion extension.
2. Release the switch once the cush- ion extension reaches the desired
position.Headrest
The driver's and front passenger's
seats are equipped with a headrest
for the occupant's safety and comfort.
The headrest not only provides com-
fort for the driver and front passenger,
but also helps to protect the head and
neck in the event of a collision.
OHG030010OHG030012OMG038400
Page 27 of 521
37
Safety features of your vehicle
For maximum effectiveness in case
of an accident, the headrest should
be adjusted so the middle of the
headrest is at the same height of the
center of gravity of an occupant's
head. Generally, the center of gravity
of most people's head is similar in
height as the top of their eyes.
Also, adjust the headrest as close to
your head as possible.
For this reason, the use of a cushion
that holds the body away from the
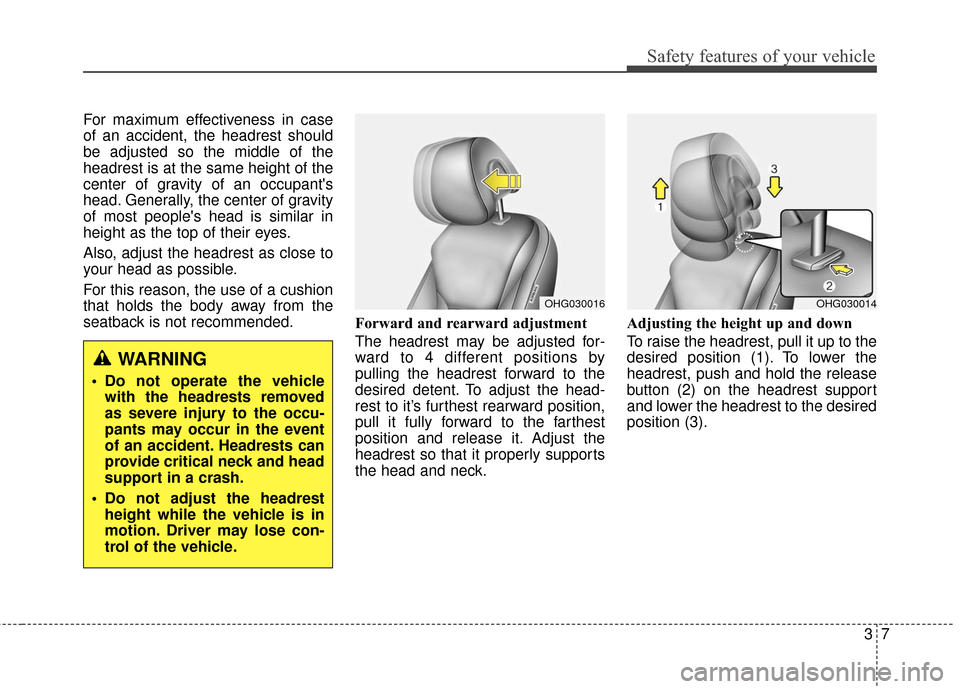
seatback is not recommended.Forward and rearward adjustment
The headrest may be adjusted for-
ward to 4 different positions by
pulling the headrest forward to the
desired detent. To adjust the head-
rest to it’s furthest rearward position,
pull it fully forward to the farthest
position and release it. Adjust the
headrest so that it properly supports
the head and neck.Adjusting the height up and down
To raise the headrest, pull it up to the
desired position (1). To lower the
headrest, push and hold the release
button (2) on the headrest support
and lower the headrest to the desired
position (3).
WARNING
Do not operate the vehicle
with the headrests removed
as severe injury to the occu-
pants may occur in the event
of an accident. Headrests can
provide critical neck and head
support in a crash.
Do not adjust the headrest height while the vehicle is in
motion. Driver may lose con-
trol of the vehicle.
OHG030016OHG030014
Page 28 of 521
Safety features of your vehicle
83
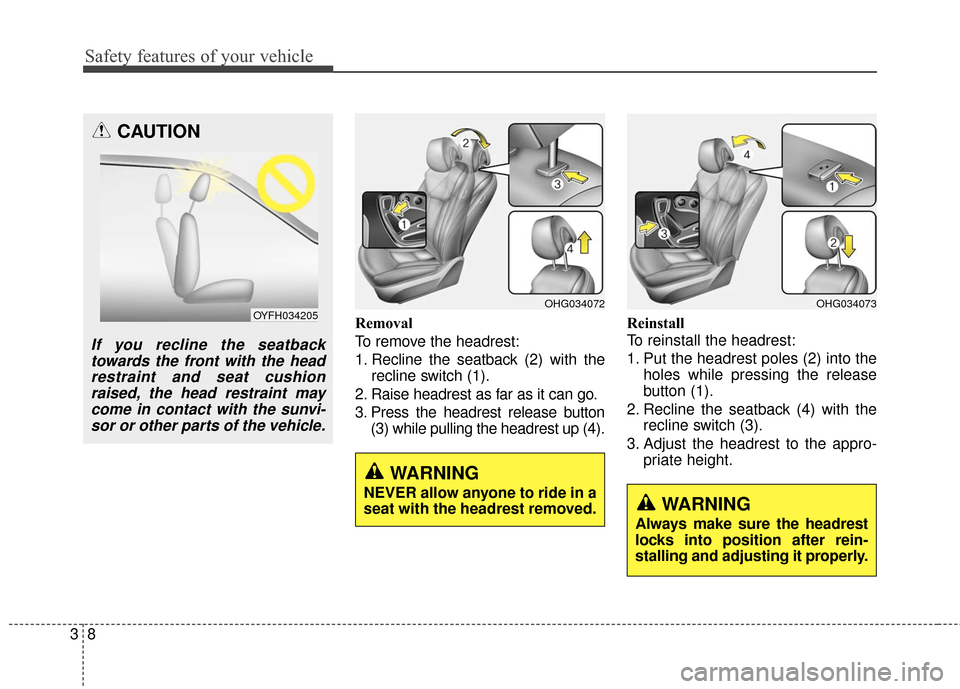
Removal
To remove the headrest:
1. Recline the seatback (2) with therecline switch (1).
2. Raise headrest as far as it can go.
3. Press the headrest release button (3) while pulling the headrest up (4). Reinstall
To reinstall the headrest:
1. Put the headrest poles (2) into the
holes while pressing the release
button (1).
2. Recline the seatback (4) with the recline switch (3).
3. Adjust the headrest to the appro- priate height.
WARNING
NEVER allow anyone to ride in a
seat with the headrest removed.WARNING
Always make sure the headrest
locks into position after rein-
stalling and adjusting it properly.
OHG034072OHG034073
CAUTION
If you recline the seatbacktowards the front with the headrestraint and seat cushionraised, the head restraint maycome in contact with the sunvi-sor or other parts of the vehicle.
OYFH034205
Page 32 of 521
Safety features of your vehicle
12
3
Rear seat
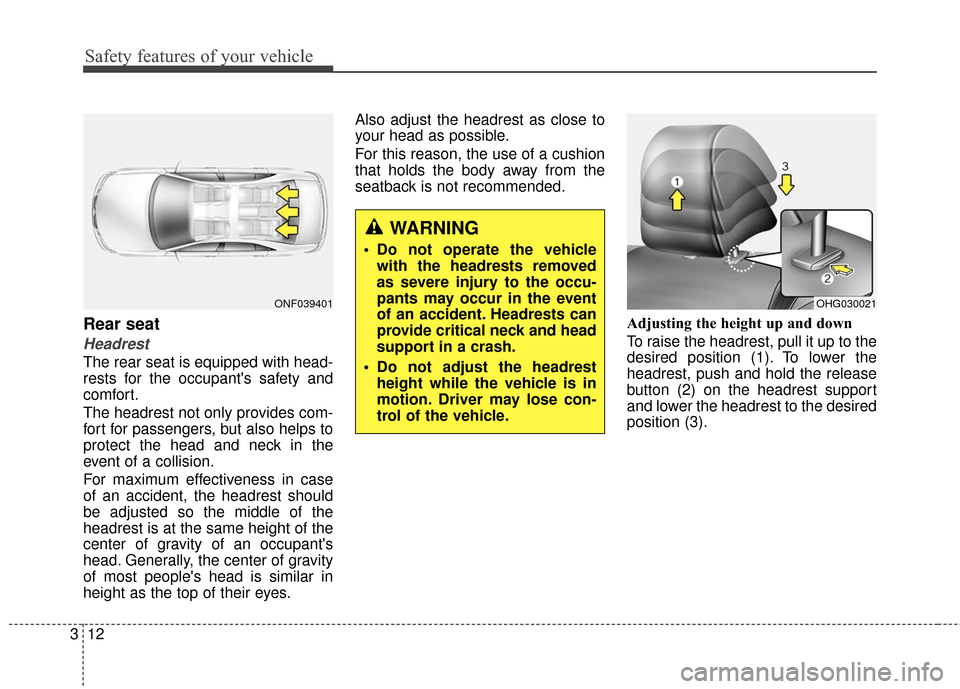
Headrest
The rear seat is equipped with head-
rests for the occupant's safety and
comfort.
The headrest not only provides com-
fort for passengers, but also helps to
protect the head and neck in the
event of a collision.
For maximum effectiveness in case
of an accident, the headrest should
be adjusted so the middle of the
headrest is at the same height of the
center of gravity of an occupant's
head. Generally, the center of gravity
of most people's head is similar in
height as the top of their eyes. Also adjust the headrest as close to
your head as possible.
For this reason, the use of a cushion
that holds the body away from the
seatback is not recommended.
Adjusting the height up and down
To raise the headrest, pull it up to the
desired position (1). To lower the
headrest, push and hold the release
button (2) on the headrest support
and lower the headrest to the desired
position (3).
OHG030021ONF039401
WARNING
Do not operate the vehiclewith the headrests removed
as severe injury to the occu-
pants may occur in the event
of an accident. Headrests can
provide critical neck and head
support in a crash.
Do not adjust the headrest height while the vehicle is in
motion. Driver may lose con-
trol of the vehicle.
Page 33 of 521
313
Safety features of your vehicle
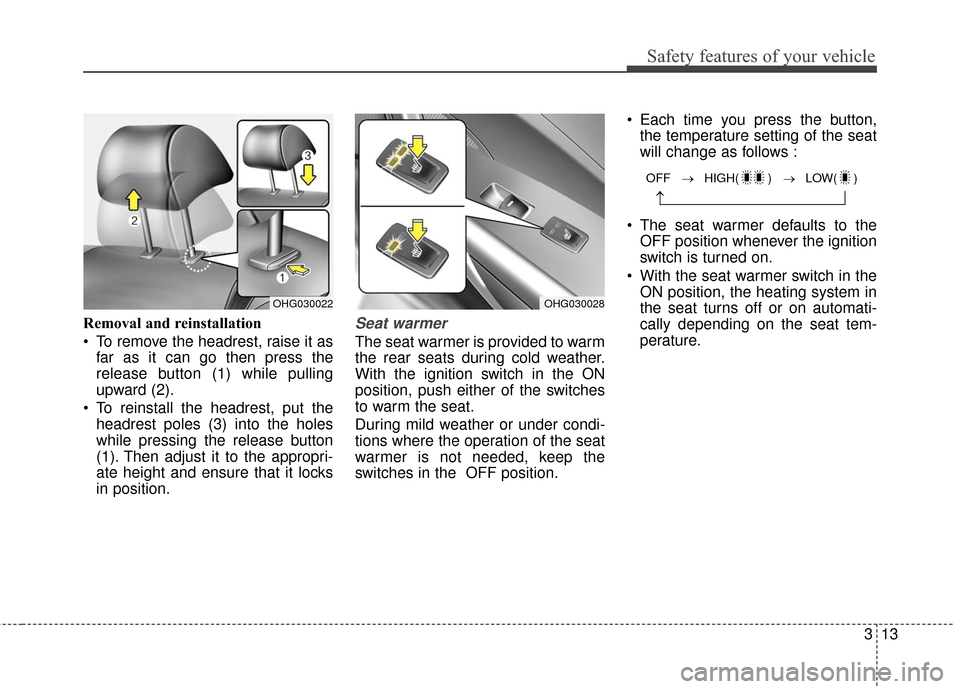
Removal and reinstallation
To remove the headrest, raise it asfar as it can go then press the
release button (1) while pulling
upward (2).
To reinstall the headrest, put the headrest poles (3) into the holes
while pressing the release button
(1). Then adjust it to the appropri-
ate height and ensure that it locks
in position.Seat warmer
The seat warmer is provided to warm
the rear seats during cold weather.
With the ignition switch in the ON
position, push either of the switches
to warm the seat.
During mild weather or under condi-
tions where the operation of the seat
warmer is not needed, keep the
switches in the OFF position. Each time you press the button,
the temperature setting of the seat
will change as follows :
The seat warmer defaults to the OFF position whenever the ignition
switch is turned on.
With the seat warmer switch in the ON position, the heating system in
the seat turns off or on automati-
cally depending on the seat tem-
perature.
OFF → HIGH( ) → LOW( )
→
OHG030028OHG030022
Page 35 of 521
315
Safety features of your vehicle
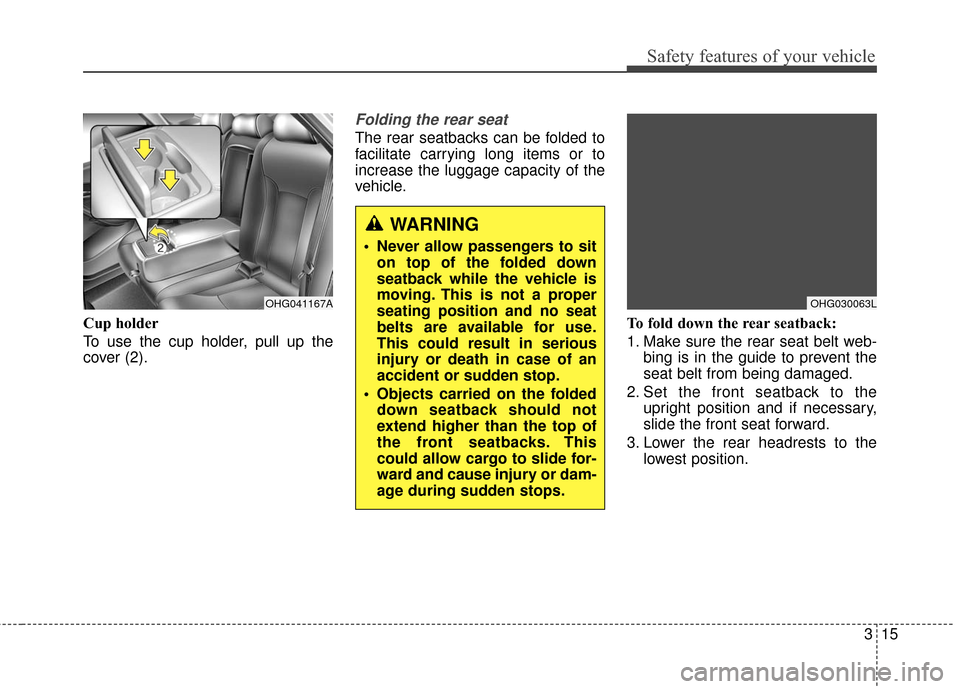
Cup holder
To use the cup holder, pull up the
cover (2).
Folding the rear seat
The rear seatbacks can be folded to
facilitate carrying long items or to
increase the luggage capacity of the
vehicle.To fold down the rear seatback:
1. Make sure the rear seat belt web-bing is in the guide to prevent the
seat belt from being damaged.
2. Set the front seatback to the upright position and if necessary,
slide the front seat forward.
3. Lower the rear headrests to the lowest position.
OHG030063L
WARNING
Never allow passengers to siton top of the folded down
seatback while the vehicle is
moving. This is not a proper
seating position and no seat
belts are available for use.
This could result in serious
injury or death in case of an
accident or sudden stop.
Objects carried on the folded down seatback should not
extend higher than the top of
the front seatbacks. This
could allow cargo to slide for-
ward and cause injury or dam-
age during sudden stops.
OHG041167A
Page 50 of 521
Safety features of your vehicle
30
3
For safety reasons, we recommend
that the child restraint system be
used in the rear seats.
Since all passenger seat belts move
freely under normal conditions and
only lock under extreme or emer-
gency conditions (emergency locking
mode), you must manually change
these seat belts to the automatic lock-
ing mode to secure a child restraint.
If the seat belt does not operate as
described in this section, have the
system checked immediately by your
authorized HYUNDAI dealer.
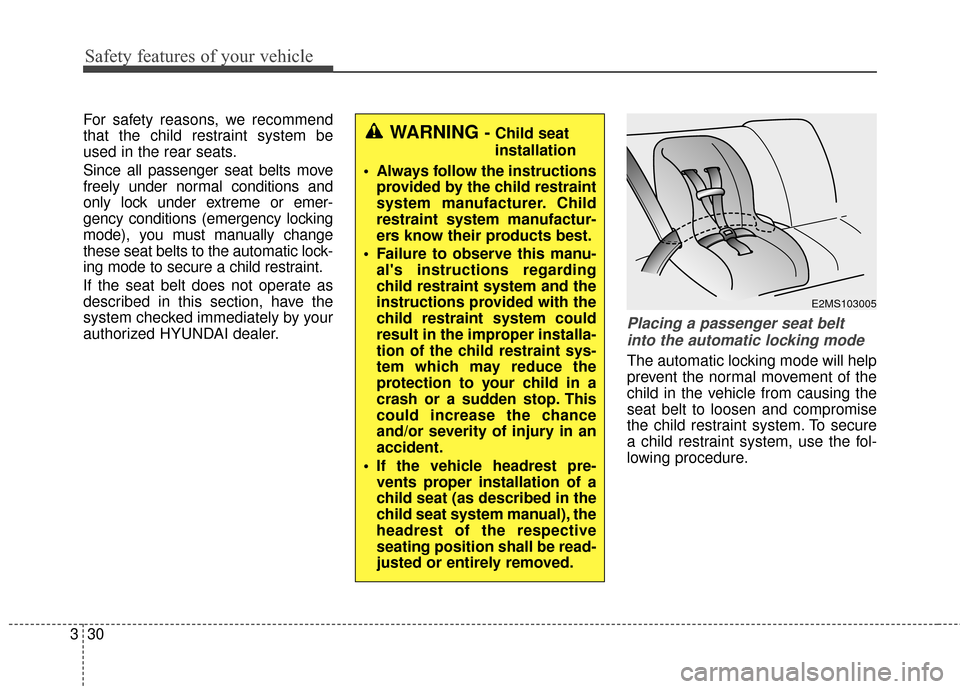
Placing a passenger seat belt
into the automatic locking mode
The automatic locking mode will help
prevent the normal movement of the
child in the vehicle from causing the
seat belt to loosen and compromise
the child restraint system. To secure
a child restraint system, use the fol-
lowing procedure.
WARNING - Child seat
installation
Always follow the instructions provided by the child restraint
system manufacturer. Child
restraint system manufactur-
ers know their products best.
Failure to observe this manu- al's instructions regarding
child restraint system and the
instructions provided with the
child restraint system could
result in the improper installa-
tion of the child restraint sys-
tem which may reduce the
protection to your child in a
crash or a sudden stop. This
could increase the chance
and/or severity of injury in an
accident.
If the vehicle headrest pre- vents proper installation of a
child seat (as described in the
child seat system manual), the
headrest of the respective
seating position shall be read-
justed or entirely removed.
E2MS103005
Page 53 of 521
333
Safety features of your vehicle
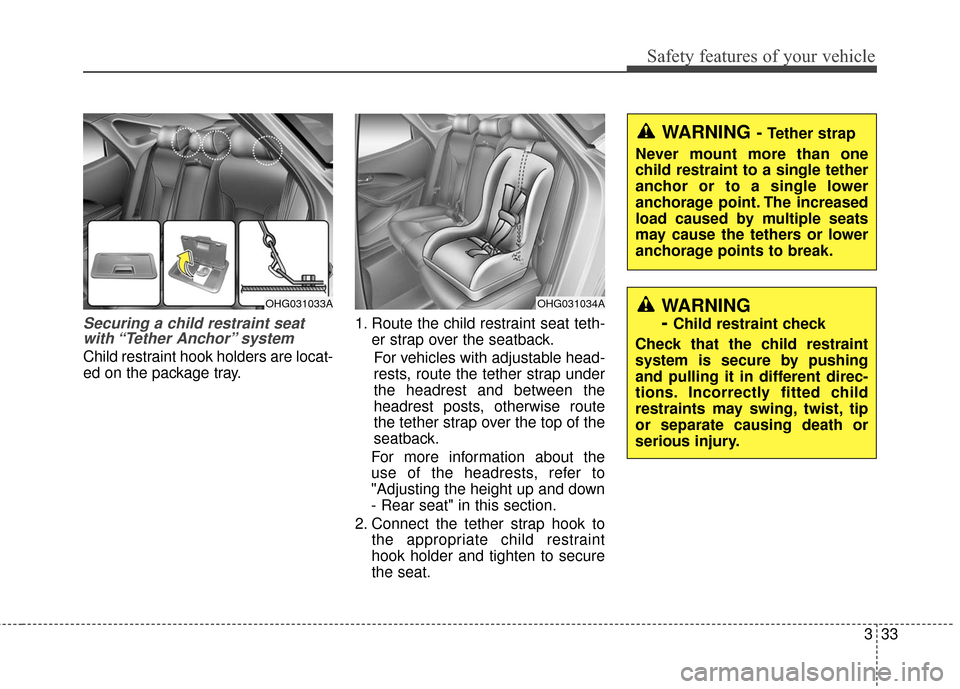
Securing a child restraint seatwith “Tether Anchor” system
Child restraint hook holders are locat-
ed on the package tray. 1. Route the child restraint seat teth-
er strap over the seatback.
For vehicles with adjustable head-
rests, route the tether strap under
the headrest and between the
headrest posts, otherwise route
the tether strap over the top of the
seatback.
For more information about the
use of the headrests, refer to
"Adjusting the height up and down
- Rear seat" in this section.
2. Connect the tether strap hook to the appropriate child restraint
hook holder and tighten to secure
the seat.
OHG031034A
WARNING - Tether strap
Never mount more than one
child restraint to a single tether
anchor or to a single lower
anchorage point. The increased
load caused by multiple seats
may cause the tethers or lower
anchorage points to break.
WARNING
-
Child restraint check
Check that the child restraint
system is secure by pushing
and pulling it in different direc-
tions. Incorrectly fitted child
restraints may swing, twist, tip
or separate causing death or
serious injury.
OHG031033A
Page 514 of 521
I5
Index
Floor mat anchor(s) ....................................................4-143
FluidBrake fluid ................................................................7-27
Washer fluid ..............................................................7-28
Folding the rear seat ......................................................3-15
Foward collision warning system (FCWS) ..................5-69
Front passenger and rear seat belt ................................3-21
Front seat adjustment ......................................................3-4 Cushion extension ......................................................3-6
Forward and rearward ................................................3-5
Lumber support ..........................................................3-6
Seat cushion height ....................................................3-5
Seatback angle ............................................................3-5
Fuel filler lid ..................................................................4-31 Emergency fuel filler lid release ..............................4-34
Fuel gauge......................................................................4-\
60
Fuel requirements ............................................................1-3
Fuse switch ....................................................................7-53\
Fuse/relay panel description ..........................................7-55
Fuses ........................................................................\
......7-51 Instrument panel fuse replacement ..........................7-52
Engine compartment fuse replacement ....................7-53
Fuse switch ................................................................7-53
Fuse/relay panel description......................................7-55
Main fuse ..................................................................7-54
Multi fuse ..................................................................7-54 Gauge
Engine coolant temperature gauge ............................4-52
Fuel gauge ................................................................4-52
GAW (Gross axle weight) ............................................5-87
GAWR (Gross axle weight rating) ................................5-87
Glass antenna ..............................................................4-145
Glassroof, see panorama sunroof ................................4-35
Glove box ....................................................................4-13\
8
Glove box lamp............................................................4-111
GVW (Gross vehicle weight) ........................................5-87
GVWR (Gross vehicle weight rating) ..........................5-87
Hazard warning flasher ........................................4-100, 6-2
Hazardous driving conditions ........................................5-75
Headlight (Headlamp) escort function ........................4-101
Headlight (Headlamp) welcome function ..................4-101
Headrest (front)................................................................3-6
Headrest (rear) ..............................................................3-12
Height adjustment (Seat belt) ........................................3-20
Highway driving ............................................................5-78
Hill-start assist control (HAC) ......................................5-35
Hood ........................................................................\
......4-29
Horn ........................................................................\
......4-45
How to use this manual ..................................................1-2
H
G