auto Hyundai Azera 2017 Owner's Manual
[x] Cancel search | Manufacturer: HYUNDAI, Model Year: 2017, Model line: Azera, Model: Hyundai Azera 2017Pages: 520, PDF Size: 16.33 MB
Page 9 of 520
13
Introduction
Symbols used in illustrations
Safety symbol This symbol means to "Avoid"
or "Do not do anything".
Arrows Indicates the location.
Indicates the action (pressing,
turning, etc.) or outcome of an
operation. Your new vehicle is designed to use
only unleaded fuel having a pump
octane number ((R+M)/2) of 87
(Research Octane Number 91) or
higher. (Do not use methanol blend-
ed fuels)
Your new vehicle is designed to
obtain maximum performance with
UNLEADED FUEL, as well as mini-
mize exhaust emissions and spark
plug fouling.
Never add any fuel system cleaning
agents to the fuel tank other than
what has been specified. (Consult an
authorized HYUNDAI dealer for
details.)
✽ ✽
NOTICE
Tighten the cap until it clicks one
time, otherwise the warning light
“Check Fuel Cap” will illuminate on
the LCD display.
FUEL REQUIREMENTS
WARNING - Refueling
• Do not "top off" after the noz- zle automatically shuts off
when refueling. Attempts to
force more fuel into the tank
can cause fuel overflow onto
you and the ground causing a
risk of fire.
Always check that the fuel cap is installed securely to pre-
vent fuel spillage in the event
of an accident.
Page 18 of 520
25
Your vehicle at a glance
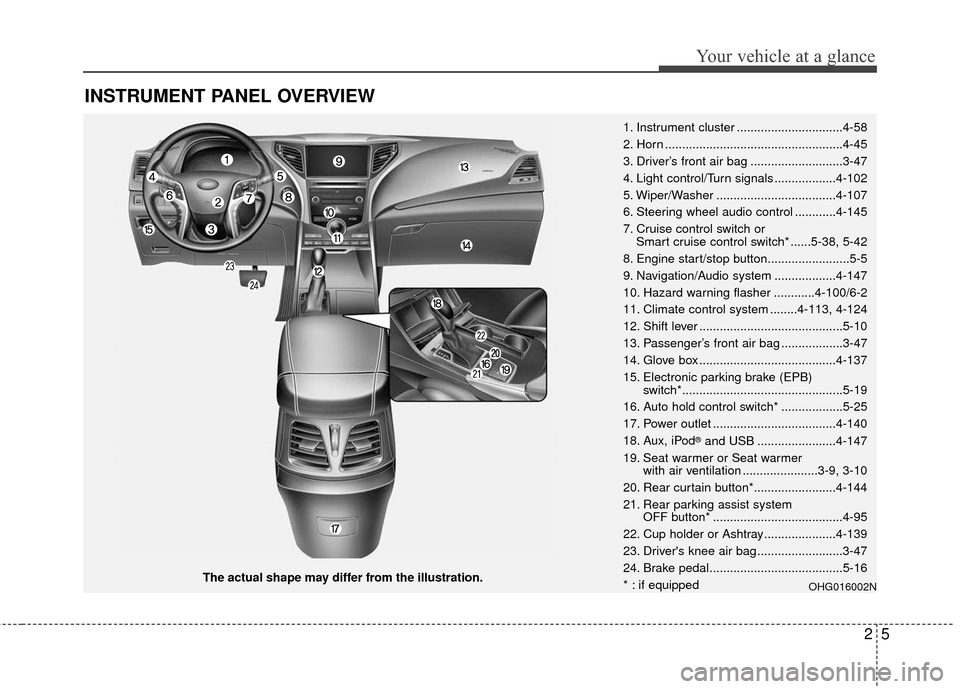
INSTRUMENT PANEL OVERVIEW
The actual shape may differ from the illustration.1. Instrument cluster ...............................4-58
2. Horn ....................................................4-45
3. Driver’s front air bag ...........................3-47
4. Light control/Turn signals ..................4-102
5. Wiper/Washer ...................................4-107
6. Steering wheel audio control ............4-145
7. Cruise control switch or
Smart cruise control switch* ......5-38, 5-42
8. Engine start/stop button........................5-5
9. Navigation/Audio system ..................4-147
10. Hazard warning flasher ............4-100/6-2
11. Climate control system ........4-113, 4-124
12. Shift lever ..........................................5-10
13. Passenger’s front air bag ..................3-47
14. Glove box ........................................4-137
15. Electronic parking brake (EPB) switch*...............................................5-19
16. Auto hold control switch* ..................5-25
17. Power outlet ....................................4-140
18. Aux, iPod
®and USB .......................4-147
19. Seat warmer or Seat warmer with air ventilation ......................3-9, 3-10
20. Rear curtain button*........................4-144
21. Rear parking assist system OFF button* ......................................4-95
22. Cup holder or Ashtray.....................4-139
23. Driver's knee air bag .........................3-47
24. Brake pedal.......................................5-16
* : if equipped
OHG016002N
Page 20 of 520

Safety features of your vehicle
Seats. . . . . . . . . . . . . . . . . . . . . . . . . . . . . . . . . . . . \
. . 3-2
• Front seat. . . . . . . . . . . . . . . . . . . . . . . . . . . . . . . . . . \
. . 3-4
. . . . . . . . . . . . . . . . . . . . . . . . . . . . . . . . . . . . \
3-12
Seat belts . . . . . . . . . . . . . . . . . . . . . . . . . . . . . . . . . . 3-17\
3-17
. . . . . . . . . . . . . . . . . . . . . . . . . 3-22
. . . . . . . . . . . . . . . . . . . . . . . . . . 3-24
. . . . . . . . . . . . . . . . . . . . . . . . . . . . . 3-27
Child restraint system . . . . . . . . . . . . . . . . . . . . . . . 3-28
. . . . . . . . . . . . . . . . . . . 3-29
- Automatic locking mode . . . . . . . . . . . . . . . . . . . . . . 3-30
- Tether Anchor system . . . . . . . . . . . . . . . . . . . . . . . . 3-33
- Lower anchor system . . . . . . . . . . . . . . . . . . . . . . . . . 3-34 Air bag - advanced supplemental restraint system .
3-36
. . . . . . . . . . . . . 3-37
. . . . . . . . . . . . . . . . . . . . . . 3-39
3-39
3-42
. . . . . . . . . . . . 3-47
. . . . . . . . . . . . . . . . . . . . . . . . . . . 3-50
. . . . . . . . . . . . . . . . . . . . . . . . . . . . . . . 3-51
. . . . . . . . . . . . . . . . . . . . . . . . . . . . . . . . . . . . \
3-58
. . . . . . . . . . . . . . . . . . . 3-59
3-60
3
Page 23 of 520

Safety features of your vehicle
43
Front seat
Automatic adjustment
The front seat can be adjusted by
using the control switch located on
the door and outside of the seat
cushion. Before driving, adjust the
seat to the proper position so as to
easily control the steering wheel,
pedals and switches on the instru-
ment panel.
WARNING - Rear
seatbacks
Always lock the rear seatback
before driving. Failure to do so
could result in passengers or
objects being thrown forward
injuring vehicle occupants.
WARNING - Seat
adjustment
Do not adjust the seat while wearing seat belts. Moving the
seat cushion forward may
cause strong pressure on the
abdomen.
Use extreme caution so that hands or other objects are not
caught in the seat mechanisms
while the seat is moving.
Use extreme caution when picking small objects trapped
under the seats or between
the seat and the center con-
sole. Your hands might be cut
or injured by the sharp edges
of the seat mechanism.
WARNING
The power seat is operable with
the ignition OFF.
Therefore, children should
never be left unattended in the
vehicle.
CAUTION
The power seat is driven by an electric motor. Stop the motoroperation once the adjust-ment is completed. Excessiveoperation may damage theelectrical equipment.
When in operation, the power seat consumes a largeamount of electrical power. Toprevent unnecessary chargingsystem drain, do not adjustthe power seat longer thannecessary while the engine isnot running.
Do not operate two or more power seat control switches atthe same time. Doing so mayresult in power seat motor orelectrical component malfunc-tion.
Page 28 of 520

39
Safety features of your vehicle
Seat warmer
The seat warmer is provided to warm
the front seats during cold weather.
With the ignition switch in the ON
position, push either of the switches
to warm the driver's seat or the front
passenger's seat.During mild weather or under condi-
tions where the operation of the seat
warmer is not needed, keep the
switches in the "OFF" position.
Each time you press the button,
the temperature setting of the seat
will change as follows :
The seat warmer defaults to the OFF position whenever the ignition
switch is turned on.
With the seat warmer switch in the ON position, the heating system in
the seat turns off or on automati-
cally depending on the seat tem-
perature.
→
■Type A
■Type BOFF
→ HIGH ( ) → LOW ( )
OFF
HIGH ( )
LOW ( ) MIDDLE ( )
→→→
→
OHG031018A
OHG036074N
■ Type A
■Type B
CAUTION
When cleaning the seats, do
not use an organic solventsuch as paint thinner, ben-zene, alcohol or gasoline.Doing so may damage the sur-face of the heater or seats.
To prevent overheating of the seat warmer, do not place any-thing on the seats that insu-lates against heat, such asblankets, cushions or seatcovers while the seat warmeris in operation.
Do not place heavy or sharp objects on seats equippedwith seat warmers. Damage tothe seat warming componentscould occur.
Page 32 of 520

313
Safety features of your vehicle
Removal and reinstallation
To remove the headrest, raise it asfar as it can go then press the
release button (1) while pulling
upward (2).
To reinstall the headrest, put the headrest poles (3) into the holes
while pressing the release button
(1). Then adjust it to the appropri-
ate height and ensure that it locks
in position.Seat warmer
The seat warmer is provided to warm
the rear seats during cold weather.
With the ignition switch in the ON
position, push either of the switches
to warm the seat.
During mild weather or under condi-
tions where the operation of the seat
warmer is not needed, keep the
switches in the OFF position. Each time you press the button,
the temperature setting of the seat
will change as follows :
The seat warmer defaults to the OFF position whenever the ignition
switch is turned on.
With the seat warmer switch in the ON position, the heating system in
the seat turns off or on automati-
cally depending on the seat tem-
perature.
OFF → HIGH( ) → LOW( )
→
OHG030028OHG030022
Page 38 of 520
319
Safety features of your vehicle
You can find the front passenger'sseat belt warning light on the cen-
ter fascia panel.
Although the front passenger seat is not occupied, the seat belt warn-
ing light will blink for 6 seconds.
The seat belt warning light can blink when a briefcase or purse is
placed on the front passenger
seat.
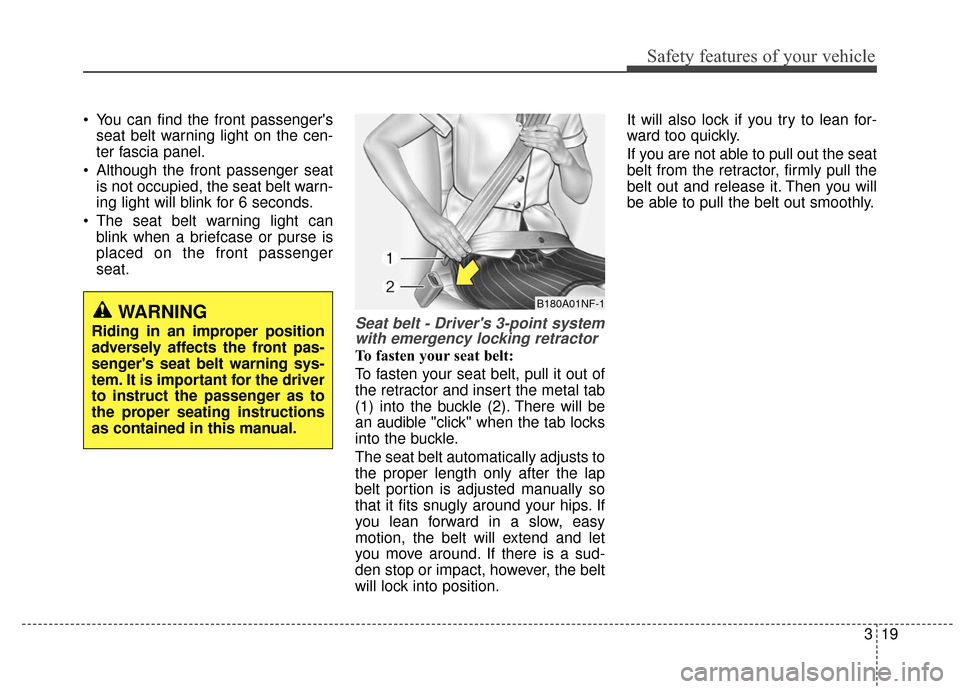
Seat belt - Driver's 3-point systemwith emergency locking retractor
To fasten your seat belt:
To fasten your seat belt, pull it out of
the retractor and insert the metal tab
(1) into the buckle (2). There will be
an audible "click" when the tab locks
into the buckle.
The seat belt automatically adjusts to
the proper length only after the lap
belt portion is adjusted manually so
that it fits snugly around your hips. If
you lean forward in a slow, easy
motion, the belt will extend and let
you move around. If there is a sud-
den stop or impact, however, the belt
will lock into position. It will also lock if you try to lean for-
ward too quickly.
If you are not able to pull out the seat
belt from the retractor, firmly pull the
belt out and release it. Then you will
be able to pull the belt out smoothly.
B180A01NF-1WARNING
Riding in an improper position
adversely affects the front pas-
senger's seat belt warning sys-
tem. It is important for the driver
to instruct the passenger as to
the proper seating instructions
as contained in this manual.
Page 40 of 520
321
Safety features of your vehicle
Seat belts - Front passenger andrear seat 3-point system withcombination locking retractor
To fasten your seat belt:
Combination retractor type seat belts
are installed in the rear seat posi-
tions to help accommodate the
installation of child restraint systems.
Although a combination retractor is
also installed in the front passenger
seat position, it is strongly recom-
mended that children always be
seated in the rear seat. NEVER
place any infant restraint system in
the front seat of the vehicle.
This type of seat belt combines the
features of both an emergency lock-
ing retractor seat belt and an auto-
matic locking retractor seat belt. To
fasten your seat belt, pull it out of the
retractor and insert the metal tab into
the buckle. There will be an audible
"click" when the tab locks into the
buckle. When not securing a child
restraint, the seat belt operates in the
same way as the driver's seat belt
(Emergency Locking Retractor Type). It automatically adjusts to the proper
length only after the lap belt portion
of the seat belt is adjusted manually
so that it fits snugly around your hips.
When the seat belt is fully extended
from the retractor to allow the instal-
lation of a child restraint system, the
seat belt operation changes to allow
the belt to retract, but not to extend
(Automatic Locking Retractor Type).
Refer to “Using a child restraint sys-
tem” in this section.
To convert from the automatic lock-
ing feature to the emergency locking
operation mode, allow the unbuckled
seat belt to fully retract.
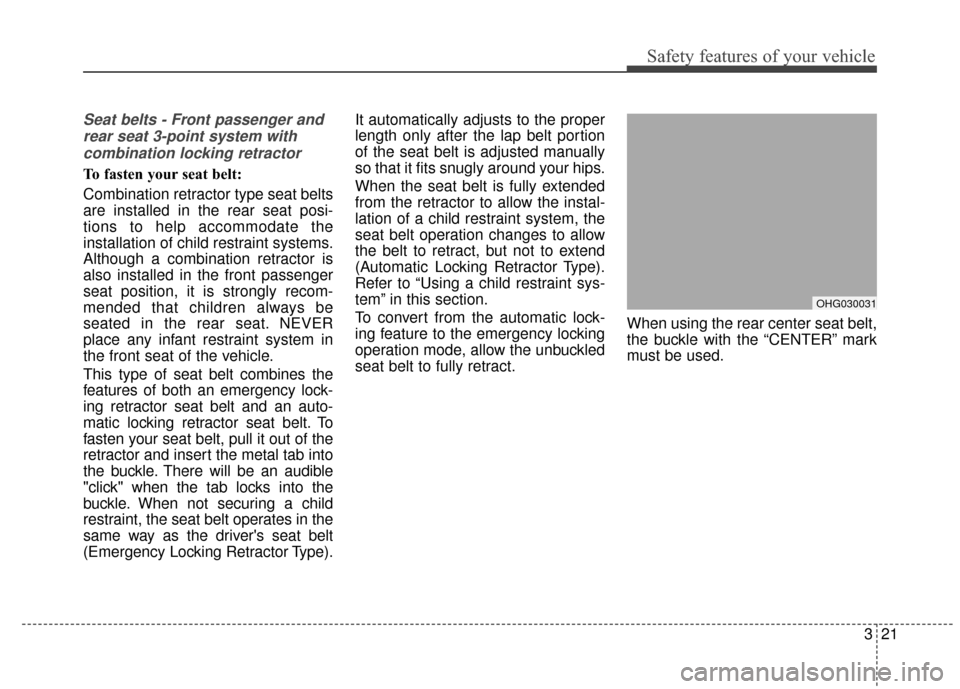
When using the rear center seat belt,
the buckle with the “CENTER” mark
must be used.
OHG030031
Page 41 of 520
Safety features of your vehicle
22
3
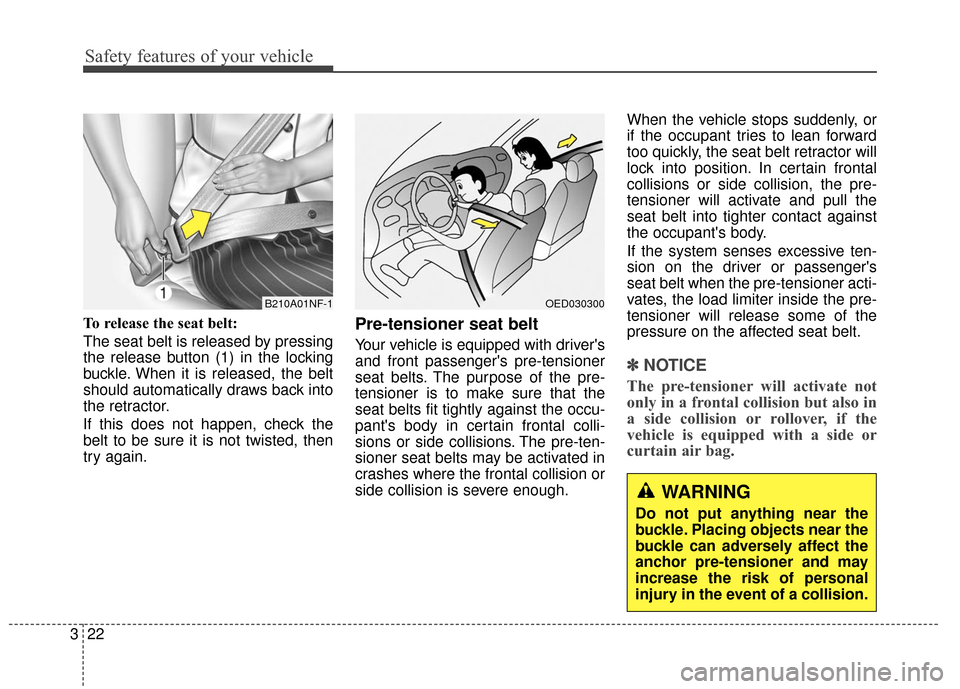
To release the seat belt:
The seat belt is released by pressing
the release button (1) in the locking
buckle. When it is released, the belt
should automatically draws back into
the retractor.
If this does not happen, check the
belt to be sure it is not twisted, then
try again.Pre-tensioner seat belt
Your vehicle is equipped with driver's
and front passenger's pre-tensioner
seat belts. The purpose of the pre-
tensioner is to make sure that the
seat belts fit tightly against the occu-
pant's body in certain frontal colli-
sions or side collisions. The pre-ten-
sioner seat belts may be activated in
crashes where the frontal collision or
side collision is severe enough. When the vehicle stops suddenly, or
if the occupant tries to lean forward
too quickly, the seat belt retractor will
lock into position. In certain frontal
collisions or side collision, the pre-
tensioner will activate and pull the
seat belt into tighter contact against
the occupant's body.
If the system senses excessive ten-
sion on the driver or passenger's
seat belt when the pre-tensioner acti-
vates, the load limiter inside the pre-
tensioner will release some of the
pressure on the affected seat belt.
✽ ✽
NOTICE
The pre-tensioner will activate not
only in a frontal collision but also in
a side collision or rollover, if the
vehicle is equipped with a side or
curtain air bag.
B210A01NF-1OED030300
WARNING
Do not put anything near the
buckle. Placing objects near the
buckle can adversely affect the
anchor pre-tensioner and may
increase the risk of personal
injury in the event of a collision.
Page 49 of 520
Safety features of your vehicle
30
3
For safety reasons, we recommend
that the child restraint system be
used in the rear seats.
Since all passenger seat belts move
freely under normal conditions and
only lock under extreme or emer-
gency conditions (emergency locking
mode), you must manually change
these seat belts to the automatic lock-
ing mode to secure a child restraint.
If the seat belt does not operate as
described in this section, have the
system checked immediately by your
authorized HYUNDAI dealer.
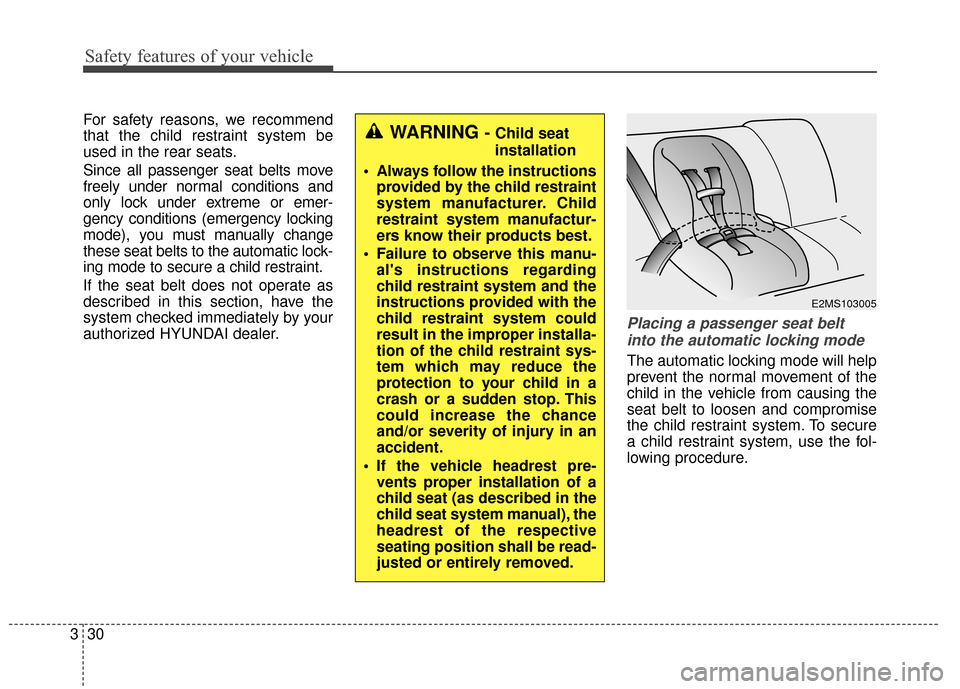
Placing a passenger seat belt
into the automatic locking mode
The automatic locking mode will help
prevent the normal movement of the
child in the vehicle from causing the
seat belt to loosen and compromise
the child restraint system. To secure
a child restraint system, use the fol-
lowing procedure.
WARNING - Child seat
installation
Always follow the instructions provided by the child restraint
system manufacturer. Child
restraint system manufactur-
ers know their products best.
Failure to observe this manu- al's instructions regarding
child restraint system and the
instructions provided with the
child restraint system could
result in the improper installa-
tion of the child restraint sys-
tem which may reduce the
protection to your child in a
crash or a sudden stop. This
could increase the chance
and/or severity of injury in an
accident.
If the vehicle headrest pre- vents proper installation of a
child seat (as described in the
child seat system manual), the
headrest of the respective
seating position shall be read-
justed or entirely removed.
E2MS103005