radio Hyundai Coupe 2004 Owner's Manual
[x] Cancel search | Manufacturer: HYUNDAI, Model Year: 2004, Model line: Coupe, Model: Hyundai Coupe 2004Pages: 389, PDF Size: 10.22 MB
Page 6 of 389
A070A01A-GATCAUTION: MODIFICATIONS TO YOUR HYUNDAI
Modification of components may void the manufacturer's warranty Your Hyundai should not be modified in any way. Modifications may adversely affect the safety,durability and performance of your Hyundai. Components which are subjected to modification or areadded to the vehicle resulting in consequential damage are not covered by the vehicle manufacturer'swarranty.
A080A01S-AAT TWO-WAY RADIO OR CELLULAR TELEPHONE INSTALLATION
Your vehicle is equipped with electronic fuel injection and other electronic components. It is possible for an improperly installed/adjusted two-way radio or cellular telephone to adversely affect electronic systems. Forthis reason, we recommend that you carefully follow the radio manufacturer's instructions or consult yourHyundai dealer for precautionary measures or special instructions if you choose to install one of thesedevices.
Page 70 of 389
FEATURES OF YOUR HYUNDAI
1- 62
Mountains Buildings
Obstructed area Iron bridges
Unobstructed area
FM radio station
SSAR012A
Ionosphere
SSAR011A
AM receptionB750A02A-AAT STEREO SOUND SYSTEM How Car Audio Works
IonosphereFM reception
SSAR010A
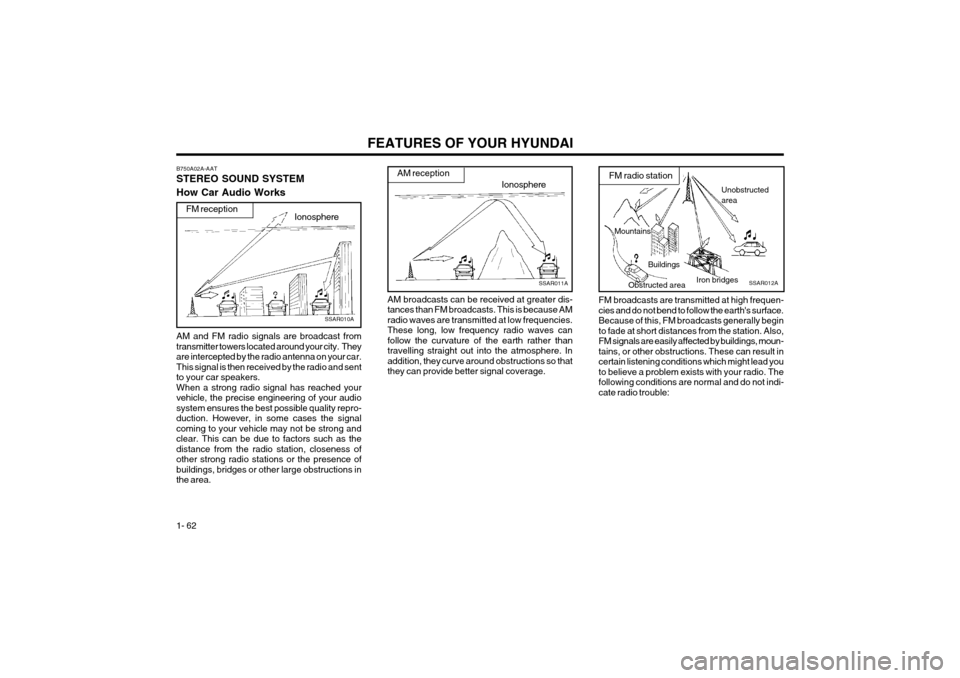
AM and FM radio signals are broadcast from transmitter towers located around your city. Theyare intercepted by the radio antenna on your car.This signal is then received by the radio and sentto your car speakers.When a strong radio signal has reached yourvehicle, the precise engineering of your audiosystem ensures the best possible quality repro-duction. However, in some cases the signalcoming to your vehicle may not be strong andclear. This can be due to factors such as thedistance from the radio station, closeness ofother strong radio stations or the presence ofbuildings, bridges or other large obstructions inthe area. AM broadcasts can be received at greater dis-tances than FM broadcasts. This is because AMradio waves are transmitted at low frequencies.These long, low frequency radio waves canfollow the curvature of the earth rather thantravelling straight out into the atmosphere. Inaddition, they curve around obstructions so thatthey can provide better signal coverage.
FM broadcasts are transmitted at high frequen-cies and do not bend to follow the earth's surface.Because of this, FM broadcasts generally beginto fade at short distances from the station. Also,FM signals are easily affected by buildings, moun-tains, or other obstructions. These can result incertain listening conditions which might lead youto believe a problem exists with your radio. Thefollowing conditions are normal and do not indi-cate radio trouble:
Page 71 of 389

FEATURES OF YOUR HYUNDAI 1- 63
SSAR014AB750B02Y-AAT Using a cellular phone or a two-way radio When a cellular phone is used inside the vehicle, noise may be produced from the audio equip-ment. This does not mean that something iswrong with the audio equipment. In such a case,use the cellular phone at a place as far aspossible from the audio equipment. CAUTION: When using a communication system such acellular phone or a radio set inside the vehi-cle, a separate external antenna must befitted. When a cellular phone or a radio set isused with an internal antenna alone, it mayinterfere with the vehicle's electrical systemand adversely affect safe operation of thevehicle. WARNING: Don't use a cellular phone when you aredriving. Stop at a safe place to use a cellularphone.SSAR013A
o Station Swapping - As an FM signal weak-ens, another more powerful signal near the same frequency may begin to play. This isbecause your radio is designed to lock ontothe clearest signal. If this occurs, selectanother station with a stronger signal.
o Multi-Path Cancellation - Radio signals being received from several directions can causedistortion or fluttering. This can be caused bya direct and reflected signal from the samestation, or by signals from two stations withclose frequencies. If this occurs, select an-other station until the condition has passed.
o Fading - As your car moves away from the
radio station, the signal will weaken and soundwill begin to fade. When this occurs, wesuggest that you select another stronger sta-tion.
o Flutter/Static - Weak FM signals or large obstructions between the transmitter and yourradio can disturb the signal causing static orfluttering noises to occur. Reducing the treblelevel may lessen this effect until the distur-bance clears.
Page 72 of 389

FEATURES OF YOUR HYUNDAI
1- 64
H240A01O-GAT STEREO RADIO OPERATION (H250) (If Installed)
H250A01GK
1. POWER ON/OFF, VOLUME Control Knob
5. BAND Selector4. TUNE/SEEK Select Button
7. SCAN Button
6. PRESET Buttons
2. BASS/BALANCE Control Knob (BASS/BAL)
3. TREBLE/FADER Control Knob (TREB/FAD)
Page 73 of 389

FEATURES OF YOUR HYUNDAI 1- 65
FAD (Fader Control) Knob Pull the treble control knob further out. Turn the control knob counterclockwise to em-
phasize front speaker sound (rear speaker
sound will be attenuated).When the control knob is turned clockwise, rear
speaker sound will be emphasized (front speaker
sound will be attenuated). 4. TUNE (Manual) Select Button Press the side or side to increase or to decrease the frequency. Press either buttonand hold down to continuously scroll. Releasebutton once the desired station is reached. SEEK Operation (Automatic Channel Selection) Press the TUNE select button 1 sec or
more.Releasing it will automatically tune to the
next available station with a beep sound.
When the side is pressed longer than 1
second, releasing will automatically tune to thenext higher frequency and when the side is
pressed longer than 1 second, releasing will
automatically tune to the next lower frequency. 5. BAND Selector
Pressing the button changes the AM, FM1 and FM2 bands. The mode selected is dis-played on LCD.
6. PRESET STATION SELECT Button
Six (6) stations for AM, FM1 and FM2 respec- tively can be preset in the electronic memorycircuit on this unit. HOW TO PRESET STATIONS Six AM and twelve FM stations may be pro- grammed into the memory of the radio. Then, bysimply pressing the band select button and/orone of the six station select buttons, you mayrecall any of these stations instantly. To pro-gram the stations, follow these steps:
o Press band selector to set the band for AM,
FM1, or FM2.
o Select the desired station to be stored by seek or manual tuning.
o Determine the preset station select button you wish to use to access that station.
o Press the station select button for more than two seconds. A select button indicator will show in the display indicating which selectbutton you have depressed. The frequencydisplay will flash after it has been stored into
the memory with a beep sound. You shouldthen release the button, and proceed toprogram the next desired station. A total of18 stations can be programmed by selectingone AM and two FM stations per button.
o When completed, any preset station may be recalled by selecting AM, FM1 or FM2 bandand the appropriate station button.
H240B02A-GAT
1. POWER ON-OFF Control KnobThe radio unit may be operated when the igni- tion key is in the "ACC" or "ON" position. Pressthe knob to switch the power on. The LCDshows the radio frequency in the radio mode orthe tape direction indicator in the tape mode. Toswitch the power off, press the knob again. VOLUME Control Rotate the knob clockwise to increase the vol- ume and turn the knob counterclockwise toreduce the volume. 2. BASS Control Knob Press to pop the knob out and turn to the left or right for the desired bass tone. BAL (Balance Control) Knob Pull the bass control knob further out. Turn the control knob clockwise to emphasize right
speaker sound (left speaker sound will be at-
tenuated).When the control knob is turned counterclock-wise, left speaker sound will be emphasized
(right speaker sound will be attenuated). 3. TREB (Treble Control) Knob Press to pop the knob out and turn to the left or right for the desired treble tone.
FM/AM
Page 78 of 389
FEATURES OF YOUR HYUNDAI
1- 70
B260F02GK-AAT The CD auto changer is located in the right side of the quarter trim.
o To use the CD auto changer.
1. Open the sliding lid of the CD auto chang- er.
2. To eject the compact disc magazine, press the EJECT button located inside the CD auto changer.
3. Insert the discs into the magazine.
4. Push the magazine into the CD auto chang- er and close the sliding lid.
o The CD auto changer can be used when the ignition switch is in either the "ON" or "ACC"position.
1. CD Select Button When the CD changer magazine contains discs, press the "CDC" button and the CD changer canbe used even if the radio is being used. TheHyundai CD changer can hold up to eight discs.The disc number will be lit, and the track number,and elapsed time will be displayed. 2. DISC Select Button To select the CD you want, push " " to cha- nge the disc number. o This unit is made of precision parts. Do
not attempt to disassemble or adjust anyparts.
o When driving your vehicle, be sure to keep the volume of the unit set low enough toallow you to hear sounds coming from theoutside.
CAUTION:
o Do not insert warped or poor quality discs into the CD changer as damage to the unitmay occur.
o Do not insert anything like coins into the player slot as damage to the unit mayoccur.
o Do not place beverages close to the audio system. The playback mechanism may bedamaged if you spill them.
o Do not impact on the audio system, or the playback mechanism could be damaged.
o Driving on the off-roads or other vibra- tions may skip your compact disc.Do not use the audio system on off-roadsas the discs could be scratched and dam-aged.
o Do not grip or pull out the disc with your hand while the disc is being pulled into theunit by the self loading mechanism. Thesecan cause poor disc scratching to occuror trouble in the compact disc changer.
o Avoid using CD-Recordable or CD- Rewritable as the player could not be op-erated in recording way of the CD maker.When using the compact disc player, genu-ine CDs are recommended.
TUNEDISC
3. TRACK UP/DOWN
o The desired track on the disc currently being
played can be selected using the track num- ber.
o Press once to skip forward to the begin- ning of the next track. Press once to skipback to the beginning of the track.
4. FF/REW ( / ) If you want to fast forward or reverse through the compact disc track, push and hold in FF ( )or REW ( ) button.When you release the button, the compact discplayer will resume playing. 5. REPEAT
o To repeat the track you are listening to, press the RPT button. To cancel , press again.
o If you do not release RPT operation when the track ends, it will automatically be replayed. This process will be continued until you pushthe button again.
6. SCAN Button
o Press the SCAN button to playback the first 10 seconds of each track.
o Press the SCAN button again within 10 sec. for the desired track.
NOTE:
o When replacing the fuse, replace it with a fuse having the correct capacity.
o This equipment is designed to be used only in a 12 volt DC battery system withnegative ground.
Page 79 of 389

FEATURES OF YOUR HYUNDAI 1- 71
H260A01O-AAT
STEREO RADIO OPERATION (H260) (If Installed) H260A01O
1. POWER ON-OFF/VOLUME/BALANCE Control Knob
2. FADER Control Knob
3. BASS/TREBLE Control Knob
4. SCAN Button 6. BAND Selector
5. TUNE/SEEK Select Button 7. PRESET Button
Page 80 of 389

FEATURES OF YOUR HYUNDAI
1- 72 3. BASS Control Knob Press to pop the knob out and turn to the left or right for the desired bass tone. TREB (Treble Control) Knob Pull the bass control knob further out. Turn to the left or right for the desired treble tone.
4. SCAN Button When the scan button is pressed, the frequency will increase and the receivable stations will betuned in one after another, receiving each stationfor 5 seconds. To stop scanning, press the scanbutton again. 5. TUNE (Manual) Select Button Press the ( ) side or ( ) side to increase or to decrease the frequency. Press either button andhold down to continuously scroll. Release buttononce the desired station is reached. SEEK Operation (Automatic Channel Selection) Press the TUNE select button for 1 sec or more. Releasing it will automatically tune to the nextavailable station with a beep sound.When the ( ) side is pressed longer than 1second, releasing will automatically tune to thenext higher frequency and when the ( ) side ispressed longer than 1 second, releasing willautomatically tune to the next lower frequency.
6. BAND Selector Pressing the button changes the AM, FM1 and FM2 bands. The mode selected is displayedon LCD. 7. PRESET STATION SELECT Button Six (6) stations for AM, FM1 or FM2 respectively can be preset in the electronic memory circuit onthis unit. HOW TO PRESET STATIONS Six AM and twelve FM stations may be pro- grammed into the memory of the radio. Then, bysimply pressing the band select button and/orone of the six station select buttons, you mayrecall any of these stations instantly. To programthe stations, follow these steps:
o Press band selector to set the band for AM,
FM1 or FM2.
o Select the desired station to be stored by seek, scan or manual tuning.
o Determine the preset station select button you wish to use to access that station.
o Press the station select button for more than two seconds. A select button indicator will show in the display indicating which selectbutton you have depressed. The frequencydisplay will flash after it has been stored intothe memory.
H260B02E-AAT
1. POWER ON-OFF Control KnobThe radio unit may be operated when the ignition key is in the "ACC" or "ON" position. Press theknob to switch the power on. The LCD shows theradio frequency in the radio mode or the CD trackindicator in either the CD mode or CD AUTOCHANGER mode. To switch the power off, pressthe knob again. VOLUME Control Rotate the knob clockwise to increase the vol- ume and turn the knob counterclockwise to re-duce the volume. BALANCE Control Pull and turn the control knob clockwise to em- phasize right speaker sound (left speaker soundwill be attenuated). When the control knob isturned counterclockwise, left speaker sound willbe emphasized (right speaker sound will beattenuated). 2. FAD (Fader Control) Knob Turn the control knob counterclockwise to em- phasize front speaker sound (rear speaker soundwill be attenuated). When the control knob isturned clockwise, rear speaker sound will beemphasized (front speaker sound will be attenu-ated).
FM/AM
Page 83 of 389
FEATURES OF YOUR HYUNDAI 1- 75
B260D02O-AAT
1. Playing CD
o Insert the CD with the label facing upward.
o Insert the CD to start CD playback, during
radio operation.
o When a disc is in the CD deck, if you press the play button, the CD player will begin playingeven if the radio is being used.
o The CD player can be used when the ignition switch is in either the "ON" or "ACC" position.
2. FF/REW ( / ) If you want to fast forward or reverse through the compact disc track, push and hold the FF ( )or REW ( ) button.When you release the button, the compact discplayer will resume playing.
3. TRACK UP/DOWN
o The desired track on the disc currently being played can be selected using the track num- ber.
o Press once to skip forward to the beginn- ing of the next track. Press once to skipback to the beginning of the track.
4. SCAN Button
o Press the SCAN button to playback the first 10 seconds of each track.
o Press the SCAN button again within 10 sec. when you have reached the desired track. 5. REPEAT Button
o To repeat the track you are currently listening
to, press the RPT button. To cancel , press again.
o If you do not release RPT operation when the track ends, it will automatically be replayed.This process will be continued until you pushthe button again.
6. EJECT Button When the EJECT button is pressed with a CD loaded, the CD will eject. NOTE:
o If the CD does not operate properly or if the ER2 fault code is displayed, use one oftwo methods to reset the CD deck func-tion.
- Remove the audio fuse for 5 minutes.Then, reinstall the audio fuse.
- Diconnect the negative terminal of the battery and wait 5 minutes. Then re-connect the negative battery terminal.
o To assure proper operation of the unit, keep the vehicle interior temperaturewithin a normal range by using thevehicle's air conditioning or heating sys-tem.
o When replacing the fuse, replace it with a fuse having the correct capacity.
o The preset station frequencies are allerased when the car battery is discon- nected. Therefore, all data will have to beset again if this should occur.
o Do not add any oil to the rotating parts. Keep magnets, screwdrivers and othermetallic objects away from the tape mecha-nism and head.
o This equipment is designed to be used only in a 12 volt DC battery system withnegative ground.
o This unit is made of precision parts. Do not attempt to disassemble or adjust anyparts.
o When driving your vehicle, be sure to keep the volume of the unit set low enough toallow you to hear sounds coming from theoutside.
o Do not expose this equipment (including the speakers) to water or excessive mois-ture.
Page 86 of 389
FEATURES OF YOUR HYUNDAI
1- 78
B260F02GK-AAT The CD auto changer is located in the right side of the quarter trim.
o To use the CD auto changer. 1. Open the sliding lid of the CD auto chang- er.
2. To eject the compact disc magazine, press the EJECT button located inside the CD auto changer.
3. Insert the discs into the magazine.
4. Push the magazine into the CD auto chang- er and close the sliding lid.
o The CD auto changer can be used when the ignition switch is in either the "ON" or "ACC"position.
1. CD Select Button When the CD changer magazine contains discs, press the "CD" button and the CD changer canbe used even if the radio is being used. TheHyundai CD changer can hold up to eight discs.The disc number will be lit, and the track number,and elapsed time will be displayed. 2. DISC Select Button To select the CD you want, push " " to change the disc number. o This unit is made of precision parts. Do
not attempt to disassemble or adjust anyparts.
o When driving your vehicle, be sure to keep the volume of the unit set low enough toallow you to hear sounds coming from theoutside.
CAUTION:
o Do not insert warped or poor quality discs into the CD changer as damage to the unitmay occur.
o Do not insert anything like coins into the changer slot as damage to the unit mayoccur.
o Do not place beverages close to the audio system. The playback mechanism may bedamaged if you spill them.
o Do not impact on the audio system, or the playback mechanism could be damaged.
o Driving on the off-roads or other vibra- tions may skip your compact disc.Do not use the audio system on off-roadsas the discs could be scratched and dam-aged.
o Do not grip or pull out the disc with your hand while the disc is being pulled into theunit by the self loading mechanism. Thesecan cause poor disc scratching to occuror trouble in the compact disc changer.
o Avoid using CD-Recordable or CD- Rewritable as the changer could not beoperated in recording way of the CD maker.When using the compact disc changer,genuine CDs are recommended.
TUNEDISC
3. TRACK UP/DOWN
o The desired track on the disc currently being
played can be selected using the track num- ber.
o Press once to skip forward to the begin- ning of the next track. Press once to skipback to the beginning of the track.
4. FF/REW ( / ) If you want to fast forward or reverse through the compact disc track, push and hold in the FF ( )or REW ( ) button.When you release the button, the compact discplayer will resume playing. 5. REPEAT
o To repeat the track you are listening to, press the RPT button. To cancel , press again.
o If you do not release RPT operation when the track ends, it will automatically be replayed. This process will be continued until you pushthe button again.
6. SCAN Button
o Press the SCAN button to playback the first 10 seconds of each track.
o Press the SCAN button again within 10 sec. for the desired track.
NOTE:
o When replacing the fuse, replace it with a fuse having the correct capacity.
o This equipment is designed to be used only in a 12 volt DC battery system withnegative ground.