Hyundai Elantra 2003 Owner's Manual
Manufacturer: HYUNDAI, Model Year: 2003, Model line: Elantra, Model: Hyundai Elantra 2003Pages: 172, PDF Size: 2.82 MB
Page 151 of 172
DO-IT-YOURSELF MAINTENANCE DO-IT-YOURSELF MAINTENANCEDO-IT-YOURSELF MAINTENANCE DO-IT-YOURSELF MAINTENANCE
DO-IT-YOURSELF MAINTENANCE
6-15
G200B01E-AAT
Replacing Accessory Fuse Replacing Accessory FuseReplacing Accessory Fuse Replacing Accessory Fuse
Replacing Accessory Fuse
The fuse box for the lights and other electrical
accessories will be found in the backside of multi
box located in the left side of driver. Inside the box
you will find a list showing the circuits protected
by each fuse.
If any of your car's lights or other electrical
accessories stop working, a blown fuse could
be the reason. If the fuse has burned out, you
will see that the metal strip inside the fuse has
burned through. If you suspect a blown fuse,
follow this procedure:
1. Turn off the ignition and all other switches.
2. Open the fuse box and examine each fuse.
Remove each fuse by pulling it toward you
(a small "fuse puller" tool is contained in the
fuse box to simplify this operation).
3. Be sure to check all other fuses even if you
find one that appears to have burned out.
B200B01E
G190A01A-AAT
CHECKING DRIVE BELTS CHECKING DRIVE BELTSCHECKING DRIVE BELTS CHECKING DRIVE BELTS
CHECKING DRIVE BELTS
G200A01A-AAT
CHECKING AND REPLACING CHECKING AND REPLACINGCHECKING AND REPLACING CHECKING AND REPLACING
CHECKING AND REPLACING
FUSES FUSESFUSES FUSES
FUSES
Replacing a Fusible Link Replacing a Fusible LinkReplacing a Fusible Link Replacing a Fusible Link
Replacing a Fusible Link
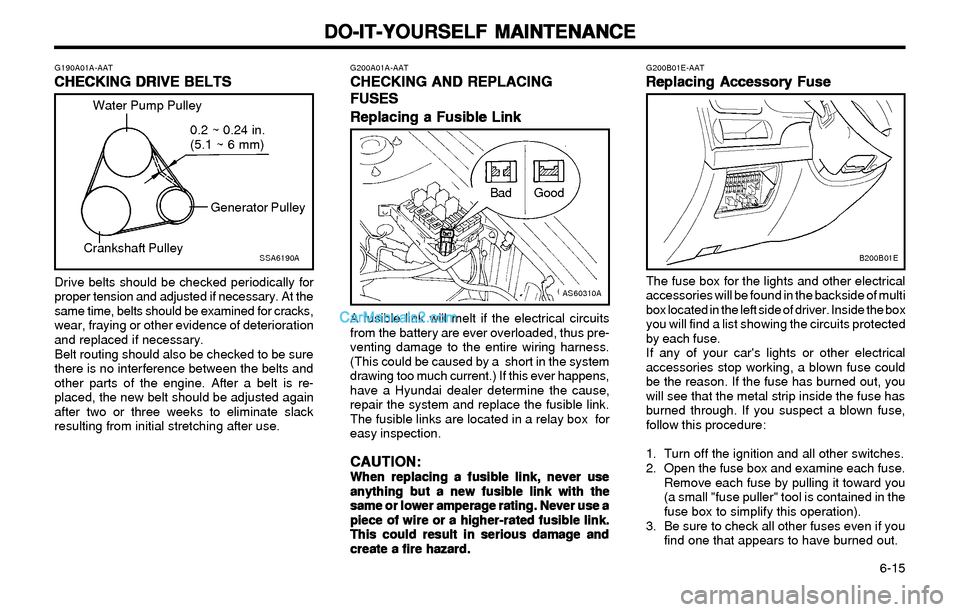
Drive belts should be checked periodically for
proper tension and adjusted if necessary. At the
same time, belts should be examined for cracks,
wear, fraying or other evidence of deterioration
and replaced if necessary.
Belt routing should also be checked to be sure
there is no interference between the belts and
other parts of the engine. After a belt is re-
placed, the new belt should be adjusted again
after two or three weeks to eliminate slack
resulting from initial stretching after use.A fusible link will melt if the electrical circuits
from the battery are ever overloaded, thus pre-
venting damage to the entire wiring harness.
(This could be caused by a short in the system
drawing too much current.) If this ever happens,
have a Hyundai dealer determine the cause,
repair the system and replace the fusible link.
The fusible links are located in a relay box for
easy inspection.
CAUTION: CAUTION:CAUTION: CAUTION:
CAUTION:When replacing a fusible link, never use When replacing a fusible link, never useWhen replacing a fusible link, never use When replacing a fusible link, never use
When replacing a fusible link, never use
anything but a new fusible link with the anything but a new fusible link with theanything but a new fusible link with the anything but a new fusible link with the
anything but a new fusible link with the
same or lower amperage rating. Never use a same or lower amperage rating. Never use asame or lower amperage rating. Never use a same or lower amperage rating. Never use a
same or lower amperage rating. Never use a
piece of wire or a higher-rated fusible link. piece of wire or a higher-rated fusible link.piece of wire or a higher-rated fusible link. piece of wire or a higher-rated fusible link.
piece of wire or a higher-rated fusible link.
This could result in serious damage and This could result in serious damage andThis could result in serious damage and This could result in serious damage and
This could result in serious damage and
create a fire hazard. create a fire hazard.create a fire hazard. create a fire hazard.
create a fire hazard.
SSA6190A
Water Pump Pulley
Generator Pulley
Crankshaft Pulley0.2 ~ 0.24 in.
(5.1 ~ 6 mm)
GoodBad
AS60310A
Page 152 of 172
DO-IT-YOURSELF MAINTENANCE DO-IT-YOURSELF MAINTENANCEDO-IT-YOURSELF MAINTENANCE DO-IT-YOURSELF MAINTENANCE
DO-IT-YOURSELF MAINTENANCE
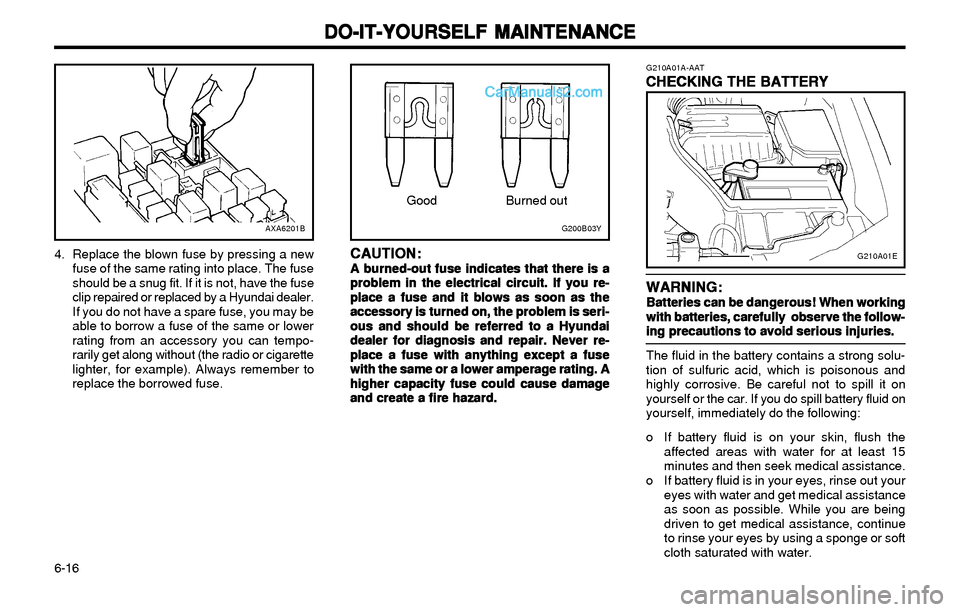
6-16 4. Replace the blown fuse by pressing a new
fuse of the same rating into place. The fuse
should be a snug fit. If it is not, have the fuse
clip repaired or replaced by a Hyundai dealer.
If you do not have a spare fuse, you may be
able to borrow a fuse of the same or lower
rating from an accessory you can tempo-
rarily get along without (the radio or cigarette
lighter, for example). Always remember to
replace the borrowed fuse.
CAUTION: CAUTION:CAUTION: CAUTION:
CAUTION:A burned-out fuse indicates that there is a A burned-out fuse indicates that there is aA burned-out fuse indicates that there is a A burned-out fuse indicates that there is a
A burned-out fuse indicates that there is a
problem in the electrical circuit. If you re- problem in the electrical circuit. If you re-problem in the electrical circuit. If you re- problem in the electrical circuit. If you re-
problem in the electrical circuit. If you re-
place a fuse and it blows as soon as the place a fuse and it blows as soon as theplace a fuse and it blows as soon as the place a fuse and it blows as soon as the
place a fuse and it blows as soon as the
accessory is turned on, the problem is seri- accessory is turned on, the problem is seri-accessory is turned on, the problem is seri- accessory is turned on, the problem is seri-
accessory is turned on, the problem is seri-
ous and should be referred to a Hyundai ous and should be referred to a Hyundaious and should be referred to a Hyundai ous and should be referred to a Hyundai
ous and should be referred to a Hyundai
dealer for diagnosis and repair. Never re- dealer for diagnosis and repair. Never re-dealer for diagnosis and repair. Never re- dealer for diagnosis and repair. Never re-
dealer for diagnosis and repair. Never re-
place a fuse with anything except a fuse place a fuse with anything except a fuseplace a fuse with anything except a fuse place a fuse with anything except a fuse
place a fuse with anything except a fuse
with the same or a lower amperage rating. A with the same or a lower amperage rating. Awith the same or a lower amperage rating. A with the same or a lower amperage rating. A
with the same or a lower amperage rating. A
higher capacity fuse could cause damage higher capacity fuse could cause damagehigher capacity fuse could cause damage higher capacity fuse could cause damage
higher capacity fuse could cause damage
and create a fire hazard. and create a fire hazard.and create a fire hazard. and create a fire hazard.
and create a fire hazard.
AXA6201B
Burned out
G200B03Y
Good
WARNING: WARNING:WARNING: WARNING:
WARNING:Batteries can be dangerous! When working Batteries can be dangerous! When workingBatteries can be dangerous! When working Batteries can be dangerous! When working
Batteries can be dangerous! When working
with batteries, carefully observe the follow- with batteries, carefully observe the follow-with batteries, carefully observe the follow- with batteries, carefully observe the follow-
with batteries, carefully observe the follow-
ing precautions to avoid serious injuries. ing precautions to avoid serious injuries.ing precautions to avoid serious injuries. ing precautions to avoid serious injuries.
ing precautions to avoid serious injuries.
The fluid in the battery contains a strong solu-
tion of sulfuric acid, which is poisonous and
highly corrosive. Be careful not to spill it on
yourself or the car. If you do spill battery fluid on
yourself, immediately do the following:
o If battery fluid is on your skin, flush the
affected areas with water for at least 15
minutes and then seek medical assistance.
o If battery fluid is in your eyes, rinse out your
eyes with water and get medical assistance
as soon as possible. While you are being
driven to get medical assistance, continue
to rinse your eyes by using a sponge or soft
cloth saturated with water.
G210A01A-AAT
CHECKING THE BATTERY CHECKING THE BATTERYCHECKING THE BATTERY CHECKING THE BATTERY
CHECKING THE BATTERY
G210A01E
Page 153 of 172
DO-IT-YOURSELF MAINTENANCE DO-IT-YOURSELF MAINTENANCEDO-IT-YOURSELF MAINTENANCE DO-IT-YOURSELF MAINTENANCE
DO-IT-YOURSELF MAINTENANCE
6-17
G230A03A-AAT
POWER STEERING FLUID LEVEL POWER STEERING FLUID LEVELPOWER STEERING FLUID LEVEL POWER STEERING FLUID LEVEL
POWER STEERING FLUID LEVEL
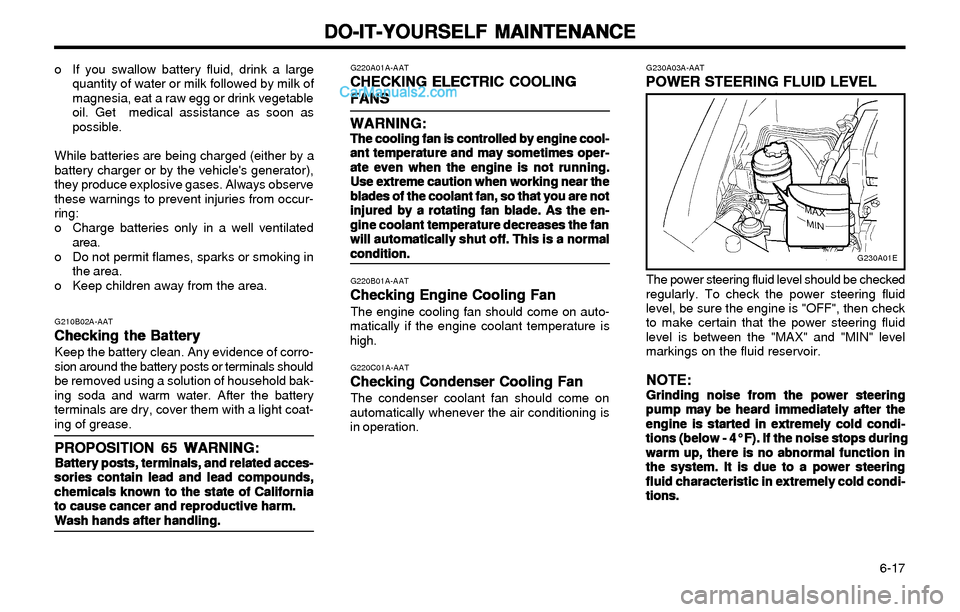
The power steering fluid level should be checked
regularly. To check the power steering fluid
level, be sure the engine is "OFF", then check
to make certain that the power steering fluid
level is between the "MAX" and "MIN" level
markings on the fluid reservoir.
NOTE: NOTE:NOTE: NOTE:
NOTE:Grinding noise from the power steering Grinding noise from the power steeringGrinding noise from the power steering Grinding noise from the power steering
Grinding noise from the power steering
pump may be heard immediately after the pump may be heard immediately after thepump may be heard immediately after the pump may be heard immediately after the
pump may be heard immediately after the
engine is started in extremely cold condi- engine is started in extremely cold condi-engine is started in extremely cold condi- engine is started in extremely cold condi-
engine is started in extremely cold condi-
tions (below - 4°F). If the noise stops during tions (below - 4°F). If the noise stops duringtions (below - 4°F). If the noise stops during tions (below - 4°F). If the noise stops during
tions (below - 4°F). If the noise stops during
warm up, there is no abnormal function in warm up, there is no abnormal function inwarm up, there is no abnormal function in warm up, there is no abnormal function in
warm up, there is no abnormal function in
the system. It is due to a power steering the system. It is due to a power steeringthe system. It is due to a power steering the system. It is due to a power steering
the system. It is due to a power steering
fluid characteristic in extremely cold condi- fluid characteristic in extremely cold condi-fluid characteristic in extremely cold condi- fluid characteristic in extremely cold condi-
fluid characteristic in extremely cold condi-
tions. tions.tions. tions.
tions.
G230A01E G220A01A-AAT
CHECKING ELECTRIC COOLING CHECKING ELECTRIC COOLINGCHECKING ELECTRIC COOLING CHECKING ELECTRIC COOLING
CHECKING ELECTRIC COOLING
FANS FANSFANS FANS
FANS
WARNING: WARNING:WARNING: WARNING:
WARNING:
The cooling fan is controlled by engine cool- The cooling fan is controlled by engine cool-The cooling fan is controlled by engine cool- The cooling fan is controlled by engine cool-
The cooling fan is controlled by engine cool-
ant temperature and may sometimes oper- ant temperature and may sometimes oper-ant temperature and may sometimes oper- ant temperature and may sometimes oper-
ant temperature and may sometimes oper-
ate even when the engine is not running. ate even when the engine is not running.ate even when the engine is not running. ate even when the engine is not running.
ate even when the engine is not running.
Use extreme caution when working near the Use extreme caution when working near theUse extreme caution when working near the Use extreme caution when working near the
Use extreme caution when working near the
blades of the coolant fan, so that you are not blades of the coolant fan, so that you are notblades of the coolant fan, so that you are not blades of the coolant fan, so that you are not
blades of the coolant fan, so that you are not
injured by a rotating fan blade. As the en- injured by a rotating fan blade. As the en-injured by a rotating fan blade. As the en- injured by a rotating fan blade. As the en-
injured by a rotating fan blade. As the en-
gine coolant temperature decreases the fan gine coolant temperature decreases the fangine coolant temperature decreases the fan gine coolant temperature decreases the fan
gine coolant temperature decreases the fan
will automatically shut off. This is a normal will automatically shut off. This is a normalwill automatically shut off. This is a normal will automatically shut off. This is a normal
will automatically shut off. This is a normal
condition. condition.condition. condition.
condition.
G220B01A-AAT
Checking Engine Cooling Fan Checking Engine Cooling FanChecking Engine Cooling Fan Checking Engine Cooling Fan
Checking Engine Cooling FanThe engine cooling fan should come on auto-
matically if the engine coolant temperature is
high.
G220C01A-AAT
Checking Condenser Cooling Fan Checking Condenser Cooling FanChecking Condenser Cooling Fan Checking Condenser Cooling Fan
Checking Condenser Cooling FanThe condenser coolant fan should come on
automatically whenever the air conditioning is
in operation.
G210B02A-AAT
Checking the Battery Checking the BatteryChecking the Battery Checking the Battery
Checking the BatteryKeep the battery clean. Any evidence of corro-
sion around the battery posts or terminals should
be removed using a solution of household bak-
ing soda and warm water. After the battery
terminals are dry, cover them with a light coat-
ing of grease.
PROPOSITION 65 WARNING: PROPOSITION 65 WARNING:PROPOSITION 65 WARNING: PROPOSITION 65 WARNING:
PROPOSITION 65 WARNING:Battery posts, terminals, and related acces- Battery posts, terminals, and related acces-Battery posts, terminals, and related acces- Battery posts, terminals, and related acces-
Battery posts, terminals, and related acces-
sories contain lead and lead compounds, sories contain lead and lead compounds,sories contain lead and lead compounds, sories contain lead and lead compounds,
sories contain lead and lead compounds,
chemicals known to the state of California chemicals known to the state of Californiachemicals known to the state of California chemicals known to the state of California
chemicals known to the state of California
to cause cancer and reproductive harm. to cause cancer and reproductive harm.to cause cancer and reproductive harm. to cause cancer and reproductive harm.
to cause cancer and reproductive harm.
Wash hands after handling. Wash hands after handling.Wash hands after handling. Wash hands after handling.
Wash hands after handling.
o If you swallow battery fluid, drink a large
quantity of water or milk followed by milk of
magnesia, eat a raw egg or drink vegetable
oil. Get medical assistance as soon as
possible.
While batteries are being charged (either by a
battery charger or by the vehicle's generator),
they produce explosive gases. Always observe
these warnings to prevent injuries from occur-
ring:
o Charge batteries only in a well ventilated
area.
o Do not permit flames, sparks or smoking in
the area.
o Keep children away from the area.
Page 154 of 172
DO-IT-YOURSELF MAINTENANCE DO-IT-YOURSELF MAINTENANCEDO-IT-YOURSELF MAINTENANCE DO-IT-YOURSELF MAINTENANCE
DO-IT-YOURSELF MAINTENANCE
6-18Recommended Fluid Recommended FluidRecommended Fluid Recommended Fluid
Recommended Fluid
Use PSF-3 type fluid
NOTE: NOTE:NOTE: NOTE:
NOTE:Do not start the engine when the power Do not start the engine when the powerDo not start the engine when the power Do not start the engine when the power
Do not start the engine when the power
steering oil reservoir is empty. steering oil reservoir is empty.steering oil reservoir is empty. steering oil reservoir is empty.
steering oil reservoir is empty.
G240A01A-AAT
POWER STEERING HOSES POWER STEERING HOSESPOWER STEERING HOSES POWER STEERING HOSES
POWER STEERING HOSESIt is suggested that you check the power steer-
ing hose connections for fluid leakage at regular
intervals. The power steering hoses should be
replaced if there is severe surface cracking,
scuffing or worn spots. Deterioration of the
hose could cause premature failure.
G250A01A-AAT
FOR MORE INFORMATION ABOUT FOR MORE INFORMATION ABOUTFOR MORE INFORMATION ABOUT FOR MORE INFORMATION ABOUT
FOR MORE INFORMATION ABOUT
YOUR HYUNDAI YOUR HYUNDAIYOUR HYUNDAI YOUR HYUNDAI
YOUR HYUNDAI
If you desire additional information about main-
taining and servicing your Hyundai, you may
purchase a factory Shop Manual at your Hyundai
dealer's parts department. This is the same
manual used by dealership technicians and
while it is highly technical it can be useful in
obtaining a better understanding of your car
and how it works.
G260A03A-AAT
REPLACING HEADLIGHT BULBS REPLACING HEADLIGHT BULBSREPLACING HEADLIGHT BULBS REPLACING HEADLIGHT BULBS
REPLACING HEADLIGHT BULBSBefore attempting to replace a headlight bulb,
be sure the switch is turned to the "OFF"
position.
The next paragraph shows how to reach the
headlight bulbs so they may be changed. Be
sure to replace the burned-out bulb with one of
the same number and wattage rating.
CAUTION: CAUTION:CAUTION: CAUTION:
CAUTION:Keep the lamps out of contact with petro- Keep the lamps out of contact with petro-Keep the lamps out of contact with petro- Keep the lamps out of contact with petro-
Keep the lamps out of contact with petro-
leum products, such as oil, gasoline, etc. leum products, such as oil, gasoline, etc.leum products, such as oil, gasoline, etc. leum products, such as oil, gasoline, etc.
leum products, such as oil, gasoline, etc.
G270A02S-AATHEADLIGHT BULB HEADLIGHT BULBHEADLIGHT BULB HEADLIGHT BULB
HEADLIGHT BULB
Replacement instructions: Replacement instructions:Replacement instructions: Replacement instructions:
Replacement instructions:
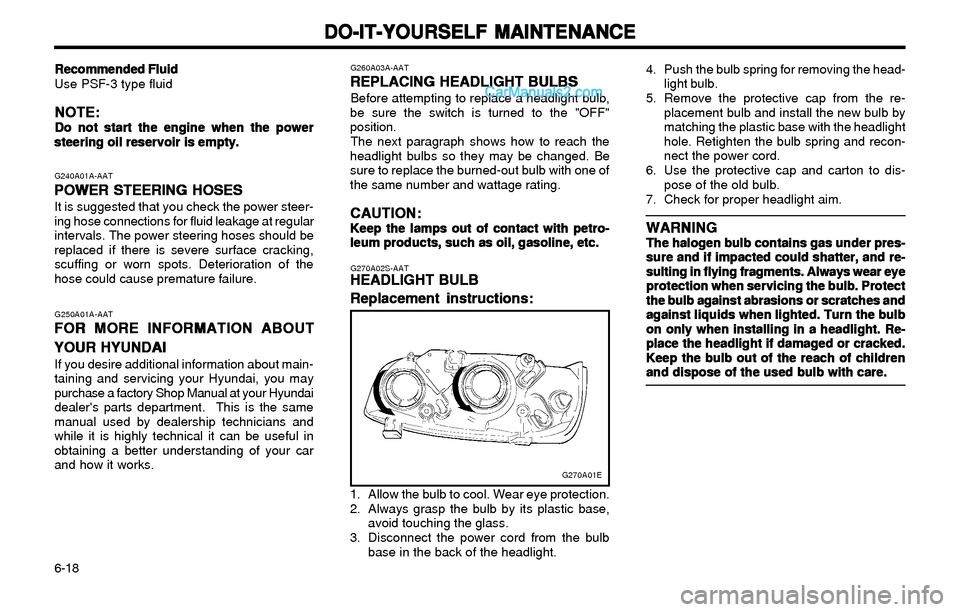
1. Allow the bulb to cool. Wear eye protection.
2. Always grasp the bulb by its plastic base,
avoid touching the glass.
3. Disconnect the power cord from the bulb
base in the back of the headlight.
G270A01E
4. Push the bulb spring for removing the head-
light bulb.
5. Remove the protective cap from the re-
placement bulb and install the new bulb by
matching the plastic base with the headlight
hole. Retighten the bulb spring and recon-
nect the power cord.
6. Use the protective cap and carton to dis-
pose of the old bulb.
7. Check for proper headlight aim.
WARNING WARNINGWARNING WARNING
WARNINGThe halogen bulb contains gas under pres- The halogen bulb contains gas under pres-The halogen bulb contains gas under pres- The halogen bulb contains gas under pres-
The halogen bulb contains gas under pres-
sure and if impacted could shatter, and re- sure and if impacted could shatter, and re-sure and if impacted could shatter, and re- sure and if impacted could shatter, and re-
sure and if impacted could shatter, and re-
sulting in flying fragments. Always wear eye sulting in flying fragments. Always wear eyesulting in flying fragments. Always wear eye sulting in flying fragments. Always wear eye
sulting in flying fragments. Always wear eye
protection when servicing the bulb. Protect protection when servicing the bulb. Protectprotection when servicing the bulb. Protect protection when servicing the bulb. Protect
protection when servicing the bulb. Protect
the bulb against abrasions or scratches and the bulb against abrasions or scratches andthe bulb against abrasions or scratches and the bulb against abrasions or scratches and
the bulb against abrasions or scratches and
against liquids when lighted. Turn the bulb against liquids when lighted. Turn the bulbagainst liquids when lighted. Turn the bulb against liquids when lighted. Turn the bulb
against liquids when lighted. Turn the bulb
on only when installing in a headlight. Re- on only when installing in a headlight. Re-on only when installing in a headlight. Re- on only when installing in a headlight. Re-
on only when installing in a headlight. Re-
place the headlight if damaged or cracked. place the headlight if damaged or cracked.place the headlight if damaged or cracked. place the headlight if damaged or cracked.
place the headlight if damaged or cracked.
Keep the bulb out of the reach of children Keep the bulb out of the reach of childrenKeep the bulb out of the reach of children Keep the bulb out of the reach of children
Keep the bulb out of the reach of children
and dispose of the used bulb with care. and dispose of the used bulb with care.and dispose of the used bulb with care. and dispose of the used bulb with care.
and dispose of the used bulb with care.
Page 155 of 172
DO-IT-YOURSELF MAINTENANCE DO-IT-YOURSELF MAINTENANCEDO-IT-YOURSELF MAINTENANCE DO-IT-YOURSELF MAINTENANCE
DO-IT-YOURSELF MAINTENANCE
6-19
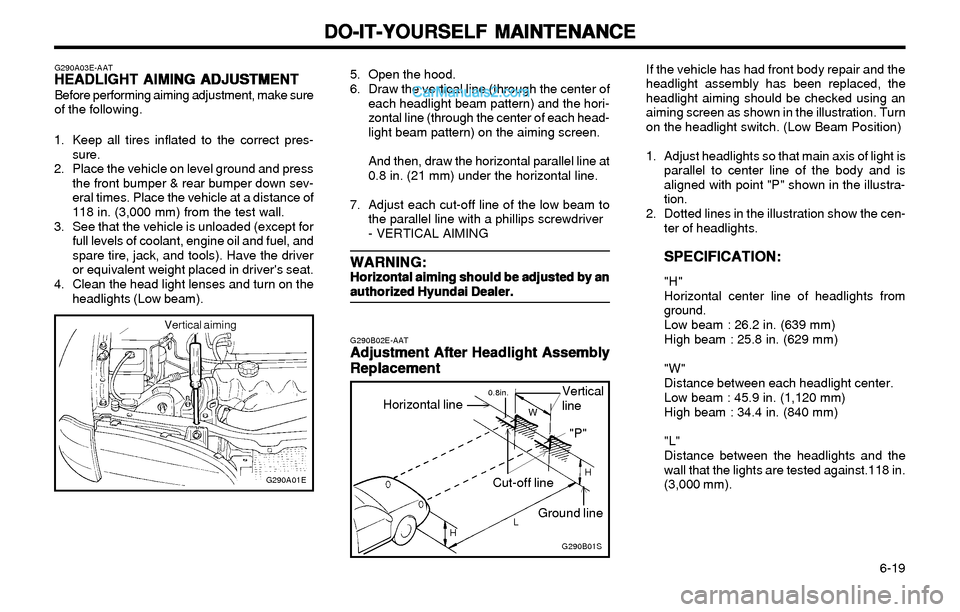
If the vehicle has had front body repair and the
headlight assembly has been replaced, the
headlight aiming should be checked using an
aiming screen as shown in the illustration. Turn
on the headlight switch. (Low Beam Position)
1. Adjust headlights so that main axis of light is
parallel to center line of the body and is
aligned with point "P" shown in the illustra-
tion.
2. Dotted lines in the illustration show the cen-
ter of headlights.
SPECIFICATION: SPECIFICATION:SPECIFICATION: SPECIFICATION:
SPECIFICATION:
"H"
Horizontal center line of headlights from
ground.
Low beam : 26.2 in. (639 mm)
High beam : 25.8 in. (629 mm)
"W"
Distance between each headlight center.
Low beam : 45.9 in. (1,120 mm)
High beam : 34.4 in. (840 mm)
"L"
Distance between the headlights and the
wall that the lights are tested against.118 in.
(3,000 mm).
G290B02E-AATAdjustment After Headlight Assembly Adjustment After Headlight AssemblyAdjustment After Headlight Assembly Adjustment After Headlight Assembly
Adjustment After Headlight Assembly
Replacement ReplacementReplacement Replacement
Replacement
G290A03E-AATHEADLI HEADLIHEADLI HEADLI
HEADLI
GHT AIMING ADJUSTMENT GHT AIMING ADJUSTMENTGHT AIMING ADJUSTMENT GHT AIMING ADJUSTMENT
GHT AIMING ADJUSTMENTBefore performing aiming adjustment, make sure
of the following.
1. Keep all tires inflated to the correct pres-
sure.
2. Place the vehicle on level ground and press
the front bumper & rear bumper down sev-
eral times. Place the vehicle at a distance of
118 in. (3,000 mm) from the test wall.
3. See that the vehicle is unloaded (except for
full levels of coolant, engine oil and fuel, and
spare tire, jack, and tools). Have the driver
or equivalent weight placed in driver's seat.
4. Clean the head light lenses and turn on the
headlights (Low beam).
G290A01E
G290B01S
Vertical
line
Cut-off line
Ground line Horizontal line
LW
H
H
"P"
0.8in.
Vertical aiming
5. Open the hood.
6. Draw the vertical line (through the center of
each headlight beam pattern) and the hori-
zontal line (through the center of each head-
light beam pattern) on the aiming screen.
And then, draw the horizontal parallel line at
0.8 in. (21 mm) under the horizontal line.
7. Adjust each cut-off line of the low beam to
the parallel line with a phillips screwdriver
- VERTICAL AIMING
WARNING: WARNING:WARNING: WARNING:
WARNING:Horizontal aiming should be adjusted by an Horizontal aiming should be adjusted by anHorizontal aiming should be adjusted by an Horizontal aiming should be adjusted by an
Horizontal aiming should be adjusted by an
authorized Hyundai Dealer. authorized Hyundai Dealer.authorized Hyundai Dealer. authorized Hyundai Dealer.
authorized Hyundai Dealer.
Page 156 of 172
DO-IT-YOURSELF MAINTENANCE DO-IT-YOURSELF MAINTENANCEDO-IT-YOURSELF MAINTENANCE DO-IT-YOURSELF MAINTENANCE
DO-IT-YOURSELF MAINTENANCE
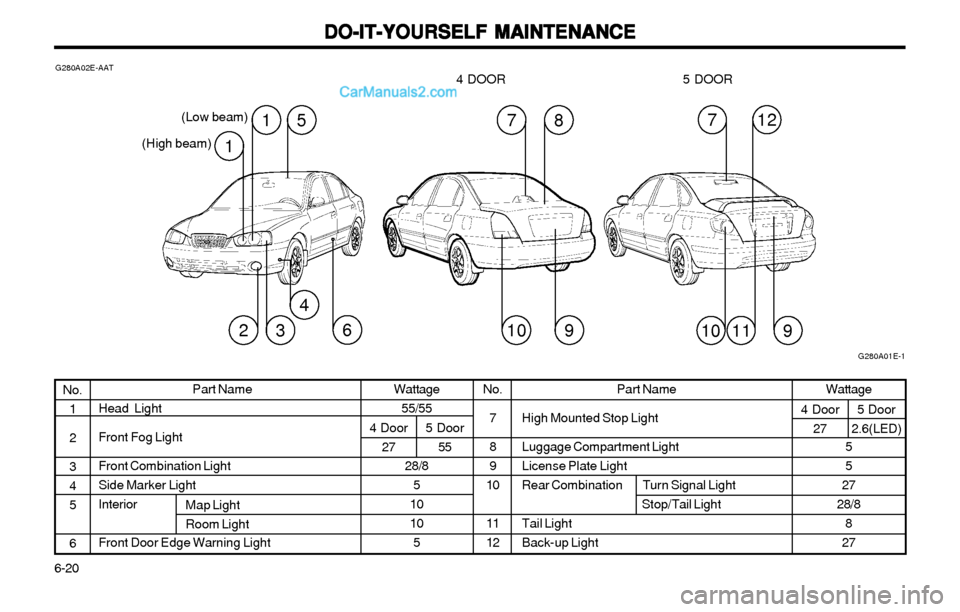
6-20Wattage
55/55
28/8
5
10
10
5 4 Door
275 Door
55Part Name
High Mounted Stop Light
Luggage Compartment Light
License Plate Light
Rear Combination Turn Signal Light
Stop/Tail Light
Tail Light
Back-up Light Part Name
Head Light
Front Fog Light
Front Combination Light
Side Marker Light
Interior
Front Door Edge Warning Light
G280A02E-AAT
G280A01E-1
No.
1
2
3
4
5
6Wattage
5
5
27
28/8
8
27
Map Light
Room Light
No.
7
8
9
10
11
12 (High beam)(Low beam)4 DOOR 5 DOOR
4 Door
275 Door
2.6(LED)
51
1
4
632
78
109
712
11109
Page 157 of 172
EMISSION CONTROL SYSTEMS EMISSION CONTROL SYSTEMSEMISSION CONTROL SYSTEMS EMISSION CONTROL SYSTEMS
EMISSION CONTROL SYSTEMS
7-1
7. 7.7. 7.
7.
EMISSION EMISSIONEMISSION EMISSION
EMISSION
CONTR CONTRCONTR CONTR
CONTR
OL OLOL OL
OL
SYSTEMS SYSTEMSSYSTEMS SYSTEMS
SYSTEMSH010B01A-AAT1. 1.1. 1.
1.
Crankcase Emission Control Crankcase Emission ControlCrankcase Emission Control Crankcase Emission Control
Crankcase Emission Control
System SystemSystem System
System
The Positive Crankcase Ventilation System is
employed to prevent air pollution caused by
blow-by gases being emitted from the crank-
case. This system supplies fresh filtered air to
the crankcase through the air intake hose.
Inside the crankcase, the fresh air mixes with
blow-by gases, which then pass through the
PCV valve and into the induction system.
H010C01S-AAT2. Evaporative Emission Control (In- 2. Evaporative Emission Control (In-2. Evaporative Emission Control (In- 2. Evaporative Emission Control (In-
2. Evaporative Emission Control (In-
cluding ORVR: Onboard Refueling cluding ORVR: Onboard Refuelingcluding ORVR: Onboard Refueling cluding ORVR: Onboard Refueling
cluding ORVR: Onboard Refueling
Vapor Recovery) System Vapor Recovery) SystemVapor Recovery) System Vapor Recovery) System
Vapor Recovery) System
The Evaporative Emission Control System is
designed to prevent fuel vapors from escaping
into the atmosphere.
(The ORVR system is designed to allow the (The ORVR system is designed to allow the(The ORVR system is designed to allow the (The ORVR system is designed to allow the
(The ORVR system is designed to allow the
vapors from the fuel tank to be loaded into vapors from the fuel tank to be loaded intovapors from the fuel tank to be loaded into vapors from the fuel tank to be loaded into
vapors from the fuel tank to be loaded into
a canister while refueling at the gas station, a canister while refueling at the gas station,a canister while refueling at the gas station, a canister while refueling at the gas station,
a canister while refueling at the gas station,
preventing the escape of fuel vapors into preventing the escape of fuel vapors intopreventing the escape of fuel vapors into preventing the escape of fuel vapors into
preventing the escape of fuel vapors into
the atmosphere.) the atmosphere.)the atmosphere.) the atmosphere.)
the atmosphere.)
Canister CanisterCanister Canister
CanisterFuel vapors generated inside the fuel tank are
absorbed and stored in the onboard canister.
When the engine is running, the fuel vapors
absorbed in the canister are drawn into the
induction system through the purge control so-
lenoid valve.
Purge Control Solenoid Valve (PCSV) Purge Control Solenoid Valve (PCSV)Purge Control Solenoid Valve (PCSV) Purge Control Solenoid Valve (PCSV)
Purge Control Solenoid Valve (PCSV)The purge control solenoid valve is controlled
by the Engine Control Module (ECM); when the
engine coolant temperature is low during idling,
the PCSV closes so that evaporated fuel is not
taken into the engine. After the engine warms-
up during ordinary driving, the PCSV opens to
introduce evaporated fuel to the engine.
H010D01A-AAT
3. 3.3. 3.
3.
Exhaust Emission Control System Exhaust Emission Control SystemExhaust Emission Control System Exhaust Emission Control System
Exhaust Emission Control SystemThe Exhaust Emission Control System is a
highly effective system which controls exhaust
emissions while maintaining good vehicle
performace.
H010A01A-AAT
EMISSION CONTROL SYSTEM EMISSION CONTROL SYSTEMEMISSION CONTROL SYSTEM EMISSION CONTROL SYSTEM
EMISSION CONTROL SYSTEMYour Hyundai is equipped with an emission
control system to meet all requirements of the
U.S. Environmental Protection Agency or Cali-
fornia Air Resources Board.
There are three emission control systems which
are as follows.
1) Crankcase Emission Control System
2) Evaporative Emission Control System
3) Exhaust Emission Control System
In order to ensure the proper function of the
emission control systems, it is recommended
that you have your car inspected and main-
tained by an authorized Hyundai dealer in ac-
cordance with the maintenance schedule in this
manual.
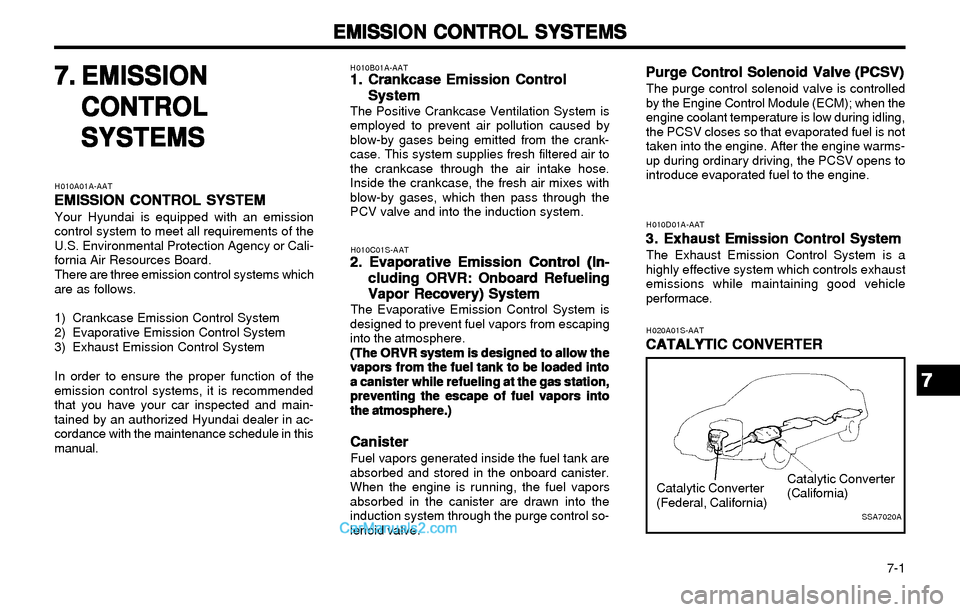
H020A01S-AAT
CATALYTIC CONVERTER CATALYTIC CONVERTERCATALYTIC CONVERTER CATALYTIC CONVERTER
CATALYTIC CONVERTER
Catalytic Converter
(California)
SSA7020A
Catalytic Converter
(Federal, California)
7 77 7
7
Page 158 of 172
7-2
EMISSION CONTROL SYSTEMS EMISSION CONTROL SYSTEMSEMISSION CONTROL SYSTEMS EMISSION CONTROL SYSTEMS
EMISSION CONTROL SYSTEMS
All Hyundai vehicles are equipped with one or
two monolith type three-way catalytic convert-
ers to reduce the carbon monoxide, hydrocar-
bons and nitrogen oxides contained in the ex-
haust gas. Exhaust gases passing through the
catalytic converter cause it to operate at a very
high temperature. The introduction of large
amounts of unburned gasoline into the exhaust
may cause the catalytic converter to overheat
and create a fire hazard. This risk may be
reduced by observing the following:
WARNING: WARNING:WARNING: WARNING:
WARNING:o oo o
o
Use unleaded fuel only. Use unleaded fuel only.Use unleaded fuel only. Use unleaded fuel only.
Use unleaded fuel only.
o oo o
o
Maintain the engine in good operating Maintain the engine in good operatingMaintain the engine in good operating Maintain the engine in good operating
Maintain the engine in good operating
condition. Extremely high catalytic con- condition. Extremely high catalytic con-condition. Extremely high catalytic con- condition. Extremely high catalytic con-
condition. Extremely high catalytic con-
verter temperatures can result from im- verter temperatures can result from im-verter temperatures can result from im- verter temperatures can result from im-
verter temperatures can result from im-
proper operation of the electrical, igni- proper operation of the electrical, igni-proper operation of the electrical, igni- proper operation of the electrical, igni-
proper operation of the electrical, igni-
tion or multiport electronic fuel injection. tion or multiport electronic fuel injection.tion or multiport electronic fuel injection. tion or multiport electronic fuel injection.
tion or multiport electronic fuel injection.
o oo o
o
If your engine stalls, pings, knocks, or is If your engine stalls, pings, knocks, or isIf your engine stalls, pings, knocks, or is If your engine stalls, pings, knocks, or is
If your engine stalls, pings, knocks, or is
hard to start, have your Hyundai dealer hard to start, have your Hyundai dealerhard to start, have your Hyundai dealer hard to start, have your Hyundai dealer
hard to start, have your Hyundai dealer
inspect and repair the problem as soon inspect and repair the problem as sooninspect and repair the problem as soon inspect and repair the problem as soon
inspect and repair the problem as soon
as possible. as possible.as possible. as possible.
as possible.
o oo o
o
Avoid driving with a very low fuel level. Avoid driving with a very low fuel level.Avoid driving with a very low fuel level. Avoid driving with a very low fuel level.
Avoid driving with a very low fuel level.
Running out of gasoline may cause the Running out of gasoline may cause theRunning out of gasoline may cause the Running out of gasoline may cause the
Running out of gasoline may cause the
engine to misfire and result in damage to engine to misfire and result in damage toengine to misfire and result in damage to engine to misfire and result in damage to
engine to misfire and result in damage to
the catalytic converter. the catalytic converter.the catalytic converter. the catalytic converter.
the catalytic converter.
o oo o
o
Avoid idling the engine for periods longer Avoid idling the engine for periods longerAvoid idling the engine for periods longer Avoid idling the engine for periods longer
Avoid idling the engine for periods longer
than 10 minutes. than 10 minutes.than 10 minutes. than 10 minutes.
than 10 minutes.
o oo o
o
The vehicle should not be pushed or The vehicle should not be pushed orThe vehicle should not be pushed or The vehicle should not be pushed or
The vehicle should not be pushed orpulled to get started. This may cause the pulled to get started. This may cause thepulled to get started. This may cause the pulled to get started. This may cause the
pulled to get started. This may cause the
catalytic converter to overheat and cre- catalytic converter to overheat and cre-catalytic converter to overheat and cre- catalytic converter to overheat and cre-
catalytic converter to overheat and cre-
ate a fire hazard. ate a fire hazard.ate a fire hazard. ate a fire hazard.
ate a fire hazard.
o oo o
o
Do not touch the catalytic converter or Do not touch the catalytic converter orDo not touch the catalytic converter or Do not touch the catalytic converter or
Do not touch the catalytic converter or
any other part of the exhaust system any other part of the exhaust systemany other part of the exhaust system any other part of the exhaust system
any other part of the exhaust system
while the catalytic converter is hot. Shut while the catalytic converter is hot. Shutwhile the catalytic converter is hot. Shut while the catalytic converter is hot. Shut
while the catalytic converter is hot. Shut
off the engine, wait for at least one hour off the engine, wait for at least one houroff the engine, wait for at least one hour off the engine, wait for at least one hour
off the engine, wait for at least one hour
before touching the catalytic converter before touching the catalytic converterbefore touching the catalytic converter before touching the catalytic converter
before touching the catalytic converter
or any other part of the exhaust system. or any other part of the exhaust system.or any other part of the exhaust system. or any other part of the exhaust system.
or any other part of the exhaust system.
o oo o
o
Remember that your Hyundai dealer is Remember that your Hyundai dealer isRemember that your Hyundai dealer is Remember that your Hyundai dealer is
Remember that your Hyundai dealer is
your best source of assistance. your best source of assistance.your best source of assistance. your best source of assistance.
your best source of assistance.
o oo o
o
Do not stop your Hyundai over any com- Do not stop your Hyundai over any com-Do not stop your Hyundai over any com- Do not stop your Hyundai over any com-
Do not stop your Hyundai over any com-
bustible material such as grass, paper, bustible material such as grass, paper,bustible material such as grass, paper, bustible material such as grass, paper,
bustible material such as grass, paper,
leaves or rags. These materials might leaves or rags. These materials mightleaves or rags. These materials might leaves or rags. These materials might
leaves or rags. These materials might
contact the hot catalytic converter and a contact the hot catalytic converter and acontact the hot catalytic converter and a contact the hot catalytic converter and a
contact the hot catalytic converter and a
fire might result. fire might result.fire might result. fire might result.
fire might result.
Page 159 of 172
CONSUMER INFORMATION & REPORTING SAFETY DEFECTS CONSUMER INFORMATION & REPORTING SAFETY DEFECTSCONSUMER INFORMATION & REPORTING SAFETY DEFECTS CONSUMER INFORMATION & REPORTING SAFETY DEFECTS
CONSUMER INFORMATION & REPORTING SAFETY DEFECTS
8-1
TEMPORARY USE ONLY
420(60)
8. 8.8. 8.
8.
CONSUMER CONSUMERCONSUMER CONSUMER
CONSUMER
INFORMA INFORMAINFORMA INFORMA
INFORMA
TION & TION &TION & TION &
TION &
REPOR REPORREPOR REPOR
REPOR
TING TINGTING TING
TING
SAFETY DEFECTS SAFETY DEFECTSSAFETY DEFECTS SAFETY DEFECTS
SAFETY DEFECTSI030A02S-AATRECOMMENDED INFLATION RECOMMENDED INFLATIONRECOMMENDED INFLATION RECOMMENDED INFLATION
RECOMMENDED INFLATION
PRESSURES PRESSURESPRESSURES PRESSURES
PRESSURES
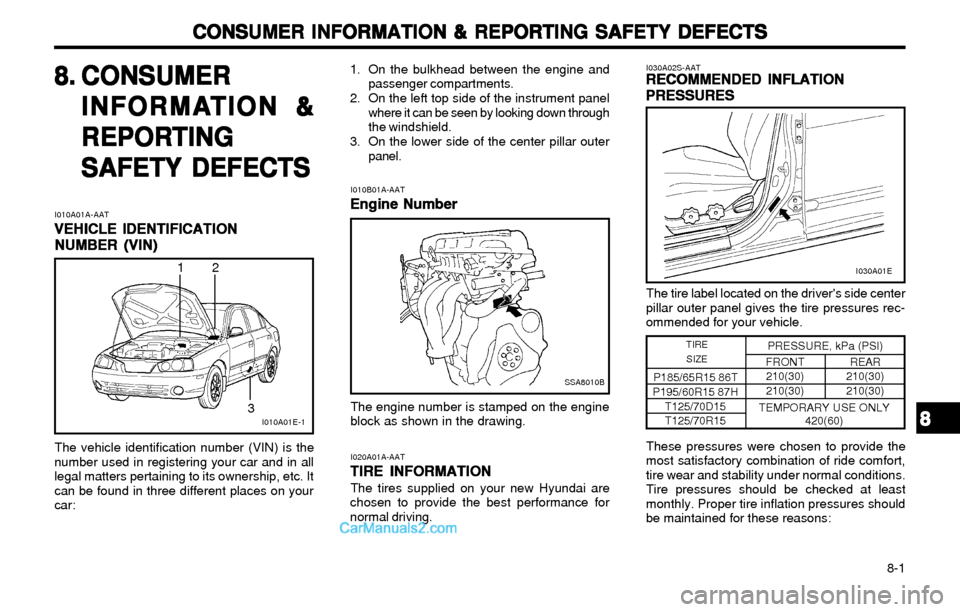
The tire label located on the driver's side center
pillar outer panel gives the tire pressures rec-
ommended for your vehicle.
I030A01E
I010A01A-AAT
VEHICLE IDENTIFICATION VEHICLE IDENTIFICATIONVEHICLE IDENTIFICATION VEHICLE IDENTIFICATION
VEHICLE IDENTIFICATION
NUMBER (VIN) NUMBER (VIN)NUMBER (VIN) NUMBER (VIN)
NUMBER (VIN)
The vehicle identification number (VIN) is the
number used in registering your car and in all
legal matters pertaining to its ownership, etc. It
can be found in three different places on your
car:1. On the bulkhead between the engine and
passenger compartments.
2. On the left top side of the instrument panel
where it can be seen by looking down through
the windshield.
3. On the lower side of the center pillar outer
panel.
I010B01A-AAT
Engine Number Engine NumberEngine Number Engine Number
Engine Number
The engine number is stamped on the engine
block as shown in the drawing.
I020A01A-AAT
TIRE INFORMATION TIRE INFORMATIONTIRE INFORMATION TIRE INFORMATION
TIRE INFORMATION
The tires supplied on your new Hyundai are
chosen to provide the best performance for
normal driving.
SSA8010B
I010A01E-1
12
3
8 88 8
8
These pressures were chosen to provide the
most satisfactory combination of ride comfort,
tire wear and stability under normal conditions.
Tire pressures should be checked at least
monthly. Proper tire inflation pressures should
be maintained for these reasons:
TIRE
SIZEPRESSURE, kPa (PSI)
P185/65R15 86T
P195/60R15 87H
T125/70D15
T125/70R15REAR
210(30)
210(30) FRONT
210(30)
210(30)
Page 160 of 172
CONSUMER INFORMATION & REPORTING SAFETY DEFECTS CONSUMER INFORMATION & REPORTING SAFETY DEFECTSCONSUMER INFORMATION & REPORTING SAFETY DEFECTS CONSUMER INFORMATION & REPORTING SAFETY DEFECTS
CONSUMER INFORMATION & REPORTING SAFETY DEFECTS
8-2 o Lower-than-recommended tire pressures
cause uneven tread wear and poor han-
dling.
o Higher-than-recommended tire pressures
increase the chance of damage from im-
pacts and cause uneven tread wear.
CAUTION: CAUTION:CAUTION: CAUTION:
CAUTION:Always observe the following: Always observe the following:Always observe the following: Always observe the following:
Always observe the following:
o oo o
o
Check pressures when the tires are cold. That Check pressures when the tires are cold. ThatCheck pressures when the tires are cold. That Check pressures when the tires are cold. That
Check pressures when the tires are cold. That
is, after the car has been parked for at least is, after the car has been parked for at leastis, after the car has been parked for at least is, after the car has been parked for at least
is, after the car has been parked for at least
three hours and hasn't been driven more than three hours and hasn't been driven more thanthree hours and hasn't been driven more than three hours and hasn't been driven more than
three hours and hasn't been driven more than
one mile or 1.6 km since starting up. one mile or 1.6 km since starting up.one mile or 1.6 km since starting up. one mile or 1.6 km since starting up.
one mile or 1.6 km since starting up.
o oo o
o
Check the pressure of your spare tire each Check the pressure of your spare tire eachCheck the pressure of your spare tire each Check the pressure of your spare tire each
Check the pressure of your spare tire each
time you check the pressure of other tires. time you check the pressure of other tires.time you check the pressure of other tires. time you check the pressure of other tires.
time you check the pressure of other tires.
o oo o
o
Never overload your car. Be especially Never overload your car. Be especiallyNever overload your car. Be especially Never overload your car. Be especially
Never overload your car. Be especially
careful about overloading if you equip your careful about overloading if you equip yourcareful about overloading if you equip your careful about overloading if you equip your
careful about overloading if you equip your
car with a luggage rack or car top carrier. car with a luggage rack or car top carrier.car with a luggage rack or car top carrier. car with a luggage rack or car top carrier.
car with a luggage rack or car top carrier.
I040A01S-AAT
SNOW TIRES SNOW TIRESSNOW TIRES SNOW TIRES
SNOW TIRESIf you equip your car with snow tires, they
should be the same size and have the same
load capacity as the original tires. Snow tires
should be installed on all four wheels; other-
wise, poor handling may result.
Snow tires should carry 4 psi (28 kPa) more air
pressure than the pressure recommended for
the standard tires on the tire label on the driver
side center pillar outer panel, or up to the
maximum pressure shown on the tire sidewall
whichever is less.
Do not drive faster than 75 mph (120 km/h)
when your car is equipped with snow tires.
I050A01S-AAT
TIRE CHAINS TIRE CHAINSTIRE CHAINS TIRE CHAINS
TIRE CHAINSTire chains, if necessary, should be installed on
the front wheels. Be sure that the chains are the
proper size and that they are installed in accor-
dance with the manufacturer's instructions.
To minimize tire and chain wear, do not con-
tinue to use tire chains when they are no longer
needed.
WARNING: WARNING:WARNING: WARNING:
WARNING:When driving on roads covered with snow When driving on roads covered with snowWhen driving on roads covered with snow When driving on roads covered with snow
When driving on roads covered with snow
or ice, drive at less than 20 mph (30 km/h). or ice, drive at less than 20 mph (30 km/h).or ice, drive at less than 20 mph (30 km/h). or ice, drive at less than 20 mph (30 km/h).
or ice, drive at less than 20 mph (30 km/h).
I060A02A-AAT
TIRE ROTATION TIRE ROTATIONTIRE ROTATION TIRE ROTATION
TIRE ROTATION
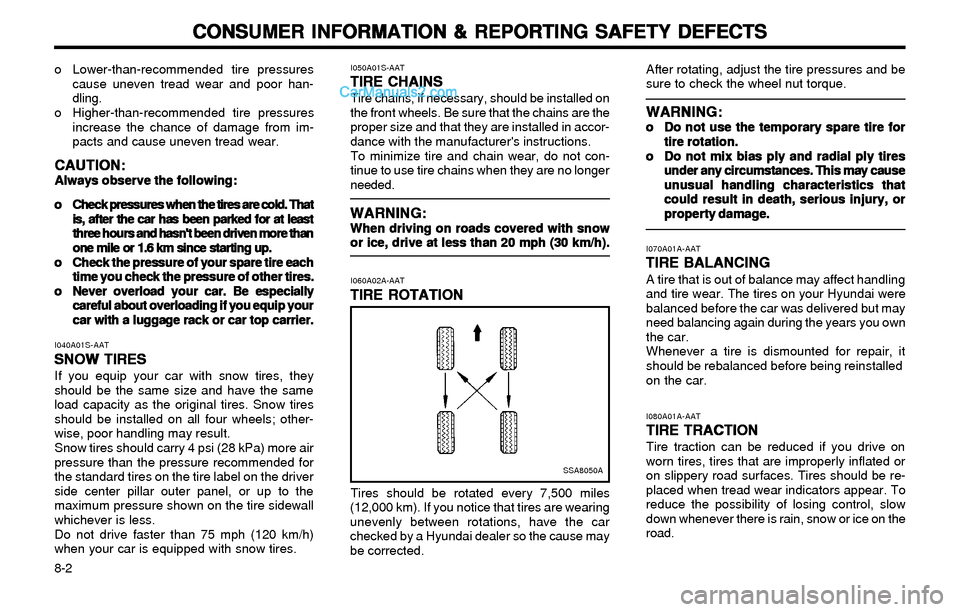
Tires should be rotated every 7,500 miles
(12,000 km). If you notice that tires are wearing
unevenly between rotations, have the car
checked by a Hyundai dealer so the cause may
be corrected.
SSA8050A
After rotating, adjust the tire pressures and be
sure to check the wheel nut torque.
WARNING: WARNING:WARNING: WARNING:
WARNING:o oo o
o
Do not use the temporary spare tire for Do not use the temporary spare tire forDo not use the temporary spare tire for Do not use the temporary spare tire for
Do not use the temporary spare tire for
tire rotation. tire rotation.tire rotation. tire rotation.
tire rotation.
o oo o
o
Do not mix bias ply and radial ply tires Do not mix bias ply and radial ply tiresDo not mix bias ply and radial ply tires Do not mix bias ply and radial ply tires
Do not mix bias ply and radial ply tires
under any circumstances. This may cause under any circumstances. This may causeunder any circumstances. This may cause under any circumstances. This may cause
under any circumstances. This may cause
unusual handling characteristics that unusual handling characteristics thatunusual handling characteristics that unusual handling characteristics that
unusual handling characteristics that
could result in death, serious injury, or could result in death, serious injury, orcould result in death, serious injury, or could result in death, serious injury, or
could result in death, serious injury, or
property damage. property damage.property damage. property damage.
property damage.
I070A01A-AAT
TIRE BALANCING TIRE BALANCINGTIRE BALANCING TIRE BALANCING
TIRE BALANCINGA tire that is out of balance may affect handling
and tire wear. The tires on your Hyundai were
balanced before the car was delivered but may
need balancing again during the years you own
the car.
Whenever a tire is dismounted for repair, it
should be rebalanced before being reinstalled
on the car.
I080A01A-AAT
TIRE TRACTION TIRE TRACTIONTIRE TRACTION TIRE TRACTION
TIRE TRACTIONTire traction can be reduced if you drive on
worn tires, tires that are improperly inflated or
on slippery road surfaces. Tires should be re-
placed when tread wear indicators appear. To
reduce the possibility of losing control, slow
down whenever there is rain, snow or ice on the
road.