length Hyundai Elantra 2006 Owner's Manual
[x] Cancel search | Manufacturer: HYUNDAI, Model Year: 2006, Model line: Elantra, Model: Hyundai Elantra 2006Pages: 277, PDF Size: 10.18 MB
Page 37 of 277
1
FEATURES OF YOUR HYUNDAI
23
B180A02A-GAT SEAT BELTS-Driver's and Passenger's 3-Point System withWebbing Clamp Locking Retrac-
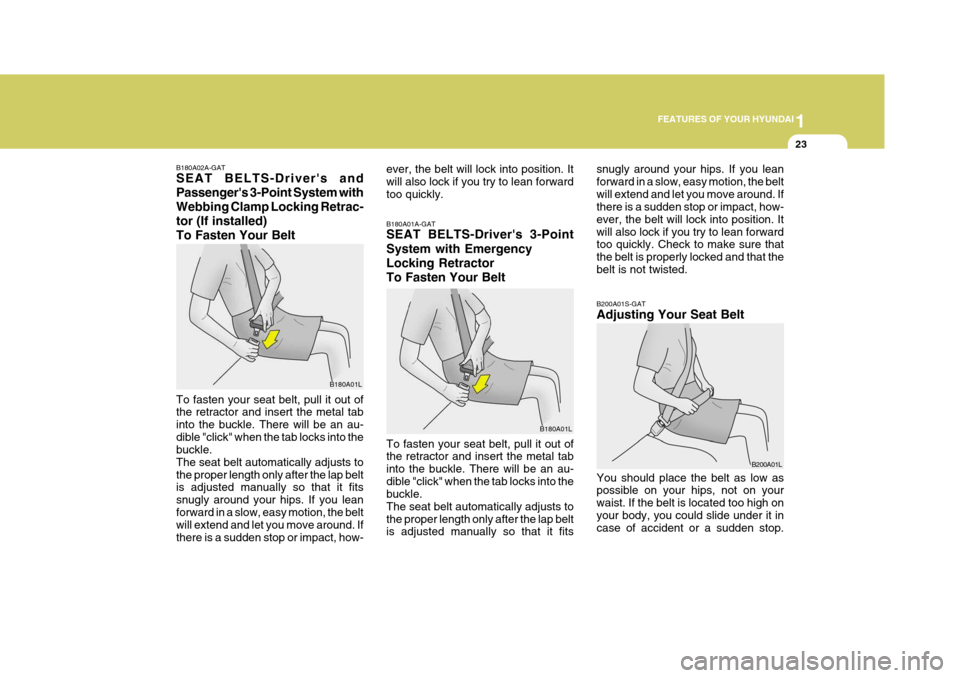
tor (If installed)To Fasten Your Belt To fasten your seat belt, pull it out of the retractor and insert the metal tab into the buckle. There will be an au-dible "click" when the tab locks into the buckle. The seat belt automatically adjusts tothe proper length only after the lap belt is adjusted manually so that it fits snugly around your hips. If you leanforward in a slow, easy motion, the belt will extend and let you move around. If there is a sudden stop or impact, how-
B180A01A-GAT SEAT BELTS-Driver's 3-Point System with Emergency Locking RetractorTo Fasten Your Belt To fasten your seat belt, pull it out of the retractor and insert the metal tab into the buckle. There will be an au-dible "click" when the tab locks into the buckle. The seat belt automatically adjusts tothe proper length only after the lap belt is adjusted manually so that it fits B180A01L
B180A01Lever, the belt will lock into position. It will also lock if you try to lean forwardtoo quickly.
snugly around your hips. If you leanforward in a slow, easy motion, the beltwill extend and let you move around. If there is a sudden stop or impact, how- ever, the belt will lock into position. Itwill also lock if you try to lean forward too quickly. Check to make sure that the belt is properly locked and that thebelt is not twisted.
B200A01S-GAT Adjusting Your Seat Belt
B200A01L
You should place the belt as low as possible on your hips, not on your waist. If the belt is located too high onyour body, you could slide under it in case of accident or a sudden stop.
Page 38 of 277
1FEATURES OF YOUR HYUNDAI
24
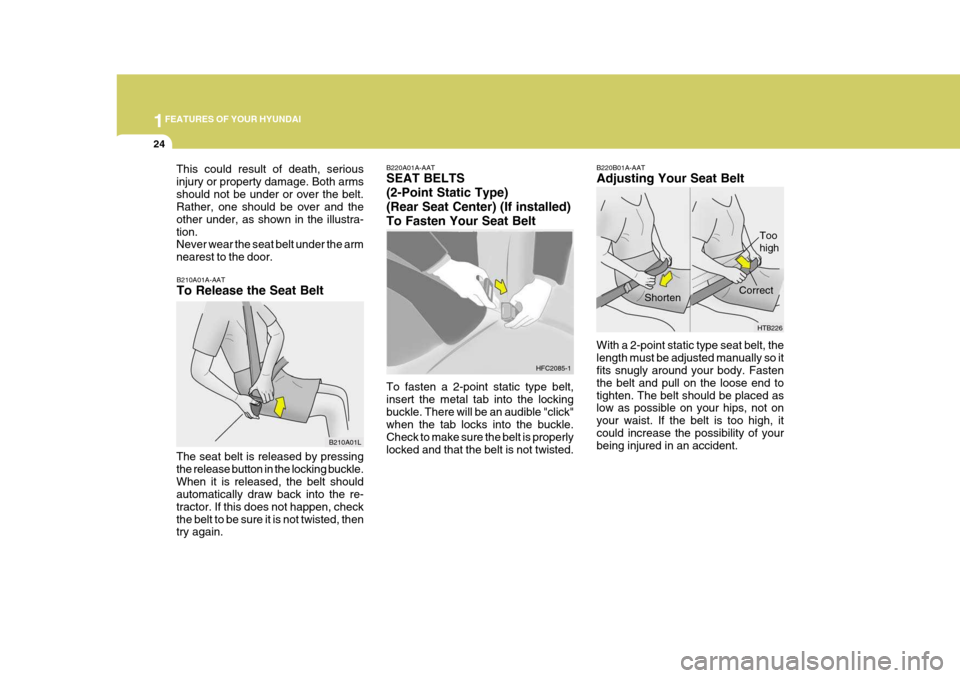
B220B01A-AAT Adjusting Your Seat Belt With a 2-point static type seat belt, the length must be adjusted manually so it fits snugly around your body. Fasten the belt and pull on the loose end totighten. The belt should be placed as low as possible on your hips, not on your waist. If the belt is too high, itcould increase the possibility of your being injured in an accident. Shorten
HTB226Too high
CorrectB220A01A-AAT SEAT BELTS (2-Point Static Type)(Rear Seat Center) (If installed)To Fasten Your Seat Belt To fasten a 2-point static type belt, insert the metal tab into the lockingbuckle. There will be an audible "click" when the tab locks into the buckle. Check to make sure the belt is properlylocked and that the belt is not twisted.
B210A01A-AAT To Release the Seat Belt
The seat belt is released by pressing the release button in the locking buckle.When it is released, the belt should automatically draw back into the re- tractor. If this does not happen, checkthe belt to be sure it is not twisted, then try again. B210A01L
HFC2085-1
This could result of death, serious injury or property damage. Both armsshould not be under or over the belt. Rather, one should be over and the other under, as shown in the illustra-tion. Never wear the seat belt under the arm nearest to the door.
Page 39 of 277
1
FEATURES OF YOUR HYUNDAI
25
!
HXDFL429
B220C01A-AAT To Release the Seat Belt When you want to release the seat belt, press the button in the locking buckle.
WARNING:
The center lap belt latching mecha- nism is different from those for therear seat shoulder belts. When fas- tening the rear seat shoulder belts or the center lap belt, make surethey are inserted into the correct buckles to obtain maximum protec- tion from the seat belt system andassure proper operation.
B220A01E
(a)
(c)
(b) (d)
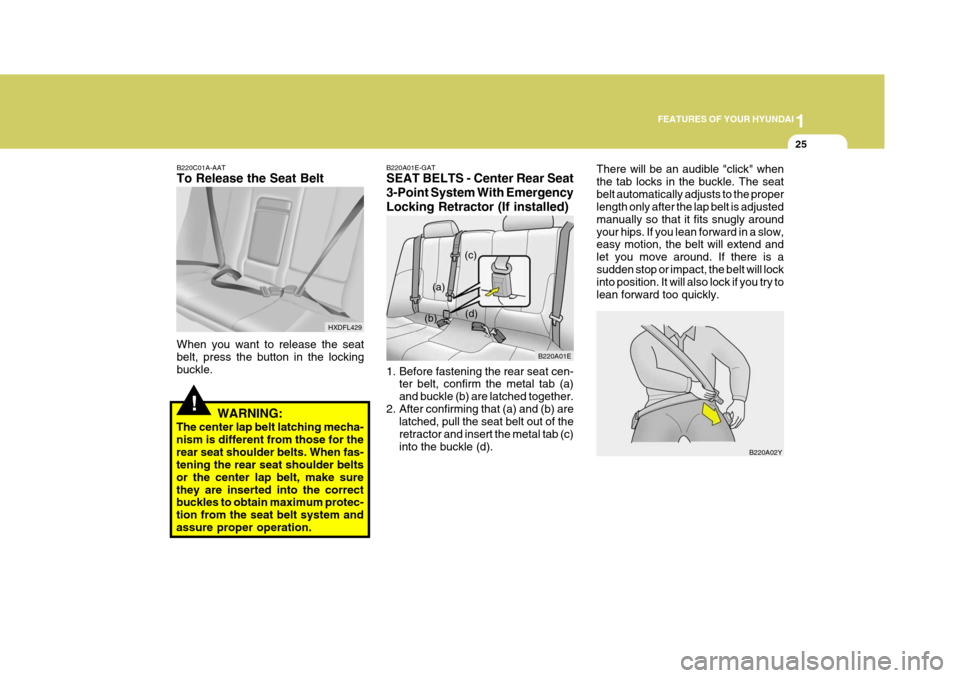
1. Before fastening the rear seat cen- ter belt, confirm the metal tab (a) and buckle (b) are latched together.
2. After confirming that (a) and (b) are latched, pull the seat belt out of theretractor and insert the metal tab (c)into the buckle (d).
B220A01E-GAT SEAT BELTS - Center Rear Seat 3-Point System With EmergencyLocking Retractor (If installed)
B220A02Y
There will be an audible "click" when the tab locks in the buckle. The seatbelt automatically adjusts to the proper length only after the lap belt is adjusted manually so that it fits snugly aroundyour hips. If you lean forward in a slow, easy motion, the belt will extend and let you move around. If there is asudden stop or impact, the belt will lock into position. It will also lock if you try to lean forward too quickly.
Page 42 of 277
1FEATURES OF YOUR HYUNDAI
28
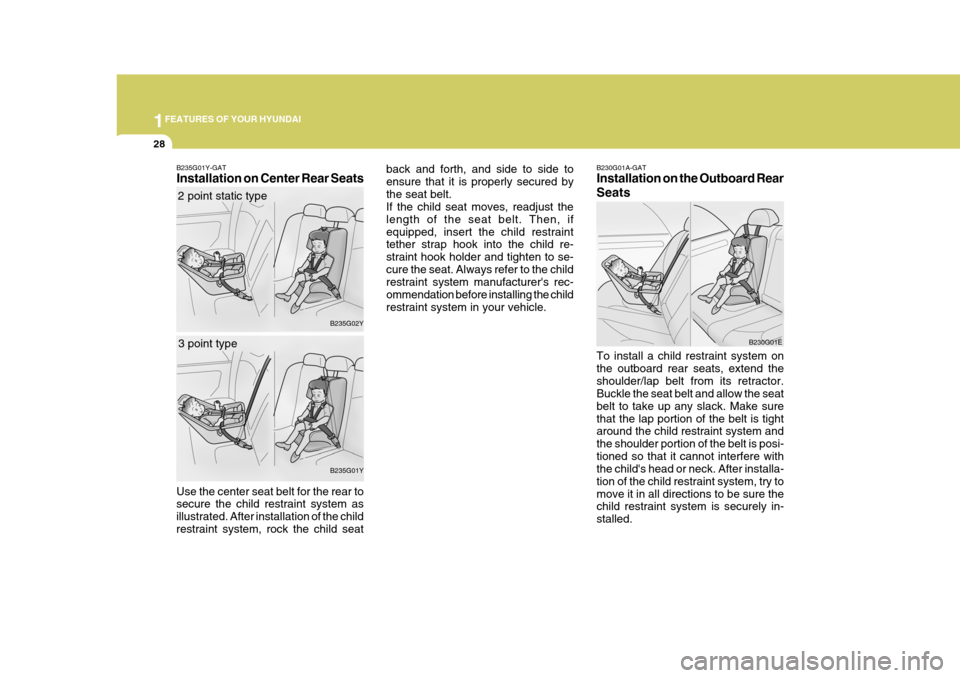
B230G01A-GAT Installation on the Outboard Rear Seats To install a child restraint system on the outboard rear seats, extend theshoulder/lap belt from its retractor. Buckle the seat belt and allow the seat belt to take up any slack. Make surethat the lap portion of the belt is tight around the child restraint system and the shoulder portion of the belt is posi-tioned so that it cannot interfere with the child's head or neck. After installa- tion of the child restraint system, try tomove it in all directions to be sure the child restraint system is securely in- stalled. B230G01Eback and forth, and side to side to ensure that it is properly secured bythe seat belt. If the child seat moves, readjust the length of the seat belt. Then, ifequipped, insert the child restraint tether strap hook into the child re- straint hook holder and tighten to se-cure the seat. Always refer to the child restraint system manufacturer's rec- ommendation before installing the childrestraint system in your vehicle.
B235G01Y-GAT Installation on Center Rear Seats
Use the center seat belt for the rear to secure the child restraint system as illustrated. After installation of the childrestraint system, rock the child seat 2 point static type
3 point type B235G02Y B235G01Y
Page 89 of 277
1
FEATURES OF YOUR HYUNDAI
75
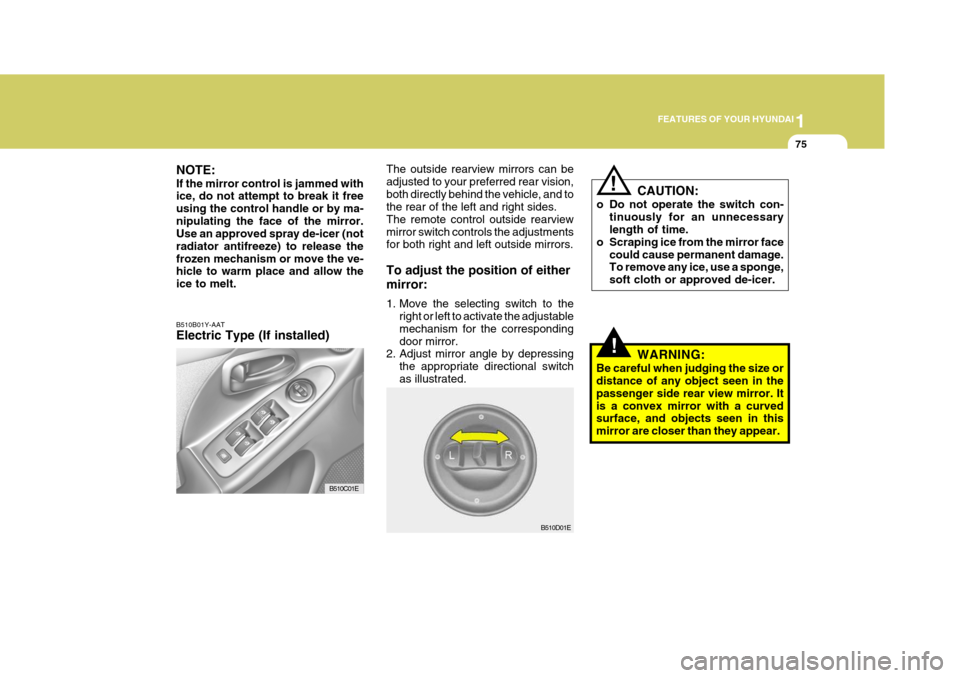
The outside rearview mirrors can be adjusted to your preferred rear vision,both directly behind the vehicle, and to the rear of the left and right sides. The remote control outside rearviewmirror switch controls the adjustments for both right and left outside mirrors. To adjust the position of either mirror:
1. Move the selecting switch to the
right or left to activate the adjustable mechanism for the correspondingdoor mirror.
2. Adjust mirror angle by depressing
the appropriate directional switchas illustrated.
NOTE: If the mirror control is jammed with ice, do not attempt to break it free using the control handle or by ma-nipulating the face of the mirror. Use an approved spray de-icer (not radiator antifreeze) to release thefrozen mechanism or move the ve- hicle to warm place and allow the ice to melt. B510B01Y-AAT Electric Type (If installed)
B510C01E
CAUTION:
o Do not operate the switch con- tinuously for an unnecessary length of time.
o Scraping ice from the mirror face could cause permanent damage.To remove any ice, use a sponge, soft cloth or approved de-icer.!
B510D01E
!WARNING:
Be careful when judging the size or distance of any object seen in the passenger side rear view mirror. Itis a convex mirror with a curved surface, and objects seen in this mirror are closer than they appear.
Page 269 of 277
9 VEHICLE SPECIFICATIONS
2
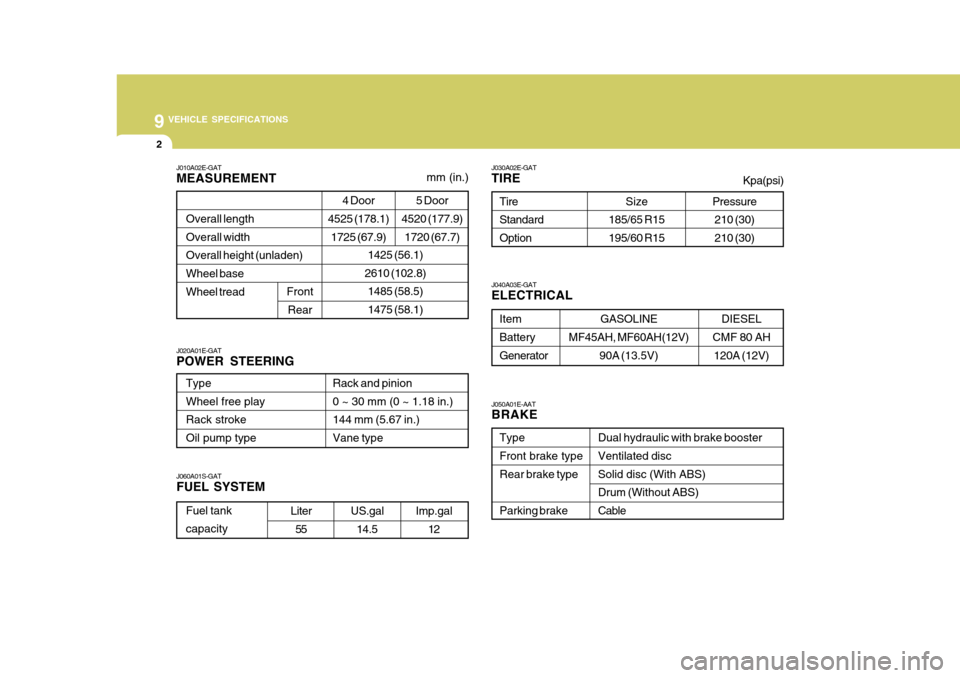
J010A02E-GAT MEASUREMENT
1425 (56.1)
2610 (102.8)
1485 (58.5) 1475 (58.1)
Overall lengthOverall width Overall height (unladen)Wheel base Wheel tread
Front
Rear
Type Wheel free playRack stroke Oil pump type Rack and pinion0 ~ 30 mm (0 ~ 1.18 in.) 144 mm (5.67 in.)Vane type
J060A01S-GAT FUEL SYSTEM
J020A01E-GATPOWER STEERING J030A02E-GATTIRE
Size
185/65 R15 195/60 R15
Tire Standard Option
J050A01E-AAT BRAKE Dual hydraulic with brake booster Ventilated disc Solid disc (With ABS) Drum (Without ABS)Cable
TypeFront brake type Rear brake type Parking brake
Item Battery Generator
J040A03E-GAT ELECTRICAL
GASOLINE
MF45AH, MF60AH(12V) 90A (13.5V)
mm (in.)
Fuel tank capacityLiter
55 US.gal
14.5 Imp.gal
12
DIESEL
CMF 80 AH 120A (12V)
4 Door
4525 (178.1)
1725 (67.9) 5 Door
4520 (177.9)
1720 (67.7)Pressure210 (30) 210 (30)
Kpa(psi)