brake light Hyundai Elantra 2012 Owner's Manual - RHD (UK. Australia)
[x] Cancel search | Manufacturer: HYUNDAI, Model Year: 2012, Model line: Elantra, Model: Hyundai Elantra 2012Pages: 384, PDF Size: 26.92 MB
Page 12 of 384
15
Introduction
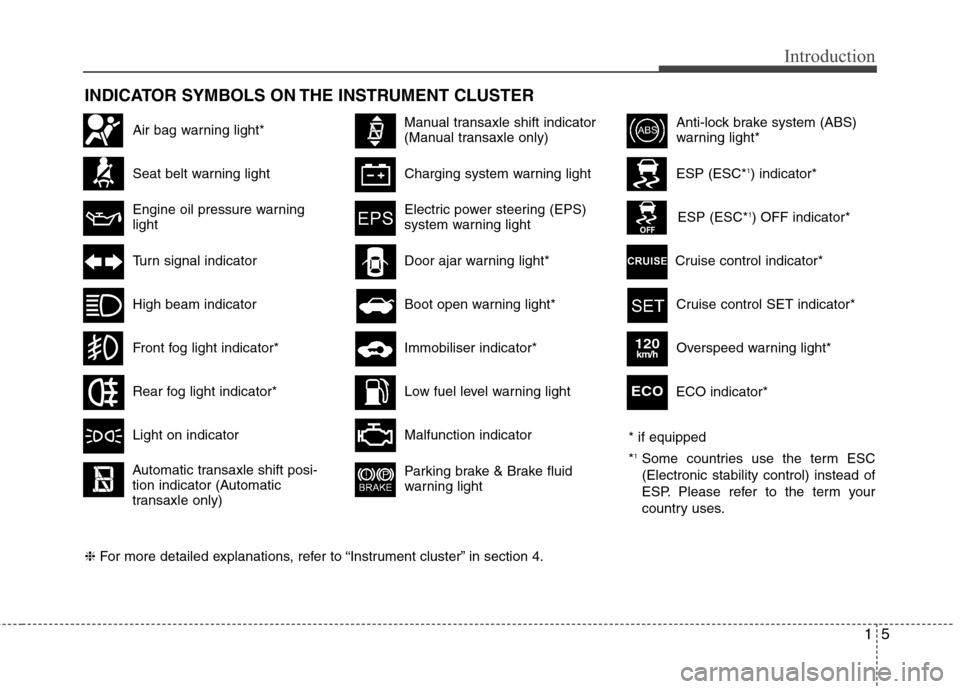
INDICATOR SYMBOLS ON THE INSTRUMENT CLUSTER
Seat belt warning light
High beam indicator
Turn signal indicator
Anti-lock brake system (ABS)
warning light*
Parking brake & Brake fluid
warning light
Malfunction indicator
Immobiliser indicator*
Boot open warning light*
Charging system warning light
Door ajar warning light*
ESP (ESC*
1
) indicator*
ESP (ESC* 1
) OFF indicator*
Front fog light indicator*
Engine oil pressure warning lightElectric power steering (EPS)
system warning light
Air bag warning light*
Rear fog light indicator*
Cruise control SET indicator*
Cruise control indicator*
Light on indicator
Automatic transaxle shift posi-
tion indicator (Automatic
transaxle only)
Manual transaxle shift indicator
(Manual transaxle only)
Low fuel level warning light
❈ For more detailed explanations, refer to “Instrument cluster” in section 4. ECO indicator*ECO
Overspeed warning light*120km/h
* if equipped *
1
Some countries use the term ESC (Electronic stability control) instead of
ESP. Please refer to the term your
country uses.
Page 15 of 384
23
Your vehicle at a glance
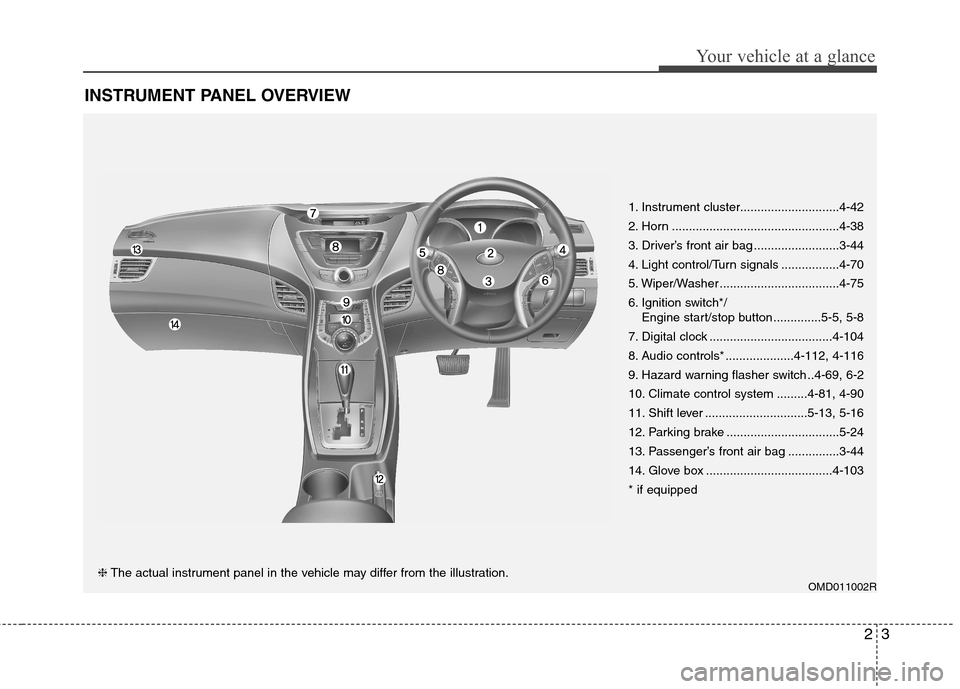
INSTRUMENT PANEL OVERVIEW
OMD011002R
1. Instrument cluster.............................4-42
2. Horn .................................................4-38
3. Driver’s front air bag .........................3-44
4. Light control/Turn signals .................4-70
5. Wiper/Washer ...................................4-75
6. Ignition switch*/
Engine start/stop button ..............5-5, 5-8
7. Digital clock ....................................4-104
8. Audio controls* ....................4-112, 4-116
9. Hazard warning flasher switch ..4-69, 6-2
10. Climate control system .........4-81, 4-90
11. Shift lever ..............................5-13, 5-16
12. Parking brake .................................5-24
13. Passenger’s front air bag ...............3-44
14. Glove box .....................................4-103* if equipped❈ The actual instrument panel in the vehicle may differ from the illustration.
Page 101 of 384
427
Features of your vehicle
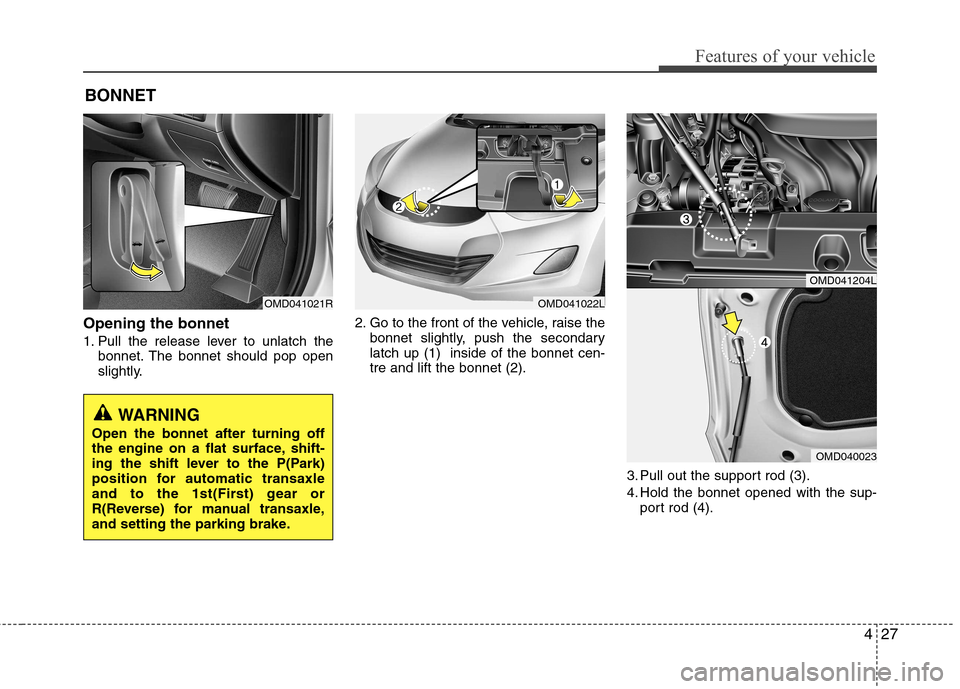
Opening the bonnet
1. Pull the release lever to unlatch thebonnet. The bonnet should pop open
slightly. 2. Go to the front of the vehicle, raise the
bonnet slightly, push the secondarylatch up (1) inside of the bonnet cen-tre and lift the bonnet (2).
3. Pull out the support rod (3).
4. Hold the bonnet opened with the sup-port rod (4).
BONNET
WARNING
Open the bonnet after turning off
the engine on a flat surface, shift-
ing the shift lever to the P(Park)
position for automatic transaxle
and to the 1st(First) gear or
R(Reverse) for manual transaxle,
and setting the parking brake.
OMD041021ROMD041022L
OMD041204L
OMD040023
Page 132 of 384
Features of your vehicle
58
4
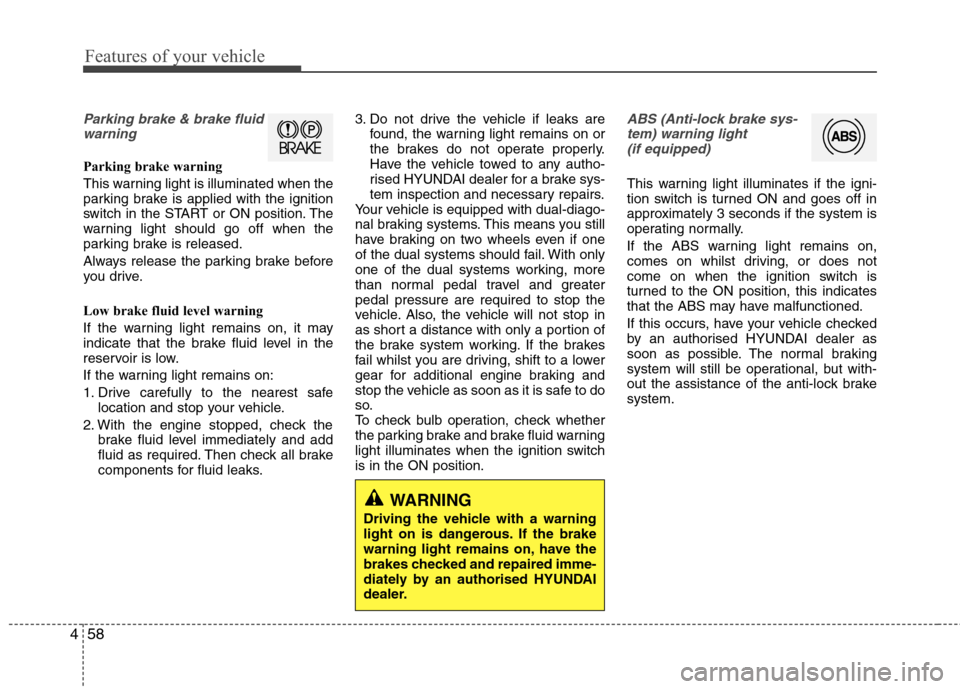
Parking brake & brake fluid
warning
Parking brake warning
This warning light is illuminated when the
parking brake is applied with the ignition
switch in the START or ON position. The
warning light should go off when the
parking brake is released.
Always release the parking brake before
you drive.
Low brake fluid level warning
If the warning light remains on, it may
indicate that the brake fluid level in the
reservoir is low.
If the warning light remains on:
1. Drive carefully to the nearest safe location and stop your vehicle.
2. With the engine stopped, check the brake fluid level immediately and add
fluid as required. Then check all brake
components for fluid leaks. 3. Do not drive the vehicle if leaks are
found, the warning light remains on or
the brakes do not operate properly.
Have the vehicle towed to any autho-
rised HYUNDAI dealer for a brake sys-
tem inspection and necessary repairs.
Your vehicle is equipped with dual-diago-
nal braking systems. This means you still
have braking on two wheels even if one
of the dual systems should fail. With only
one of the dual systems working, more
than normal pedal travel and greaterpedal pressure are required to stop the
vehicle. Also, the vehicle will not stop in
as short a distance with only a portion of
the brake system working. If the brakes
fail whilst you are driving, shift to a lower
gear for additional engine braking and
stop the vehicle as soon as it is safe to do
so.
To check bulb operation, check whether
the parking brake and brake fluid warning
light illuminates when the ignition switchis in the ON position.
ABS (Anti-lock brake sys-
tem) warning light (if equipped)
This warning light illuminates if the igni-
tion switch is turned ON and goes off in
approximately 3 seconds if the system is
operating normally.
If the ABS warning light remains on,
comes on whilst driving, or does not
come on when the ignition switch is
turned to the ON position, this indicates
that the ABS may have malfunctioned.
If this occurs, have your vehicle checked
by an authorised HYUNDAI dealer as
soon as possible. The normal braking
system will still be operational, but with-
out the assistance of the anti-lock brakesystem.
WARNING
Driving the vehicle with a warning
light on is dangerous. If the brake
warning light remains on, have the
brakes checked and repaired imme-
diately by an authorised HYUNDAI
dealer.
Page 133 of 384
459
Features of your vehicle
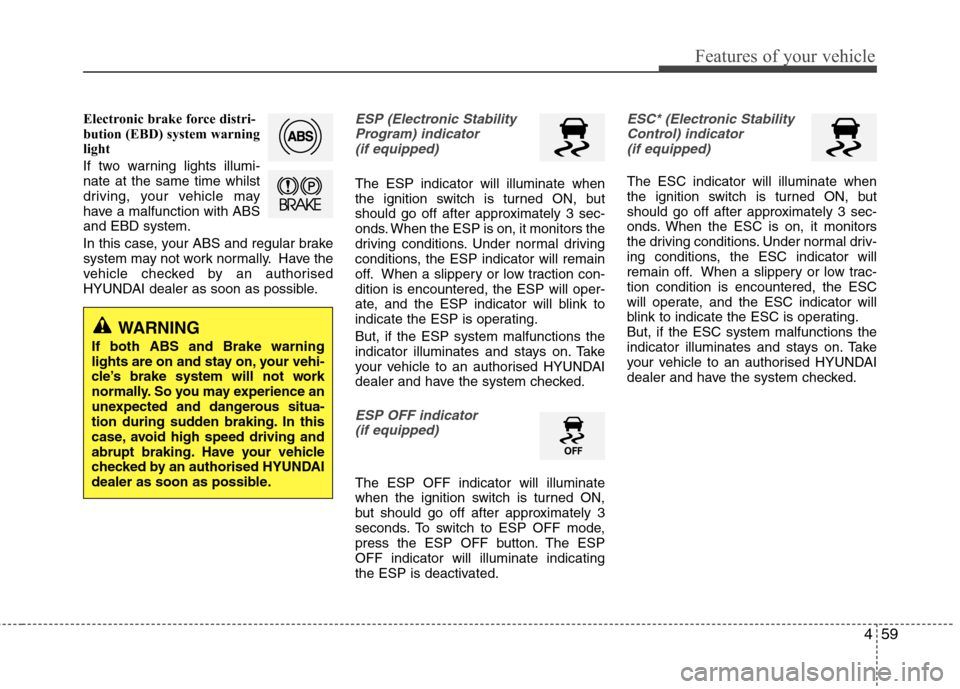
Electronic brake force distri-
bution (EBD) system warning
light
If two warning lights illumi- nate at the same time whilst
driving, your vehicle may
have a malfunction with ABSand EBD system.
In this case, your ABS and regular brake
system may not work normally. Have the
vehicle checked by an authorised
HYUNDAI dealer as soon as possible.ESP (Electronic StabilityProgram) indicator(if equipped)
The ESP indicator will illuminate when
the ignition switch is turned ON, but
should go off after approximately 3 sec-
onds. When the ESP is on, it monitors the
driving conditions. Under normal driving
conditions, the ESP indicator will remain
off. When a slippery or low traction con-dition is encountered, the ESP will oper-
ate, and the ESP indicator will blink to
indicate the ESP is operating. But, if the ESP system malfunctions the
indicator illuminates and stays on. Take
your vehicle to an authorised HYUNDAI
dealer and have the system checked.
ESP OFF indicator (if equipped)
The ESP OFF indicator will illuminate
when the ignition switch is turned ON,
but should go off after approximately 3
seconds. To switch to ESP OFF mode,
press the ESP OFF button. The ESPOFF indicator will illuminate indicating
the ESP is deactivated.
ESC* (Electronic Stability
Control) indicator (if equipped)
The ESC indicator will illuminate when
the ignition switch is turned ON, but
should go off after approximately 3 sec-
onds. When the ESC is on, it monitors
the driving conditions. Under normal driv-
ing conditions, the ESC indicator will
remain off. When a slippery or low trac-tion condition is encountered, the ESC
will operate, and the ESC indicator will
blink to indicate the ESC is operating.But, if the ESC system malfunctions the
indicator illuminates and stays on. Take
your vehicle to an authorised HYUNDAI
dealer and have the system checked.
WARNING
If both ABS and Brake warning
lights are on and stay on, your vehi-
cle’s brake system will not work
normally. So you may experience an
unexpected and dangerous situa-
tion during sudden braking. In this
case, avoid high speed driving and
abrupt braking. Have your vehicle
checked by an authorised HYUNDAI
dealer as soon as possible.
Page 212 of 384
53
Driving your vehicle
Before entering the vehicle
• Be sure that all windows, outside mir-ror(s), and outside lights are clean.
Check the condition of the tyres.
Check under the vehicle for any sign of leaks.
Be sure there are no obstacles behind you if you intend to back up. Necessary inspections
Fluid levels, such as engine oil, engine
coolant, brake fluid, and washer fluid
should be checked on a regular basis,
with the exact interval depending on the
fluid. Further details are provided in sec-
tion 7, “Maintenance”.
Before starting
Close and lock all doors.
Position the seat so that all controls are
easily reached.
Adjust the inside and outside rearview mirrors.
Be sure that all lights work.
Check all gauges.
Check the operation of warning lights when the ignition switch is turned to the ON position.
Release the parking brake and make sure the brake warning light goes out.
For safe operation, be sure you are famil-
iar with your vehicle and its equipment.
BEFORE DRIVING
WARNING
All passengers must be properly
belted whenever the vehicle is mov-
ing. Refer to “Seat belts” in section
3 for more information on their
proper use.
WARNING
Always check the surrounding
areas near your vehicle for people,
especially children, before putting a
car into D (Drive) or R (Reverse).
WARNING
Driving whilst distracted can result
in a loss of vehicle control, that
may lead to an accident, severe
personal injury, and death. The dri-
ver’s primary responsibility is in
the safe and legal operation of a
vehicle, and use of any handheld
devices, other equipment, or vehi-
cle systems which take the driver’s
eyes, attention and focus away
from the safe operation of a vehicle
or which are not permissible by law
should never be used during oper-
ation of the vehicle.
Page 218 of 384
59
Driving your vehicle
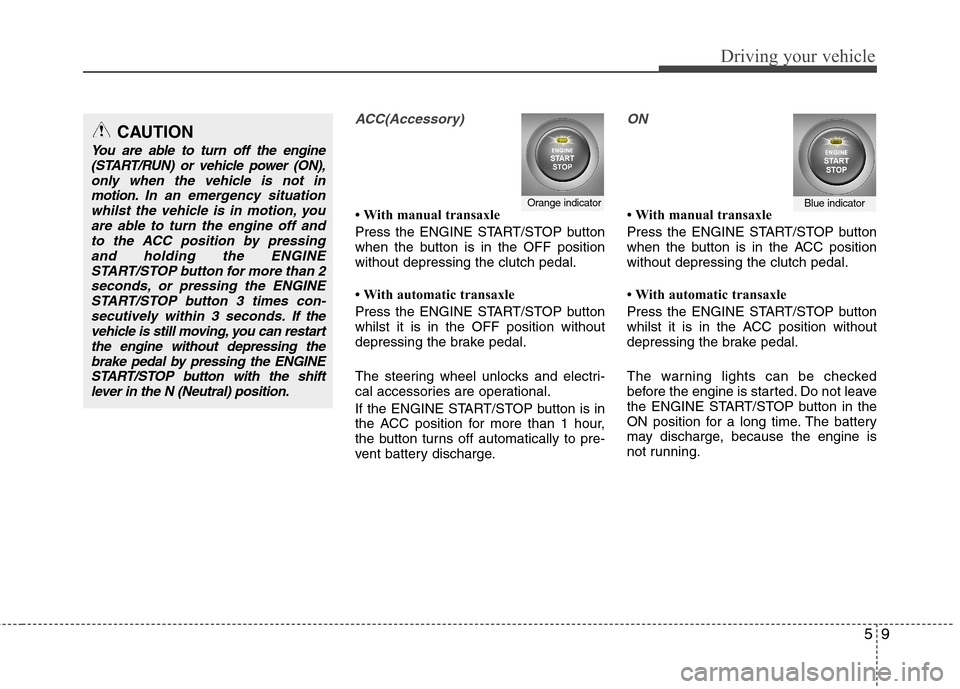
ACC(Accessory)
With manual transaxle
Press the ENGINE START/STOP button
when the button is in the OFF positionwithout depressing the clutch pedal.
With automatic transaxle
Press the ENGINE START/STOP button whilst it is in the OFF position without
depressing the brake pedal.
The steering wheel unlocks and electri-
cal accessories are operational.
If the ENGINE START/STOP button is in
the ACC position for more than 1 hour,
the button turns off automatically to pre-
vent battery discharge.
ON
With manual transaxle
Press the ENGINE START/STOP button
when the button is in the ACC positionwithout depressing the clutch pedal.
With automatic transaxle
Press the ENGINE START/STOP button
whilst it is in the ACC position without
depressing the brake pedal.
The warning lights can be checked
before the engine is started. Do not leave
the ENGINE START/STOP button in the
ON position for a long time. The battery
may discharge, because the engine is
not running.Orange indicatorBlue indicator
CAUTION
You are able to turn off the engine(START/RUN) or vehicle power (ON),
only when the vehicle is not inmotion. In an emergency situation
whilst the vehicle is in motion, you are able to turn the engine off and
to the ACC position by pressingand holding the ENGINESTART/STOP button for more than 2
seconds, or pressing the ENGINESTART/STOP button 3 times con-secutively within 3 seconds. If thevehicle is still moving, you can restart
the engine without depressing thebrake pedal by pressing the ENGINESTART/STOP button with the shiftlever in the N (Neutral) position.
Page 223 of 384
Driving your vehicle
14
5
During cold weather, shifting may be
difficult until the transaxle lubricant has
warmed up. This is normal and not
harmful to the transaxle.
If you've come to a complete stop and it's hard to shift into 1st (First) or R
(Reverse), leave the shift lever at
Neutral position and release the clutch.
Depress the clutch pedal back down,and then shift into 1st (First) or R
(Reverse) gear position.Using the clutch
The clutch should be pressed all the way
to the floor before shifting, then released
slowly. The clutch pedal should always be
fully released whilst driving. Do not rest
your foot on the clutch pedal whilst driv-
ing. This can cause unnecessary wear.
Do not partially engage the clutch to hold
the car on an incline. This causes unnec-
essary wear. Use the foot brake or park-
ing brake to hold the car on an incline. Do
not operate the clutch pedal rapidly and
repeatedly.
Downshifting
When you must slow down in heavy traf-
fic or whilst driving up steep hills, down-
shift before the engine starts to labour.
Downshifting reduces the chance of
stalling and gives better acceleration
when you need to increase your speed
again. When the vehicle is travelling
down steep hills, downshifting helps
maintain safe speed and prolongs brake
life.
CAUTION
To avoid premature clutch wear
and damage, do not drive with
your foot resting on the clutchpedal. Also, don’t use the clutchto hold the vehicle stopped on anuphill grade, whilst waiting for a
traffic light, etc.
Do not use the shift lever as a handrest during driving, as thiscan result in premature wear ofthe transaxle shift forks.
When operating the clutch pedal, press the clutch pedal down fully.
If you don't press the clutch pedalfully, the clutch may be damagedor noise may occur.
WARNING
Before leaving the driver’s seat, always set the parking brake fully
and shut the engine off. Thenmake sure the transaxle is shifted
into 1st (First) gear when the
vehicle is parked on a level or
uphill grade, and shifted into R
(Reverse) on a downhill grade.
Unexpected and sudden vehicle
movement can occur if these pre-
cautions are not followed in the
order identified.
If your vehicle has a manual transaxle not equipped with a
ignition lock switch, it may moveand cause a serious accident
when starting the engine without
depressing the clutch pedalwhilst the parking brake is
released and the shift lever not inthe Neutral position.
Page 227 of 384
Driving your vehicle
18
5
R (Reverse)
Use this position to drive the vehicle
backward.
N (Neutral)
The wheels and transaxle are not locked.
The vehicle will roll freely even on the
slightest incline unless the parking brake
or service brakes are applied. D (Drive)
This is the normal forward driving posi-
tion. The transaxle will automatically shift
through a 6-gear sequence, providing the
best fuel economy and power.
For extra power when passing another
vehicle or climbing grades, depress the
accelerator fully, at which time the
transaxle will automatically downshift to
the next lower gear.
✽✽
NOTICE
Always ensure vehicle is stationary, at a
complete stop, before selecting D
(Drive).
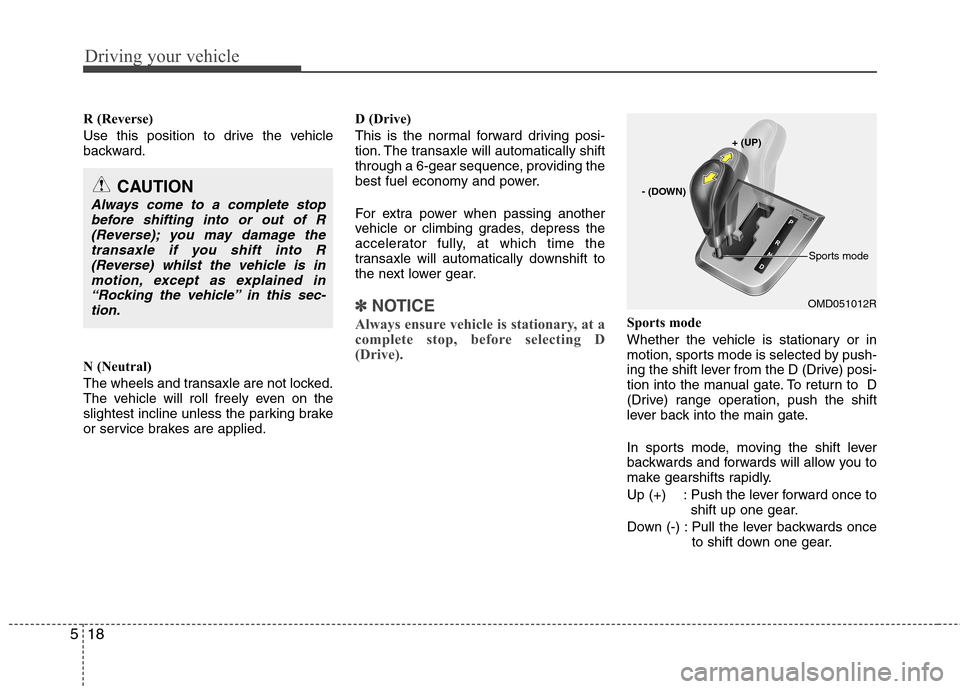
Sports mode
Whether the vehicle is stationary or in
motion, sports mode is selected by push-
ing the shift lever from the D (Drive) posi-
tion into the manual gate. To return to D
(Drive) range operation, push the shift
lever back into the main gate.
In sports mode, moving the shift lever
backwards and forwards will allow you to
make gearshifts rapidly.
Up (+) : Push the lever forward once to shift up one gear.
Down (-) : Pull the lever backwards once to shift down one gear.
CAUTION
Always come to a complete stop
before shifting into or out of R(Reverse); you may damage the
transaxle if you shift into R(Reverse) whilst the vehicle is inmotion, except as explained in “Rocking the vehicle” in this sec-
tion.
OMD051012R
+ (UP)
- (DOWN)
Sports mode
Page 231 of 384
Driving your vehicle
22
5
Power brakes
Your vehicle has power-assisted brakes
that adjust automatically through normal
usage.
In the event that the power-assisted
brakes lose power because of a stalled
engine or some other reason, you can
still stop your vehicle by applying greater
force to the brake pedal than you nor-
mally would. The stopping distance, how-
ever, will be longer.
When the engine is not running, the
reserve brake power is partially depleted
each time the brake pedal is applied. Do
not pump the brake pedal when the
power assist has been interrupted.
Pump the brake pedal only when neces-
sary to maintain steering control on slip-
pery surfaces. BRAKE SYSTEM (Continued)
Always, confirm the position of
the brake and accelerator pedal
before driving. If you don't checkthe position of the accelerator
and brake pedal before driving,
you may depress the accelerator
instead of the brake pedal. It maycause a serious accident.WARNING - Brakes
Do not drive with your foot rest- ing on the brake pedal. This will create abnormal high brake tem-
peratures, excessive brake lining
and pad wear, and increasedstopping distances.
When descending a long or steep hill, shift to a lower gear and
avoid continuous application of
the brakes. Continuous brakeapplication will cause the brakes
to overheat and could result in a
temporary loss of braking per-
formance.
Wet brakes may impair the vehi- cle’s ability to safely slow down;
the vehicle may also pull to oneside when the brakes are applied.
Applying the brakes lightly will
indicate whether they have been
affected in this way. Always test
your brakes in this fashion after
driving through deep water. To
dry the brakes, apply them lightly
whilst maintaining a safe forward
speed until brake performancereturns to normal.
(Continued)