check Hyundai Elantra 2012 Manual PDF
[x] Cancel search | Manufacturer: HYUNDAI, Model Year: 2012, Model line: Elantra, Model: Hyundai Elantra 2012Pages: 383, PDF Size: 8.94 MB
Page 280 of 383
621
What to do in an emergency
Notes on the safe use of the Tire
Mobility Kit
Park your car at the side of the
road so that you can work with the
Tire Mobility Kit away from moving
traffic. Place your warning triangle
in a prominent place to make pass-
ing vehicles aware of your location.
To be sure your vehicle will not
move, even when you're on fairly
level ground, always set your park-
ing brake.
Only use the Tire Mobility Kit for
sealing/inflation passenger car
tires. Do not use on motorcycles,
bicycles or any other type of tires.
Do not remove any foreign objects
such as nails or screws that have
penetrated the tire.
Before using the Tire Mobility Kit,
read the precautionary advice
printed on the sealant bottle! Provided the car is outdoors, leave
the engine running. Otherwise
operating the compressor may
eventually drain the car battery.
Never leave the Tire Mobility Kit
unattended while it is being used.
Do not leave the compressor run-
ning for more than 10 min. at a time
or it may overheat.
Do not use the Tire Mobility Kit if the
ambient temperature is below -22°F
(-30°C).
Do not use the sealing compound
after its expiration date which can
be found on the label of the bottle.
Keep away from children.
WARNING
Have your tire repaired as soon
as possible. The tire may loose
air pressure at any time after
inflating with the TMK.
CAUTION
The Tire Mobility Kit is a tempo-
rary fix to the tire and the tire
should be inspected by an
authorized HYUNDAI dealer as
soon as possible.
CAUTION
When using Tire Mobility Kit, the
tire sealant can damage the tire
pressure sensor. After using the
Tire Mobility Kit, have the tire
pressure sensor checked by an
authorized HYUNDAI dealer.
Page 281 of 383
What to do in an emergency
22 6
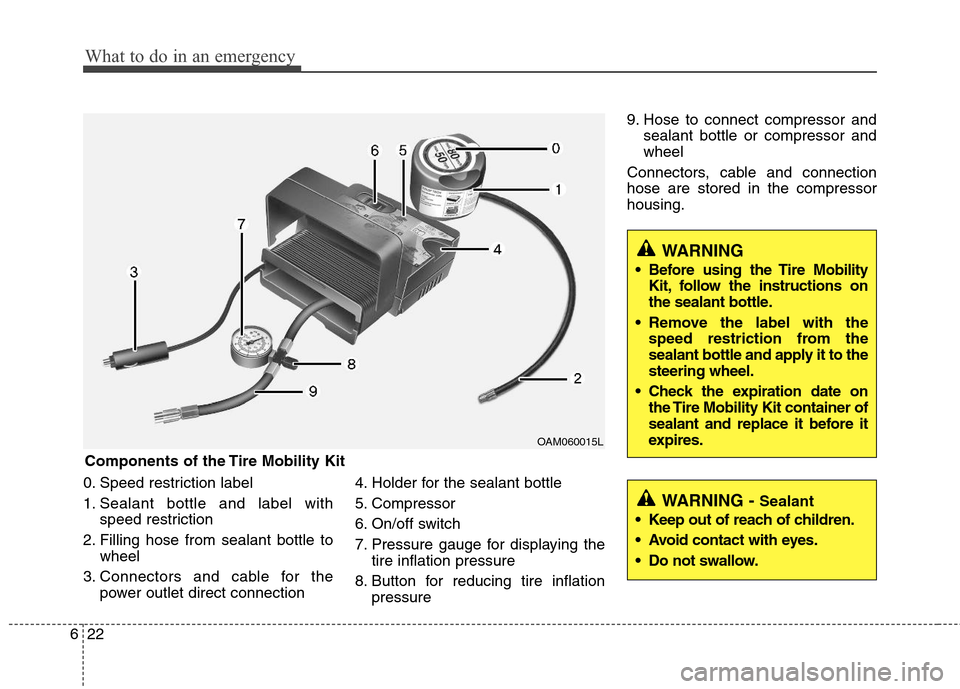
0. Speed restriction label
1. Sealant bottle and label with
speed restriction
2. Filling hose from sealant bottle to
wheel
3. Connectors and cable for the
power outlet direct connection4. Holder for the sealant bottle
5. Compressor
6. On/off switch
7. Pressure gauge for displaying the
tire inflation pressure
8. Button for reducing tire inflation
pressure9. Hose to connect compressor and
sealant bottle or compressor and
wheel
Connectors, cable and connection
hose are stored in the compressor
housing.
WARNING
Before using the Tire Mobility
Kit, follow the instructions on
the sealant bottle.
Remove the label with the
speed restriction from the
sealant bottle and apply it to the
steering wheel.
Check the expiration date on
the Tire Mobility Kit container of
sealant and replace it before it
expires.
WARNING - Sealant
Keep out of reach of children.
Avoid contact with eyes.
Do not swallow.
Components of the Tire Mobility Kit
OAM060015L
Page 283 of 383
What to do in an emergency
24 6
Distributing the sealant
11. Immediately drive approximately
2 miles (3 km) to evenly distribute
the sealant in the tire.Setting the tire inflation pressure
12. After driving approximately 2
miles (3 km), stop at a suitable
location.
13. Connect connection hose (9) of
the compressor directly to the tire
valve.
14. Connect between compressor
and the vehicle power outlet
using the cable and connectors.
15. Adjust the tire inflation pressure
to 32 psi (220 kPa). With the igni-
tion switched on, proceed as fol-
lows.
- To increase the inflation pres-
sure:Switch on the compressor,
position I. To check the current
inflation pressure setting, briefly
switch off the compressor.✽ ✽
NOTE
The pressure gauge may show high-
er than actual reading when the
compressor is running. To get an
accurate tire reading, the compres-
sor needs to be turned off.
- To reduce the inflation pres-
sure:Press the button (8) on the
compressor.
16. Remove the speed restriction
label(0) from the sealant bottle(1)
and place it in a highly visible
place in the vehicle such as on
the steering wheel to remind you
not to drive too fast.
WARNING
Do not let the compressor run for
more than 10 minutes, otherwise
the device will overheat and may
be damaged.
CAUTION
Do not exceed a speed of
50mph (80 km/h). If possible, do
not fall below a speed of 12 mph
(20 km/h).
While driving, if you experience
any unusual vibration, ride dis-
turbance or noise, reduce your
speed and drive with caution
until you can safely pull off of
the side of the road.
Call for road side service or tow-
ing.
CAUTION
Be careful not to overinflate the
tire and stay away from the tire
when filling it.
Page 287 of 383
What to do in an emergency
28 6
Use extreme caution when towing the
vehicle. A driver must be in the vehicle to
steer it and operate the brakes.
Towing in this manner may be done only
on hard-surfaced roads for a short dis-
tance and at low speeds. Also, the
wheels, axles, power train, steering and
brakes must all be in good condition.
Do not use the tow hooks to pull a vehi-
cle out of mud, sand or other condi-
tions from which the vehicle cannot be
driven out under its own power.
Avoid towing a vehicle heavier than the
vehicle doing the towing.
The drivers of both vehicles should
communicate with each other frequent-
ly. Before emergency towing, check that
the hook is not broken or damaged.
Fasten the towing cable or chain
securely to the hook.
Do not jerk the hook. Apply steady and
even force.
To avoid damaging the hook, do not
pull from the side or at a vertical angle.
Always pull straight ahead.CAUTION
Attach a towing strap to the tow
hook.
Using a portion of the vehicle
other than the tow hooks for tow-
ing may damage the body of your
vehicle.
Use only a cable or chain specifi-
cally intended for use in towing
vehicles. Securely fasten the
cable or chain to the towing hook
provided.WARNING
Use extreme caution when towing
the vehicle.
driving maneuvers which would
place excessive stress on the
emergency towing hook and tow-
ing cable or chain. The hook and
towing cable or chain may break
and cause serious injury or dam-
age.
If the disabled vehicle cannot be
moved, do not forcibly continue
the towing. Contact an authorized
Hyundai dealer or a commercial
tow truck service for assistance.
Tow the vehicle as straight ahead
as possible.
Keep away from the vehicle dur-
ing towing.
Page 288 of 383
629
What to do in an emergency
Emergency towing precautions
Turn the ignition switch to ACC so the
steering wheel isn’t locked.
Place the transaxle shift lever in N
(Neutral).
Release the parking bake.
Press the brake pedal with more force
than normal since you will have
reduced brake performance.
More steering effort will be required
because the power steering system
will be disabled.
If you are driving down a long hill, the
brakes may overheat and brake per-
formance will be reduced. Stop often
and let the brakes cool off.CAUTION - Automatic
transaxle
If the car is being towed with all
four wheels on the ground, it can
be towed only from the front. Be
sure that the transaxle is in neu-
tral. Be sure the steering is
unlocked by placing the ignition
switch in the ACC position. A
driver must be in the towed vehi-
cle to operate the steering and
brakes.
To avoid serious damage to the
automatic transaxle, limit the
vehicle speed to 10 mph (15 km/h)
and drive less than 1 mile (1.5
km) when towing.
Before towing, check the auto-
matic transaxle fluid leak under
your vehicle. If the automatic
transaxle fluid is leaking, a
flatbed equipment or towing dolly
must be used.
Page 292 of 383
Maintenance
4 7
The following lists are vehicle checks and
inspections that should be performed by
the owner or an authorized HYUNDAI
dealer at the frequencies indicated to
help ensure safe, dependable operation
of your vehicle.
Any adverse conditions should be
brought to the attention of your dealer as
soon as possible.
These Owner Maintenance Checks are
generally not covered by warranties and
you may be charged for labor, parts and
lubricants used.Owner maintenance schedule
When you stop for fuel:
Check the engine oil level.
Check coolant level in coolant reser-
voir.
Check the windshield washer fluid
level.
Look for low or under-inflated tires.
WARNING- Maintenance
work
Performing maintenance work on
a vehicle can be dangerous. You
can be seriously injured while
performing some maintenance
procedures. If you lack sufficient
knowledge and experience or the
proper tools and equipment to do
the work, have it done by an
authorized HYUNDAI dealer.
Working under the hood with the
engine running is dangerous. It
becomes even more dangerous
when you wear jewelry or loose
clothing. These can become
entangled in moving parts and
result in injury. Therefore, if you
must run the engine while work-
ing under the hood, make certain
that you remove all jewelry (espe-
cially rings, bracelets, watches,
and necklaces) and all neckties,
scarves, and similar loose cloth-
ing before getting near the
engine or cooling fans.
OWNER MAINTENANCE
WARNING
Be careful when checking your
engine coolant level when the
engine is hot. Scalding hot coolant
and steam may blow out under
pressure. This could cause burns
or other serious injury.
Page 293 of 383
75
Maintenance
While operating your vehicle:
Note any changes in the sound of the
exhaust or any smell of exhaust fumes
in the vehicle.
Check for vibrations in the steering
wheel. Notice any increased steering
effort or looseness in the steering
wheel, or change in its straight-ahead
position.
Notice if your vehicle constantly turns
slightly or “pulls” to one side when trav-
eling on smooth, level road.
When stopping, listen and check for
unusual sounds, pulling to one side,
increased brake pedal travel or “hard-
to-push” brake pedal.
If any slipping or changes in the oper-
ation of your transaxle occurs, check
the transaxle fluid level.
Check automatic transaxle P (Park)
function.
Check parking brake.
Check for fluid leaks under your vehicle
(water dripping from the air condition-
ing system during or after use is nor-
mal).
At least monthly:
Check coolant level in the engine
coolant reservoir.
Check the operation of all exterior
lights, including the stoplights, turn sig-
nals and hazard warning flashers.
Check the inflation pressures of all
tires including the spare.
At least twice a year
(i.e., every Spring and Fall):
Check radiator, heater and air condi-
tioning hoses for leaks or damage.
Check windshield washer spray and
wiper operation. Clean wiper blades
with clean cloth dampened with wash-
er fluid.
Check headlight alignment.
Check muffler, exhaust pipes, shields
and clamps.
Check the lap/shoulder belts for wear
and function.
Check for worn tires and loose wheel
lug nuts.
At least once a year:
Clean body and door drain holes.
Lubricate door hinges and checks, and
hood hinges.
Lubricate door and hood locks and
latches.
Lubricate door rubber weatherstrips.
Check the air conditioning system.
Inspect and lubricate automatic
transaxle linkage and controls.
Clean battery and terminals.
Check the brake fluid level.
Page 304 of 383
Maintenance
16 7
150,000 miles (240,000 km) or 120 months
❑Rotate tire
❑Inspect battery condition
❑Inspect vacuum hose
❑Inspect air conditioning refrigerant
❑Inspect brake hoses and lines
❑Inspect exhaust pipe and muffler
❑Inspect front brake disc/pads, calipers
❑Inspect rear brake disc/pads (if equipped)
❑Inspect rear brake drums/linings (if equipped)
❑Inspect steering gear box, linkage & boots/lower arm ball joint,
upper arm ball joint
❑Inspect suspension mounting bolts
❑Inspect brake/clutch (if equipped) fluid
❑Inspect fuel filter *1
❑Inspect fuel lines, fuel hoses and connections
❑Inspect fuel tank air filter (if equipped) *1
❑Inspect parking brake
❑Inspect vapor hose and fuel filler cap
❑Inspect manual transaxle fluid (if equipped)
❑Inspect drive belts *2
(First, 60,000 miles (96,000 km) or 72 months
after every 15,000 miles (24,000 km) or 24 months)
(Continued)
NORMAL MAINTENANCE SCHEDULE (CONT.)
No check, No service required
❑Automatic transaxle fluid (if equipped)
*1: Fuel filter & Fuel tank air filter are considered to be maintenance free but
periodic inspection is recommended for this maintenance schedule depends
on fuel quality. If there are some important safety matters like fuel flow
restriction, surging, loss of power, hard starting problem etc, replace the fuel
filter immediately regardless of maintenance schedule and consult an
authorized HYUNDAI dealer for details.
*
2: The drive belt should be replaced when cracks occur or tension is reduced
excessively.
*
3: If TOP TIER Detergent Gasoline is not available, one bottle of additive is rec-
ommended. Additives are available from your authorized HYUNDAI dealer
along with information on how to use them. Do not mix other additives.
(Continued)
❑Replace climate control air filter (for evaporator and blower unit)
❑Replace air cleaner filter
❑Replace engine oil and filter
(150,000 miles (240,000 km) or 240 months)
❑Replace coolant (First, 120,000 miles (192,000 km) or 120 months
after every 30,000 miles (48,000 km) or 24 months)
❑Add fuel additive *3 (150,000 miles (240,000 km) or 240 months)
Page 306 of 383
Maintenance
18 7
EXPLANATION OF SCHEDULED MAINTENANCE ITEMS
Engine oil and filter
The engine oil and filter should be
changed at the intervals specified in the
maintenance schedule. If the car is being
driven in severe conditions, more fre-
quent oil and filter changes are required.
Drive belts
Inspect all drive belts for evidence of
cuts, cracks, excessive wear or oil satu-
ration and replace if necessary. Drive
belts should be checked periodically for
proper tension and adjusted as neces-
sary.
Fuel filter
A clogged filter can limit the speed at
which the vehicle may be driven, damage
the emission system and cause multiple
issues such as hard starting. If an exces-
sive amount of foreign matter accumu-
lates in the fuel tank, the filter may
require replacement more frequently.
After installing a new filter, run the engine
for several minutes, and check for leaks
at the connections. Fuel filters should be
installed by an authorized HYUNDAI
dealer.
Fuel lines, fuel hoses and con-
nections
Check the fuel lines, fuel hoses and con-
nections for leakage and damage. Have
an authorized HYUNDAI dealer replace
any damaged or leaking parts immedi-
ately.
Vapor hose and fuel filler cap
The vapor hose and fuel filler cap should
be inspected at those intervals specified
in the maintenance schedule. Make sure
that a new vapor hose or fuel filler cap is
correctly replaced.
Vacuum crankcase ventilation
hoses
Inspect the surface of hoses for evidence
of heat and/or mechanical damage. Hard
and brittle rubber, cracking, tears, cuts,
abrasions, and excessive swelling indi-
cate deterioration. Particular attention
should be paid to examine those hose
surfaces nearest to high heat sources,
such as the exhaust manifold.
Inspect the hose routing to assure that
the hoses do not come in contact with
any heat source, sharp edges or moving
component which might cause heat dam-
age or mechanical wear. Inspect all hose
connections, such as clamps and cou-
plings, to make sure they are secure, and
that no leaks are present. Hoses should
be replaced immediately if there is any
evidence of deterioration or damage.
Page 307 of 383
719
Maintenance
Air cleaner filter
A Genuine HYUNDAI air cleaner filter is
recommended when the filter is
replaced.
Spark plugs
Make sure to install new spark plugs of
the correct heat range.
Cooling system
Check cooling system components, such
as radiator, coolant reservoir, hoses and
connections for leakage and damage.
Replace any damaged parts.
Coolant
The coolant should be changed at the
intervals specified in the maintenance
schedule.
Automatic transaxle fluid
(if equipped)
Automatic transaxle fluid should not be
checked under normal usage conditions.
But in severe conditions, the fluid should
be changed at an authorized HYUNDAI
dealer in accordance to the scheduled
maintenance at the beginning of this
chapter.
✽ ✽
NOTICE
Automatic transaxle fluid color is basi-
cally red.
As the vehicle is driven, the automatic
transaxle fluid will begin to look darker.
This is a normal condition and you
should not judge the need to replace the
fluid based upon the changed color.
Manual transaxle fluid
(if equipped)
Inspect the manual transaxle fluid
according to the maintenance schedule.
Brake hoses and lines
Visually check for proper installation,
chafing, cracks, deterioration and any
leakage. Replace any deteriorated or
damaged parts immediately.
Brake/clutch fluid
Check brake fluid level in the brake fluid
reservoir. The level should be between
“MIN” and “MAX” marks on the side of
the reservoir. Use only hydraulic brake
fluid conforming to DOT 3 or DOT 4
specification.
CAUTION
The use of a non-specified fluid
could result in transaxle malfunc-
tion and failure.
Use only specified automatic
transaxle fluid. (Refer to
“Recommended lubricants and
capacities” in section 8.)