brake Hyundai Elantra 2016 Owner's Manual - RHD (UK. Australia)
[x] Cancel search | Manufacturer: HYUNDAI, Model Year: 2016, Model line: Elantra, Model: Hyundai Elantra 2016Pages: 498, PDF Size: 9.45 MB
Page 12 of 498
15
Introduction
Do not use methanol
Fuels containing methanol (wood
alcohol) should not be used in your
vehicle. This type of fuel can reduce
vehicle performance and damage
components of the fuel system,
engine control system and emission
control system.
Fuel Additives
HYUNDAI recommends that you use
unleaded petrol which has an
Octane Rating of RON (Research
Octane Number) 91 / AKI (Anti-
Knock Index) 87 or higher.
For customers who do not use good
quality petrol including fuel additives
regularly, and have problems starting
or the engine does not run smoothly,
one bottle of additives added to the
fuel tank at every 15,000km.
Additives are available from your
authorised HYUNDAI dealer along
with information on how to use them.No special run-in period is needed.
By following a few simple precau-
tions for the first 1,000 km you may
add to the performance, economy
and life of your vehicle:
• Do not race the engine.
• Whilst driving, keep your engine
speed (rpm, or revolutions per
minute) between 2,000 rpm and
4,000 rpm.
• Do not maintain a single speed for
long periods of time, either fast or
slow.
Varying engine speed is needed to
properly run-in the engine.
• Avoid hard stops, except in emer-
gencies, to allow the brakes to seat
properly.
• Don't tow a trailer during the first
2,000 km of operation.
VEHICLE RUN-IN PROCESS
Page 16 of 498
Your vehicle at a glance
4 2
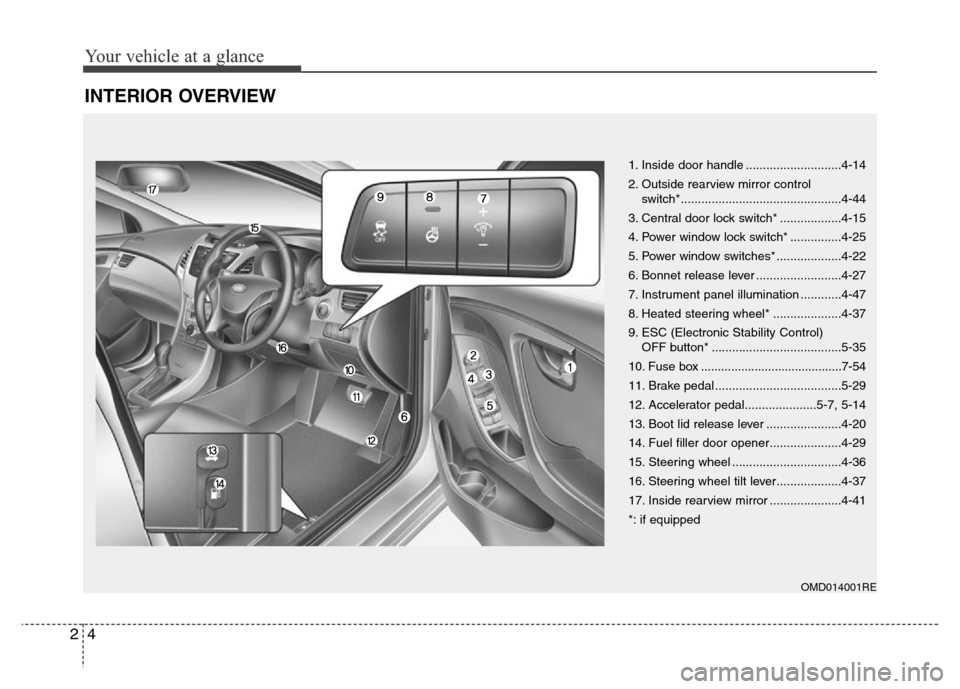
INTERIOR OVERVIEW
OMD014001RE
1. Inside door handle ............................4-14
2. Outside rearview mirror control
switch*...............................................4-44
3. Central door lock switch* ..................4-15
4. Power window lock switch* ...............4-25
5. Power window switches* ...................4-22
6. Bonnet release lever .........................4-27
7. Instrument panel illumination ............4-47
8. Heated steering wheel* ....................4-37
9. ESC (Electronic Stability Control)
OFF button* ......................................5-35
10. Fuse box ..........................................7-54
11. Brake pedal .....................................5-29
12. Accelerator pedal.....................5-7, 5-14
13. Boot lid release lever ......................4-20
14. Fuel filler door opener.....................4-29
15. Steering wheel ................................4-36
16. Steering wheel tilt lever...................4-37
17. Inside rearview mirror .....................4-41
*: if equipped
Page 17 of 498
25
Your vehicle at a glance
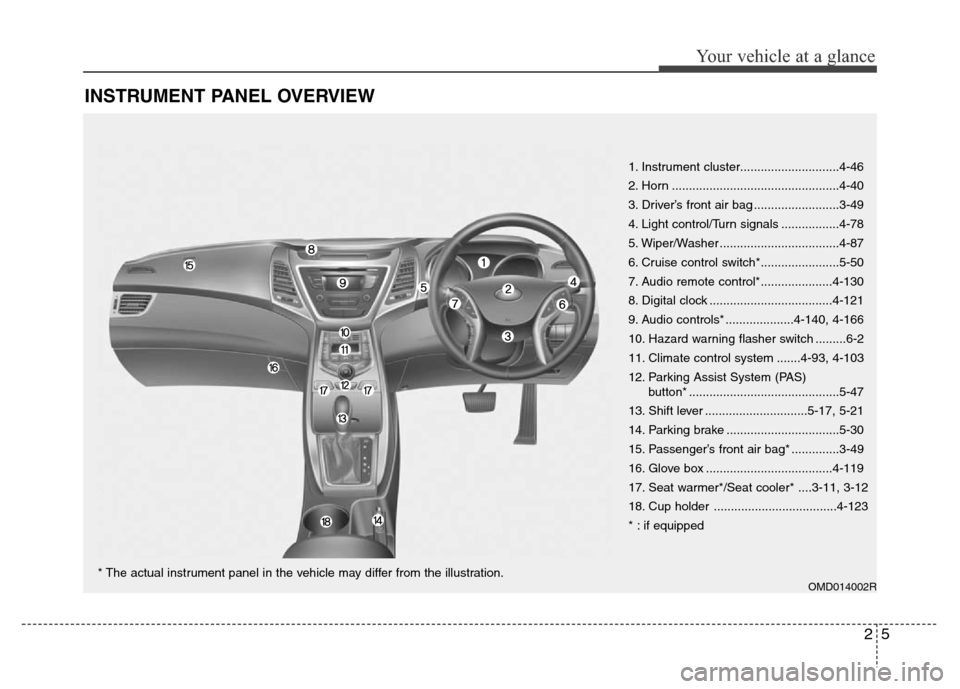
INSTRUMENT PANEL OVERVIEW
OMD014002R
1. Instrument cluster.............................4-46
2. Horn .................................................4-40
3. Driver’s front air bag .........................3-49
4. Light control/Turn signals .................4-78
5. Wiper/Washer ...................................4-87
6. Cruise control switch*.......................5-50
7. Audio remote control*.....................4-130
8. Digital clock ....................................4-121
9. Audio controls* ....................4-140, 4-166
10. Hazard warning flasher switch .........6-2
11. Climate control system .......4-93, 4-103
12. Parking Assist System (PAS)
button* ............................................5-47
13. Shift lever ..............................5-17, 5-21
14. Parking brake .................................5-30
15. Passenger’s front air bag* ..............3-49
16. Glove box .....................................4-119
17. Seat warmer*/Seat cooler* ....3-11, 3-12
18. Cup holder ....................................4-123
* : if equipped
* The actual instrument panel in the vehicle may differ from the illustration.
Page 18 of 498
Your vehicle at a glance
6 2
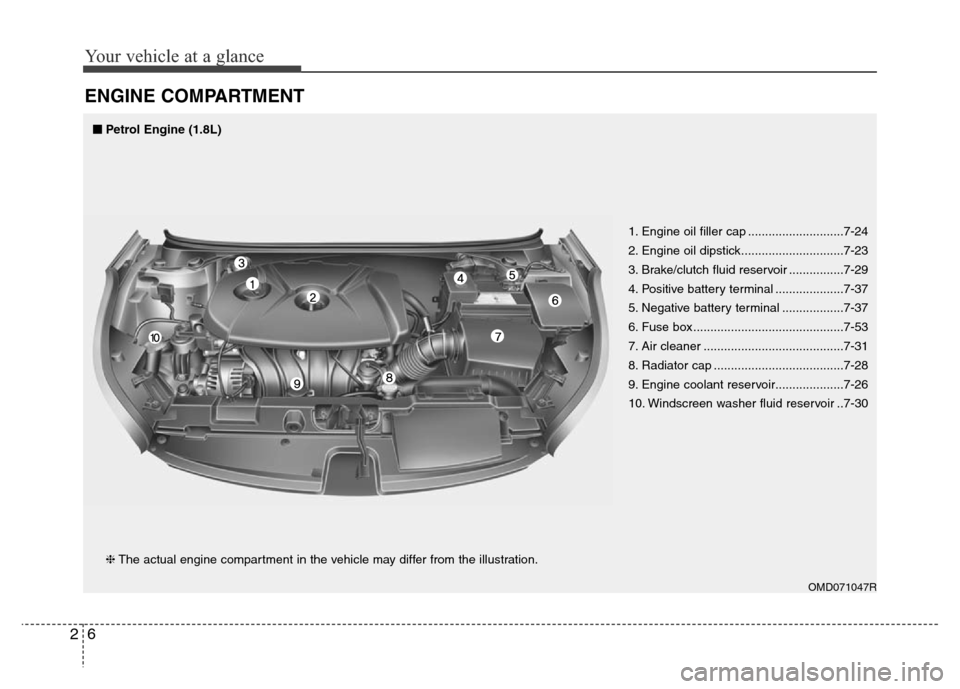
ENGINE COMPARTMENT
OMD071047R
❈The actual engine compartment in the vehicle may differ from the illustration.1. Engine oil filler cap ............................7-24
2. Engine oil dipstick..............................7-23
3. Brake/clutch fluid reservoir ................7-29
4. Positive battery terminal ....................7-37
5. Negative battery terminal ..................7-37
6. Fuse box ............................................7-53
7. Air cleaner .........................................7-31
8. Radiator cap ......................................7-28
9. Engine coolant reservoir....................7-26
10. Windscreen washer fluid reservoir ..7-30
■■Petrol Engine (1.8L)
Page 35 of 498
317
Safety features of your vehicle
Folding the rear seat
The rear seatbacks can be folded to
facilitate carrying long items or to
increase the luggage capacity of the
vehicle.To fold down the rear seatback:
1. Set the front seatback to the
upright position and if necessary,
slide the front seat forward.
2.Lower the rear headrests to the
lowest position.CAUTION
• Make sure the engine is off,
the transaxle is in P and the
parking brake is applied
whenever loading or unload-
ing cargo. Vehicle may move if
shift lever is inadvertently
moved to another position.
• Be careful when loading cargo
through the rear passenger
seats to prevent damage to
the vehicle interior.
• When cargo is loaded through
the rear passenger seats,
ensure the cargo is properly
secured to prevent it from
moving whilst driving.
Unsecured cargo in the pas-
senger compartment can
cause damage to the vehicle
or injury to it’s occupants.
WARNING
The purpose of the fold-down
rear seatbacks is to allow you to
carry longer objects that could
not be accommodated in the
luggage compartment.
Never allow passengers sit on
top of the folded down seatback
whilst the vehicle is moving.
This is not a proper seating
position and no seat belts are
available for use.
This could result in serious
injury or death in case of an
accident or sudden stop.
Objects carried on the folded
down seatback should not
extend higher than the top of
the front seatbacks. Doing this
could allow cargo to slide for-
ward and cause injury or dam-
age during sudden stops.
Page 37 of 498
319
Safety features of your vehicle
WARNING- Cargo
Cargo should always be
secured to prevent it from being
thrown about the vehicle in a
collision and causing injury to
the vehicle occupants. Do not
place objects in the rear seats,
as they cannot be properly
secured and may hit the front
seat occupants in a collision.
WARNING - Cargo loading
When loading or unloading
cargo, ensure the engine is off,
the automatic transaxle is in P
(Park) or the manual transaxle
is in R (Reverse) or 1st gear,
and the parking brake is secure-
ly applied. Failure to take these
steps may allow the vehicle to
move if the shift lever is inad-
vertently moved to another
position.WARNING
When you return the rear seat-
back to its upright position after
being folded down:
Be careful not to damage the
seat belt webbing or buckle. Do
not allow the seat belt webbing
or buckle to get caught or
pinched in the rear seat. Ensure
that the seatback is completely
locked into its upright position
by pushing on the top of the
seatback. Otherwise, in an acci-
dent or sudden stop, the seat
could fold down and allow
cargo to enter the passenger
compartment, which could
result in serious injury or death.
CAUTION- Rear seat
belts
• When returning the rear seat-
backs to the upright position,
remember to return the rear
shoulder belts to their proper
position.
• Routing the seat belt webbing
through the rear seat belt
guides will help keep the seat
belts from being trapped
behind or under the seats.
Page 77 of 498
359
Safety features of your vehicle
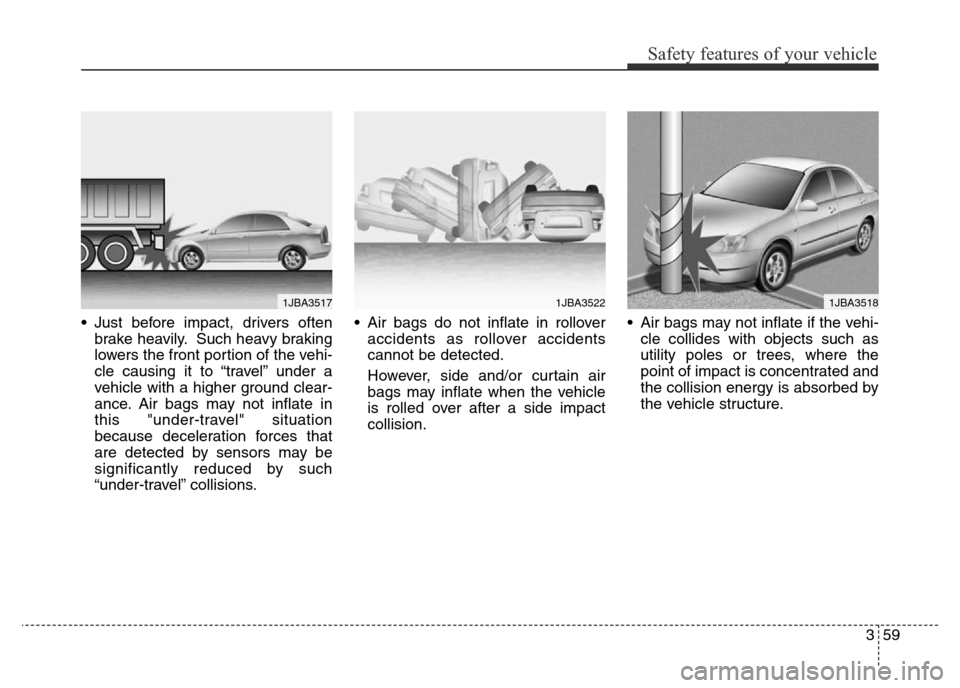
• Just before impact, drivers often
brake heavily. Such heavy braking
lowers the front portion of the vehi-
cle causing it to “travel” under a
vehicle with a higher ground clear-
ance. Air bags may not inflate in
this "under-travel" situation
because deceleration forces that
are detected by sensors may be
significantly reduced by such
“under-travel” collisions.• Air bags do not inflate in rollover
accidents as rollover accidents
cannot be detected.
However, side and/or curtain air
bags may inflate when the vehicle
is rolled over after a side impact
collision.• Air bags may not inflate if the vehi-
cle collides with objects such as
utility poles or trees, where the
point of impact is concentrated and
the collision energy is absorbed by
the vehicle structure.
1JBA35181JBA35171JBA3522
Page 96 of 498
Features of your vehicle
16 4
When pressing the ( ) portion (2) of
the switch, all vehicle doors will
unlock.
WARNING
The doors should always be
fully closed and locked whilst
the vehicle is in motion. If the
doors are unlocked, the risk of
being thrown from the vehicle in
a crash is increased.
WARNING
Do not leave children or ani-
mals unattended in your vehi-
cle. An enclosed vehicle can
become extremely hot, causing
death or serious injury to unat-
tended children or animals who
cannot escape the vehicle.
Children might operate features
of the vehicle that could injure
them, or they could encounter
other harm, possibly from
someone gaining entry to the
vehicle.
WARNING - Always
secure your vehicle
Leaving your vehicle unlocked
can invite theft or entry into the
vehicle.
To secure your vehicle, whilst
pressing the brake, move the
shift lever to the P (Park) posi-
tion (for automatic transaxle) or
first gear or R (Reverse, for
manual transaxle), engage the
parking brake, and place the
ignition switch in the LOCK/OFF
position, close all windows,
lock all doors, and always take
the key with you.
Page 100 of 498
Features of your vehicle
20 4
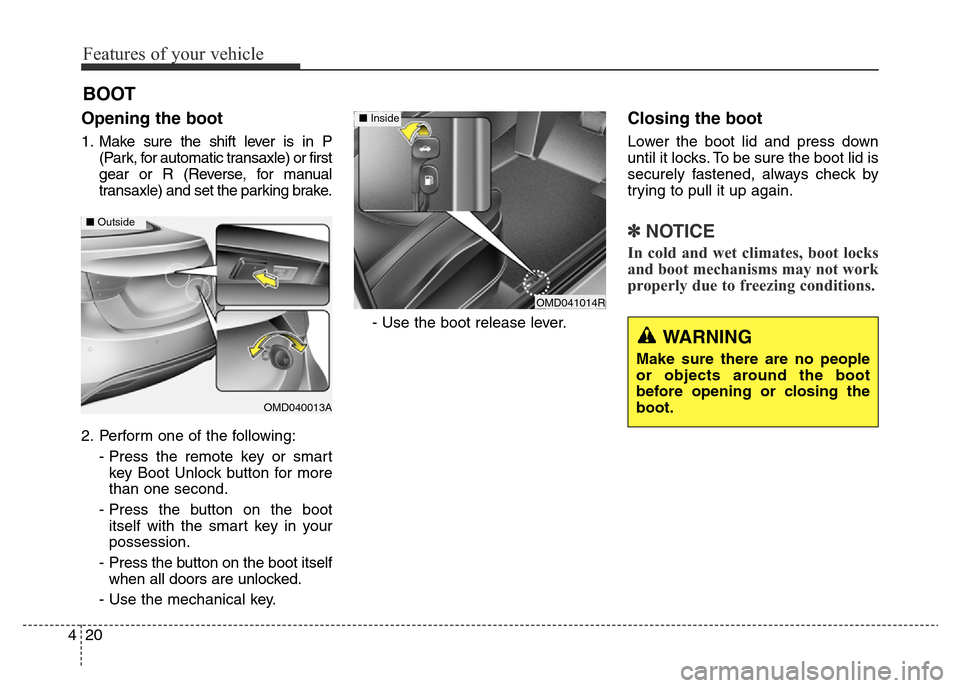
Opening the boot
1. Make sure the shift lever is in P
(Park, for automatic transaxle) or first
gear or R (Reverse, for manual
transaxle) and set the parking brake.
2. Perform one of the following:
- Press the remote key or smart
key Boot Unlock button for more
than one second.
- Press the button on the boot
itself with the smart key in your
possession.
- Press the button on the boot itself
when all doors are unlocked.
- Use the mechanical key.- Use the boot release lever.
Closing the boot
Lower the boot lid and press down
until it locks. To be sure the boot lid is
securely fastened, always check by
trying to pull it up again.
✽NOTICE
In cold and wet climates, boot locks
and boot mechanisms may not work
properly due to freezing conditions.
BOOT
OMD040013A
■Outside
WARNING
Make sure there are no people
or objects around the boot
before opening or closing the
boot.
OMD041014R
■ Inside
Page 107 of 498
427
Features of your vehicle
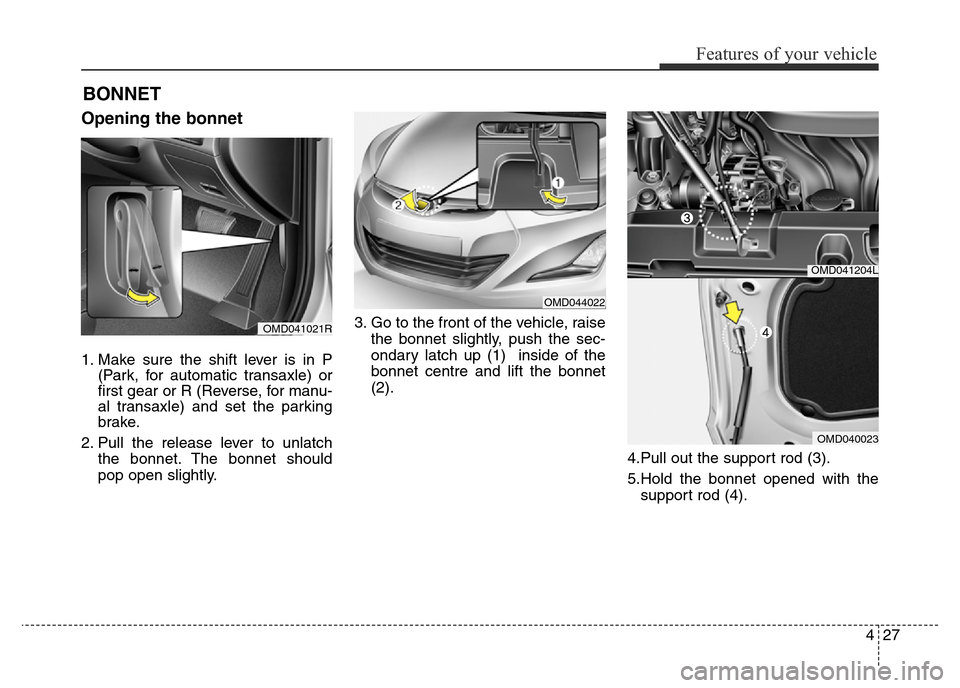
Opening the bonnet
1. Make sure the shift lever is in P
(Park, for automatic transaxle) or
first gear or R (Reverse, for manu-
al transaxle) and set the parking
brake.
2. Pull the release lever to unlatch
the bonnet. The bonnet should
pop open slightly.3. Go to the front of the vehicle, raise
the bonnet slightly, push the sec-
ondary latch up (1) inside of the
bonnet centre and lift the bonnet
(2).
4.Pull out the support rod (3).
5.Hold the bonnet opened with the
support rod (4).
BONNET
OMD041204L
OMD040023
OMD044022
OMD041021R