turn signal Hyundai Elantra 2016 Owner's Manual - RHD (UK. Australia)
[x] Cancel search | Manufacturer: HYUNDAI, Model Year: 2016, Model line: Elantra, Model: Hyundai Elantra 2016Pages: 498, PDF Size: 9.45 MB
Page 17 of 498
25
Your vehicle at a glance
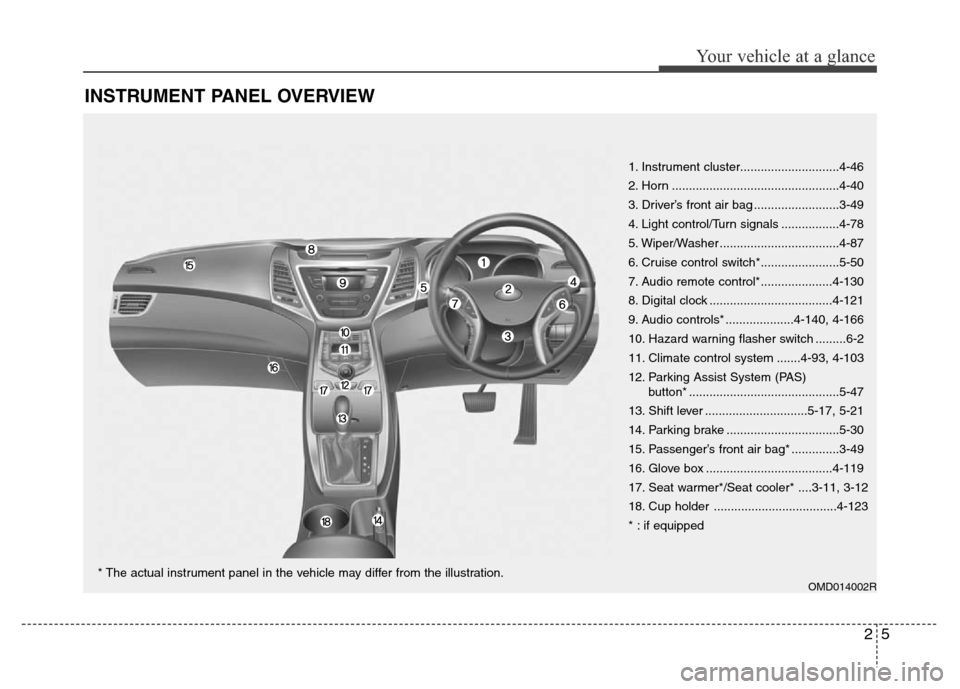
INSTRUMENT PANEL OVERVIEW
OMD014002R
1. Instrument cluster.............................4-46
2. Horn .................................................4-40
3. Driver’s front air bag .........................3-49
4. Light control/Turn signals .................4-78
5. Wiper/Washer ...................................4-87
6. Cruise control switch*.......................5-50
7. Audio remote control*.....................4-130
8. Digital clock ....................................4-121
9. Audio controls* ....................4-140, 4-166
10. Hazard warning flasher switch .........6-2
11. Climate control system .......4-93, 4-103
12. Parking Assist System (PAS)
button* ............................................5-47
13. Shift lever ..............................5-17, 5-21
14. Parking brake .................................5-30
15. Passenger’s front air bag* ..............3-49
16. Glove box .....................................4-119
17. Seat warmer*/Seat cooler* ....3-11, 3-12
18. Cup holder ....................................4-123
* : if equipped
* The actual instrument panel in the vehicle may differ from the illustration.
Page 61 of 498
343
Safety features of your vehicle
How does the air bag system
operate?
• Air bags are activated (able to
inflate if necessary) only when the
ignition switch is turned to the ON
or START position.
• Air bags inflate instantly in the
event of a serious frontal or side
collision in order to help protect the
occupants from serious physical
injury.
• There is no single speed at which
the air bags will inflate.
Generally, air bags are designed to
inflate based upon the severity of a
collision and its direction. These
two factors determine whether the
sensors produce an electronic
deployment/inflation signal.
• Air bag deployment depends on a
number of factors including vehicle
speed, angles of impact and the
density and stiffness of the vehi-
cles or objects which your vehicle
hits in the collision. The determin-
ing, factors are not limited to those
mentioned above.• The front air bags will completely
inflate and deflate in an instant.
It is virtually impossible for you to
see the air bags inflate during an
accident.
It is much more likely that you will
simply see the deflated air bags
hanging out of their storage com-
partments after the collision.
• In order to help provide protection
in a severe collision, the air bags
must inflate rapidly. The speed of
air bag inflation is a consequence
of an extremely short time in which
a collision occurs and the need to
get the air bag between the occu-
pant and the vehicle structures
before the occupant impacts those
structures. This speed of inflation
reduces the risk of serious or life-
threatening injuries in a severe col-
lision and is thus a necessary part
of air bag design.
However, air bag inflation can also
cause injuries which can include
facial abrasions, bruises and bro-
ken bones because the inflation
speed also causes the air bags to
expand with a great deal of force.• There are even circumstances
under which contact with the
steering wheel air bag can cause
fatal injuries, especially if the
occupant is positioned exces-
sively close to the steering wheel.
WARNING
• To avoid severe personal
injury or death caused by
deploying air bags in a colli-
sion, the driver should sit as
far back from the steering
wheel air bag as possible (at
least 250 mm away). The front
passenger should always
move their seat as far back as
possible and sit back in their
seat.
• Air bags inflate instantly in
the event of a collision.
Passengers may be injured by
the air bag expansion force if
they are not seated properly.
• Air bag inflation may cause
injuries including facial or
bodily abrasions, injuries
from broken glasses or burns.
Page 138 of 498
Features of your vehicle
58 4
Horn Feedback (if equipped)
If this item is checked, the horn feed-
back operation will be activated.
After locking the door by pressing the
lock button on the remote key, if you
press the lock button again within 4
seconds, the warning sound will
operate once to indicate that all
doors are locked.LAMP
Headlight delay (if equipped)
On - The Headlight delay and
Headlight Welcome function will
be activated.
Off - The Headlight delay and
Headlight Welcome function will
be inactivated.
Auto Triple Turn (One-touch turn sig-
nal)
On - The lane change signals will
blink 3 times or more when the
turn signal lever is moved
slightly.
Off - The Auto Triple Turn function
will be inactivated.
SETTINGS
AVG fuel economy
Auto Reset - The average fuel econ-
omy will reset automat-
ically when you drive
after refuelling.
Manual Reset - The average fuel
economy will not
reset automatically
when you drive after
refuelling.
ECO Driving (if equipped)
If this item is checked, the ECO
Driving function will be activated.
Page 155 of 498
475
Features of your vehicle
Immobiliser Indicator
Light (with smart key)
(if equipped)
This indicator light illuminates for up
to 30 seconds:
When the vehicle detects the smart
key in the vehicle whilst the Engine
Start/Stop button is in the ACC or ON.
- At this time, you can start the
engine.
- The indicator light goes off after
starting the engine.
This indicator light blinks for a few
seconds:
When the smart key is not in the
vehicle.
- At this time, you can not start the
engine.This indicator light illuminates for 2
seconds and goes off:
When the vehicle can not detect the
smart key which is in the vehicle
whilst the Engine Start/Stop button is
ON.
In this case, we recommend that you
have the vehicle inspected by an
authorised HYUNDAI dealer.
This indicator light blinks:
• When the battery of the smart key
is weak.
- At this time, you can not start the
engine. However, you can start
the engine if you press the Engine
Start/Stop button with the smart
key. (For more details, refer to
“Starting the Engine” in chapter
5).
• When there is a malfunction with
the immobiliser system.
In this case, we recommend that
you have the vehicle inspected by
an authorised HYUNDAI dealer.
Turn Signal Indicator
Light
This indicator light blinks:
When you turn the turn signals on.
If any of the following occurs, there
may a malfunction with the turn sig-
nal system. In this case, we recom-
mend that you have the vehicle
inspected by an authorised
HYUNDAI dealer.
- The indicator light does not blink
but illuminates.
- The indicator light blinks more
rapidly.
- The indicator light does not illumi-
nate at all.
Page 156 of 498
Features of your vehicle
76 4
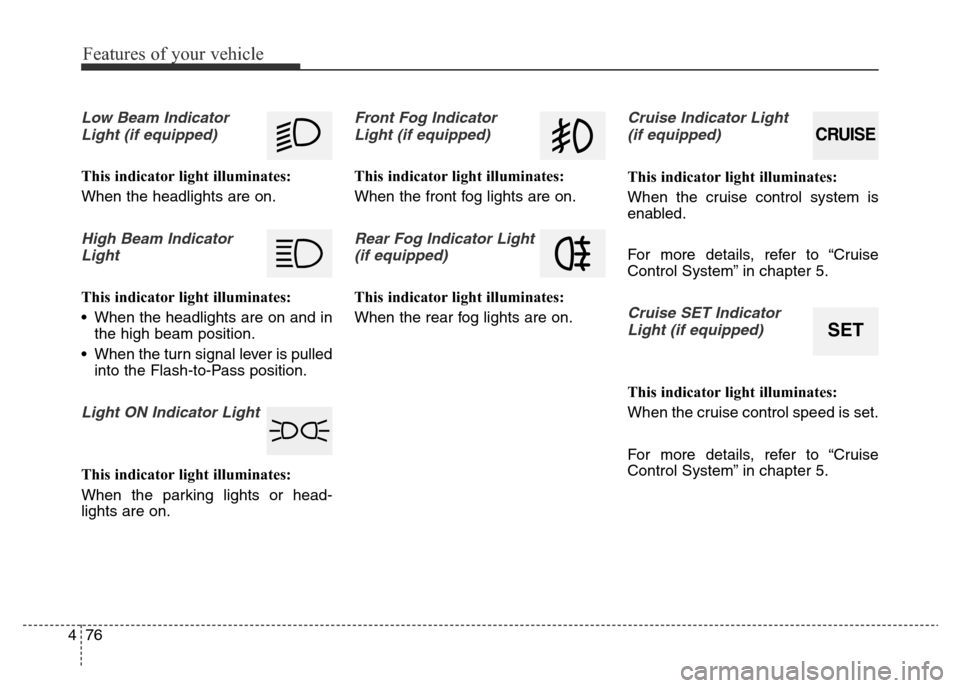
Low Beam Indicator
Light (if equipped)
This indicator light illuminates:
When the headlights are on.
High Beam Indicator
Light
This indicator light illuminates:
• When the headlights are on and in
the high beam position.
• When the turn signal lever is pulled
into the Flash-to-Pass position.
Light ON Indicator Light
This indicator light illuminates:
When the parking lights or head-
lights are on.
Front Fog Indicator
Light (if equipped)
This indicator light illuminates:
When the front fog lights are on.
Rear Fog Indicator Light
(if equipped)
This indicator light illuminates:
When the rear fog lights are on.
Cruise Indicator Light
(if equipped)
This indicator light illuminates:
When the cruise control system is
enabled.
For more details, refer to “Cruise
Control System” in chapter 5.
Cruise SET Indicator
Light (if equipped)
This indicator light illuminates:
When the cruise control speed is set.
For more details, refer to “Cruise
Control System” in chapter 5.
CRUISE
SET
Page 160 of 498
Features of your vehicle
80 4
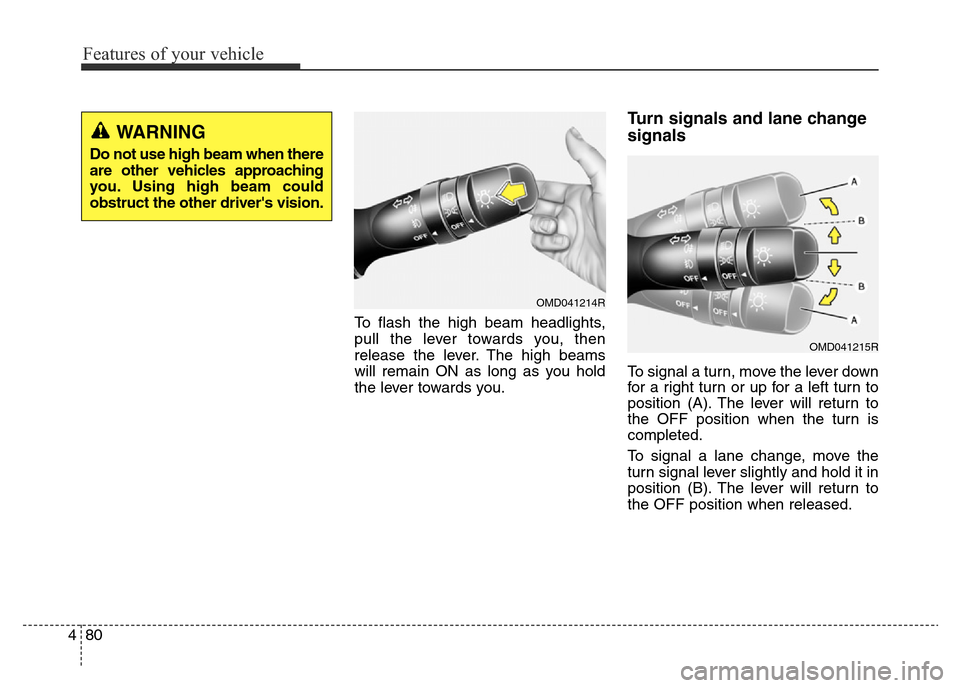
To flash the high beam headlights,
pull the lever towards you, then
release the lever. The high beams
will remain ON as long as you hold
the lever towards you.
Turn signals and lane change
signals
To signal a turn, move the lever down
for a right turn or up for a left turn to
position (A). The lever will return to
the OFF position when the turn is
completed.
To signal a lane change, move the
turn signal lever slightly and hold it in
position (B). The lever will return to
the OFF position when released.
WARNING
Do not use high beam when there
are other vehicles approaching
you. Using high beam could
obstruct the other driver's vision.
OMD041214R
OMD041215R
Page 161 of 498
481
Features of your vehicle
One-touch lane change function
(if equipped)
To activate a one-touch lane change
function, move the turn signal lever
slightly and then release it. The lane
change signals will blink 3 times.
✽NOTICE
If the turn signal indicator stays on
and does not flash, or if it flashes
abnormally, a bulb may be burned
out or have a poor electrical connec-
tion in the circuit. The bulb may
require replacement.
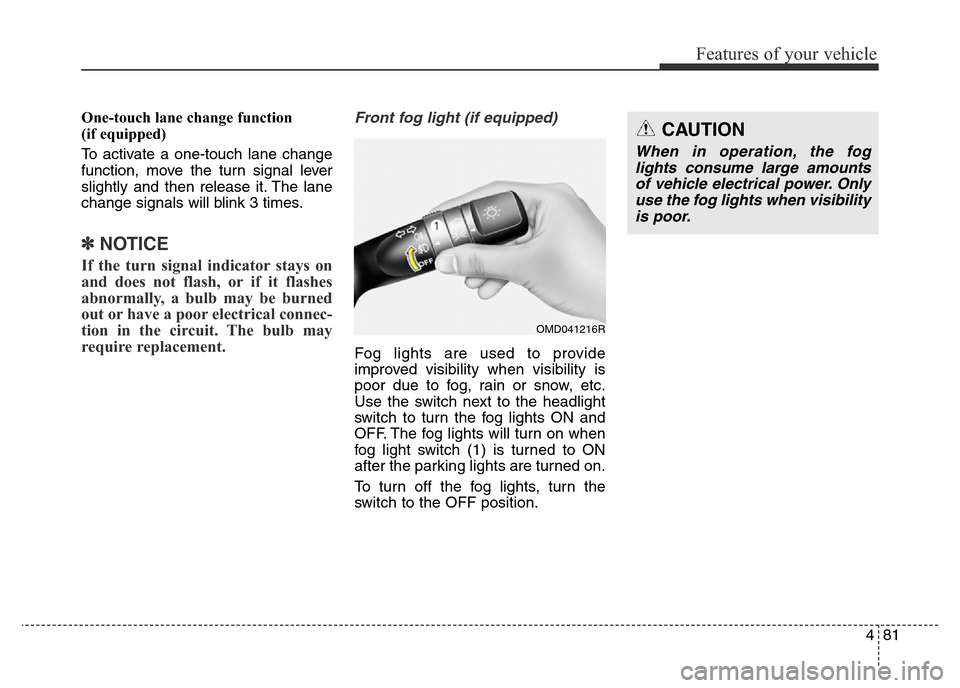
Front fog light (if equipped)
Fog lights are used to provide
improved visibility when visibility is
poor due to fog, rain or snow, etc.
Use the switch next to the headlight
switch to turn the fog lights ON and
OFF. The fog lights will turn on when
fog light switch (1) is turned to ON
after the parking lights are turned on.
To turn off the fog lights, turn the
switch to the OFF position.
CAUTION
When in operation, the fog
lights consume large amounts
of vehicle electrical power. Only
use the fog lights when visibility
is poor.
OMD041216R
Page 209 of 498
4129
Features of your vehicle
✽NOTICE
• If you install an aftermarket HID
lighting system, your vehicle’s
audio and electronic devices may
malfunction.
• Prevent chemicals such as per-
fume, cosmetic oil, sun cream,
hand cleaner, and air freshener
from contacting the interior parts
as they may cause damage or dis-
colouration.
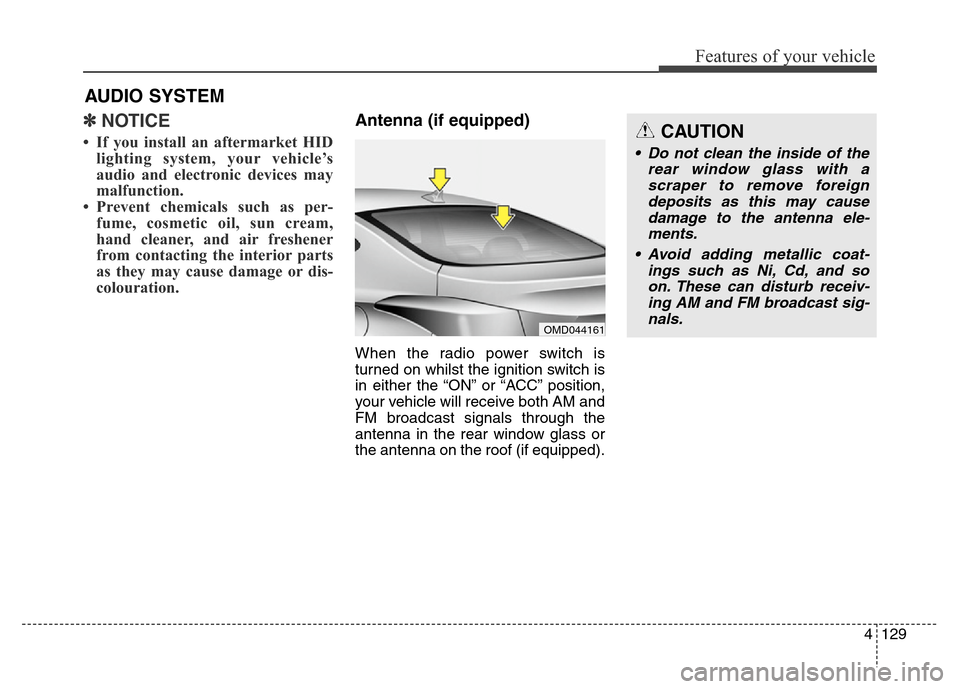
Antenna (if equipped)
When the radio power switch is
turned on whilst the ignition switch is
in either the “ON” or “ACC” position,
your vehicle will receive both AM and
FM broadcast signals through the
antenna in the rear window glass or
the antenna on the roof (if equipped).
AUDIO SYSTEM
OMD044161
CAUTION
• Do not clean the inside of the
rear window glass with a
scraper to remove foreign
deposits as this may cause
damage to the antenna ele-
ments.
• Avoid adding metallic coat-
ings such as Ni, Cd, and so
on. These can disturb receiv-
ing AM and FM broadcast sig-
nals.
Page 244 of 498
Features of your vehicle
164 4
✽NOTICE - USING THE
Bluetooth®Wireless Technology
MOBILE PHONE
• Do not use a mobile phone or per-
form Bluetooth®Wireless
Technology settings (e.g. pairing a
phone) whilst driving.
• Some Bluetooth
®Wireless
Technology -enabled phones may
not be recognised by the system or
fully compatible with the system.
• Before using Bluetooth
®Wireless
Technology related features of the
audio system, refer to your
phone’s User’s Manual for phone-
side Bluetooth
®Wireless
Technology operations.
• The phone must be paired to the
audio system to use Bluetooth
®
Wireless Technology related fea-
tures.
• You will not be able to use the
hands-free feature when your
phone (in the vehicle) is outside of
the mobile service area (e.g. in a
tunnel, underground, mountain-
ous area, etc.).
(Continued)(Continued)
• If the mobile phone signal is poor
or the vehicle's interior noise is too
loud, it may be difficult to hear the
other person’s voice during a call.
• Do not place the phone near or
inside metallic objects, otherwise
communications with Bluetooth
®
Wireless Technology system or
mobile service stations can be dis-
turbed.
• Whilst a phone is connected
through Bluetooth
®Wireless
Technology your phone may dis-
charge quicker than usual for
additional Bluetooth
®Wireless
Technology-related operations.
• Some mobile phones or other
devices may cause interference,
noise or a malfunction to the audio
system. If this occurs, store the
device in a different location. This
may resolve the problem.
• Phone contact names should be
saved in English or they may not
be displayed correctly.
(Continued)(Continued)
• If activated, upon vehicle igni-
tion(IGN/ACC ON), the
Bluetooth
®Wireless Technology
phone will be automatically con-
nected. Even if you are outside, the
Bluetooth
®Wireless Technology
phone will be automatically con-
nected once you are in the vicinity
of the vehicle.
If you do not want automatic
Bluetooth
®Wireless Technology
connection, turn the Bluetooth®
Wireless Technology feature off.
• The hands-free call volume and
quality may differ depending on
the mobile phone type.
•Bluetooth
®Wireless Technology
features can be used only when the
mobile phone has been paired and
connected with the device. For
more information on pairing and
connecting Bluetooth
®Wireless
Technology enabled mobile
phones, refer to the “Phone Setup”
section.
(Continued)
Page 372 of 498
Driving your vehicle
68 5
Reversing
Hold the bottom of the steering
wheel with one hand. Then, to move
the trailer to the left, move your hand
to the left. To move the trailer to the
right, move your hand to the right.
Always reverse slowly and, if possi-
ble, have someone guide you.
Making turns
When you’re turning with a trailer,
make wider turns than normal. Do
this so your trailer won’t strike soft
shoulders, curbs, road signs, trees,
or other objects. Avoid jerky or sud-
den manoeuvres. Signal well in
advance.
Turn signals
When you tow a trailer, your vehicle
has to have a different turn signal
flasher and extra wiring. The green
arrows on your instrument panel will
flash whenever you signal a turn or
lane change. Properly connected,
the trailer lights will also flash to alert
other drivers you’re about to turn,
change lanes, or stop.
When towing a trailer, the green
arrows on your instrument cluster will
flash for turns even if the bulbs on
the trailer are burned out. Thus, you
may think drivers behind you are
seeing your signals when, in fact,
they are not. It’s important to check
occasionally to be sure the trailer
bulbs are still working. You must also
check the lights every time you dis-
connect and then reconnect the
wires.WARNING
Do not connect a trailer lighting
system directly to your vehi-
cle’s lighting system. Use an
approved trailer wiring harness.
Failure to do so could result in
damage to the vehicle electrical
system and/or personal injury.
Consult an authorised
HYUNDAI dealer for assistance.