Hyundai Elantra 2017 Owner's Manual - RHD (UK. Australia)
Manufacturer: HYUNDAI, Model Year: 2017, Model line: Elantra, Model: Hyundai Elantra 2017Pages: 571, PDF Size: 65.66 MB
Page 531 of 571
7-61
7
Maintenance
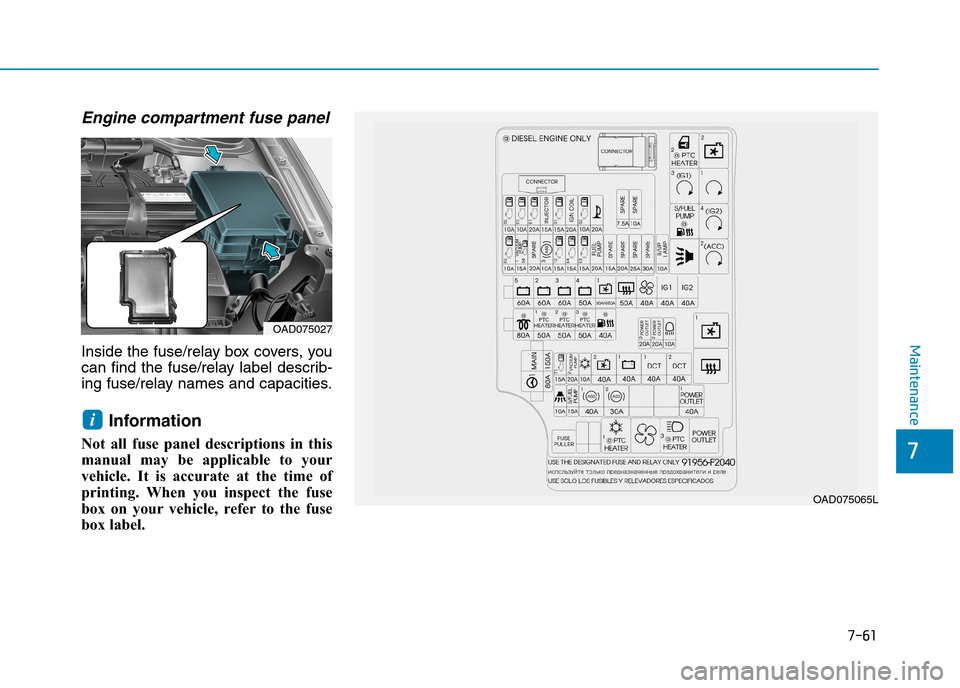
Engine compartment fuse panel
Inside the fuse/relay box covers, you
can find the fuse/relay label describ-
ing fuse/relay names and capacities.
Information
Not all fuse panel descriptions in this
manual may be applicable to your
vehicle. It is accurate at the time of
printing. When you inspect the fuse
box on your vehicle, refer to the fuse
box label.
i
OAD075065L
OAD075027
Page 532 of 571
7-62
Maintenance
SymbolRelay NO.Relay NameTy p e
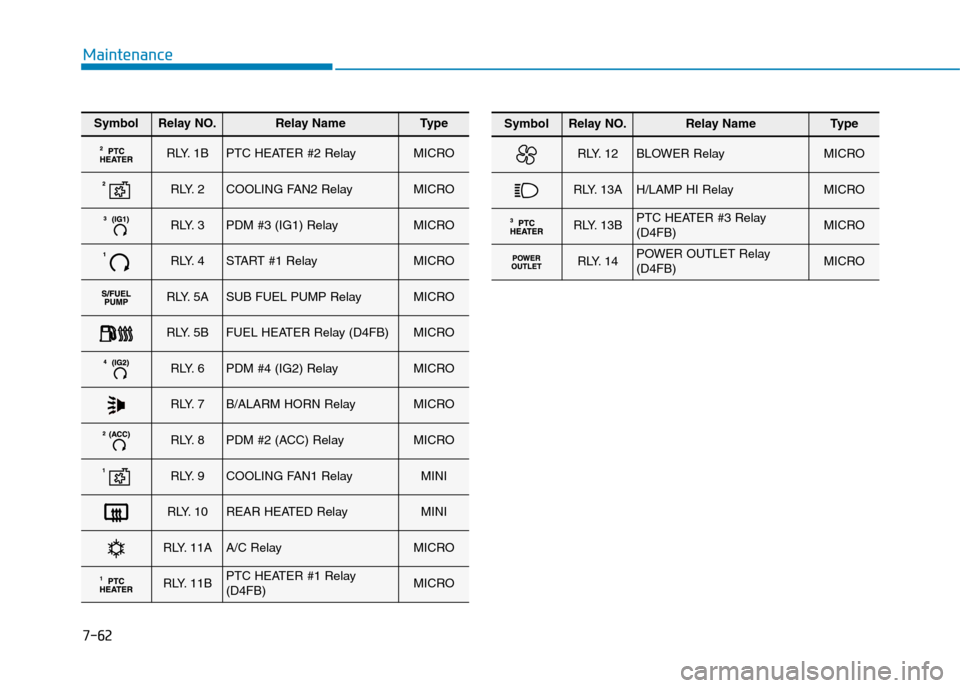
RLY. 1BPTC HEATER #2 RelayMICRO
RLY. 2COOLING FAN2 RelayMICRO
RLY. 3PDM #3 (IG1) RelayMICRO
RLY. 4START #1 RelayMICRO
RLY. 5ASUB FUEL PUMP RelayMICRO
RLY. 5BFUEL HEATER Relay (D4FB)MICRO
RLY. 6PDM #4 (IG2) RelayMICRO
RLY. 7B/ALARM HORN RelayMICRO
RLY. 8PDM #2 (ACC) RelayMICRO
RLY. 9COOLING FAN1 RelayMINI
RLY. 10REAR HEATED RelayMINI
RLY. 11AA/C RelayMICRO
RLY. 11BPTC HEATER #1 Relay(D4FB)MICRO
SymbolRelay NO.Relay NameTy p e
RLY. 12BLOWER RelayMICRO
RLY. 13AH/LAMP HI RelayMICRO
RLY. 13BPTC HEATER #3 Relay(D4FB)MICRO
RLY. 14POWER OUTLET Relay(D4FB)MICRO
Page 533 of 571
7-63
7
Maintenance
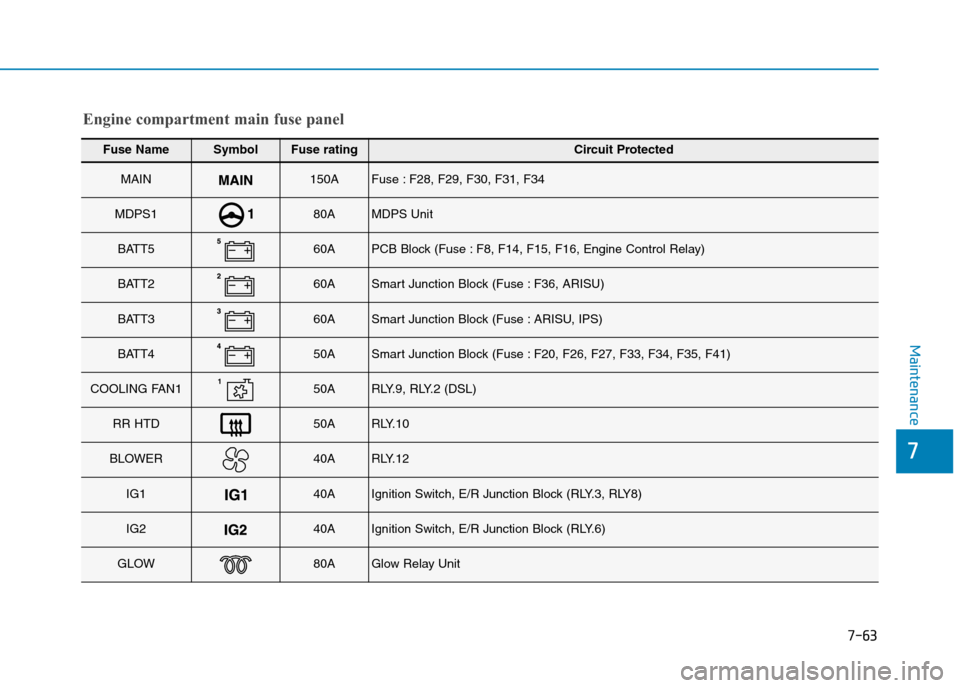
Fuse NameSymbolFuse ratingCircuit Protected
MAIN150AFuse : F28, F29, F30, F31, F34
MDPS180AMDPS Unit
BATT560APCB Block (Fuse : F8, F14, F15, F16, Engine Control Relay)
BATT260ASmart Junction Block (Fuse : F36, ARISU)
BATT360ASmart Junction Block (Fuse : ARISU, IPS)
BATT450ASmart Junction Block (Fuse : F20, F26, F27, F33, F34, F35, F41)
COOLING FAN150ARLY.9, RLY.2 (DSL)
RR HTD50ARLY.10
BLOWER40ARLY.12
IG140AIgnition Switch, E/R Junction Block (RLY.3, RLY8)
IG240AIgnition Switch, E/R Junction Block (RLY.6)
GLOW80AGlow Relay Unit
Engine compartment main fuse panel
Page 534 of 571
7-64
Maintenance
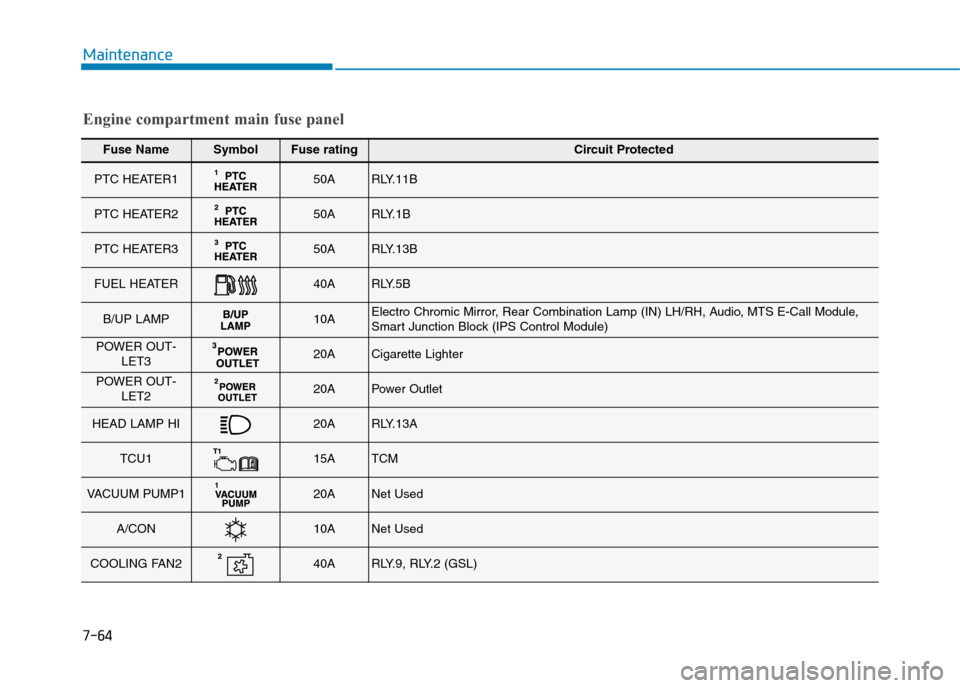
Fuse NameSymbolFuse ratingCircuit Protected
PTC HEATER150ARLY.11B
PTC HEATER250ARLY.1B
PTC HEATER350ARLY.13B
FUEL HEATER40ARLY.5B
B/UP LAMP10AElectro Chromic Mirror, Rear Combination Lamp (IN) LH/RH, Audio, MTS E-Call Module,Smart Junction Block (IPS Control Module)
POWER OUT-LET320ACigarette Lighter
POWER OUT-LET220APower Outlet
HEAD LAMP HI20ARLY.13A
TCU115ATCM
VAC U U M P U M P 120ANet Used
A/CON10ANet Used
COOLING FAN240ARLY.9, RLY.2 (GSL)
Engine compartment main fuse panel
Page 535 of 571
7-65
7
Maintenance
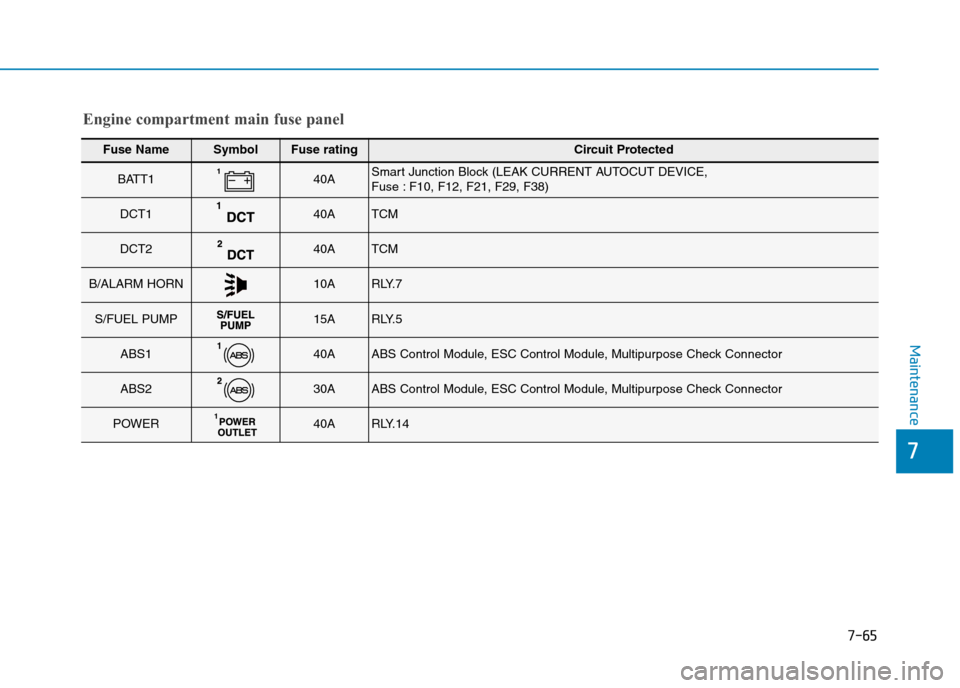
Fuse NameSymbolFuse ratingCircuit Protected
BATT140ASmart Junction Block (LEAK CURRENT AUTOCUT DEVICE, Fuse : F10, F12, F21, F29, F38)
DCT140ATCM
DCT240ATCM
B/ALARM HORN10ARLY.7
S/FUEL PUMP15ARLY.5
ABS140AABS Control Module, ESC Control Module, Multipurpose Check Connector
ABS230AABS Control Module, ESC Control Module, Multipurpose Check Connector
POWER40ARLY.14
Engine compartment main fuse panel
Page 536 of 571
7-66
Maintenance
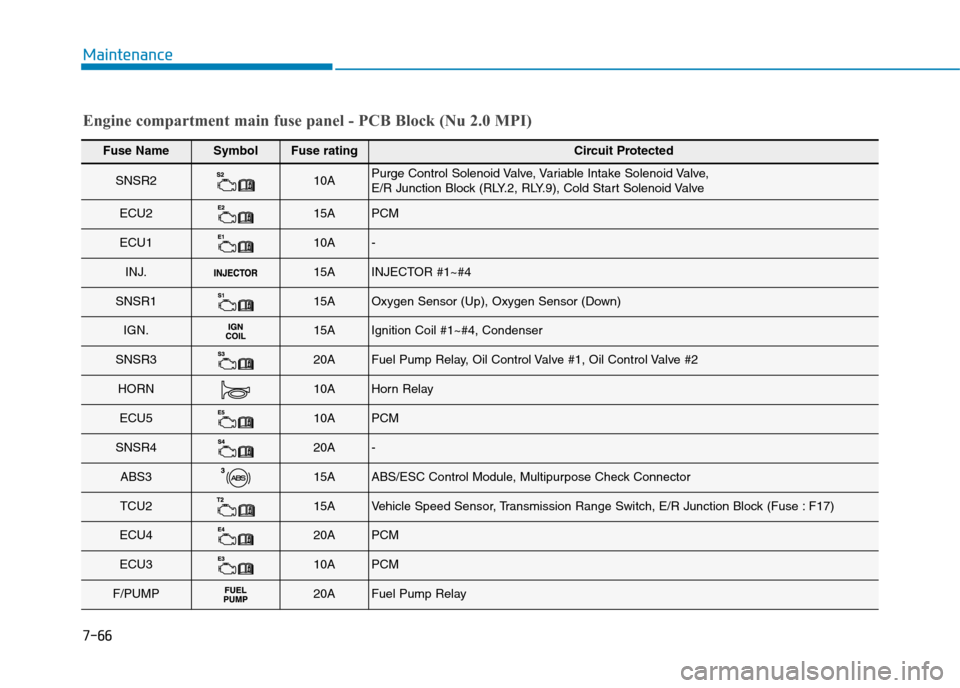
Engine compartment main fuse panel - PCB Block (Nu 2.0 MPI)
Fuse NameSymbolFuse ratingCircuit Protected
SNSR210APurge Control Solenoid Valve, Variable Intake Solenoid Valve, E/R Junction Block (RLY.2, RLY.9), Cold Start Solenoid Valve
ECU215APCM
ECU110A-
INJ.15AINJECTOR #1~#4
SNSR115AOxygen Sensor (Up), Oxygen Sensor (Down)
IGN.15AIgnition Coil #1~#4, Condenser
SNSR320AFuel Pump Relay, Oil Control Valve #1, Oil Control Valve #2
HORN10AHorn Relay
ECU510APCM
SNSR420A-
ABS315AABS/ESC Control Module, Multipurpose Check Connector
TCU215AVe h i c l e S p e e d S e n s o r, Tr a n s m i s s i o n R a n g e S w i t c h , E / R J u n c t i o n B l o c k ( F u s e : F 1 7 )
ECU420APCM
ECU310APCM
F/PUMP20AFuel Pump Relay
Page 537 of 571
7-67
7
Maintenance
LLIIGGHHTT BBUULLBBSS
Consult an authorised HYUNDAI
dealer to replace most vehicle light
bulbs. It is difficult to replace vehicle
light bulbs because other parts of the
vehicle must be removed before you
can get to the bulb. This is especially
true for removing the headlamp
assembly to get to the bulb(s).
Removing/installing the headlamp
assembly can result in damage to
the vehicle.
Be sure to replace the burned-out
bulb with one of the same wattage
rating. Otherwise, it may cause
damage to the fuse or electrical
wiring system.
NOTICE
If you don’t have the necessary
tools, the correct bulbs and the
expertise, consult an autho-
rised HYUNDAI dealer. In many
cases, it is difficult to replace
vehicle light bulbs because
other parts of the vehicle must
be removed before you can get
to the bulb. This is especially
true if you have to remove the
headlamp assembly to get to
the bulb(s).
Removing/installing the head-
lamp assembly can result in
damage to the vehicle.
CAUTION
Prior to working on a light, firm-
ly apply the parking brake,
ensure that the ignition switch
is in the LOCK/OFF position
and turn off the lights to avoid
sudden movement of the vehi-
cle and burning your fingers or
receiving an electric shock.
WA R N I N G
Page 538 of 571
7-68
Maintenance
Information
After heavy rain, or washing, head-
lamp and tail lamp lenses could
appear frosty. This condition is caused
by the temperature difference between
the lamp inside and outside.
This is similar to the condensation on
your windows inside your vehicle
when raining and doesn’t indicate a
problem with your vehicle. If the
water leaks into the lamp bulb circuit-
ry, we recommend that the system be
checked by an authorised HYUNDAI
dealer.
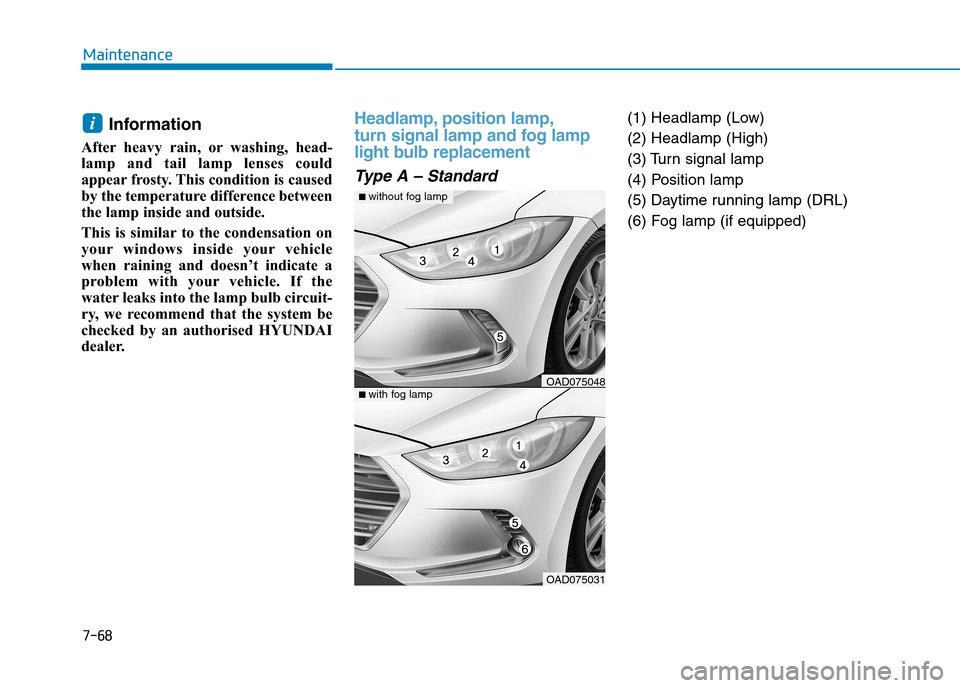
Headlamp, position lamp,
turn signal lamp and fog lamp
light bulb replacement
Ty p e A – S t a n d a rd
(1) Headlamp (Low)
(2) Headlamp (High)
(3) Turn signal lamp
(4) Position lamp
(5) Daytime running lamp (DRL)
(6) Fog lamp (if equipped)
i
OAD075031
OAD075048
■ without fog lamp
■ with fog lamp
Page 539 of 571
7-69
7
Maintenance
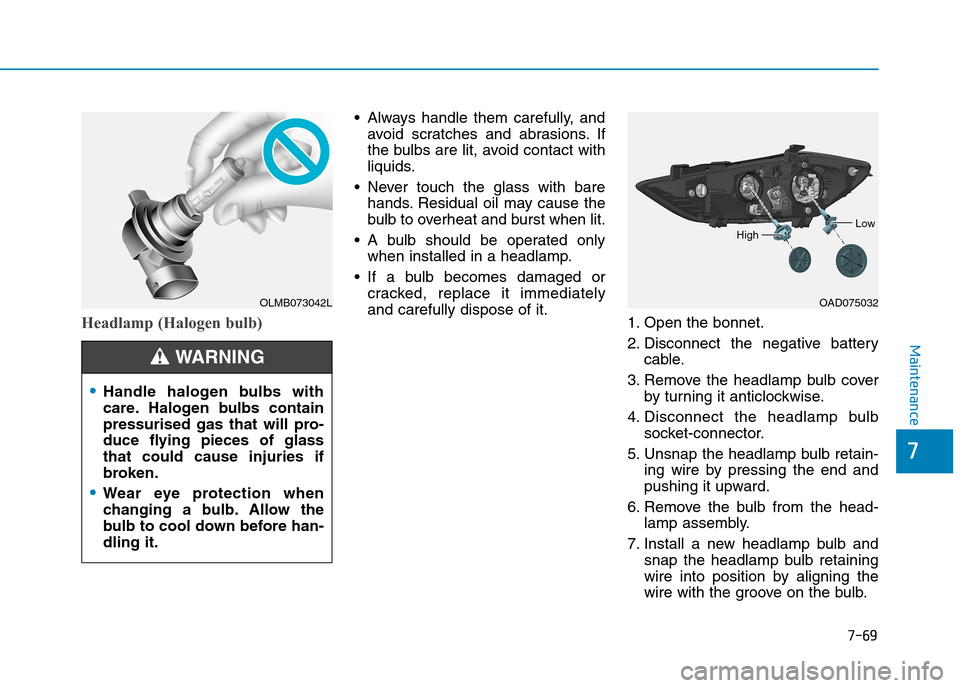
Headlamp (Halogen bulb)
•Always handle them carefully, and
avoid scratches and abrasions. If
the bulbs are lit, avoid contact with
liquids.
•Never touch the glass with bare
hands. Residual oil may cause the
bulb to overheat and burst when lit.
•A bulb should be operated only
when installed in a headlamp.
•If a bulb becomes damaged or
cracked, replace it immediately
and carefully dispose of it.1. Open the bonnet.
2. Disconnect the negative battery
cable.
3. Remove the headlamp bulb cover
by turning it anticlockwise.
4. Disconnect the headlamp bulb
socket-connector.
5. Unsnap the headlamp bulb retain-
ing wire by pressing the end and
pushing it upward.
6. Remove the bulb from the head-
lamp assembly.
7. Install a new headlamp bulb and
snap the headlamp bulb retaining
wire into position by aligning the
wire with the groove on the bulb.
OLMB073042L
•Handle halogen bulbs with
care. Halogen bulbs contain
pressurised gas that will pro-
duce flying pieces of glass
that could cause injuries if
broken.
•Wear eye protection when
changing a bulb. Allow the
bulb to cool down before han-
dling it.
WA R N I N G
OAD075032
HighLow
Page 540 of 571
7-70
Maintenance
8. Connect the headlamp bulb sock-
et-connector.
9. Install the headlamp bulb cover by
turning it clockwise.
Information
The headlamp aiming should be
adjusted after an accident or after the
headlamp assembly is reinstalled at an
authorised HYUNDAI dealer.
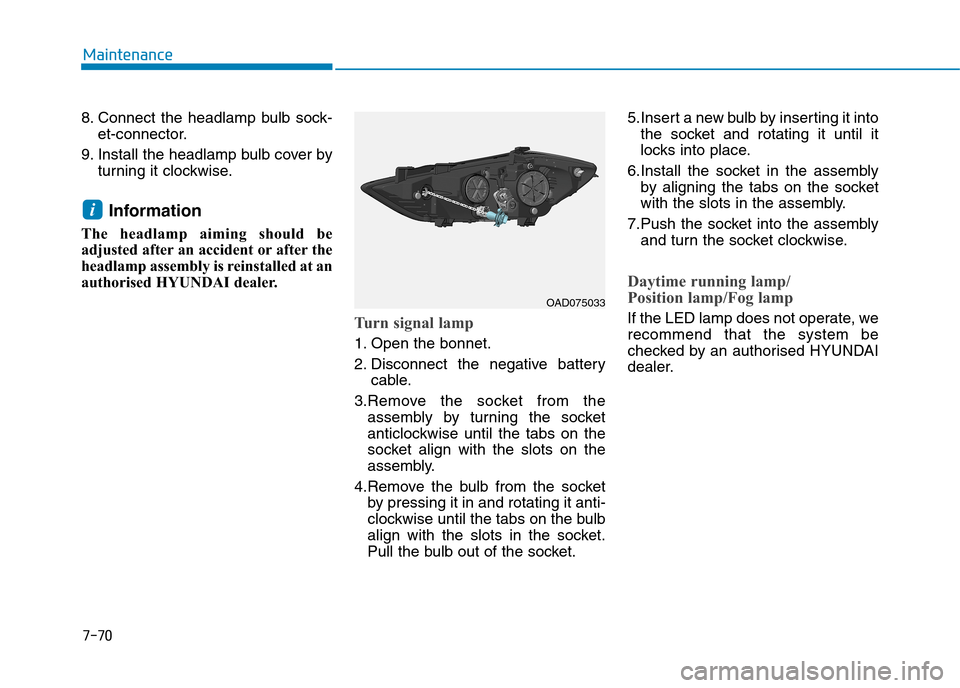
Turn signal lamp
1. Open the bonnet.
2. Disconnect the negative battery
cable.
3.Remove the socket from the
assembly by turning the socket
anticlockwise until the tabs on the
socket align with the slots on the
assembly.
4.Remove the bulb from the socket
by pressing it in and rotating it anti-
clockwise until the tabs on the bulb
align with the slots in the socket.
Pull the bulb out of the socket.
5.Insert a new bulb by inserting it into
the socket and rotating it until it
locks into place.
6.Install the socket in the assembly
by aligning the tabs on the socket
with the slots in the assembly.
7.Push the socket into the assembly
and turn the socket clockwise.
Daytime running lamp/
Position lamp/Fog lamp
If the LED lamp does not operate, we
recommend that the system be
checked by an authorised HYUNDAI
dealer.
i
OAD075033