rear seat Hyundai Elantra 2017 Owner's Guide
[x] Cancel search | Manufacturer: HYUNDAI, Model Year: 2017, Model line: Elantra, Model: Hyundai Elantra 2017Pages: 637, PDF Size: 15.02 MB
Page 72 of 637

2-42
Safety system of your vehicle
Child Seat Restraint for Vehicle ISOFIX Positions
Suitability of each seating position for ISOFIX Child Restraint Systems according to ECE regulations.
Mass Group Size Class FixtureVehicle ISOFIX Positions
Front PassengerRear Outboard
(Driver side)Rear Outboard
(Passenger side)Rear Center
CarrycotF ISO/L1 - X X -
G ISO/L2 - X X -
0 : UP to 10kg E ISO/R1 - IL IL -
0+ : UP to 13kgE ISO/R1 - IL IL -
D ISO/R2 - IL IL -
C ISO/R3 - IL IL -
I : 9 to 18kgD ISO/R2 - IL IL -
C ISO/R3 - IL IL -
B ISO/F2 - IUF, IL IUF, IL -
B1 ISO/F2X - IUF, IL IUF, IL -
A ISO/F3 - IUF, IL IUF, IL -
IUF = Suitable for ISOFIX forward child restraints systems of universal category approved for use in the mass group.
IL = Suitable for particular ISOFIX child restraints systems (CRS) given in the attached list. These ISOFIX CRS are those of the
"specific vehicle", "restricted" or "semi-universal" categories.
X = ISOFIX position not suitable for ISOFIX child restraint system in this mass group and/or this size class.
Page 73 of 637

2-43
Safety system of your vehicle
2
Securing a Child Restraint
System with a lap/shoulder belt
When not using the ISOFIX system,
all Child Restraint Systems must be
secured to a rear seat with the lap
part of a lap/shoulder belt.
Installing a Child Restraint System
with a lap/shoulder belt
To install a Child Restraint System
on the rear seats, do the following:
1. Place the Child Restraint System
on a rear seat and route the lap/
shoulder belt around or through
the restraint, following the restraint
manufacturer’s instructions.
Make sure the seat belt webbing is
not twisted.
Information
When using the rear center seat belt,
you should also refer to the “3-point
Rear Center Seat Belt” in this chapter.
i
OLMB033044
Page 75 of 637

2-45
Safety system of your vehicle
2
Child Seat Restraint Suitability for Seat Position using the Seat Belt
Suitability of each seating position for "universal" category belted Child Restraint Systems according to ECE regulations
Use Child Restraint Systems that have been officially approved and are appropriate for your children.
When using the Child Restraint Systems, refer to the following table.
U : Suitable for "universal" category restraints approved for use in this mass group
UF : Suitable for forward-facing "universal" category restraints approved for use in this mass group
X : Seat position not suitable for children in this mass group
Mass Group
Seating Position
FRONT
PassengerREAR
OutboardREAR
Center
0 : Up to 10 kg
(0 - 9 months)XUU
0+ : Up to 13 kg
(0 - 2 years)XUU
I : 9 kg to 18 kg
(9 months - 4 years)XUU
II & III : 15 kg to 36 kg
(4 - 12 years)XUU
Page 81 of 637
2-51
Safety system of your vehicle
2
Curtain air bags (if equipped)
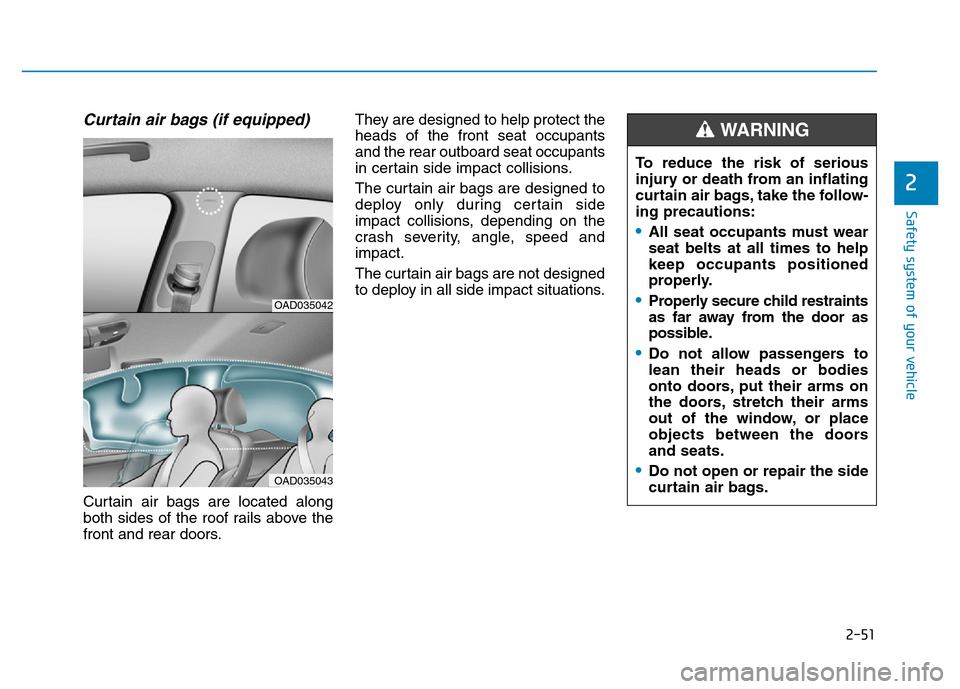
Curtain air bags are located along
both sides of the roof rails above the
front and rear doors.They are designed to help protect the
heads of the front seat occupants
and the rear outboard seat occupants
in certain side impact collisions.
The curtain air bags are designed to
deploy only during certain side
impact collisions, depending on the
crash severity, angle, speed and
impact.
The curtain air bags are not designed
to deploy in all side impact situations.
OAD035042
OAD035043
To reduce the risk of serious
injury or death from an inflating
curtain air bags, take the follow-
ing precautions:
•All seat occupants must wear
seat belts at all times to help
keep occupants positioned
properly.
•Properly secure child restraints
as far away from the door as
possible.
•Do not allow passengers to
lean their heads or bodies
onto doors, put their arms on
the doors, stretch their arms
out of the window, or place
objects between the doors
and seats.
•Do not open or repair the side
curtain air bags.
WARNING
Page 87 of 637
2-57
Safety system of your vehicle
2
Noise and smoke from inflating
air bag
When the air bags inflate, they make
a loud noise and may produce
smoke and powder in the air inside of
the vehicle. This is normal and is a
result of the ignition of the air bag
inflator. After the air bag inflates, you
may feel substantial discomfort in
breathing because of the contact of
your chest with both the seat belt and
the air bag, as well as from breathing
the smoke and powder. The powder
may aggravate asthma for some
people. If you experience breathing
problems after an air bag deploy-
ment, seek medical attention imme-
diately.
Though the smoke and powder are
nontoxic, they may cause irritation to
the skin, eyes, nose, throat, etc. If
this is the case, wash and rinse with
cold water immediately and seek
medical attention if the symptoms
persist.
Do not install a child restraint
on the front passenger seat
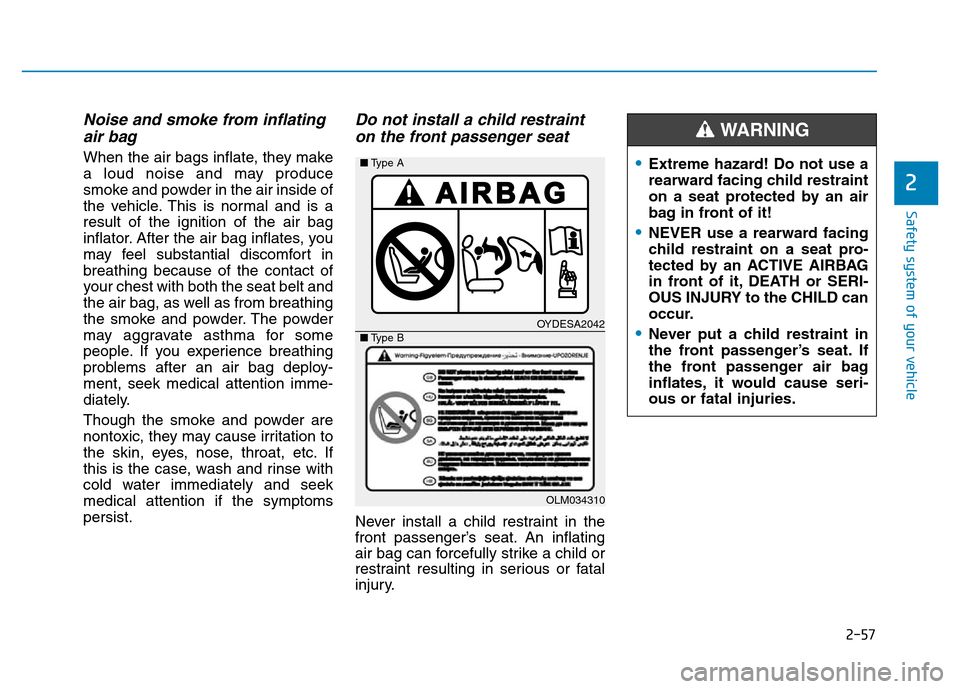
Never install a child restraint in the
front passenger’s seat. An inflating
air bag can forcefully strike a child or
restraint resulting in serious or fatal
injury.
OYDESA2042
OLM034310 ■Type A
■Type B
•Extreme hazard! Do not use a
rearward facing child restraint
on a seat protected by an air
bag in front of it!
•NEVER use a rearward facing
child restraint on a seat pro-
tected by an ACTIVE AIRBAG
in front of it, DEATH or SERI-
OUS INJURY to the CHILD can
occur.
•Never put a child restraint in
the front passenger’s seat. If
the front passenger air bag
inflates, it would cause seri-
ous or fatal injuries.
WARNING
Page 91 of 637

2-61
Safety system of your vehicle
2
Air bag non-inflation conditions
In certain low-speed collisions the air
bags may not deploy. The air bags
are designed not to deploy in such
cases because they may not provide
benefits beyond the protection of the
seat belts.Front air bags are not designed to
inflate in rear collisions, because
occupants are moved backward by
the force of the impact. In this case,
inflated air bags would not provide
any additional benefit.Front air bags may not inflate in side
impact collisions, because occupants
move in the direction of the collision,
and thus in side impacts, front air bag
deployment would not provide addi-
tional occupant protection.
However, side and curtain air bags
may inflate depending on the severity
of impact.
OAD035049OAD035048
OAD035047
Page 114 of 637
3-19
Convenient features of your vehicle
3
Child-protector rear door locks
The child safety lock is provided to
help prevent children seated in the
rear from accidentally opening the
rear doors. The rear door safety locks
should be used whenever children
are in the vehicle.
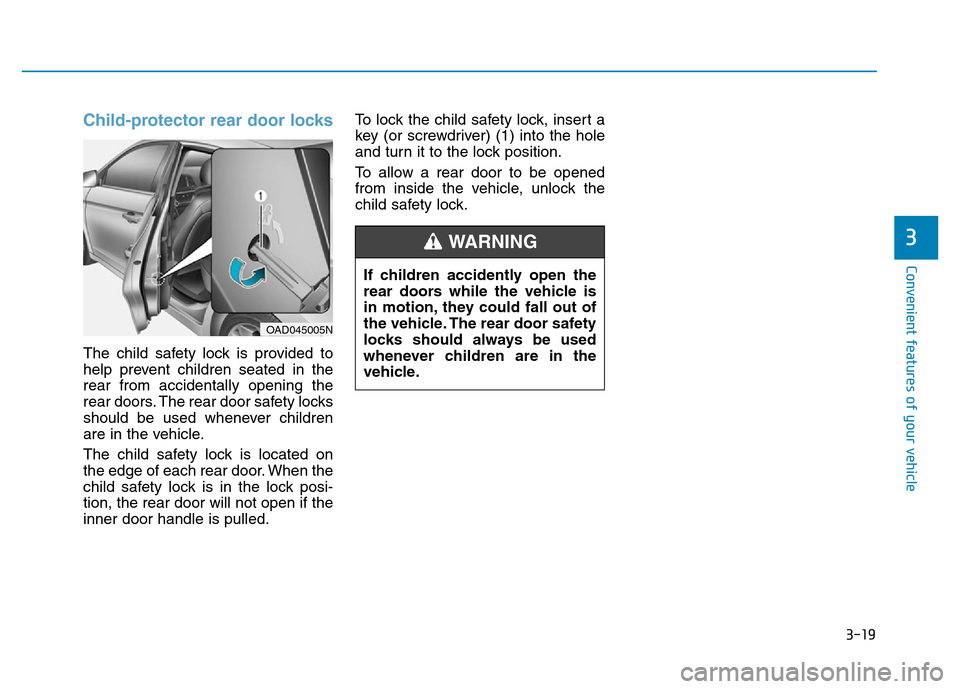
The child safety lock is located on
the edge of each rear door. When the
child safety lock is in the lock posi-
tion, the rear door will not open if the
inner door handle is pulled.To lock the child safety lock, insert a
key (or screwdriver) (1) into the hole
and turn it to the lock position.
To allow a rear door to be opened
from inside the vehicle, unlock the
child safety lock.
OAD045005N
If children accidently open the
rear doors while the vehicle is
in motion, they could fall out of
the vehicle. The rear door safety
locks should always be used
whenever children are in the
vehicle.
WARNING
Page 116 of 637
3-21
Convenient features of your vehicle
3
The Driver Position Memory System
is provided to store and recall the fol-
lowing memory settings with a sim-
ple button operation.
- Driver's seat position
- Outside rearview mirror position
- Instrument panel illumination intensityInformation
• If the battery is disconnected, the
memory settings will be erased.
• If the Driver Position Memory
System does not operate normally,
we recommend that you have the
system checked by an authorized
HYUNDAI dealer.
Storing memory positions
1. Move the shift lever into P (for
automatic transmission/dual clutch
transmission) or Neutral (for manu-
al transmission) while the ignition
switch or the Engine Start/Stop
button is in the ON position.
2. Adjust the driver's seat position,
outside rearview mirror position
and instrument panel illumination
intensity to the desired position.
3. Press the SET button. The system
will beep once and notify you
"Press button to save settings"on
the LCD display.
4. Press one of the memory buttons
(1 or 2) within 5 seconds. The sys-
tem will beep twice when the mem-
ory has been successfully stored.
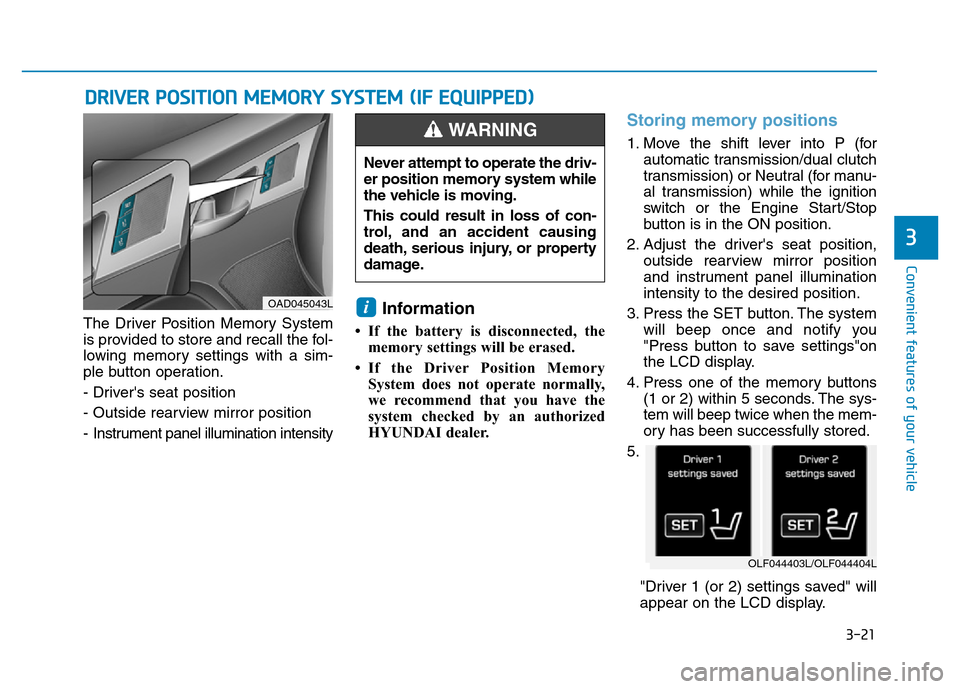
5.
"Driver 1 (or 2) settings saved" will
appear on the LCD display.
i
DRIVER POSITION MEMORY SYSTEM (IF EQUIPPED)
OAD045043L
Never attempt to operate the driv-
er position memory system while
the vehicle is moving.
This could result in loss of con-
trol, and an accident causing
death, serious injury, or property
damage.
WARNING
OLF044403L/OLF044404L
Page 117 of 637
3-22
Convenient features of your vehicle
Recalling memory position
1. Move the shift lever into P (for auto-
matic transmission/dual clutch
transmission) or Neutral (for manu-
al transmission) while the ignition
switch or the Engine Start/Stop but-
ton is in the ON position.
2. Press the desired memory button
(1 or 2). The system will beep
once, then the driver’s seat posi-
tion, outside rearview mirror and
instrument panel illumination will
automatically adjust to the stored
position (if equipped).
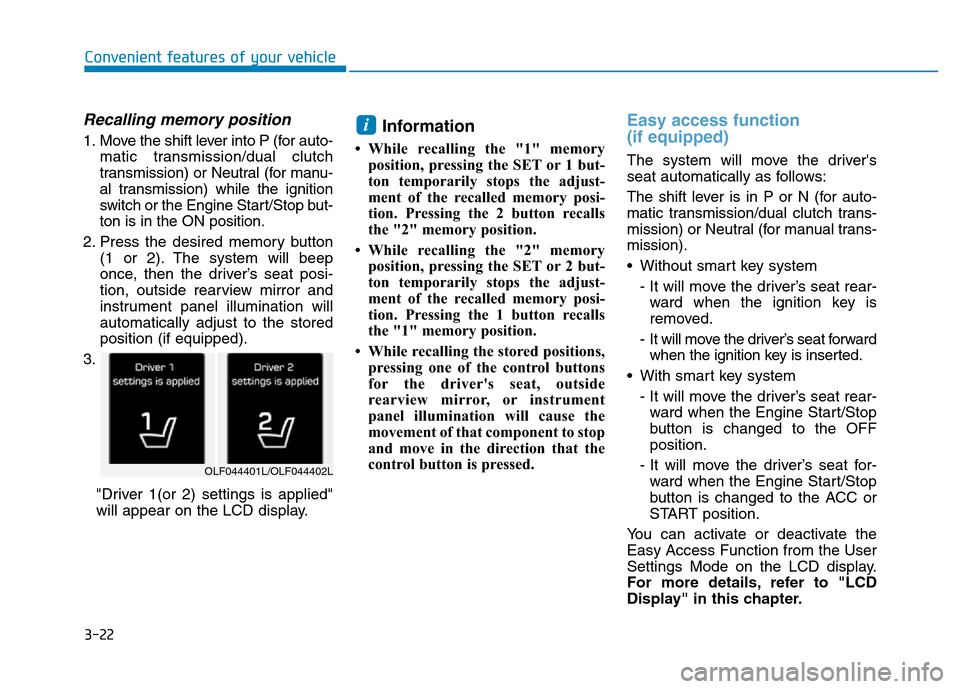
3.
"Driver 1(or 2) settings is applied"
will appear on the LCD display.Information
• While recalling the "1" memory
position, pressing the SET or 1 but-
ton temporarily stops the adjust-
ment of the recalled memory posi-
tion. Pressing the 2 button recalls
the "2" memory position.
• While recalling the "2" memory
position, pressing the SET or 2 but-
ton temporarily stops the adjust-
ment of the recalled memory posi-
tion. Pressing the 1 button recalls
the "1" memory position.
• While recalling the stored positions,
pressing one of the control buttons
for the driver's seat, outside
rearview mirror, or instrument
panel illumination will cause the
movement of that component to stop
and move in the direction that the
control button is pressed.
Easy access function
(if equipped)
The system will move the driver's
seat automatically as follows:
The shift lever is in P or N (for auto-
matic transmission/dual clutch trans-
mission) or Neutral (for manual trans-
mission).
• Without smart key system
- It will move the driver’s seat rear-
ward when the ignition key is
removed.
- It will move the driver’s seat forward
when the ignition key is inserted.
• With smart key system
- It will move the driver’s seat rear-
ward when the Engine Start/Stop
button is changed to the OFF
position.
- It will move the driver’s seat for-
ward when the Engine Start/Stop
button is changed to the ACC or
START position.
You can activate or deactivate the
Easy Access Function from the User
Settings Mode on the LCD display.
For more details, refer to "LCD
Display" in this chapter.
i
OLF044401L/OLF044402L
Page 121 of 637
3-26
Convenient features of your vehicle
MIRRORS
Inside rearview mirror
Before you start driving, adjust the
rearview mirror to the center on the
view through the rear window.
When cleaning the mirror, use a
paper towel or similar material
dampened with glass cleaner. Do
not spray glass cleaner directly on
the mirror as that may cause the
liquid cleaner to enter the mirror
housing.
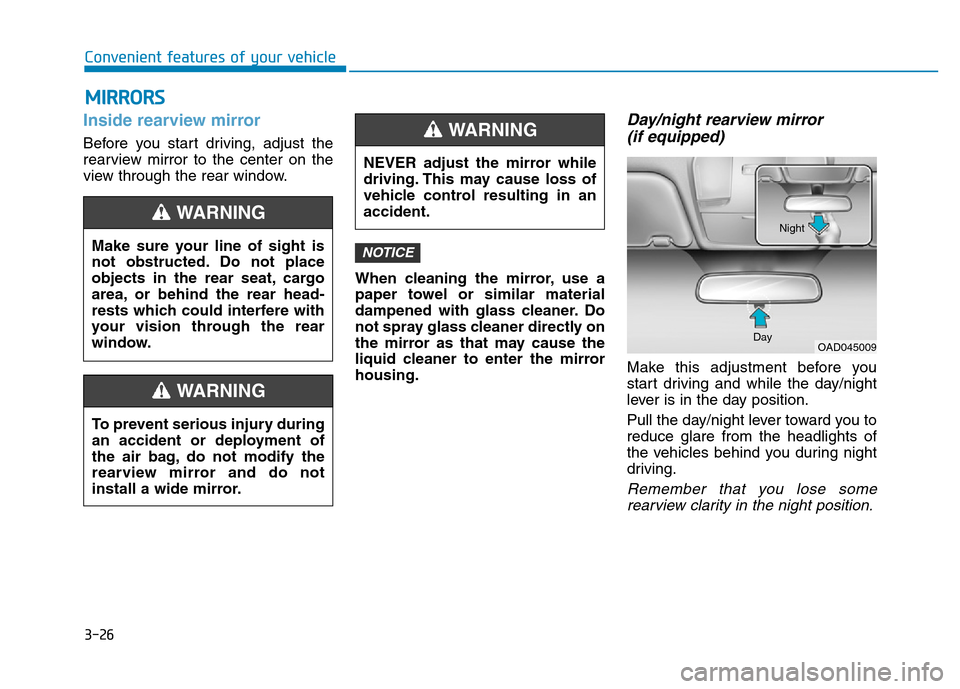
Day/night rearview mirror
(if equipped)
Make this adjustment before you
start driving and while the day/night
lever is in the day position.
Pull the day/night lever toward you to
reduce glare from the headlights of
the vehicles behind you during night
driving.
Remember that you lose some
rearview clarity in the night position.
NOTICEMake sure your line of sight is
not obstructed. Do not place
objects in the rear seat, cargo
area, or behind the rear head-
rests which could interfere with
your vision through the rear
window.
WARNING
To prevent serious injury during
an accident or deployment of
the air bag, do not modify the
rearview mirror and do not
install a wide mirror.
WARNING
NEVER adjust the mirror while
driving. This may cause loss of
vehicle control resulting in an
accident.
WARNING
OAD045009 DayNight