ECU Hyundai Elantra Coupe 2014 User Guide
[x] Cancel search | Manufacturer: HYUNDAI, Model Year: 2014, Model line: Elantra Coupe, Model: Hyundai Elantra Coupe 2014Pages: 550, PDF Size: 45.11 MB
Page 60 of 550
Safety features of your vehicle
341
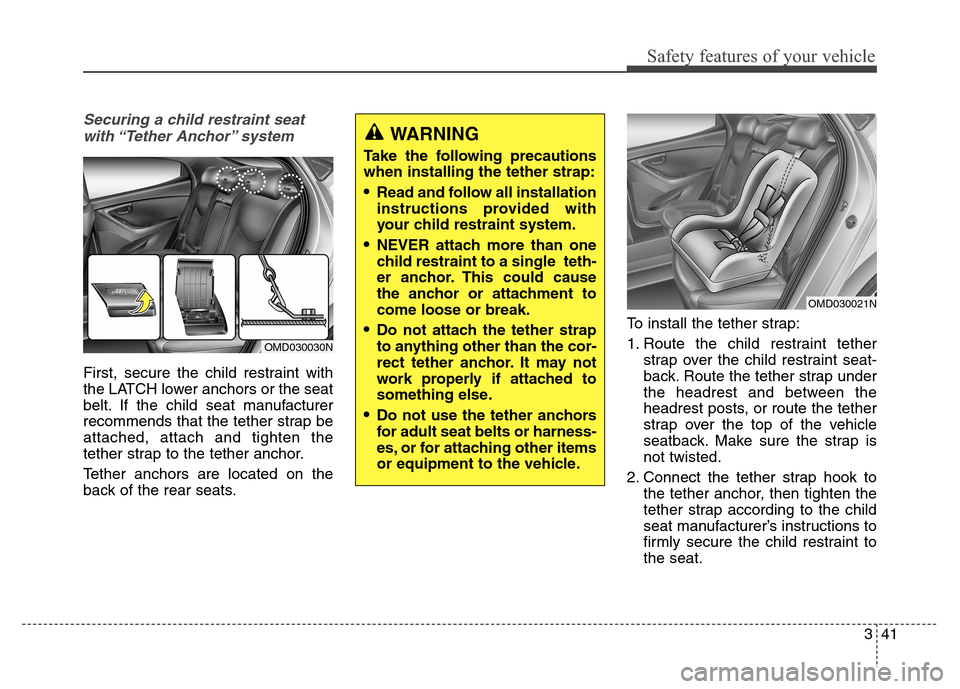
Securing a child restraint seat
with “Tether Anchor” system
First, secure the child restraint with
the LATCH lower anchors or the seat
belt. If the child seat manufacturer
recommends that the tether strap be
attached, attach and tighten the
tether strap to the tether anchor.
Tether anchors are located on the
back of the rear seats.To install the tether strap:
1. Route the child restraint tether
strap over the child restraint seat-
back. Route the tether strap under
the headrest and between the
headrest posts, or route the tether
strap over the top of the vehicle
seatback. Make sure the strap is
not twisted.
2. Connect the tether strap hook to
the tether anchor, then tighten the
tether strap according to the child
seat manufacturer’s instructions to
firmly secure the child restraint to
the seat.
OMD030021N
OMD030030N
WARNING
Take the following precautions
when installing the tether strap:
Read and follow all installation
instructions provided with
your child restraint system.
NEVER attach more than one
child restraint to a single teth-
er anchor. This could cause
the anchor or attachment to
come loose or break.
Do not attach the tether strap
to anything other than the cor-
rect tether anchor. It may not
work properly if attached to
something else.
Do not use the tether anchors
for adult seat belts or harness-
es, or for attaching other items
or equipment to the vehicle.
Page 61 of 550
Safety features of your vehicle
42 33. Check that the child restraint is
securely attached to the seat by
pushing and pulling the seat for-
ward and from side-to-side.
Securing a child restraint with a
lap belt or lap/shoulder belt
When not using the LATCH system,
all child restraints must be secured to
a vehicle rear seat with the lap part
of a lap/shoulder belt.
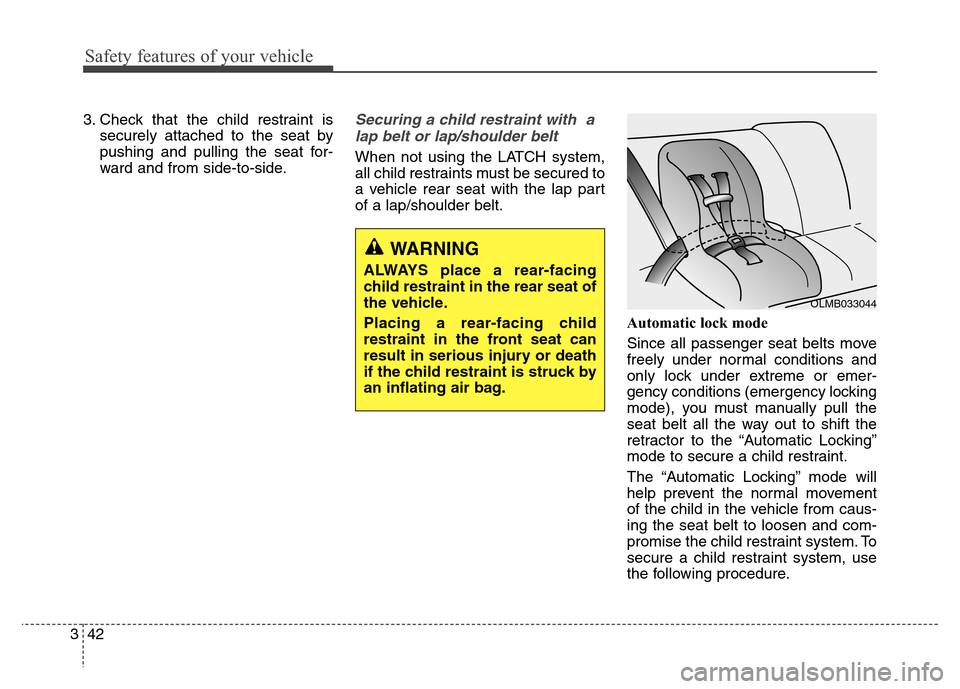
Automatic lock mode
Since all passenger seat belts move
freely under normal conditions and
only lock under extreme or emer-
gency conditions (emergency locking
mode), you must manually pull the
seat belt all the way out to shift the
retractor to the “Automatic Locking”
mode to secure a child restraint.
The “Automatic Locking” mode will
help prevent the normal movement
of the child in the vehicle from caus-
ing the seat belt to loosen and com-
promise the child restraint system. To
secure a child restraint system, use
the following procedure.
OLMB033044
WARNING
ALWAYS place a rear-facing
child restraint in the rear seat of
the vehicle.
Placing a rear-facing child
restraint in the front seat can
result in serious injury or death
if the child restraint is struck by
an inflating air bag.
Page 69 of 550
Safety features of your vehicle
50 3
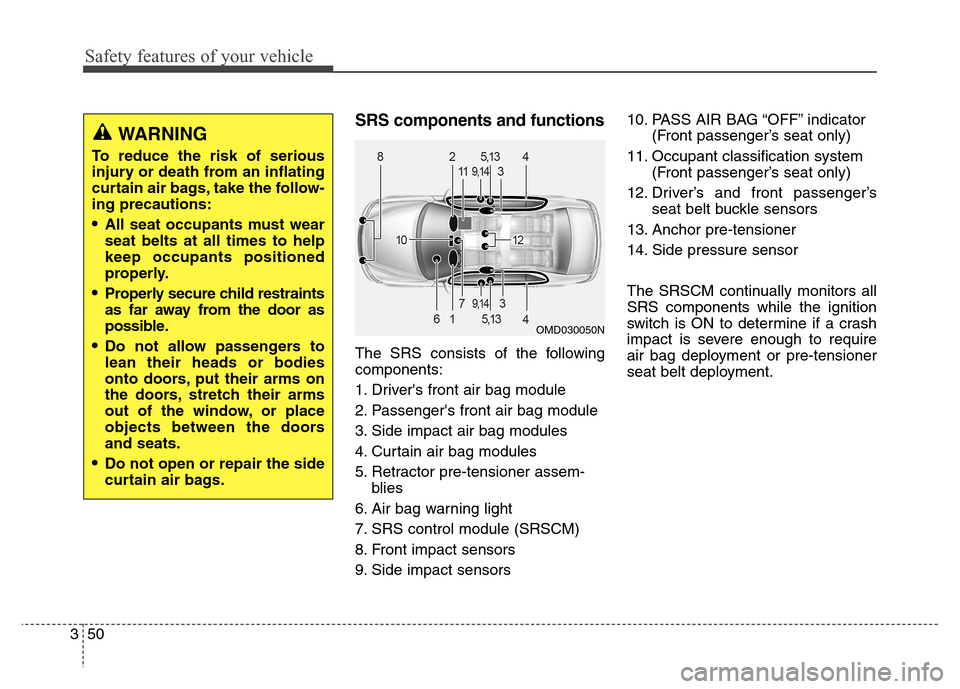
SRS components and functions
The SRS consists of the following
components:
1. Driver's front air bag module
2. Passenger's front air bag module
3. Side impact air bag modules
4. Curtain air bag modules
5. Retractor pre-tensioner assem-
blies
6. Air bag warning light
7. SRS control module (SRSCM)
8. Front impact sensors
9. Side impact sensors10. PASS AIR BAG “OFF” indicator
(Front passenger’s seat only)
11. Occupant classification system
(Front passenger’s seat only)
12. Driver’s and front passenger’s
seat belt buckle sensors
13. Anchor pre-tensioner
14. Side pressure sensor
The SRSCM continually monitors all
SRS components while the ignition
switch is ON to determine if a crash
impact is severe enough to require
air bag deployment or pre-tensioner
seat belt deployment.
WARNING
To reduce the risk of serious
injury or death from an inflating
curtain air bags, take the follow-
ing precautions:
All seat occupants must wear
seat belts at all times to help
keep occupants positioned
properly.
Properly secure child restraints
as far away from the door as
possible.
Do not allow passengers to
lean their heads or bodies
onto doors, put their arms on
the doors, stretch their arms
out of the window, or place
objects between the doors
and seats.
Do not open or repair the side
curtain air bags.
OMD030050N
Page 100 of 550
Features of your vehicle
14 4
Operating door locks from
outside the vehicle
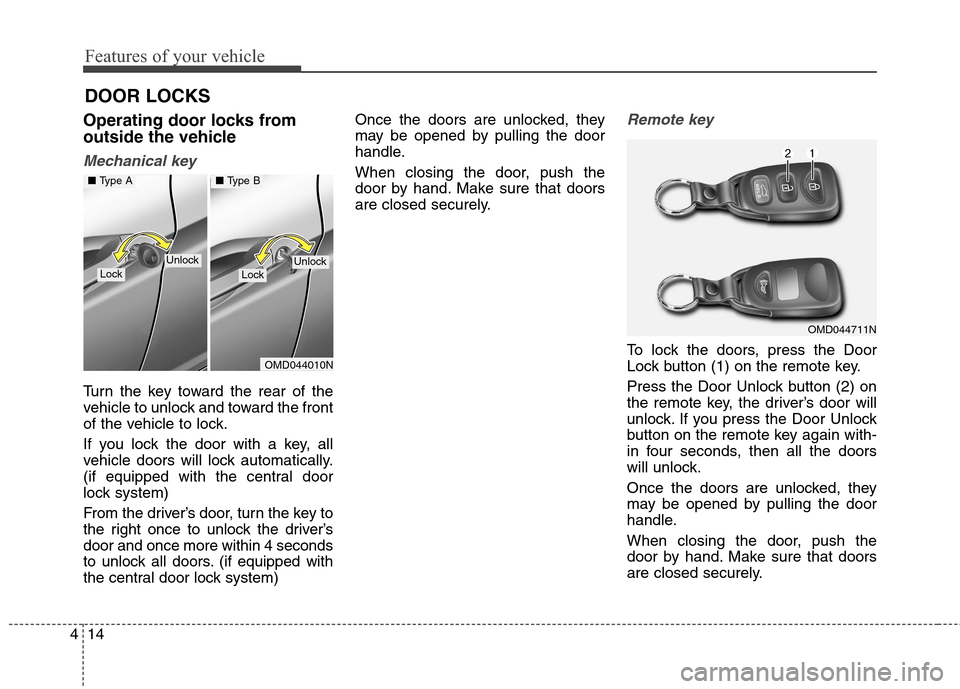
Mechanical key
Turn the key toward the rear of the
vehicle to unlock and toward the front
of the vehicle to lock.
If you lock the door with a key, all
vehicle doors will lock automatically.
(if equipped with the central door
lock system)
From the driver’s door, turn the key to
the right once to unlock the driver’s
door and once more within 4 seconds
to unlock all doors. (if equipped with
the central door lock system)Once the doors are unlocked, they
may be opened by pulling the door
handle.
When closing the door, push the
door by hand. Make sure that doors
are closed securely.
Remote key
To lock the doors, press the Door
Lock button (1) on the remote key.
Press the Door Unlock button (2) on
the remote key, the driver’s door will
unlock. If you press the Door Unlock
button on the remote key again with-
in four seconds, then all the doors
will unlock.
Once the doors are unlocked, they
may be opened by pulling the door
handle.
When closing the door, push the
door by hand. Make sure that doors
are closed securely.
DOOR LOCKS
OMD044711N
OMD044010N
LockLockUnlockUnlock
■ Type A■ Type B
Page 101 of 550
415
Features of your vehicle
✽ ✽
NOTICE
• In cold and wet climates, door lock
and door mechanisms may not
work properly due to freezing con-
ditions.
• If the door is locked/unlocked
multiple times in rapid succession
with either the vehicle key or door
lock switch, the system may stop
operating temporarily in order to
protect the circuit and prevent
damage to system components.
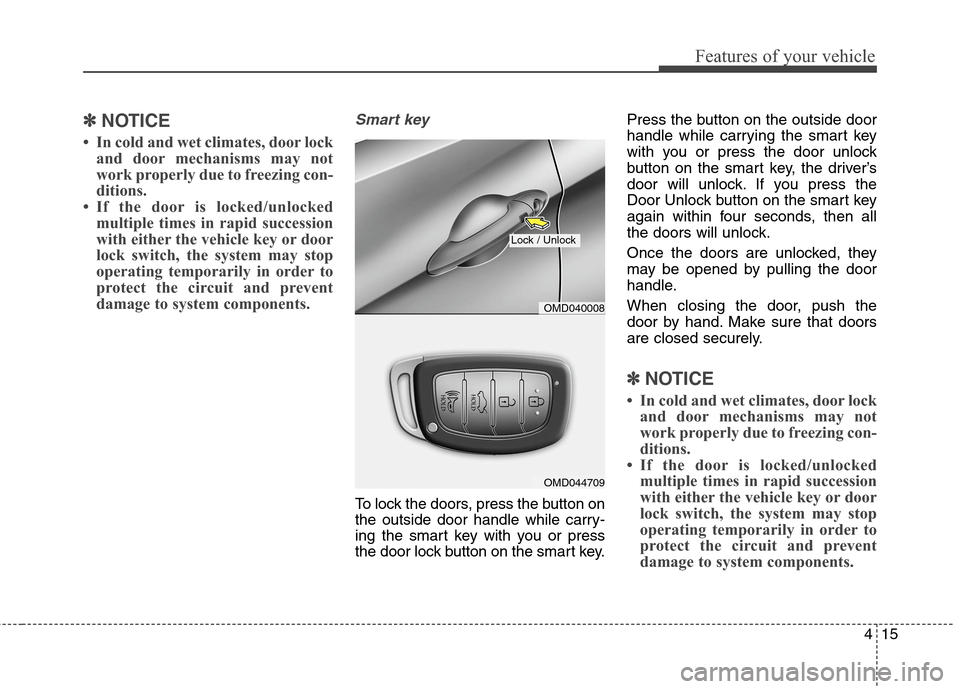
Smart key
To lock the doors, press the button on
the outside door handle while carry-
ing the smart key with you or press
the door lock button on the smart key.Press the button on the outside door
handle while carrying the smart key
with you or press the door unlock
button on the smart key, the driver’s
door will unlock. If you press the
Door Unlock button on the smart key
again within four seconds, then all
the doors will unlock.
Once the doors are unlocked, they
may be opened by pulling the door
handle.
When closing the door, push the
door by hand. Make sure that doors
are closed securely.
✽ ✽
NOTICE
• In cold and wet climates, door lock
and door mechanisms may not
work properly due to freezing con-
ditions.
• If the door is locked/unlocked
multiple times in rapid succession
with either the vehicle key or door
lock switch, the system may stop
operating temporarily in order to
protect the circuit and prevent
damage to system components.
OMD044709
Lock / Unlock
OMD040008
Page 104 of 550
Features of your vehicle
18 4
Auto door lock/unlock features
Impact sensing door unlock sys-
tem (if equipped)
All doors will be automatically
unlocked when an impact causes the
air bags to deploy.
Speed sensing door lock system
(if equipped)
All doors will be automatically locked
when vehicle speed exceeds 9 mph
(15 km/h).
WARNING - Always
secure your vehicle
Leaving your vehicle unlocked
increases the potential risk to
you or others from someone
hiding in your vehicle.
To secure your vehicle, while
depressing the brake, move the
shift lever to the P (Park) posi-
tion (for automatic transaxle) or
first gear or R (Reverse, for
manual transaxle), engage the
parking brake, and place the
ignition switch in the LOCK/OFF
position, close all windows,
lock all doors, and always take
the key with you.WARNING
Opening a door when something
is approaching may cause dam-
age or injury. Be careful when
opening doors and watch for
vehicles, motorcycles, bicycles
or pedestrians approaching the
vehicle in the path of the door.
Page 106 of 550
Features of your vehicle
20 4
This system helps to protect your
vehicle and valuables. The horn will
sound and the hazard warning lights
will blink continuously if any of the
following occurs:
- A door is opened without using the
remote key or smart key.
- The trunk is opened without using
the remote key or smart key.
- The engine hood is opened.
The alarm continues for 30 seconds,
then the system resets. To turn off
the alarm, unlock the doors with the
remote key or smart key.
The Theft Alarm System automati-
cally sets 30 seconds after you lock
the doors and the trunk. For the sys-
tem to activate, you must lock the
doors and the trunk from outside the
vehicle with the remote key or smart
key or by pressing the button on the
outside of the door handles with the
smart key in your possession.
The hazard warning lights will blink
and the chime will sound once to
indicate the system is armed.Once the security system is set, open-
ing any door, the trunk, or the hood
without using the remote key or smart
key will cause the alarm to activate.
The Theft Alarm System will not set if
the hood, the trunk, or any door is
not fully closed. If the system will not
set, check the hood, the trunk, or the
doors are fully closed.
Do not attempt to alter this system or
add other devices to it.✽ ✽
NOTICE
• Do not lock the doors until all pas-
sengers have left the vehicle. If the
remaining passenger leaves the
vehicle when the system is armed,
the alarm will be activated.
• If the vehicle is not disarmed with
the remote key or smart key, open
the doors by using the mechanical
key and place the ignition switch in
the ON position (for remote key)
or start the engine (for smart key)
by directly pressing the Engine
Start/Stop button with the smart
key.
• When the system is disarmed but a
door or trunk is not opened within
30 seconds, the system will be
rearmed.
THEFT-ALARM SYSTEM
Page 107 of 550
421
Features of your vehicle
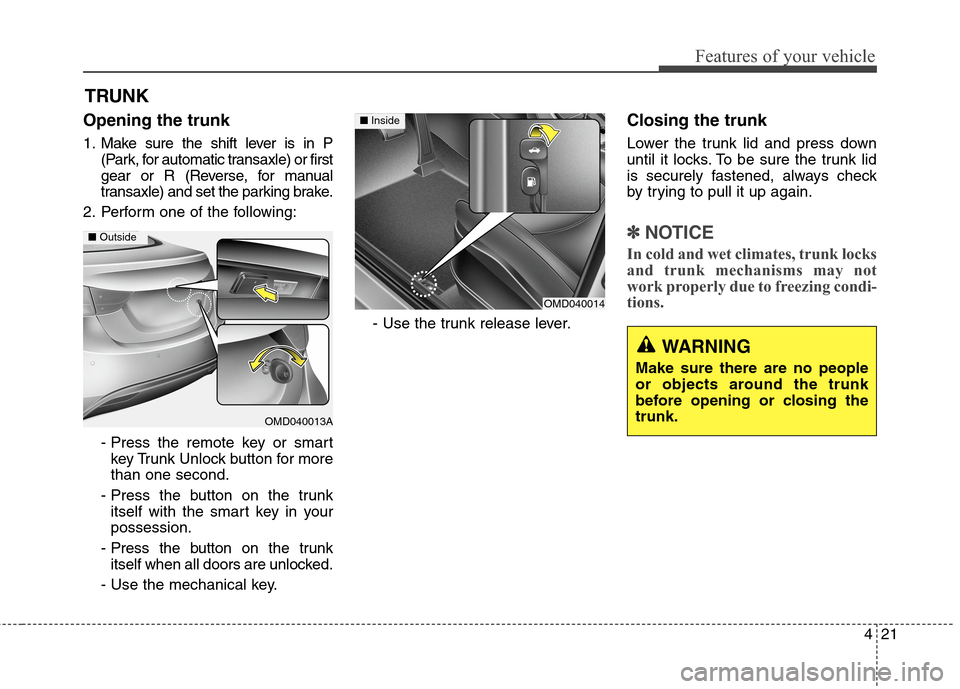
Opening the trunk
1. Make sure the shift lever is in P
(Park, for automatic transaxle) or first
gear or R (Reverse, for manual
transaxle) and set the parking brake.
2. Perform one of the following:
- Press the remote key or smart
key Trunk Unlock button for more
than one second.
- Press the button on the trunk
itself with the smart key in your
possession.
- Press the button on the trunk
itself when all doors are unlocked.
- Use the mechanical key.- Use the trunk release lever.
Closing the trunk
Lower the trunk lid and press down
until it locks. To be sure the trunk lid
is securely fastened, always check
by trying to pull it up again.
✽ ✽
NOTICE
In cold and wet climates, trunk locks
and trunk mechanisms may not
work properly due to freezing condi-
tions.
TRUNK
OMD040013A
■Outside
WARNING
Make sure there are no people
or objects around the trunk
before opening or closing the
trunk.
OMD040014
■ Inside
Page 116 of 550
Features of your vehicle
30 4
Closing the hood
1. Before closing the hood, check the
following:
ment must be correctly installed.
bustible material must be removed
from the engine compartment.
2. Return the support rod to its clip to
prevent it from rattling.
3. Lower the hood halfway and push
down to securely lock in place.
Then double check to be sure the
hood is secure.
WARNING
Before closing the hood,
ensure that all obstructions
are removed from the hood
opening.
Always double check to be
sure that the hood is firmly
latched before driving away. If
it is not latched, the hood
could open while the vehicle
is being driven, causing a
total loss of visibility, which
might result in an accident.
Do not move the vehicle with
the hood in the raised posi-
tion, as vision is obstructed,
which might result in an acci-
dent, and the hood could fall
or be damaged.
WARNING - Support rod
Grasp the support rod in the
area wrapped in rubber. The
rubber will help prevent you
from being burned by hot
metal when the engine is hot.
The support rod must be
inserted completely into the
hole provided whenever you
inspect the engine compart-
ment. This will prevent the
hood from falling and possi-
bly injuring you.
Page 117 of 550
431
Features of your vehicle
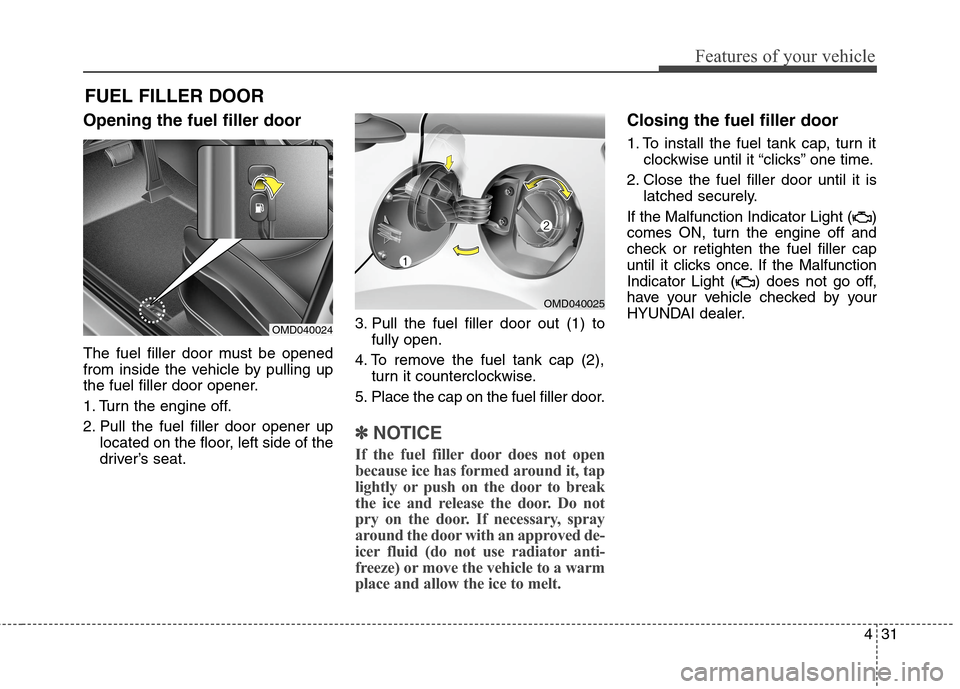
Opening the fuel filler door
The fuel filler door must be opened
from inside the vehicle by pulling up
the fuel filler door opener.
1. Turn the engine off.
2. Pull the fuel filler door opener up
located on the floor, left side of the
driver’s seat.3. Pull the fuel filler door out (1) to
fully open.
4. To remove the fuel tank cap (2),
turn it counterclockwise.
5. Place the cap on the fuel filler door.
✽ ✽
NOTICE
If the fuel filler door does not open
because ice has formed around it, tap
lightly or push on the door to break
the ice and release the door. Do not
pry on the door. If necessary, spray
around the door with an approved de-
icer fluid (do not use radiator anti-
freeze) or move the vehicle to a warm
place and allow the ice to melt.
Closing the fuel filler door
1. To install the fuel tank cap, turn it
clockwise until it “clicks” one time.
2. Close the fuel filler door until it is
latched securely.
If the Malfunction Indicator Light ( )
comes ON, turn the engine off and
check or retighten the fuel filler cap
until it clicks once. If the Malfunction
Indicator Light ( ) does not go off,
have your vehicle checked by your
HYUNDAI dealer.
FUEL FILLER DOOR
OMD040025
OMD040024