rear Hyundai Elantra Coupe 2014 Manual Online
[x] Cancel search | Manufacturer: HYUNDAI, Model Year: 2014, Model line: Elantra Coupe, Model: Hyundai Elantra Coupe 2014Pages: 550, PDF Size: 45.11 MB
Page 451 of 550
721
Maintenance
721
Maintenance
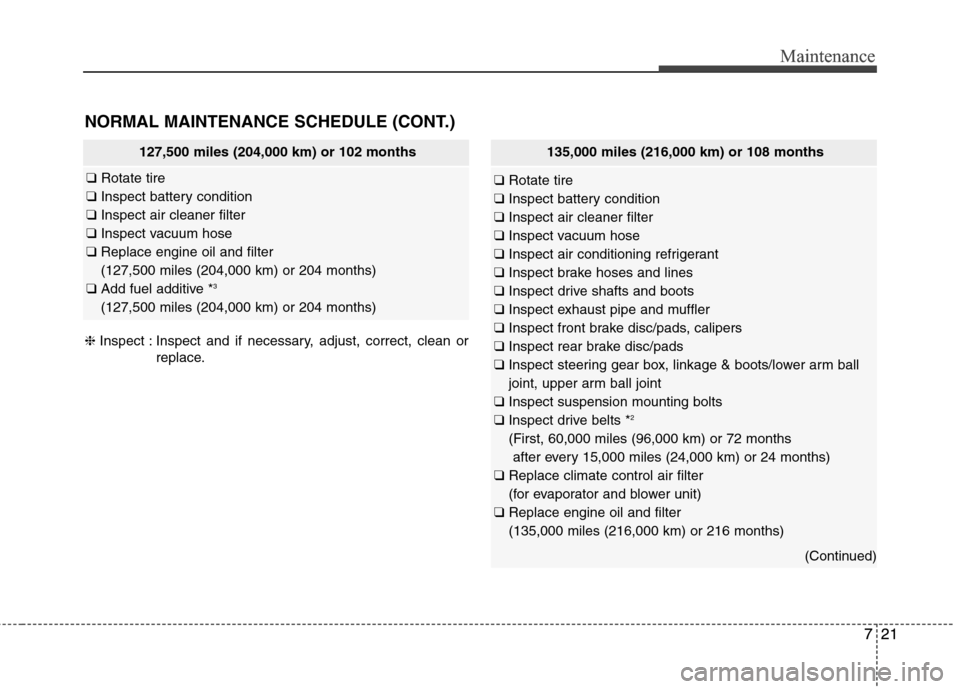
NORMAL MAINTENANCE SCHEDULE (CONT.)
❈Inspect : Inspect and if necessary, adjust, correct, clean or
replace.
127,500 miles (204,000 km) or 102 months
❑Rotate tire
❑Inspect battery condition
❑Inspect air cleaner filter
❑Inspect vacuum hose
❑Replace engine oil and filter
(127,500 miles (204,000 km) or 204 months)
❑Add fuel additive *
3
(127,500 miles (204,000 km) or 204 months)
135,000 miles (216,000 km) or 108 months
❑Rotate tire
❑Inspect battery condition
❑Inspect air cleaner filter
❑Inspect vacuum hose
❑Inspect air conditioning refrigerant
❑Inspect brake hoses and lines
❑Inspect drive shafts and boots
❑Inspect exhaust pipe and muffler
❑Inspect front brake disc/pads, calipers
❑Inspect rear brake disc/pads
❑Inspect steering gear box, linkage & boots/lower arm ball
joint, upper arm ball joint
❑Inspect suspension mounting bolts
❑Inspect drive belts *
2
(First, 60,000 miles (96,000 km) or 72 months
after every 15,000 miles (24,000 km) or 24 months)
❑Replace climate control air filter
(for evaporator and blower unit)
❑Replace engine oil and filter
(135,000 miles (216,000 km) or 216 months)
(Continued)
Page 453 of 550
723
Maintenance
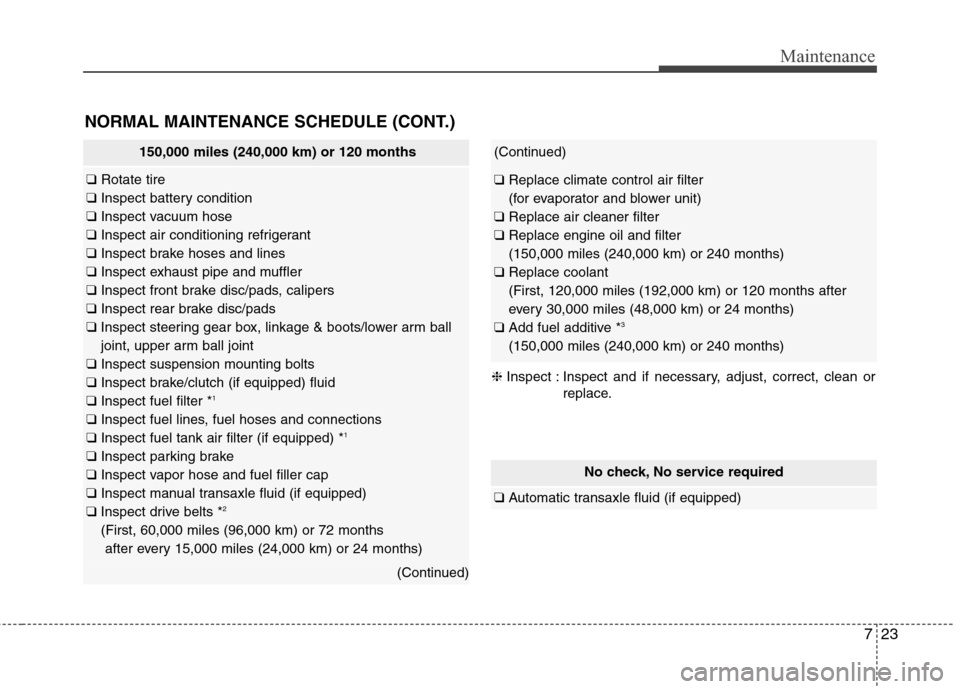
NORMAL MAINTENANCE SCHEDULE (CONT.)
No check, No service required
❑Automatic transaxle fluid (if equipped)
150,000 miles (240,000 km) or 120 months
❑Rotate tire
❑Inspect battery condition
❑Inspect vacuum hose
❑Inspect air conditioning refrigerant
❑Inspect brake hoses and lines
❑Inspect exhaust pipe and muffler
❑Inspect front brake disc/pads, calipers
❑Inspect rear brake disc/pads
❑Inspect steering gear box, linkage & boots/lower arm ball
joint, upper arm ball joint
❑Inspect suspension mounting bolts
❑Inspect brake/clutch (if equipped) fluid
❑Inspect fuel filter *
1
❑Inspect fuel lines, fuel hoses and connections
❑Inspect fuel tank air filter (if equipped) *1
❑Inspect parking brake
❑Inspect vapor hose and fuel filler cap
❑Inspect manual transaxle fluid (if equipped)
❑Inspect drive belts *
2
(First, 60,000 miles (96,000 km) or 72 months
after every 15,000 miles (24,000 km) or 24 months)
(Continued)
(Continued)
❑Replace climate control air filter
(for evaporator and blower unit)
❑Replace air cleaner filter
❑Replace engine oil and filter
(150,000 miles (240,000 km) or 240 months)
❑Replace coolant
(First, 120,000 miles (192,000 km) or 120 months after
every 30,000 miles (48,000 km) or 24 months)
❑Add fuel additive *
3
(150,000 miles (240,000 km) or 240 months)
❈Inspect : Inspect and if necessary, adjust, correct, clean or
replace.
Page 454 of 550
Maintenance
24 7
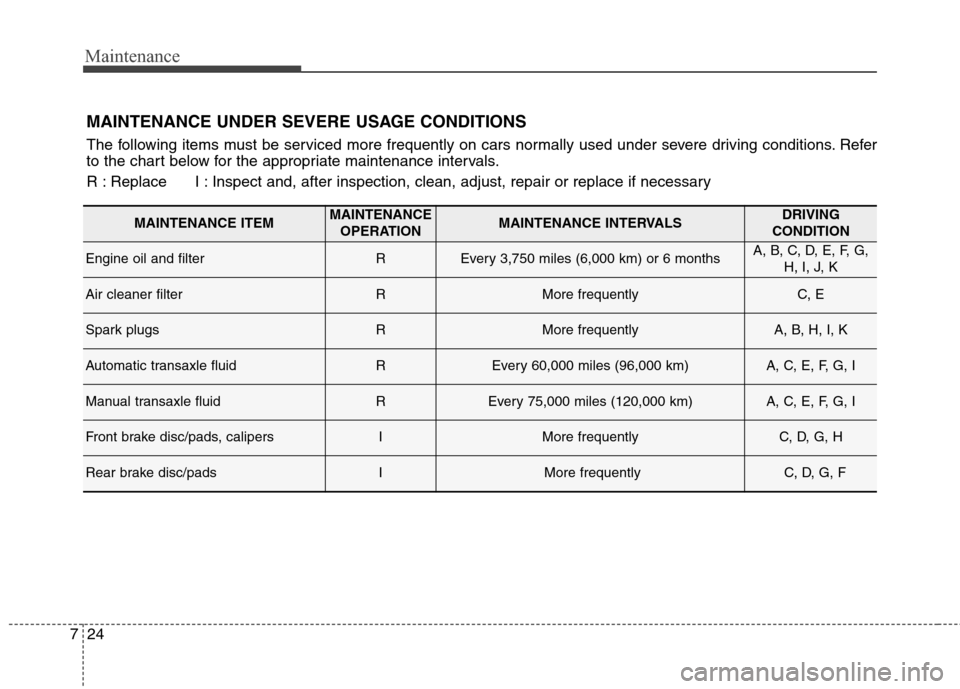
MAINTENANCE UNDER SEVERE USAGE CONDITIONS
The following items must be serviced more frequently on cars normally used under severe driving conditions. Refer
to the chart below for the appropriate maintenance intervals.
R : Replace I : Inspect and, after inspection, clean, adjust, repair or replace if necessary
MAINTENANCE ITEMMAINTENANCE
OPERATIONMAINTENANCE INTERVALSDRIVING
CONDITION
Engine oil and filterREvery 3,750 miles (6,000 km) or 6 monthsA, B, C, D, E, F, G,
H, I, J, K
Air cleaner filterRMore frequentlyC, E
Spark plugsRMore frequentlyA, B, H, I, K
Automatic transaxle fluidREvery 60,000 miles (96,000 km) A, C, E, F, G, I
Manual transaxle fluidREvery 75,000 miles (120,000 km) A, C, E, F, G, I
Front brake disc/pads, calipersIMore frequentlyC, D, G, H
Rear brake disc/padsIMore frequentlyC, D, G, F
Page 480 of 550
Maintenance
50 7
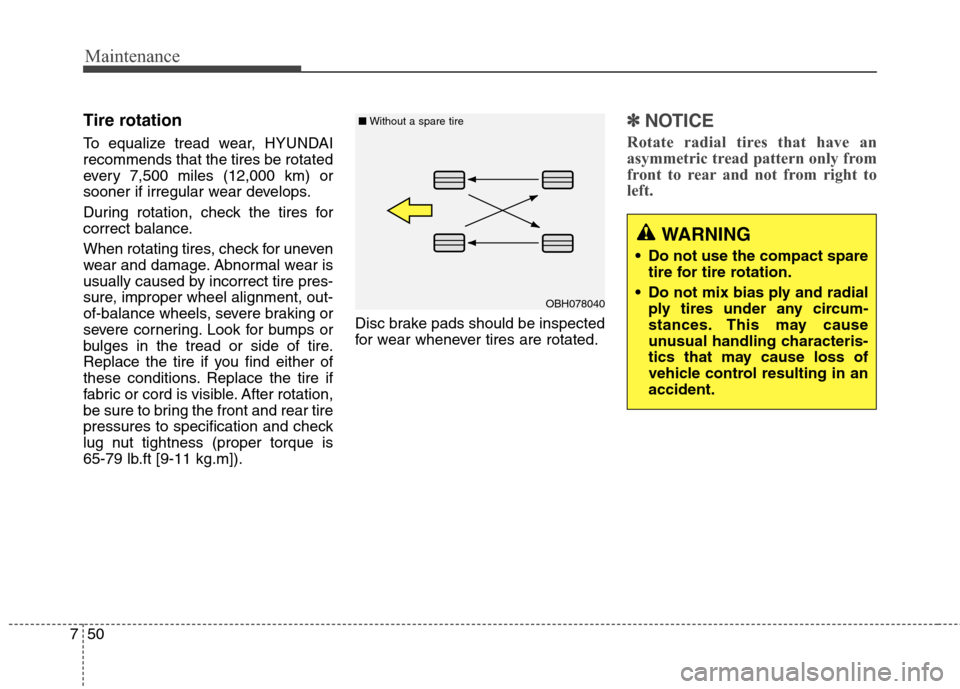
Tire rotation
To equalize tread wear, HYUNDAI
recommends that the tires be rotated
every 7,500 miles (12,000 km) or
sooner if irregular wear develops.
During rotation, check the tires for
correct balance.
When rotating tires, check for uneven
wear and damage. Abnormal wear is
usually caused by incorrect tire pres-
sure, improper wheel alignment, out-
of-balance wheels, severe braking or
severe cornering. Look for bumps or
bulges in the tread or side of tire.
Replace the tire if you find either of
these conditions. Replace the tire if
fabric or cord is visible. After rotation,
be sure to bring the front and rear tire
pressures to specification and check
lug nut tightness (proper torque is
65-79 lb.ft [9-11 kg.m]).Disc brake pads should be inspected
for wear whenever tires are rotated.
✽ ✽
NOTICE
Rotate radial tires that have an
asymmetric tread pattern only from
front to rear and not from right to
left.
OBH078040 ■Without a spare tire
WARNING
Do not use the compact spare
tire for tire rotation.
Do not mix bias ply and radial
ply tires under any circum-
stances. This may cause
unusual handling characteris-
tics that may cause loss of
vehicle control resulting in an
accident.
Page 488 of 550
Maintenance
58 7
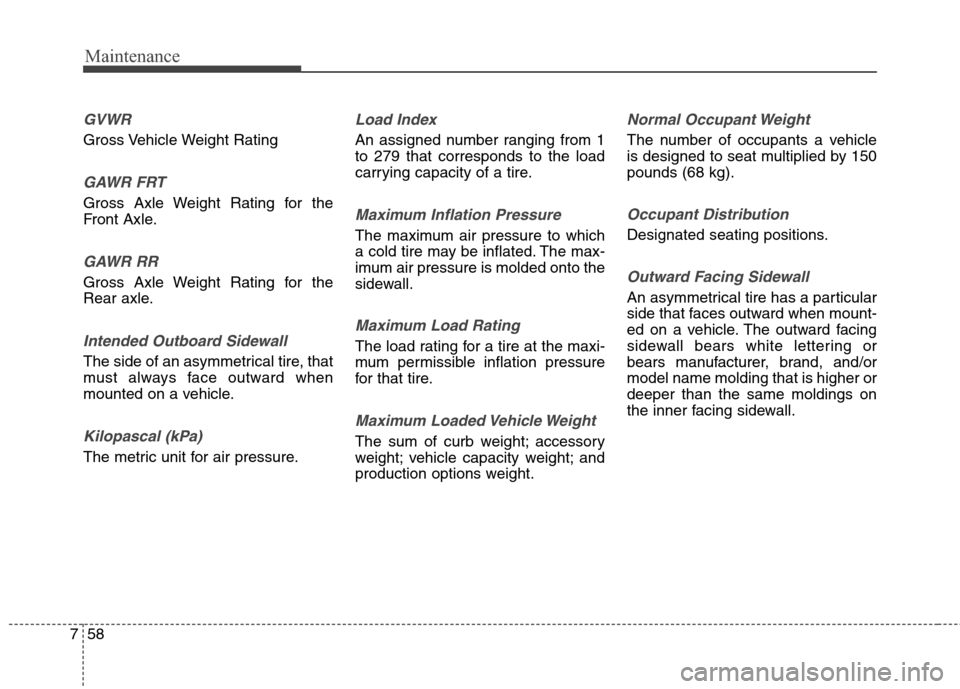
GVWR
Gross Vehicle Weight Rating
GAWR FRT
Gross Axle Weight Rating for the
Front Axle.
GAWR RR
Gross Axle Weight Rating for the
Rear axle.
Intended Outboard Sidewall
The side of an asymmetrical tire, that
must always face outward when
mounted on a vehicle.
Kilopascal (kPa)
The metric unit for air pressure.
Load Index
An assigned number ranging from 1
to 279 that corresponds to the load
carrying capacity of a tire.
Maximum Inflation Pressure
The maximum air pressure to which
a cold tire may be inflated. The max-
imum air pressure is molded onto the
sidewall.
Maximum Load Rating
The load rating for a tire at the maxi-
mum permissible inflation pressure
for that tire.
Maximum Loaded Vehicle Weight
The sum of curb weight; accessory
weight; vehicle capacity weight; and
production options weight.
Normal Occupant Weight
The number of occupants a vehicle
is designed to seat multiplied by 150
pounds (68 kg).
Occupant Distribution
Designated seating positions.
Outward Facing Sidewall
An asymmetrical tire has a particular
side that faces outward when mount-
ed on a vehicle. The outward facing
sidewall bears white lettering or
bears manufacturer, brand, and/or
model name molding that is higher or
deeper than the same moldings on
the inner facing sidewall.
Page 491 of 550
761
Maintenance
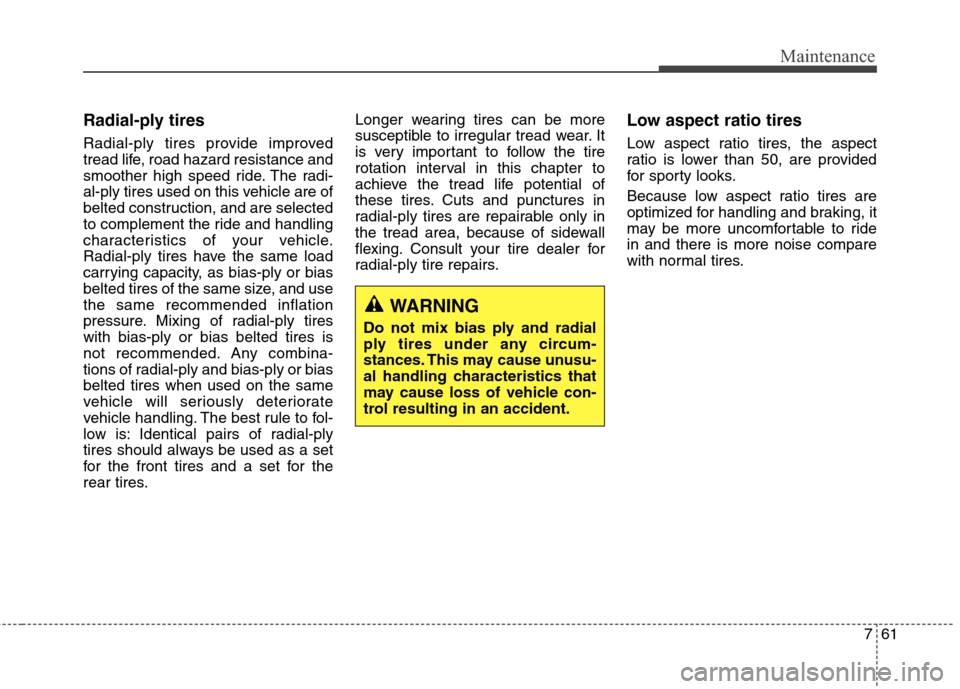
Radial-ply tires
Radial-ply tires provide improved
tread life, road hazard resistance and
smoother high speed ride. The radi-
al-ply tires used on this vehicle are of
belted construction, and are selected
to complement the ride and handling
characteristics of your vehicle.
Radial-ply tires have the same load
carrying capacity, as bias-ply or bias
belted tires of the same size, and use
the same recommended inflation
pressure. Mixing of radial-ply tires
with bias-ply or bias belted tires is
not recommended. Any combina-
tions of radial-ply and bias-ply or bias
belted tires when used on the same
vehicle will seriously deteriorate
vehicle handling. The best rule to fol-
low is: Identical pairs of radial-ply
tires should always be used as a set
for the front tires and a set for the
rear tires.Longer wearing tires can be more
susceptible to irregular tread wear. It
is very important to follow the tire
rotation interval in this chapter to
achieve the tread life potential of
these tires. Cuts and punctures in
radial-ply tires are repairable only in
the tread area, because of sidewall
flexing. Consult your tire dealer for
radial-ply tire repairs.
Low aspect ratio tires
Low aspect ratio tires, the aspect
ratio is lower than 50, are provided
for sporty looks.
Because low aspect ratio tires are
optimized for handling and braking, it
may be more uncomfortable to ride
in and there is more noise compare
with normal tires.
WARNING
Do not mix bias ply and radial
ply tires under any circum-
stances. This may cause unusu-
al handling characteristics that
may cause loss of vehicle con-
trol resulting in an accident.
Page 499 of 550
769
Maintenance
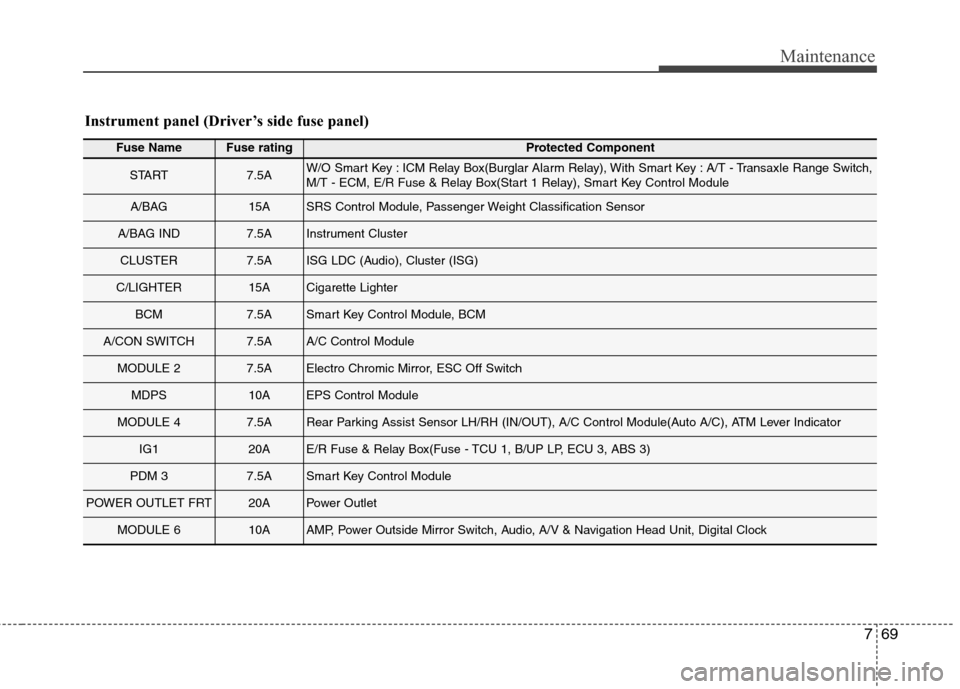
Fuse NameFuse ratingProtected Component
START7.5AW/O Smart Key : ICM Relay Box(Burglar Alarm Relay), With Smart Key : A/T - Transaxle Range Switch,
M/T - ECM, E/R Fuse & Relay Box(Start 1 Relay), Smart Key Control Module
A/BAG15ASRS Control Module, Passenger Weight Classification Sensor
A/BAG IND7.5AInstrument Cluster
CLUSTER7.5AISG LDC (Audio), Cluster (ISG)
C/LIGHTER15ACigarette Lighter
BCM7.5ASmart Key Control Module, BCM
A/CON SWITCH7.5AA/C Control Module
MODULE 27.5AElectro Chromic Mirror, ESC Off Switch
MDPS10AEPS Control Module
MODULE 47.5ARear Parking Assist Sensor LH/RH (IN/OUT), A/C Control Module(Auto A/C), ATM Lever Indicator
IG120AE/R Fuse & Relay Box(Fuse - TCU 1, B/UP LP, ECU 3, ABS 3)
PDM 37.5ASmart Key Control Module
POWER OUTLET FRT20APower Outlet
MODULE 610AAMP, Power Outside Mirror Switch, Audio, A/V & Navigation Head Unit, Digital Clock
Instrument panel (Driver’s side fuse panel)
Page 500 of 550
Maintenance
70 7
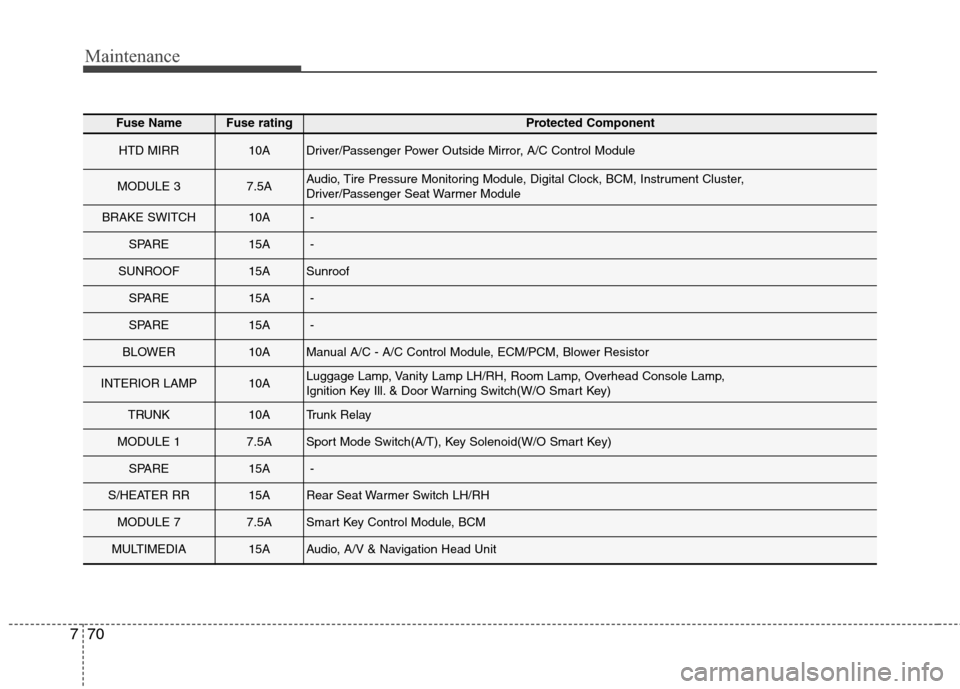
Fuse NameFuse ratingProtected Component
HTD MIRR10ADriver/Passenger Power Outside Mirror, A/C Control Module
MODULE 37.5AAudio, Tire Pressure Monitoring Module, Digital Clock, BCM, Instrument Cluster,
Driver/Passenger Seat Warmer Module
BRAKE SWITCH10A-
SPARE15A-
SUNROOF15ASunroof
SPARE15A-
SPARE15A-
BLOWER10AManual A/C - A/C Control Module, ECM/PCM, Blower Resistor
INTERIOR LAMP10ALuggage Lamp, Vanity Lamp LH/RH, Room Lamp, Overhead Console Lamp,
Ignition Key Ill. & Door Warning Switch(W/O Smart Key)
TRUNK10ATrunk Relay
MODULE 17.5ASport Mode Switch(A/T), Key Solenoid(W/O Smart Key)
SPARE15A-
S/HEATER RR15ARear Seat Warmer Switch LH/RH
MODULE 77.5ASmart Key Control Module, BCM
MULTIMEDIA15AAudio, A/V & Navigation Head Unit
Page 503 of 550
773
Maintenance
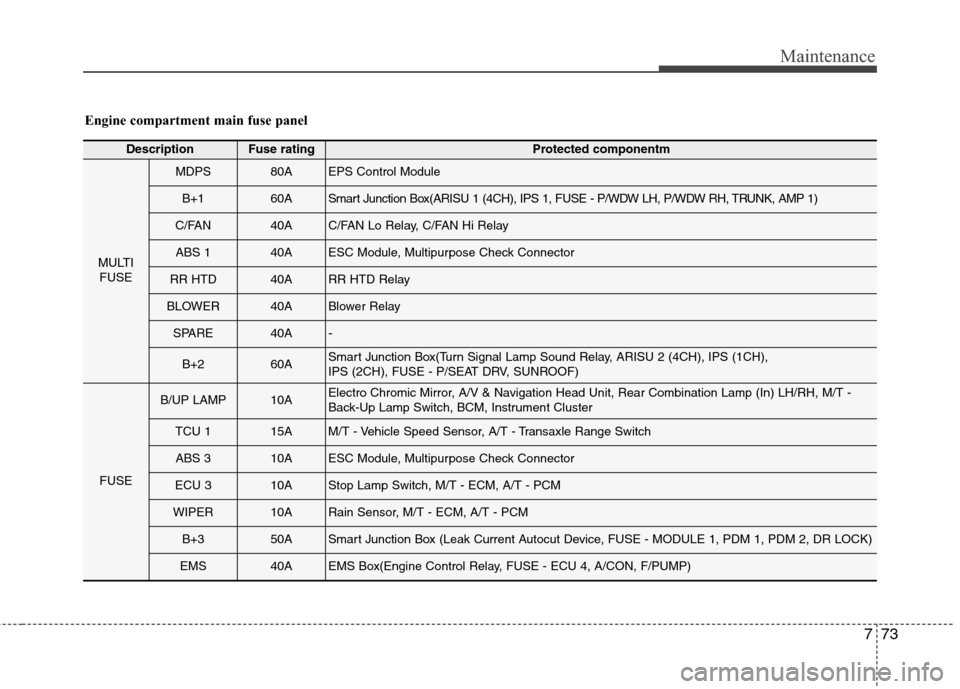
Engine compartment main fuse panel
DescriptionFuse ratingProtected componentm
MULTI
FUSE
MDPS80AEPS Control Module
B+160ASmart Junction Box(ARISU 1 (4CH), IPS 1, FUSE - P/WDW LH, P/WDW RH, TRUNK, AMP 1)
C/FAN40AC/FAN Lo Relay, C/FAN Hi Relay
ABS 140AESC Module, Multipurpose Check Connector
RR HTD40ARR HTD Relay
BLOWER40ABlower Relay
SPARE40A-
B+260ASmart Junction Box(Turn Signal Lamp Sound Relay, ARISU 2 (4CH), IPS (1CH),
IPS (2CH), FUSE - P/SEAT DRV, SUNROOF)
FUSE
B/UP LAMP10AElectro Chromic Mirror, A/V & Navigation Head Unit, Rear Combination Lamp (In) LH/RH, M/T -
Back-Up Lamp Switch, BCM, Instrument Cluster
TCU 115AM/T - Vehicle Speed Sensor, A/T - Transaxle Range Switch
ABS 310AESC Module, Multipurpose Check Connector
ECU 310AStop Lamp Switch, M/T - ECM, A/T - PCM
WIPER10ARain Sensor, M/T - ECM, A/T - PCM
B+350ASmart Junction Box (Leak Current Autocut Device, FUSE - MODULE 1, PDM 1, PDM 2, DR LOCK)
EMS40AEMS Box(Engine Control Relay, FUSE - ECU 4, A/CON, F/PUMP)
Page 511 of 550
781
Maintenance
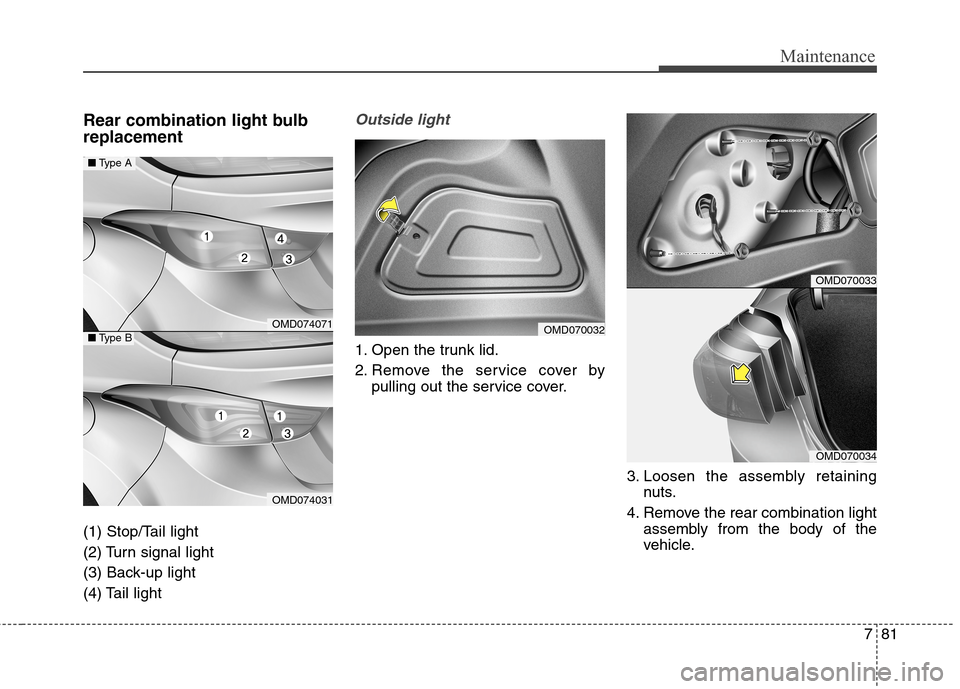
Rear combination light bulb
replacement
(1) Stop/Tail light
(2) Turn signal light
(3) Back-up light
(4) Tail light
Outside light
1. Open the trunk lid.
2. Remove the service cover by
pulling out the service cover.
3. Loosen the assembly retaining
nuts.
4. Remove the rear combination light
assembly from the body of the
vehicle.
OMD074071
OMD074031
■Type A
■Type BOMD070032
OMD070033
OMD070034