tire pressure Hyundai Elantra GT 2018 Owner's Guide
[x] Cancel search | Manufacturer: HYUNDAI, Model Year: 2018, Model line: Elantra GT, Model: Hyundai Elantra GT 2018Pages: 478, PDF Size: 13.64 MB
Page 351 of 478
6-13
What to do in an emergency
6
You may not be able identify a tire
with low pressure by simply looking
at it. Always use a good quality tire
pressure gage to measure the tire's
inflation pressure. Please note that a
tire that is hot (from being driven) will
have a higher pressure measure-
ment than a tire that is cold.
A cold tire means the vehicle has
been sitting for 3 hours and driven for
less than 1 mile (1.6 km) in that 3
hour period.
Allow the tire to cool before measur-
ing the inflation pressure. Always be
sure the tire is cold before inflating to
the recommended pressure.Information
This device complies with Part 15 of
the FCC rules.
Operation is subject to the following
three conditions:
1. This device may not cause harmfulinterference, and
2. This device must accept any inter- ference received, including interfer-
ence that may cause undesired
operation.
3. Changes or modifications not expressly approved by the party
responsible for compliance could
void the user's authority to operate
the equipment.
i
The TPMS cannot alert you to
severe and sudden tire dam-
age caused by external fac-
tors such as nails or road
debris.
If you feel any vehicle instabil-
ity, immediately take your foot
off the accelerator, apply the
brakes gradually with light
force, and slowly move to a
safe position off the road.
WARNING
Tampering with, modifying, or
disabling the Tire Pressure
Monitoring System (TPMS)
components may interfere with
the system's ability to warn the
driver of low tire pressure con-
ditions and/or TPMS malfunc-
tions. Tampering with, modify-
ing, or disabling the Tire
Pressure Monitoring System
(TPMS) components may void
the warranty for that portion of
the vehicle.
WARNING
Page 355 of 478
6-17
What to do in an emergency
6
9. Loosen the lug nuts with the wheellug nut wrench and remove them
with your fingers. Remove the
wheel from the studs and lay it flat
on the ground out of the way.
Remove any dirt or debris from
the studs, mounting surfaces, and
wheel.
10. Install the spare tire onto the studs of the hub.
11. Tighten the lug nuts with your fin- gers onto the studs with the
smaller end of the lug nuts clos-
est to the wheel.
12. Lower the vehicle to the ground by turning the jack handle coun-
terclockwise.
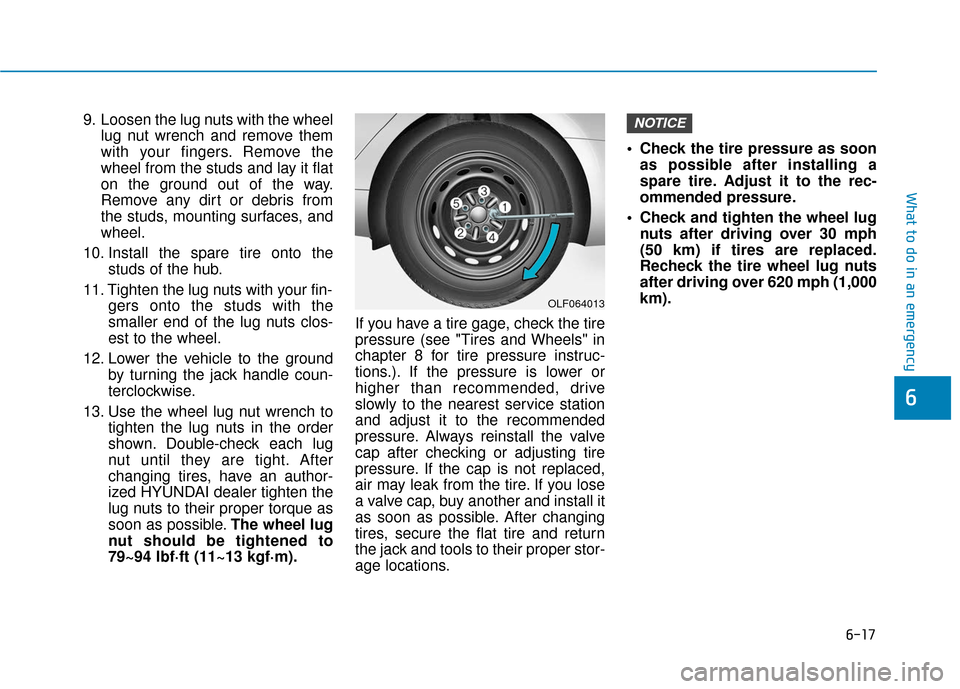
13. Use the wheel lug nut wrench to tighten the lug nuts in the order
shown. Double-check each lug
nut until they are tight. After
changing tires, have an author-
ized HYUNDAI dealer tighten the
lug nuts to their proper torque as
soon as possible. The wheel lug
nut should be tightened to
79~94 lbf·ft (11~13 kgf·m). If you have a tire gage, check the tire
pressure (see "Tires and Wheels" in
chapter 8 for tire pressure instruc-
tions.). If the pressure is lower or
higher than recommended, drive
slowly to the nearest service station
and adjust it to the recommended
pressure. Always reinstall the valve
cap after checking or adjusting tire
pressure. If the cap is not replaced,
air may leak from the tire. If you lose
a valve cap, buy another and install it
as soon as possible. After changing
tires, secure the flat tire and return
the jack and tools to their proper stor-
age locations. Check the tire pressure as soon
as possible after installing a
spare tire. Adjust it to the rec-
ommended pressure.
Check and tighten the wheel lug nuts after driving over 30 mph
(50 km) if tires are replaced.
Recheck the tire wheel lug nuts
after driving over 620 mph (1,000
km).NOTICE
OLF064013
Page 356 of 478
6-18
What to do in an emergency
If any of the equipment such as the
jack, lug nuts, studs, or other equip-
ment is damaged or in poor condi-
tion, do not attempt to change the
tire and call for assistance.
Use of compact spare tires
Compact spare tires are designed for
emergency use only. Drive carefully
on the compact spare tire and
always follow the safety precautions. When driving with the compact spare
tire mounted to your vehicle:
Check the tire pressure after
installing the compact spare tire.
The compact spare tire should be
inflated to 60 psi (420 kPa).
Do not take this vehicle through an automatic car wash while the com-
pact spare tire is installed.
Do not use the compact spare tire on any other vehicle because this
tire has been designed especially
for your vehicle.
The compact spare tire’s tread life is shorter than a regular tire.
Inspect your compact spare tire
regularly and replace worn com-
pact spare tires with the same size
and design, mounted on the same
wheel.
Do not use more than one compact spare tire at a time.
When the original tire and wheel
are repaired and reinstalled on the
vehicle, the lug nut torque must be
set correctly. The correct lug nut
tightening torque is 79~94 lbf·ft
(11~13 kgf·m).
NOTICE
Your vehicle has metric threads
on the studs and lug nuts. Make
certain during tire changing that
the same nuts that were
removed are reinstalled. If you
have to replace your lug nuts
make sure they have metric
threads to avoid damaging the
studs and ensure the wheel is
properly secured to the hub.
Consult an authorized HYUNDAI
dealer for assistance.
CAUTION
To prevent compact spare tire
failure and loss of control pos-
sibly resulting in an accident:
Use the compact spare tire
only in an emergency.
NEVER operate your vehicle
over 50 mph (80 km/h).
Do not exceed the vehicle's
maximum load rating or the
load carrying capacity shown
on the sidewall of the com-
pact spare tire.
Do not use the compact spare
tire continuously. Repair or
replace the original tire as
soon as possible to avoid fail-
ure of the compact spare tire.
WARNING
Page 363 of 478

7
Tires and Wheels .................................................7-38
Tire Care ........................................................................\
....7-38
Recommended Cold Tire Inflation Pressures ...........7-39
Check Tire Inflation Pressure ......................................7-40
Tire Rotation...................................................................\
..7-40
Wheel Alignment and Tire Balance ............................7-41
Tire Replacement ............................................................7-42
Wheel Replacement ........................................................7-43
Tire Traction .....................................................................7-4\
3
Tire Maintenance ............................................................7-43
Tire Sidewall Labeling ....................................................7-43
Tire Terminology and Definitions................................7-47
All Season Tires ...............................................................7-50
Summer Tires ...................................................................7-50
Snow Tires ........................................................................\
7-51
Radial-Ply Tires ...............................................................7-51
Low Aspect Ratio Tires..................................................7-51
Fuses ......................................................................7-\
53
Instrument Panel Fuse Replacement..........................7-54
Engine Compartment Panel Fuse Replacement.......7-55
Fuse/Relay Panel Description ......................................7-57
Light Bulbs ............................................................7-67
Headlamp, Parking Lamp, Daytime Running Light,
Turn Signal Lamp and Side Marker ............................7-67
Side Repeater Lamp Replacement ..............................7-70
Rear Combination Light Bulb Replacement ..............7-71
High Mounted Stop Lamp Replacement ....................7-75
License Plate Light Bulb Replacement ......................7-76
Interior Light Bulb Replacement .................................7-76
Appearance care ..................................................7-78
Exterior Care ....................................................................7-78\
Interior Care .....................................................................7-8\
2
Emission Control System ....................................7-85
Crankcase Emission Control System ..........................7-85
Evaporative Emission Control System Including
Onboard Refueling Vapor Recovery (ORVR)............7-85
Exhaust Emission Control System ..............................7-86
California Perchlorate Notice.............................7-89
Page 367 of 478
7-6
Maintenance
Owner Maintenance Schedule
When you stop for fuel:
• Check the engine oil level.
Check the coolant level in theengine coolant reservoir.
Check the windshield washer fluid level.
Check the for low or under-inflated tires.
While operating your vehicle:
Note any changes in the sound ofthe exhaust or any smell of
exhaust fumes in the vehicle.
Check for vibrations in the steering wheel. Notice if there is any
increased steering effort or loose-
ness in the steering wheel, or
change in its straight-ahead posi-
tion.
Notice if your vehicle constantly turns slightly or "pulls" to one side
when traveling on smooth, level
road.
When stopping, listen and check for unusual sounds, pulling to one
side, increased brake pedal travel
or "hard-to-push" brake pedal.
If any slipping or changes in the operation of your transmission
occurs, check the transmission
fluid level.
Check the automatic transmission/ dual clutch transmission P (Park)
function. Check the parking brake.
Check for fluid leaks under your
vehicle (water dripping from the air
conditioning system during or after
use is normal).
At least monthly:
Check coolant level in the enginecoolant reservoir.
Check the operation of all exterior lights, including the brake lights,
turn signals and hazard warning
flashers.
Check the inflation pressures of all tires including the spare for tires
that are worn, show uneven wear,
or are damaged.
Check for loose wheel lug nuts.
Be careful when checking your
engine coolant level when the
engine is hot. This may result in
coolant being blown out of the
opening and cause serious
burns and other injuries.
WARNING
Page 399 of 478
7-38
Maintenance
T
TI
IR
R E
ES
S
A
A N
N D
D
W
W H
HE
EE
EL
LS
S
Tire Care
For proper maintenance, safety, and
maximum fuel economy, you must
always maintain recommended tire
inflation pressures and stay within
the load limits and weight distribution
recommended for your vehicle.
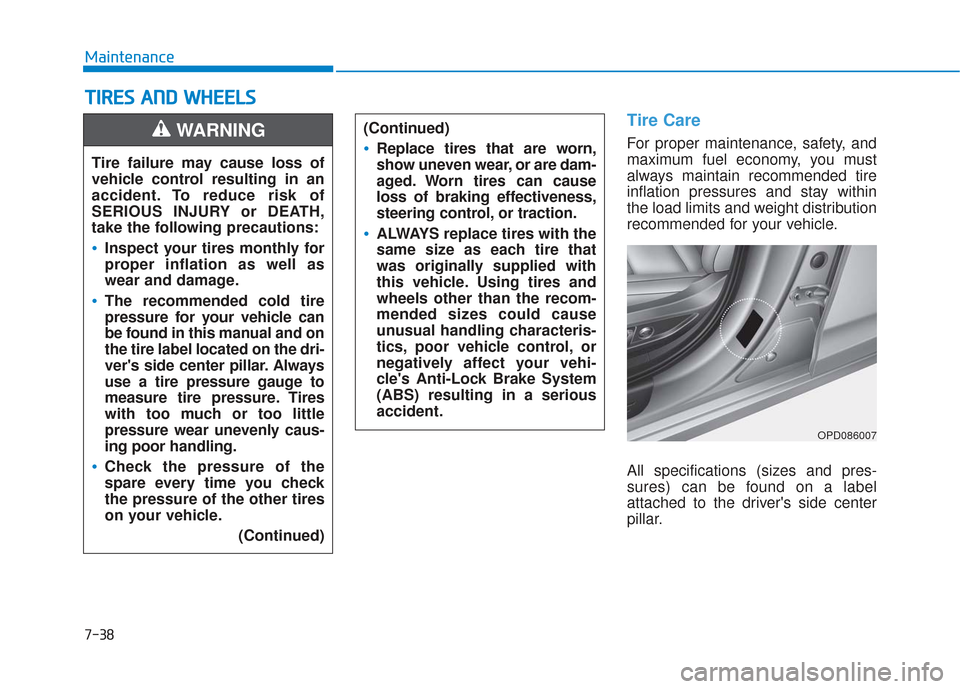
All specifications (sizes and pres-
sures) can be found on a label
attached to the driver's side center
pillar.
(Continued)Replace tires that are worn,
show uneven wear, or are dam-
aged. Worn tires can cause
loss of braking effectiveness,
steering control, or traction.
ALWAYS replace tires with the
same size as each tire that
was originally supplied with
this vehicle. Using tires and
wheels other than the recom-
mended sizes could cause
unusual handling characteris-
tics, poor vehicle control, or
negatively affect your vehi-
cle's Anti-Lock Brake System
(ABS) resulting in a serious
accident.
Tire failure may cause loss of
vehicle control resulting in an
accident. To reduce risk of
SERIOUS INJURY or DEATH,
take the following precautions:
Inspect your tires monthly for
proper inflation as well as
wear and damage.
The recommended cold tire
pressure for your vehicle can
be found in this manual and on
the tire label located on the dri-
ver's side center pillar. Always
use a tire pressure gauge to
measure tire pressure. Tires
with too much or too little
pressure wear unevenly caus-
ing poor handling.
Check the pressure of the
spare every time you check
the pressure of the other tires
on your vehicle.
(Continued)
WARNING
OPD086007
Page 400 of 478
7-39
7
Maintenance
Recommended Cold Tire
Inflation Pressures
All tire pressures (including the
spare) should be checked when the
tires are cold. "Cold tires" means the
vehicle has not been driven for at
least three hours or has been driven
for less than one mile (1.6 km).
Warm tires normally exceed recom-
mended cold tire pressures by 4 to 6
psi (28 to 41 kPa). Do not release air
from warm tires to adjust the pres-
sure or the tires will be under-inflat-
ed. For recommended inflation pres-
sure, refer to "Tire and Wheels" in
chapter 8.Recommended pressures must
be maintained for the best ride,
vehicle handling, and minimum
tire wear.
Over-inflation or under-inflation
can reduce tire life, adversely
affect vehicle handling, and
lead to sudden tire failure that
could result in loss of vehicle
control resulting in an accident.
Severe under-inflation can lead
to severe heat build-up, causing
blowouts, tread separation and
other tire failures that can result
in the loss of vehicle control
resulting in an accident. This
risk is much higher on hot days
and when driving for long peri-
ods at high speeds.
WARNING
Under-inflation results in
excessive wear, poor handling
and reduced fuel economy.
Wheel deformation is also
possible. Keep your tire pres-
sures at the proper levels. If a
tire frequently needs refilling,
have it checked by an author-
ized HYUNDAI dealer.
Over-inflation produces a
harsh ride, excessive wear at
the center of the tire tread,
and a greater possibility of
damage from road hazards.
CAUTION
Page 401 of 478
7-40
Maintenance
Check Tire Inflation Pressure
Check your tires, including the spare
tire, once a month or more.
How to check
Use a good quality tire pressure
gauge to check tire pressure. You
can not tell if your tires are properly
inflated simply by looking at them.
Radial tires may look properly inflat-
ed when they are under-inflated.
Remove the valve cap from the tire
valve stem. Press the tire gauge firm-
ly onto the valve to get a pressure
measurement. If the cold tire inflation
pressure matches the recommended
pressure on the tire label located on
the driver's side center pillar or in this
manual. No further adjustment is
necessary. If the pressure is low, add
air until you reach the recommended
pressure. Make sure to put the valve
caps back on the valve stems.
Without the valve cap, dirt or mois-
ture could get into the valve core and
cause air leakage. If a valve cap is
missing, install a new one as soon as
possible.If you overfill the tire, release air by
pushing on the metal stem in the
center of the tire valve. Recheck the
tire pressure with the tire gauge. Be
sure to put the valve caps back on
the valve stems. Without the valve
cap, dirt or moisture could get into
the valve core and cause air leakage.
If a valve cap is missing, install a new
one as soon as possible.
A cold tire means the vehicle has
been sitting for 3 hours and driven for
less than 1 mile (1.6 km) in that 3
hour period.
Allow the tire to cool before measur-
ing the inflation pressure. Always be
sure the tire is cold before inflating to
the recommended pressure.
Tire Rotation
To equalize tread wear, HYUNDAI
recommends that the tires be rotated
according to the maintenance sched-
ule or sooner if irregular wear devel-
ops.
During rotation, check the tires for
correct balance.
When rotating tires, check for uneven
wear and damage. Abnormal wear is
usually caused by incorrect tire pres-
sure, improper wheel alignment, out-
of-balance wheels, severe braking or
severe cornering. Look for bumps or
bulges in the tread or side of the tire.
Replace the tire if you find any of
these conditions. Replace the tire if
fabric or cord is visible. After rotation,
be sure to bring the front and rear tire
pressures to specification and check
lug nut tightness (proper torque is
79~94 lbf·ft [11~13 kgf·m]).
Page 406 of 478
7-45
7
Maintenance
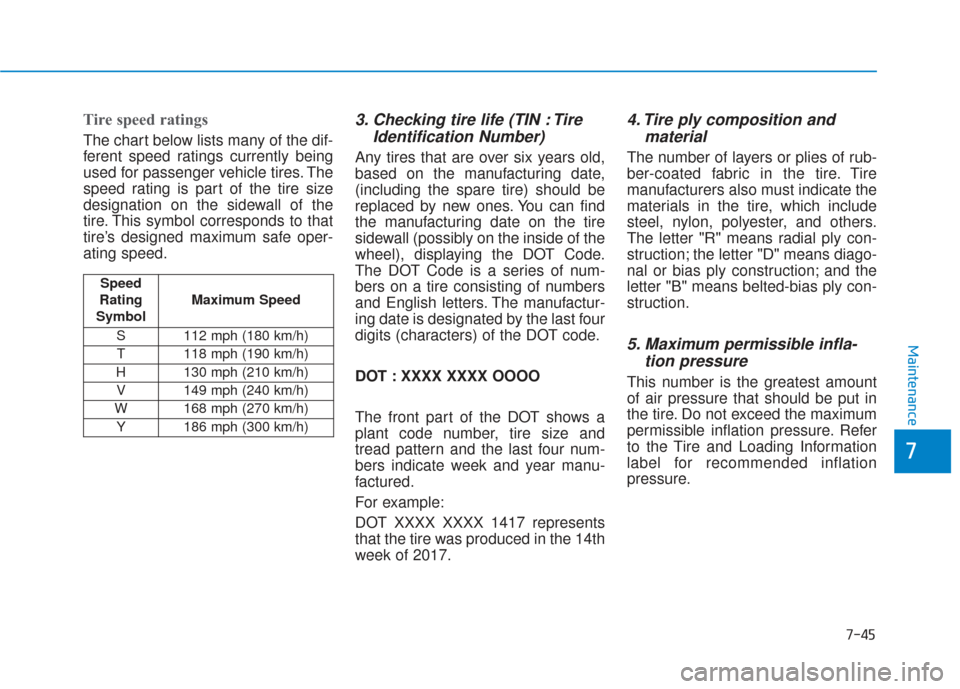
Tire speed ratings
The chart below lists many of the dif-
ferent speed ratings currently being
used for passenger vehicle tires. The
speed rating is part of the tire size
designation on the sidewall of the
tire. This symbol corresponds to that
tire’s designed maximum safe oper-
ating speed.
3. Checking tire life (TIN : TireIdentification Number)
Any tires that are over six years old,
based on the manufacturing date,
(including the spare tire) should be
replaced by new ones. You can find
the manufacturing date on the tire
sidewall (possibly on the inside of the
wheel), displaying the DOT Code.
The DOT Code is a series of num-
bers on a tire consisting of numbers
and English letters. The manufactur-
ing date is designated by the last four
digits (characters) of the DOT code.
DOT : XXXX XXXX OOOO
The front part of the DOT shows a
plant code number, tire size and
tread pattern and the last four num-
bers indicate week and year manu-
factured.
For example:
DOT XXXX XXXX 1417 represents
that the tire was produced in the 14th
week of 2017.
4. Tire ply composition andmaterial
The number of layers or plies of rub-
ber-coated fabric in the tire. Tire
manufacturers also must indicate the
materials in the tire, which include
steel, nylon, polyester, and others.
The letter "R" means radial ply con-
struction; the letter "D" means diago-
nal or bias ply construction; and the
letter "B" means belted-bias ply con-
struction.
5. Maximum permissible infla-tion pressure
This number is the greatest amount
of air pressure that should be put in
the tire. Do not exceed the maximum
permissible inflation pressure. Refer
to the Tire and Loading Information
label for recommended inflation
pressure.
Speed
Rating
Symbol Maximum Speed
S 112 mph (180 km/h) T 118 mph (190 km/h)
H 130 mph (210 km/h) V 149 mph (240 km/h)
W 168 mph (270 km/h)
Y186 mph (300 km/h)
Page 408 of 478
7-47
7
Maintenance
Temperature - A, B & C
The temperature grades are A (the
highest), B and C representing the
tire’s resistance to the generation of
heat and its ability to dissipate heat
when tested under controlled condi-
tions on a specified indoor laboratory
test wheel.
Sustained high temperature can
cause the material of the tire to
degenerate and reduce tire life, and
excessive temperature can lead to
sudden tire failure. Grade C
responds to a level of performance
which all passenger car tires must
meet under the Federal Motor
Vehicle Safety Standard No. 109.
Grades B and A represent higher
levels of performance on the labora-
tory test wheel than the minimum
required by law.
Tire Terminology and
Definitions
Air Pressure
The amount of air inside the tire
pressing outward on the tire. Air
pressure is expressed in pounds per
square inch (psi) or kilopascal (kPa).
Accessory Weight
This means the combined weight of
optional accessories. Some exam-
ples of optional accessories are
automatic transmission, power
seats, and air conditioning.
Aspect Ratio
The relationship of a tire's height to
its width.
Belt
A rubber coated layer of cords that is
located between the plies and the
tread. Cords may be made from steel
or other reinforcing materials.
The temperature grade for this
tire is established for a tire that
is properly inflated and not
overloaded. Excessive speed,
under-inflation, over-inflation,
or excessive loading, either
separately or in combination,
can cause heat build-up and
possible sudden tire failure.
This may cause loss of vehicle
control resulting in an accident.
WARNING